Users Manual - English and Spanish
Page 7
... MAIN PARTS ...10 ACCESSORIES ...12 Optional Accessories ...13 USING YOUR SEWING MACHINE 14 Connecting Plugs ...15 Main Power and Sewing Light Switch ...15 Foot Controller ...15 Checking the Needle ...16 Replacing the Needle ...16 Changing the Presser Foot ...18 Flat Bed Attachment ...19 Using a Free-arm Style ...19 THE CONTROLS ...20 Pattern Selection Dial ...20 Patterns...
... MAIN PARTS ...10 ACCESSORIES ...12 Optional Accessories ...13 USING YOUR SEWING MACHINE 14 Connecting Plugs ...15 Main Power and Sewing Light Switch ...15 Foot Controller ...15 Checking the Needle ...16 Replacing the Needle ...16 Changing the Presser Foot ...18 Flat Bed Attachment ...19 Using a Free-arm Style ...19 THE CONTROLS ...20 Pattern Selection Dial ...20 Patterns...

Users Manual - English and Spanish
Page 8
APPENDIX ...69 MAINTENANCE ...69 Changing the Light Bulb ...69 Cleaning ...70 Troubleshooting ...72 INDEX ...79 7 USING ATTACHMENTS AND APPLICATIONS 56 Zipper Insertion ...56 Gathering ...57 Darning ...58 Appliqués ...58 Monogramming and Embroidering ...59 OPTIONAL ACCESSORIES 62 Using the Walking Foot ...62 Using the Quilting Foot ...63 Using the 1/4-inch Quilting Foot ...65 Using the Narrow Hemmer Foot ...65 Using the Blind Stitch Foot ...67 6. 5.
APPENDIX ...69 MAINTENANCE ...69 Changing the Light Bulb ...69 Cleaning ...70 Troubleshooting ...72 INDEX ...79 7 USING ATTACHMENTS AND APPLICATIONS 56 Zipper Insertion ...56 Gathering ...57 Darning ...58 Appliqués ...58 Monogramming and Embroidering ...59 OPTIONAL ACCESSORIES 62 Using the Walking Foot ...62 Using the Quilting Foot ...63 Using the 1/4-inch Quilting Foot ...65 Using the Narrow Hemmer Foot ...65 Using the Blind Stitch Foot ...67 6. 5.
Users Manual - English and Spanish
Page 11
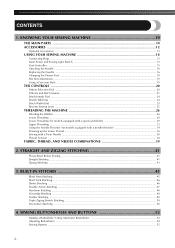
...Parts Code for sewing with accessory compartment (page 19) B Presser foot (page 18) C Reverse sewing lever (page 25) You can turn this to control the sewing speed, and to start and stop sewing. KNOWING YOUR SEWING MACHINE 1 KNOWING YOUR SEWING MACHINE THE MAIN PARTS ...1 Bobbin winder (page 26) This winds the thread onto the bobbin for use this in the reverse direction. 10 D Pattern selection dial (page 20) You can turn the main power and sewing light switch on certain models.) A Flat bed attachment...
...Parts Code for sewing with accessory compartment (page 19) B Presser foot (page 18) C Reverse sewing lever (page 25) You can turn this to control the sewing speed, and to start and stop sewing. KNOWING YOUR SEWING MACHINE 1 KNOWING YOUR SEWING MACHINE THE MAIN PARTS ...1 Bobbin winder (page 26) This winds the thread onto the bobbin for use this in the reverse direction. 10 D Pattern selection dial (page 20) You can turn the main power and sewing light switch on certain models.) A Flat bed attachment...
Users Manual - English and Spanish
Page 13
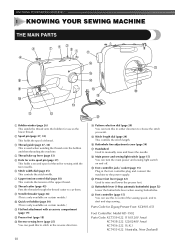
...para cremalleras (1 unidad) Código de la pieza EE.UU. KNOWING YOUR SEWING MACHINE / CONOZCA SU MÁQUINA DE COSER ACCESSORIES / ACCESORIOS The following accessories are stored in the flat bed attachment. Otros XD1792-031 X59375-121 130920-021 X55467-021 XC6063-021 Note/Nota ●...; The included accessories vary depending on the machine model. ● Los accesorios incluidos varían según...
...para cremalleras (1 unidad) Código de la pieza EE.UU. KNOWING YOUR SEWING MACHINE / CONOZCA SU MÁQUINA DE COSER ACCESSORIES / ACCESORIOS The following accessories are stored in the flat bed attachment. Otros XD1792-031 X59375-121 130920-021 X55467-021 XC6063-021 Note/Nota ●...; The included accessories vary depending on the machine model. ● Los accesorios incluidos varían según...
Users Manual - English and Spanish
Page 67
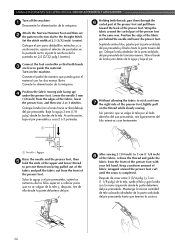
... del pie prensatela hasta que termine la costura. 66 Turn on the thread while slowly sewing. Coloque la tela (con el revés hacia arriba) debajo del pie prensatela. ...ón, baje el pie prensatela y cosa 2 ó 3 puntadas. 1 Holding both hands 3 are free to the Straight Stitch. Keep a uniform amount of the presser foot in the same way. Connect the ... y, después, tire de ella desde la parte delantera del pie. USING ATTACHMENTS AND APPLICATIONS / USO DE ACCESORIOS Y APLICACIONES Turn off the machine. 1 Desconecte la alimentación de la máquina. Baje la aguja ...
... del pie prensatela hasta que termine la costura. 66 Turn on the thread while slowly sewing. Coloque la tela (con el revés hacia arriba) debajo del pie prensatela. ...ón, baje el pie prensatela y cosa 2 ó 3 puntadas. 1 Holding both hands 3 are free to the Straight Stitch. Keep a uniform amount of the presser foot in the same way. Connect the ... y, después, tire de ella desde la parte delantera del pie. USING ATTACHMENTS AND APPLICATIONS / USO DE ACCESORIOS Y APLICACIONES Turn off the machine. 1 Desconecte la alimentación de la máquina. Baje la aguja ...
Users Manual - English and Spanish
Page 68
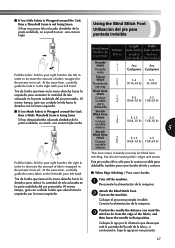
... en la mano derecha hacia la derecha para reducir la cantidad de tela colocada en la parte ondulada del pie prensatela. Attach the Blind Stitch Foot. 2 Turn on the machine. Coloque el pie para puntada invisible. Position the needle the distance you want the 3 stitch to be from the edge... elástica F-1.5 3-5 (1/64-1/16) (1/8-3/16) 5 F-1.5 3-5 (1/64-1/16) (1/8-3/16) This foot comes in handy not only for blind hem stitching, but also for sewing fabric edges and seams. Este pie resulta útil no se podrá coser una costura triple Using the Blind Stitch Foot Utilización del...
... en la mano derecha hacia la derecha para reducir la cantidad de tela colocada en la parte ondulada del pie prensatela. Attach the Blind Stitch Foot. 2 Turn on the machine. Coloque el pie para puntada invisible. Position the needle the distance you want the 3 stitch to be from the edge... elástica F-1.5 3-5 (1/64-1/16) (1/8-3/16) 5 F-1.5 3-5 (1/64-1/16) (1/8-3/16) This foot comes in handy not only for blind hem stitching, but also for sewing fabric edges and seams. Este pie resulta útil no se podrá coser una costura triple Using the Blind Stitch Foot Utilización del...

Users Manual - English and Spanish
Page 69
... hem. Lower the presser foot and begin sewing. 6 Baje el pie prensatela y comience a coser. 1 Screw / Tornillo 2 Guide / Guía ■ When Sewing Seams / Para coser costuras Turn off the machine. 1 Desconecte la alimentación de la máquina. Attach the Blind Stitch Foot. 2 Turn on ... Right side of fabric / Tela del derecho 4 Wrong side of the fabric. Set the pattern selection dial to guide the fabric. USING ATTACHMENTS AND APPLICATIONS / USO DE ACCESORIOS Y APLICACIONES Turn the foot guide screw and carefully adjust 4 to the Zigzag 4 Stitch. Para coser costuras...
... hem. Lower the presser foot and begin sewing. 6 Baje el pie prensatela y comience a coser. 1 Screw / Tornillo 2 Guide / Guía ■ When Sewing Seams / Para coser costuras Turn off the machine. 1 Desconecte la alimentación de la máquina. Attach the Blind Stitch Foot. 2 Turn on ... Right side of fabric / Tela del derecho 4 Wrong side of the fabric. Set the pattern selection dial to guide the fabric. USING ATTACHMENTS AND APPLICATIONS / USO DE ACCESORIOS Y APLICACIONES Turn the foot guide screw and carefully adjust 4 to the Zigzag 4 Stitch. Para coser costuras...
Users Manual - English and Spanish
Page 73
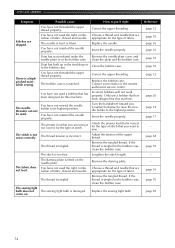
...fabric, thread and needle. Possible cause How to the right. Contact your retailer or the nearest authorized service center. page 32, 37 - - - Attach the presser foot that is not plugged in the bobbin case, clean the bobbin case. The upper thread tension is tangled. The thread is too...15 page 27 page 15 page 16 page 17 page 16 page 39 - Contact your retailer or the nearest authorized service center. Symptom The sewing machine does not work properly. Lightly guide the fabric. Remove any knots or tangles. You have not fitted the spool properly. Replace the needle ...
...fabric, thread and needle. Possible cause How to the right. Contact your retailer or the nearest authorized service center. page 32, 37 - - - Attach the presser foot that is not plugged in the bobbin case, clean the bobbin case. The upper thread tension is tangled. The thread is too...15 page 27 page 15 page 16 page 17 page 16 page 39 - Contact your retailer or the nearest authorized service center. Symptom The sewing machine does not work properly. Lightly guide the fabric. Remove any knots or tangles. You have not fitted the spool properly. Replace the needle ...
Users Manual - English and Spanish
Page 74
...has been designed for this machine. Reset the bobbin thread correctly. thread breaks. You have not used a bobbin that has been designed for this machine. Only use a bobbin that has been designed for this machine. - page 32 You have not attached the presser foot holder ...properly. You have not used a bobbin that has been designed for this machine. Choose a thread and needle that are sewing thin fabric,...
...has been designed for this machine. Reset the bobbin thread correctly. thread breaks. You have not used a bobbin that has been designed for this machine. Only use a bobbin that has been designed for this machine. - page 32 You have not attached the presser foot holder ...properly. You have not used a bobbin that has been designed for this machine. Choose a thread and needle that are sewing thin fabric,...
Users Manual - English and Spanish
Page 75
... or the nearest authorized service center. The presser foot that has been designed for this machine. The thread is incorrect. Remove the tangled thread. If the thread is a highpitched noise while sewing. You have not used the right combination of fabric, thread and needle. Dust has built...plate. There is tangled in the bobbin case, clean the bobbin case. The bobbin case is too fine. Correct the upper threading. Attach the presser foot that you are appropriate for the type of fabric. The stitch is scratched. The darning plate is correct for the...
... or the nearest authorized service center. The presser foot that has been designed for this machine. The thread is incorrect. Remove the tangled thread. If the thread is a highpitched noise while sewing. You have not used the right combination of fabric, thread and needle. Dust has built...plate. There is tangled in the bobbin case, clean the bobbin case. The bobbin case is too fine. Correct the upper threading. Attach the presser foot that you are appropriate for the type of fabric. The stitch is scratched. The darning plate is correct for the...
Users Manual - English and Spanish
Page 80
...sewing 55 C Cleaning 70 Connecting plugs 15 D Darning 58 Darning plate 55, 58, 59, 64 Decorative stitching 50 Double action stitching 47 Drawing up the lower thread 36 E Elastic stitching 46 Embroidering 59 F Fabric, thread, and needle combinations 39 Feather stitching 49 Flat bed attachment 19 Foot controller 15 Free-arm... needle threader 34 twin needle 37 upper 32 Triple zigzag stretch stitching 50 Troubleshooting 72 Twin needle , attaching 17 37 sewing 36 U Unpacking instructions 4 Upper tension control dial 38 Upper threading 32 W Walking foot 62 Z Zigzag stitching 43 ...
...sewing 55 C Cleaning 70 Connecting plugs 15 D Darning 58 Darning plate 55, 58, 59, 64 Decorative stitching 50 Double action stitching 47 Drawing up the lower thread 36 E Elastic stitching 46 Embroidering 59 F Fabric, thread, and needle combinations 39 Feather stitching 49 Flat bed attachment 19 Foot controller 15 Free-arm... needle threader 34 twin needle 37 upper 32 Triple zigzag stretch stitching 50 Troubleshooting 72 Twin needle , attaching 17 37 sewing 36 U Unpacking instructions 4 Upper tension control dial 38 Upper threading 32 W Walking foot 62 Z Zigzag stitching 43 ...


