Users Manual - English and Spanish
Page 2
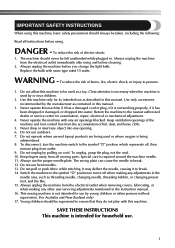
... the cord. 10. Do not pull or push fabric while stitching. This sewing machine is intended for use . 1 Young children should be supervised to be used as ...machine and foot control free from the electrical outlet when removing covers, lubricating, or when making any opening. 6. Never drop or insert any air openings blocked. Do not use outdoors. 7. Replace...the machine switch to break. 14. IMPORTANT SAFETY INSTRUCTIONS When using this machine, basic safety precautions should always be taken, including the following: Read all moving parts. Use this machine only...
... the cord. 10. Do not pull or push fabric while stitching. This sewing machine is intended for use . 1 Young children should be supervised to be used as ...machine and foot control free from the electrical outlet when removing covers, lubricating, or when making any opening. 6. Never drop or insert any air openings blocked. Do not use outdoors. 7. Replace...the machine switch to break. 14. IMPORTANT SAFETY INSTRUCTIONS When using this machine, basic safety precautions should always be taken, including the following: Read all moving parts. Use this machine only...
Users Manual - English and Spanish
Page 5
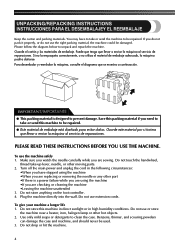
...REPACKING INSTRUCTIONS INSTRUCCIONES PARA EL DESEMBALAJEY EL REEMBALAJE Keep the carton and packing materials. You may have stopped using the machine •When you are sewing. Guarde este material por si tuviera que llevar o enviar la máquina al servicio de reparaciones. Benzene, ...THESE INSTRUCTIONS BEFORE YOU USE THE MACHINE. To give your machine a longer life 1. IMPORTANT/IMPORTANTE ● This packing material is a power failure while you are using the machine •If you are replacing or removing the needle or any other part •If there is designed to...
...REPACKING INSTRUCTIONS INSTRUCCIONES PARA EL DESEMBALAJEY EL REEMBALAJE Keep the carton and packing materials. You may have stopped using the machine •When you are sewing. Guarde este material por si tuviera que llevar o enviar la máquina al servicio de reparaciones. Benzene, ...THESE INSTRUCTIONS BEFORE YOU USE THE MACHINE. To give your machine a longer life 1. IMPORTANT/IMPORTANTE ● This packing material is a power failure while you are using the machine •If you are replacing or removing the needle or any other part •If there is designed to...
Users Manual - English and Spanish
Page 7
KNOWING YOUR SEWING MACHINE 10 THE MAIN PARTS ...10 ACCESSORIES ...12 Optional Accessories ...13 USING YOUR SEWING MACHINE 14 Connecting Plugs ...15 Main Power and Sewing Light Switch ...15 Foot Controller ...15 Checking the Needle ...16 Replacing the Needle ...16 Changing the Presser Foot ...18 Flat Bed Attachment ...19 Using a Free-arm Style ...19 THE CONTROLS ...20 Pattern Selection Dial...
KNOWING YOUR SEWING MACHINE 10 THE MAIN PARTS ...10 ACCESSORIES ...12 Optional Accessories ...13 USING YOUR SEWING MACHINE 14 Connecting Plugs ...15 Main Power and Sewing Light Switch ...15 Foot Controller ...15 Checking the Needle ...16 Replacing the Needle ...16 Changing the Presser Foot ...18 Flat Bed Attachment ...19 Using a Free-arm Style ...19 THE CONTROLS ...20 Pattern Selection Dial...
Users Manual - English and Spanish
Page 37
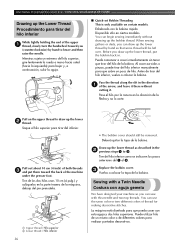
... bobina. Pase el hilo por la ranura en la dirección de la flecha y no lo corte. Replace the bobbin cover. 3 Vuelva a colocar la tapa de la bobina. Tire del hilo inferior como se indica... thread along the slit in the direction 1 of the arrow, and leave it . KNOWING YOUR SEWING MACHINE / CONOZCA SU MÁQUINA DE COSER Drawing up the Lower Thread Procedimiento para tirar del hilo ... tirar del inferior. Tire de los dos hilos unos 10 cm (4 pulg.) y colóquelos en la parte trasera de la máquina, debajo del pie prensatela. 1 Upper thread / Hilo superior 2 Lower thread ...
... bobina. Pase el hilo por la ranura en la dirección de la flecha y no lo corte. Replace the bobbin cover. 3 Vuelva a colocar la tapa de la bobina. Tire del hilo inferior como se indica... thread along the slit in the direction 1 of the arrow, and leave it . KNOWING YOUR SEWING MACHINE / CONOZCA SU MÁQUINA DE COSER Drawing up the Lower Thread Procedimiento para tirar del hilo ... tirar del inferior. Tire de los dos hilos unos 10 cm (4 pulg.) y colóquelos en la parte trasera de la máquina, debajo del pie prensatela. 1 Upper thread / Hilo superior 2 Lower thread ...
Users Manual - English and Spanish
Page 80
...Free-arm style 19 G Gathering 57 H Handwheel 32 Heirloom stitching 48 L Light bulb changing 69 Light switch 15 Lower threading 28 , quick-set bobbin 30 36 M Main parts 10 Main power 15 Maintenance 69 Monogramming 59 N Narrow hemmer foot 65 Needle checking 16 combinations with fabric and thread 39 replacing...threader 34 twin needle 37 upper 32 Triple zigzag stretch stitching 50 Troubleshooting 72 Twin needle , attaching 17 37 sewing 36 U Unpacking instructions 4 Upper tension control dial 38 Upper threading 32 W Walking foot 62 Z Zigzag stitching 43 Zipper insertion 56...
...Free-arm style 19 G Gathering 57 H Handwheel 32 Heirloom stitching 48 L Light bulb changing 69 Light switch 15 Lower threading 28 , quick-set bobbin 30 36 M Main parts 10 Main power 15 Maintenance 69 Monogramming 59 N Narrow hemmer foot 65 Needle checking 16 combinations with fabric and thread 39 replacing...threader 34 twin needle 37 upper 32 Triple zigzag stretch stitching 50 Troubleshooting 72 Twin needle , attaching 17 37 sewing 36 U Unpacking instructions 4 Upper tension control dial 38 Upper threading 32 W Walking foot 62 Z Zigzag stitching 43 Zipper insertion 56...


