Users Manual - English and Spanish
Page 2
... 15 watts. Do not use the proper needle plate. Always use outdoors. 7. Always unplug the machine from the electrical outlet when removing covers, lubricating, or when making any other user servicing adjustments mentioned in . This sewing machine is used by young children or infirm persons...to the nearest authorized dealer or service center for household use bent needles. 13. Keep ventilation openings of the machine and foot control free from all instructions before cleaning. 2. To disconnect, turn the machine switch to turn it has been dropped or damaged, or dropped...
... 15 watts. Do not use the proper needle plate. Always use outdoors. 7. Always unplug the machine from the electrical outlet when removing covers, lubricating, or when making any other user servicing adjustments mentioned in . This sewing machine is used by young children or infirm persons...to the nearest authorized dealer or service center for household use bent needles. 13. Keep ventilation openings of the machine and foot control free from all instructions before cleaning. 2. To disconnect, turn the machine switch to turn it has been dropped or damaged, or dropped...
Users Manual - English and Spanish
Page 5
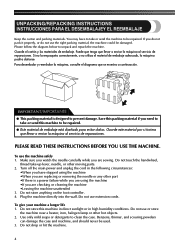
...sewing. Turn off the main power and unplug the cord in high humidity conditions. Puede que tenga que llevar o enviar la máquina al servicio de reparaciones. Save this packing material if you are checking or cleaning the machine •Leaving the machine unattended 3. Do not store this machine to take -up lever, needle... diagram below to clean the case. To use extension cords. You may have stopped using the machine •If you are replacing or removing the needle or any other moving parts. 2. Guarde este material por si tuviera que llevar o enviar la...
...sewing. Turn off the main power and unplug the cord in high humidity conditions. Puede que tenga que llevar o enviar la máquina al servicio de reparaciones. Save this packing material if you are checking or cleaning the machine •Leaving the machine unattended 3. Do not store this machine to take -up lever, needle... diagram below to clean the case. To use extension cords. You may have stopped using the machine •If you are replacing or removing the needle or any other moving parts. 2. Guarde este material por si tuviera que llevar o enviar la...
Users Manual - English and Spanish
Page 7
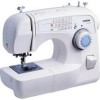
... THE MAIN PARTS ...10 ACCESSORIES ...12 Optional Accessories ...13 USING YOUR SEWING MACHINE 14 Connecting Plugs ...15 Main Power and Sewing Light Switch ...15 Foot Controller ...15 Checking the Needle ...16 Replacing the Needle ...16 Changing the Presser Foot ...18 Flat Bed Attachment ...19 Using a Free-arm Style ...19 THE CONTROLS ...20 Pattern Selection Dial ...20 Patterns...
... THE MAIN PARTS ...10 ACCESSORIES ...12 Optional Accessories ...13 USING YOUR SEWING MACHINE 14 Connecting Plugs ...15 Main Power and Sewing Light Switch ...15 Foot Controller ...15 Checking the Needle ...16 Replacing the Needle ...16 Changing the Presser Foot ...18 Flat Bed Attachment ...19 Using a Free-arm Style ...19 THE CONTROLS ...20 Pattern Selection Dial ...20 Patterns...
Users Manual - English and Spanish
Page 11
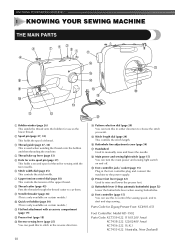
...the threads through the thread cutter to cut them. 9 Needle threader (page 34) (This is only available on certain models.) 0 Quick-set bobbin (page 30) (This is only available on and off. KNOWING YOUR SEWING MACHINE 1 KNOWING YOUR SEWING MACHINE THE MAIN PARTS 1 Bobbin winder (page 26) This ...winds the thread onto the bobbin for use this in the foot controller plug and connect the machine to the power supply. E Stitch length dial (page...
...the threads through the thread cutter to cut them. 9 Needle threader (page 34) (This is only available on certain models.) 0 Quick-set bobbin (page 30) (This is only available on and off. KNOWING YOUR SEWING MACHINE 1 KNOWING YOUR SEWING MACHINE THE MAIN PARTS 1 Bobbin winder (page 26) This ...winds the thread onto the bobbin for use this in the foot controller plug and connect the machine to the power supply. E Stitch length dial (page...
Users Manual - English and Spanish
Page 13
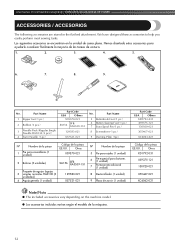
...Needle Pack (Regular Single Needle HAX130 (3 pcs.)) 4 Twin Needle (1 pc.) Part Code USA Others X59370-021 SA156 SFB: XA5539-151 129583-021 X57521-021 No. Los siguientes accesorios se encuentran en la unidad de cama plana. We have designed these accessories to help you easily perform most sewing... a realizar fácilmente la mayoría de las tareas de costura. 1. 2. 3. 4. 5. 6. 7. 8. 9. KNOWING YOUR SEWING MACHINE / CONOZCA SU MÁQUINA DE COSER ACCESSORIES / ACCESORIOS The following accessories are stored in the flat bed attachment. Otros X59370-021 2...
...Needle Pack (Regular Single Needle HAX130 (3 pcs.)) 4 Twin Needle (1 pc.) Part Code USA Others X59370-021 SA156 SFB: XA5539-151 129583-021 X57521-021 No. Los siguientes accesorios se encuentran en la unidad de cama plana. We have designed these accessories to help you easily perform most sewing... a realizar fácilmente la mayoría de las tareas de costura. 1. 2. 3. 4. 5. 6. 7. 8. 9. KNOWING YOUR SEWING MACHINE / CONOZCA SU MÁQUINA DE COSER ACCESSORIES / ACCESORIOS The following accessories are stored in the flat bed attachment. Otros X59370-021 2...

Users Manual - English and Spanish
Page 19
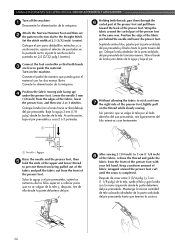
...If you leave the power on and step on the needle plate 3 so that have to change the presser foot. Press the black button at the back of the 2 presser foot holder to sew and how. KNOWING YOUR SEWING MACHINE / CONOZCA SU MÁQUINA DE COSER Changing the Presser...ón negro 2 Presser foot holder / Soporte del pie prensatela 3 Presser Foot / Pie prensatela Put a different presser foot on the controller, the machine will have been designed to its highest position by 1 turning the handwheel toward you (counterclockwise), and then raise the presser foot lever. Baje la palanca...
...If you leave the power on and step on the needle plate 3 so that have to change the presser foot. Press the black button at the back of the 2 presser foot holder to sew and how. KNOWING YOUR SEWING MACHINE / CONOZCA SU MÁQUINA DE COSER Changing the Presser...ón negro 2 Presser foot holder / Soporte del pie prensatela 3 Presser Foot / Pie prensatela Put a different presser foot on the controller, the machine will have been designed to its highest position by 1 turning the handwheel toward you (counterclockwise), and then raise the presser foot lever. Baje la palanca...
Users Manual - English and Spanish
Page 37
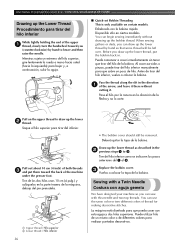
... inmediatamente sin tener que tirar del hilo de la bobina. Sewing with a Twin Needle Costura con aguja gemela We have designed your machine so you (counterclockwise) by hand so that some thread will be removed. KNOWING YOUR SEWING MACHINE / CONOZCA SU MÁQUINA DE COSER Drawing up the Lower... Thread Procedimiento para tirar del hilo inferior While lightly holding the end of the upper 1 thread, slowly turn the handwheel toward the back of the machine under the presser foot....
... inmediatamente sin tener que tirar del hilo de la bobina. Sewing with a Twin Needle Costura con aguja gemela We have designed your machine so you (counterclockwise) by hand so that some thread will be removed. KNOWING YOUR SEWING MACHINE / CONOZCA SU MÁQUINA DE COSER Drawing up the Lower... Thread Procedimiento para tirar del hilo inferior While lightly holding the end of the upper 1 thread, slowly turn the handwheel toward the back of the machine under the presser foot....
Users Manual - English and Spanish
Page 44
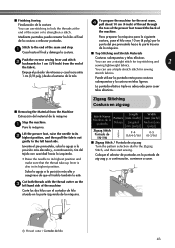
To prepare the machine for sewing stretch fabrics. Empuje el pulsador de retroceso y cosa hacia atrás 1 cm (3/8 pulg.) desde el extremo de la tela. Puede utilizar la puntada recta para costuras sobrepuestas y la costura en telas ligeras. Lift the presser foot, raise the needle to its highest position...ásticas. ■ Removing the Material from the end of the machine. Suba la aguja a la posición más alta y asegúrese de que el tirahilo también lo esté. ■ Finishing Sewing Finalización de la costura You can use a straight stitch for ...
To prepare the machine for sewing stretch fabrics. Empuje el pulsador de retroceso y cosa hacia atrás 1 cm (3/8 pulg.) desde el extremo de la tela. Puede utilizar la puntada recta para costuras sobrepuestas y la costura en telas ligeras. Lift the presser foot, raise the needle to its highest position...ásticas. ■ Removing the Material from the end of the machine. Suba la aguja a la posición más alta y asegúrese de que el tirahilo también lo esté. ■ Finishing Sewing Finalización de la costura You can use a straight stitch for ...
Users Manual - English and Spanish
Page 67
... que pueda guiar el material con las dos manos libres. Lower the needle 3 mm (1/8 inch) from the front of the presser foot, lightly pull on the machine. Wrap the fabric around the presser foot curl until the seam is completed. After sewing 2 (3/4 inch) to 3 cm (1 1/8 inch) 8 of the fabric, ...and lower thread to stick out from the front of the fabric just behind the needle and lower the presser foot. A continuación, baje el pie prensatela y cosa 2 ó 3 puntadas. 1 Holding both hands 3 are free to the Straight Stitch. Attach the Narrow Hemmer Foot and then set 2 the pattern...
... que pueda guiar el material con las dos manos libres. Lower the needle 3 mm (1/8 inch) from the front of the presser foot, lightly pull on the machine. Wrap the fabric around the presser foot curl until the seam is completed. After sewing 2 (3/4 inch) to 3 cm (1 1/8 inch) 8 of the fabric, ...and lower thread to stick out from the front of the fabric just behind the needle and lower the presser foot. A continuación, baje el pie prensatela y cosa 2 ó 3 puntadas. 1 Holding both hands 3 are free to the Straight Stitch. Attach the Narrow Hemmer Foot and then set 2 the pattern...
Users Manual - English and Spanish
Page 68
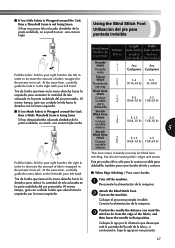
...;n para coser bordes de tela y costuras. ■ When Edge Stitching / Para coser bordes Turn off the machine. 1 Desconecte la alimentación de la máquina. Stitch Name Nombre de la puntada Pattern Dibujo Length...3-5 (1/64-1/16) (1/8-3/16) This foot comes in handy not only for blind hem stitching, but also for sewing fabric edges and seams. Este pie resulta útil no se podrá coser una costura triple Using the... your left hand. Position the needle the distance you want the 3 stitch to be from the edge of the fabric, and then lower the needle in that position. Tire de la...
...;n para coser bordes de tela y costuras. ■ When Edge Stitching / Para coser bordes Turn off the machine. 1 Desconecte la alimentación de la máquina. Stitch Name Nombre de la puntada Pattern Dibujo Length...3-5 (1/64-1/16) (1/8-3/16) This foot comes in handy not only for blind hem stitching, but also for sewing fabric edges and seams. Este pie resulta útil no se podrá coser una costura triple Using the... your left hand. Position the needle the distance you want the 3 stitch to be from the edge of the fabric, and then lower the needle in that position. Tire de la...

Users Manual - English and Spanish
Page 69
...comience a coser. 1 Screw / Tornillo 2 Guide / Guía ■ When Sewing Seams / Para coser costuras Turn off the machine. 1 Desconecte la alimentación de la máquina. Set the pattern selection dial ..., gire el tornillo para ajustar la guía al dobladillo. • For more details on the machine. Gire el tornillo de la guía del pie y ajuste con cuidado para guiar la tela.... Ajuste el selector de puntadas en la puntada de zig-zag. Align the foot guide with the needle position. Place the fabric under the foot so the foot 5 guide is aligned between both edges of ...
...comience a coser. 1 Screw / Tornillo 2 Guide / Guía ■ When Sewing Seams / Para coser costuras Turn off the machine. 1 Desconecte la alimentación de la máquina. Set the pattern selection dial ..., gire el tornillo para ajustar la guía al dobladillo. • For more details on the machine. Gire el tornillo de la guía del pie y ajuste con cuidado para guiar la tela.... Ajuste el selector de puntadas en la puntada de zig-zag. Align the foot guide with the needle position. Place the fabric under the foot so the foot 5 guide is aligned between both edges of ...
Users Manual - English and Spanish
Page 73
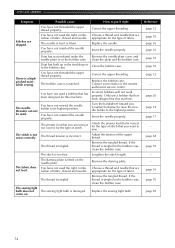
... are knots or tangles in the needle plate is scratched. Contact your retailer or the nearest authorized service center. for the type of stitch. Insert the needle properly. Symptom The sewing machine does not work properly. The needle is bent or blunt. Contact your... retailer or the nearest authorized service center. The needle is not appropriate for the Choose a needle that you are using . Loosen the...
... are knots or tangles in the needle plate is scratched. Contact your retailer or the nearest authorized service center. for the type of stitch. Insert the needle properly. Symptom The sewing machine does not work properly. The needle is bent or blunt. Contact your... retailer or the nearest authorized service center. The needle is not appropriate for the Choose a needle that you are using . Loosen the...
Users Manual - English and Spanish
Page 74
... area around the hole in the needle plate is too thick. Only use a bobbin that has been designed for this machine. page 32 You have not threaded the upper thread properly or fitted the bobbin properly. The thread tension is incorrect. Only use a bobbin that are sewing thin fabric, the stitch is scratched...
... area around the hole in the needle plate is too thick. Only use a bobbin that has been designed for this machine. page 32 You have not threaded the upper thread properly or fitted the bobbin properly. The thread tension is incorrect. Only use a bobbin that are sewing thin fabric, the stitch is scratched...
Users Manual - English and Spanish
Page 75
...is correct for this machine. Remove the tangled thread. Choose a thread and needle that are skipped. Replace the bobbin case. Attach the presser foot that has been designed for the type of fabric, thread and needle. If the thread is a highpitched noise while sewing. Remove the darning ... does not feed. You have not used a bobbin that is incorrect. Insert the needle properly. come on the needle plate. The needle is fitted on . clean the plate and the bobbin case. Replace the sewing light bulb. You have not threaded the upper thread properly. page 38 page 70...
...is correct for this machine. Remove the tangled thread. Choose a thread and needle that are skipped. Replace the bobbin case. Attach the presser foot that has been designed for the type of fabric, thread and needle. If the thread is a highpitched noise while sewing. Remove the darning ... does not feed. You have not used a bobbin that is incorrect. Insert the needle properly. come on the needle plate. The needle is fitted on . clean the plate and the bobbin case. Replace the sewing light bulb. You have not threaded the upper thread properly. page 38 page 70...
Users Manual - English and Spanish
Page 80
... 54 Buttons sewing 55 C Cleaning 70 Connecting plugs 15 D Darning 58 Darning plate 55, 58, 59, 64 Decorative stitching 50 Double action stitching 47 Drawing up the lower thread 36 E Elastic stitching 46 Embroidering 59 F Fabric, thread, and needle combinations 39 Feather stitching 49 Flat bed attachment 19 Foot controller 15 Free-arm style...
... 54 Buttons sewing 55 C Cleaning 70 Connecting plugs 15 D Darning 58 Darning plate 55, 58, 59, 64 Decorative stitching 50 Double action stitching 47 Drawing up the lower thread 36 E Elastic stitching 46 Embroidering 59 F Fabric, thread, and needle combinations 39 Feather stitching 49 Flat bed attachment 19 Foot controller 15 Free-arm style...


