Users Manual - English and Spanish
Page 2
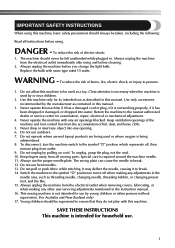
... manufacturer as threading needle, changing needle, threading bobbin, or changing presser foot, and the like. 15. Keep ventilation openings of the machine and foot control free from the accumulation of electric shock: 1. Always use outdoors. 7. SAVE THESE INSTRUCTIONS This machine is intended for ...manual. Never drop or insert any other user servicing adjustments mentioned in this machine if it has a damaged cord or plug, if it is being administered. 8. This sewing machine is required around the machine needle. 11. To reduce the risk of lint, dust, and loose cloth...
... manufacturer as threading needle, changing needle, threading bobbin, or changing presser foot, and the like. 15. Keep ventilation openings of the machine and foot control free from the accumulation of electric shock: 1. Always use outdoors. 7. SAVE THESE INSTRUCTIONS This machine is intended for ...manual. Never drop or insert any other user servicing adjustments mentioned in this machine if it has a damaged cord or plug, if it is being administered. 8. This sewing machine is required around the machine needle. 11. To reduce the risk of lint, dust, and loose cloth...
Users Manual - English and Spanish
Page 5
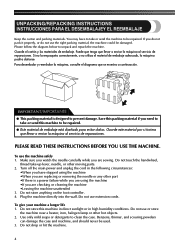
...Do not use extension cords. Use only mild soaps or detergents to unpack and repack the machine. IMPORTANT/IMPORTANTE ● This packing material is a power failure while you are using the machine •If you are sewing. Do not store anything on the foot controller. 4. Please follow the diagram below to.... Save this packing material if you do not pack it properly, or do not use the machine safely 1. Make sure you watch the needle carefully while you are replacing or removing the needle or any other moving parts. 2. Turn off the main power and unplug the cord in high...
...Do not use extension cords. Use only mild soaps or detergents to unpack and repack the machine. IMPORTANT/IMPORTANTE ● This packing material is a power failure while you are using the machine •If you are sewing. Do not store anything on the foot controller. 4. Please follow the diagram below to.... Save this packing material if you do not pack it properly, or do not use the machine safely 1. Make sure you watch the needle carefully while you are replacing or removing the needle or any other moving parts. 2. Turn off the main power and unplug the cord in high...
Users Manual - English and Spanish
Page 7
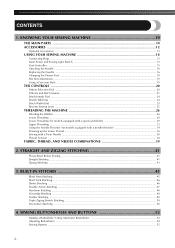
... THE MAIN PARTS ...10 ACCESSORIES ...12 Optional Accessories ...13 USING YOUR SEWING MACHINE 14 Connecting Plugs ...15 Main Power and Sewing Light Switch ...15 Foot Controller ...15 Checking the Needle ...16 Replacing the Needle ...16 Changing the Presser Foot ...18 Flat Bed Attachment ...19 Using a Free-arm Style ...19 THE CONTROLS ...20 Pattern Selection Dial ...20 Patterns...
... THE MAIN PARTS ...10 ACCESSORIES ...12 Optional Accessories ...13 USING YOUR SEWING MACHINE 14 Connecting Plugs ...15 Main Power and Sewing Light Switch ...15 Foot Controller ...15 Checking the Needle ...16 Replacing the Needle ...16 Changing the Presser Foot ...18 Flat Bed Attachment ...19 Using a Free-arm Style ...19 THE CONTROLS ...20 Pattern Selection Dial ...20 Patterns...
Users Manual - English and Spanish
Page 11
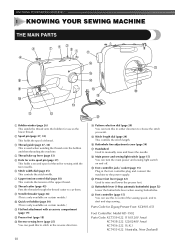
... used when winding the thread onto the bobbin and then threading the machine. 4 Thread take-up lever (page 33) 5 Hole for extra spool pin (page 37) This holds a second spool of thread for sewing with the twin needle. 6 Stitch width dial (page 25) This controls the stitch width...manually raise and lower the needle. Parts Code for Zigzag Presser Foot: XC4901-051 Foot Controller: Model KD-1902 Parts Code: XC7359-022 (110/120V Area) XC7438-222 (220/240V Area) XC7456-222 (U.K.) XC7455-022 (Australia, New Zealand) KNOWING YOUR SEWING MACHINE 1 KNOWING YOUR SEWING MACHINE THE MAIN PARTS 1 ...
... used when winding the thread onto the bobbin and then threading the machine. 4 Thread take-up lever (page 33) 5 Hole for extra spool pin (page 37) This holds a second spool of thread for sewing with the twin needle. 6 Stitch width dial (page 25) This controls the stitch width...manually raise and lower the needle. Parts Code for Zigzag Presser Foot: XC4901-051 Foot Controller: Model KD-1902 Parts Code: XC7359-022 (110/120V Area) XC7438-222 (220/240V Area) XC7456-222 (U.K.) XC7455-022 (Australia, New Zealand) KNOWING YOUR SEWING MACHINE 1 KNOWING YOUR SEWING MACHINE THE MAIN PARTS 1 ...
Users Manual - English and Spanish
Page 13
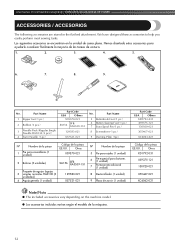
...la pieza EE.UU. KNOWING YOUR SEWING MACHINE / CONOZCA SU MÁQUINA DE COSER ACCESSORIES / ACCESORIOS The following accessories are stored in the flat bed attachment. Part Name 1 Zipper foot (1 pc.) 2 Bobbin (3 pcs.) 3 Needle Pack (Regular Single Needle HAX130 (3 pcs.)) 4 Twin Needle (1 pc.) Part Code USA Others...The included accessories vary depending on the machine model. ● Los accesorios incluidos varían según el modelo de la máquina. 12 No. We have designed these accessories to help you easily perform most sewing tasks. Hemos diseñado estos ...
...la pieza EE.UU. KNOWING YOUR SEWING MACHINE / CONOZCA SU MÁQUINA DE COSER ACCESSORIES / ACCESORIOS The following accessories are stored in the flat bed attachment. Part Name 1 Zipper foot (1 pc.) 2 Bobbin (3 pcs.) 3 Needle Pack (Regular Single Needle HAX130 (3 pcs.)) 4 Twin Needle (1 pc.) Part Code USA Others...The included accessories vary depending on the machine model. ● Los accesorios incluidos varían según el modelo de la máquina. 12 No. We have designed these accessories to help you easily perform most sewing tasks. Hemos diseñado estos ...

Users Manual - English and Spanish
Page 19
...Botón negro 2 Presser foot holder / Soporte del pie prensatela 3 Presser Foot / Pie prensatela Put a different presser foot on the needle plate 3 so that have been designed to sew and how. Si utiliza un pie prensatela erróneo, la aguja puede golpearlo y doblarse o romperse, y podría causar lesiones...snap in line with this machine. If you use the wrong presser foot, the needle may strike the presser foot and bend or break, and may cause accident or injury. ● Antes de cambiar el pie prensatela, apague la máquina. KNOWING YOUR SEWING MACHINE / CONOZCA SU MÁ...
...Botón negro 2 Presser foot holder / Soporte del pie prensatela 3 Presser Foot / Pie prensatela Put a different presser foot on the needle plate 3 so that have been designed to sew and how. Si utiliza un pie prensatela erróneo, la aguja puede golpearlo y doblarse o romperse, y podría causar lesiones...snap in line with this machine. If you use the wrong presser foot, the needle may strike the presser foot and bend or break, and may cause accident or injury. ● Antes de cambiar el pie prensatela, apague la máquina. KNOWING YOUR SEWING MACHINE / CONOZCA SU MÁ...
Users Manual - English and Spanish
Page 37
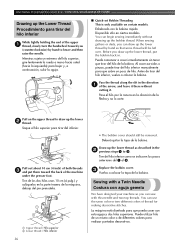
... lower thread by hand to 3. You can use the same color or two different colors of thread for making decorative stitches. Sewing with this needle and two top threads. KNOWING YOUR SEWING MACHINE / CONOZCA SU MÁQUINA DE COSER Drawing up the Lower Thread Procedimiento para tirar del hilo inferior While lightly holding the...
... lower thread by hand to 3. You can use the same color or two different colors of thread for making decorative stitches. Sewing with this needle and two top threads. KNOWING YOUR SEWING MACHINE / CONOZCA SU MÁQUINA DE COSER Drawing up the Lower Thread Procedimiento para tirar del hilo inferior While lightly holding the...
Users Manual - English and Spanish
Page 44
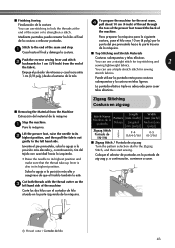
...backwards for the next seam, 4 pull about 10 cm (4 inch) of thread through the toes of the presser foot toward the back of the machine Corte los dos hilos con el cortador de hilo situado en la parte izquierda de la máquina. . Levante el pie prensatela, suba la ...aguja a la posición más elevada y, a continuación, tire del tejido con suavidad hacia la izquierda. • Raise the needle to the Zigzag Stitch, and then start sewing. Coloque el selector de puntadas en la puntada de zig-zag y, a continuación, comience a coser. 1 Thread cutter / Cortador de hilo ...
...backwards for the next seam, 4 pull about 10 cm (4 inch) of thread through the toes of the presser foot toward the back of the machine Corte los dos hilos con el cortador de hilo situado en la parte izquierda de la máquina. . Levante el pie prensatela, suba la ...aguja a la posición más elevada y, a continuación, tire del tejido con suavidad hacia la izquierda. • Raise the needle to the Zigzag Stitch, and then start sewing. Coloque el selector de puntadas en la puntada de zig-zag y, a continuación, comience a coser. 1 Thread cutter / Cortador de hilo ...
Users Manual - English and Spanish
Page 67
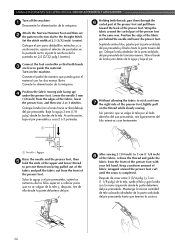
...the needle 3 mm (1/8 inch) from the front of the presser foot with your left hand. Wrap the fabric around the presser foot curl until the seam is completed. After sewing .... Position the edge of the presser foot, lightly pull on the machine. Conecte el pedal de manera que pueda guiar el material con las...needle and the presser foot, then 5 hold the ends of the upper and lower thread to guide the material. Ajuste la anchura de la puntada en 2,5 (3/32 pulg.) (centro). A continuación, baje el pie prensatela y cosa 2 ó 3 puntadas. 1 Holding both hands 3 are free...
...the needle 3 mm (1/8 inch) from the front of the presser foot with your left hand. Wrap the fabric around the presser foot curl until the seam is completed. After sewing .... Position the edge of the presser foot, lightly pull on the machine. Conecte el pedal de manera que pueda guiar el material con las...needle and the presser foot, then 5 hold the ends of the upper and lower thread to guide the material. Ajuste la anchura de la puntada en 2,5 (3/32 pulg.) (centro). A continuación, baje el pie prensatela y cosa 2 ó 3 puntadas. 1 Holding both hands 3 are free...
Users Manual - English and Spanish
Page 68
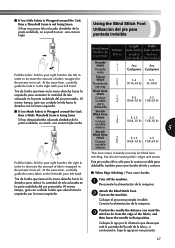
...para coser bordes de tela y costuras. ■ When Edge Stitching / Para coser bordes Turn off the machine. 1 Desconecte la alimentación de la máquina. Stitch Name Nombre de la puntada Pattern Dibujo Length... (1/64-1/16) (1/8-3/16) This foot comes in handy not only for blind hem stitching, but also for sewing fabric edges and seams. Este pie resulta útil no se podrá coser una costura triple Using ... the right in order to decrease the amount of the fabric, and then lower the needle in that position. ■ If too Little Fabric is Wrapped around the Curl, then...
...para coser bordes de tela y costuras. ■ When Edge Stitching / Para coser bordes Turn off the machine. 1 Desconecte la alimentación de la máquina. Stitch Name Nombre de la puntada Pattern Dibujo Length... (1/64-1/16) (1/8-3/16) This foot comes in handy not only for blind hem stitching, but also for sewing fabric edges and seams. Este pie resulta útil no se podrá coser una costura triple Using ... the right in order to decrease the amount of the fabric, and then lower the needle in that position. ■ If too Little Fabric is Wrapped around the Curl, then...

Users Manual - English and Spanish
Page 69
Align the foot guide with the needle position. Ajuste el selector de puntadas en la puntada de zig-zag. Si desea información sobre la costura invisible... y ajuste con cuidado para guiar la tela. Lower the presser foot and begin sewing. 6 Baje el pie prensatela y comience a coser. 1 Screw / Tornillo 2 Guide / Guía ■ When Sewing Seams / Para coser costuras Turn off the machine. 1 Desconecte la alimentación de la máquina. Conecte la alimentació... puntada invisible, gire el tornillo para ajustar la guía al dobladillo. • For more details on the machine.
Align the foot guide with the needle position. Ajuste el selector de puntadas en la puntada de zig-zag. Si desea información sobre la costura invisible... y ajuste con cuidado para guiar la tela. Lower the presser foot and begin sewing. 6 Baje el pie prensatela y comience a coser. 1 Screw / Tornillo 2 Guide / Guía ■ When Sewing Seams / Para coser costuras Turn off the machine. 1 Desconecte la alimentación de la máquina. Conecte la alimentació... puntada invisible, gire el tornillo para ajustar la guía al dobladillo. • For more details on the machine.
Users Manual - English and Spanish
Page 73
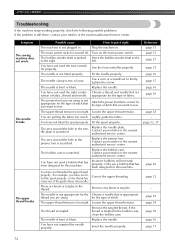
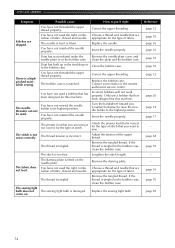
... that has been designed for the type of stitch. The thread is too tight. page 38 - Symptom The sewing machine does not work properly. The needle breaks. The bobbin-winder shaft is scratched. Fit the needle properly. Fit the spool properly. The bobbin case is pushed Move the bobbin-winder shaft to the to...
... that has been designed for the type of stitch. The thread is too tight. page 38 - Symptom The sewing machine does not work properly. The needle breaks. The bobbin-winder shaft is scratched. Fit the needle properly. Fit the spool properly. The bobbin case is pushed Move the bobbin-winder shaft to the to...
Users Manual - English and Spanish
Page 74
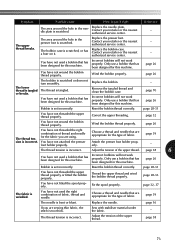
... page 28-33 You have not used a bobbin that has been designed for this machine. Sew with stabiliser material under the fabric. - Symptom Possible cause How to put it . Replace the needle plate. Contact your retailer or the nearest authorized service center. - The bobbin case ...used the right combination of thread and needle for the fabric you are appropriate for this machine. page 32, 37 The fabric is tangled or breaks. Replace the needle. page 38 73 The bobbin is incorrect. Only use a bobbin that are sewing thin fabric, the stitch is set ...
... page 28-33 You have not used a bobbin that has been designed for this machine. Sew with stabiliser material under the fabric. - Symptom Possible cause How to put it . Replace the needle plate. Contact your retailer or the nearest authorized service center. - The bobbin case ...used the right combination of thread and needle for the fabric you are appropriate for this machine. page 32, 37 The fabric is tangled or breaks. Replace the needle. page 38 73 The bobbin is incorrect. Only use a bobbin that are sewing thin fabric, the stitch is set ...
Users Manual - English and Spanish
Page 75
... nearest authorized service center. The thread is a highpitched noise while sewing. APPENDIX / ANEXO Symptom Possible cause How to put it right You have not threaded the upper thread properly. There is tangled. The thread is correct for this machine. Replace the needle. Attach the presser foot that has been designed for the type...
... nearest authorized service center. The thread is a highpitched noise while sewing. APPENDIX / ANEXO Symptom Possible cause How to put it right You have not threaded the upper thread properly. There is tangled. The thread is correct for this machine. Replace the needle. Attach the presser foot that has been designed for the type...
Users Manual - English and Spanish
Page 80
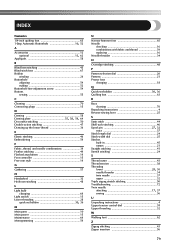
... 54 Buttons sewing 55 C Cleaning 70 Connecting plugs 15 D Darning 58 Darning plate 55, 58, 59, 64 Decorative stitching 50 Double action stitching 47 Drawing up the lower thread 36 E Elastic stitching 46 Embroidering 59 F Fabric, thread, and needle combinations 39 Feather stitching 49 Flat bed attachment 19 Foot controller 15 Free-arm style...
... 54 Buttons sewing 55 C Cleaning 70 Connecting plugs 15 D Darning 58 Darning plate 55, 58, 59, 64 Decorative stitching 50 Double action stitching 47 Drawing up the lower thread 36 E Elastic stitching 46 Embroidering 59 F Fabric, thread, and needle combinations 39 Feather stitching 49 Flat bed attachment 19 Foot controller 15 Free-arm style...


