
Users Manual - English
Page 2
... near children. 2. Always unplug the machine before use as threading the needle, changing the needle, threading the bobbin, or changing the presser foot. 15. This sewing machine is required around the machine needle. 11. Use only accessories recommended... by pulling on the cord. Keep ventilation openings of electric shock: 1. To disconnect the machine, set the main switch to break. 12. Do not pull or push fabric while stitching. The machine...
... near children. 2. Always unplug the machine before use as threading the needle, changing the needle, threading the bobbin, or changing the presser foot. 15. This sewing machine is required around the machine needle. 11. Use only accessories recommended... by pulling on the cord. Keep ventilation openings of electric shock: 1. To disconnect the machine, set the main switch to break. 12. Do not pull or push fabric while stitching. The machine...

Users Manual - English
Page 4
... ...4 ACCESSORIES ...5 USING YOUR SEWING MACHINE 6 Connecting Plugs ...6 Main Power/Sewing Light Switch ...7 Foot Controller ...7 Inserting the Needle ...7 Checking the Needle ...8 Changing the Presser Foot ...8 Converting to Free-arm Style ...9 Steadying the Machine ...9 THE CONTROLS ...10 Pattern Selection Dial ...10 Recommended Widths and Lengths for Stitches 11 Stitch Length Dial ...13 Stretch Stitching ...13 Stitch Width Dial ...14 Reverse Sewing Lever ...14 Drop...
... ...4 ACCESSORIES ...5 USING YOUR SEWING MACHINE 6 Connecting Plugs ...6 Main Power/Sewing Light Switch ...7 Foot Controller ...7 Inserting the Needle ...7 Checking the Needle ...8 Changing the Presser Foot ...8 Converting to Free-arm Style ...9 Steadying the Machine ...9 THE CONTROLS ...10 Pattern Selection Dial ...10 Recommended Widths and Lengths for Stitches 11 Stitch Length Dial ...13 Stretch Stitching ...13 Stitch Width Dial ...14 Reverse Sewing Lever ...14 Drop...

Users Manual - English
Page 5
... to choose the stitch you (counterclockwise) to stitch in the foot controller plug and connect the machine to start and stop sewing. F Main power/sewing light switch (page 7) You can push this to control the sewing speed, and to the power supply. KNOWING YOUR SEWING MACHINE PRINCIPAL PARTS 1... Bobbin-winding assembly (page 15) This winds the thread onto the bobbin, which you use this to raise and lower the needle. H Presser foot lever (page 8) This raises and lowers the presser foot....
... to choose the stitch you (counterclockwise) to stitch in the foot controller plug and connect the machine to start and stop sewing. F Main power/sewing light switch (page 7) You can push this to control the sewing speed, and to the power supply. KNOWING YOUR SEWING MACHINE PRINCIPAL PARTS 1... Bobbin-winding assembly (page 15) This winds the thread onto the bobbin, which you use this to raise and lower the needle. H Presser foot lever (page 8) This raises and lowers the presser foot....
Users Manual - English
Page 6
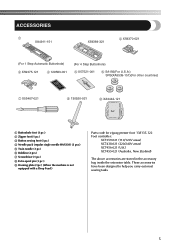
... 8 130920-021 9 XA3442-121 1 Buttonhole foot (1 pc.) 2 Zipper foot (1 pc.) 3 Button sewing foot (1 pc.) 4 Needle pack (regular single needle HAX130) (3 pcs.) 5 Twin needle (1 pc.) 6 Bobbins (3 pcs.) 7 Screwdriver (1 pc.) 8 Extra spool pin (1 pc.) 9 Darning plate (1pc.) (When the machine is not equipped with a Drop Feed.) Parts code for zigzag presser foot: 138135-122 Foot controller: XC7359-021 (110/120V...
... 8 130920-021 9 XA3442-121 1 Buttonhole foot (1 pc.) 2 Zipper foot (1 pc.) 3 Button sewing foot (1 pc.) 4 Needle pack (regular single needle HAX130) (3 pcs.) 5 Twin needle (1 pc.) 6 Bobbins (3 pcs.) 7 Screwdriver (1 pc.) 8 Extra spool pin (1 pc.) 9 Darning plate (1pc.) (When the machine is not equipped with a Drop Feed.) Parts code for zigzag presser foot: 138135-122 Foot controller: XC7359-021 (110/120V...
Users Manual - English
Page 9
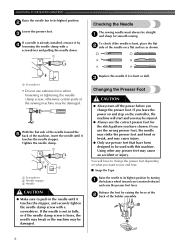
...before you (counterclockwise) and raise the presser foot lever. Using other any presser feet may cause injury. ● Only use the correct presser foot for smooth sewing. If you leave the power on and step on the controller, the machine will have to change the presser foot depending on a flat surface as shown.... and pulling the needle down. 1 Checking the Needle The sewing needle must always be straight 1 and sharp for the stitch pattern you have chosen. If you use the wrong presser foot, the needle may strike the presser foot and bend or break, and may cause an accident or ...
...before you (counterclockwise) and raise the presser foot lever. Using other any presser feet may cause injury. ● Only use the correct presser foot for smooth sewing. If you leave the power on and step on the controller, the machine will have to change the presser foot depending on a flat surface as shown.... and pulling the needle down. 1 Checking the Needle The sewing needle must always be straight 1 and sharp for the stitch pattern you have chosen. If you use the wrong presser foot, the needle may strike the presser foot and bend or break, and may cause an accident or ...
Users Manual - English
Page 10
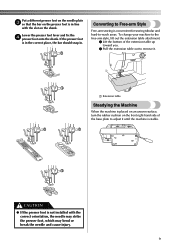
...and cause injury. 9 CAUTION ● If the presser foot is not installed with the slot on the shank. Converting to Free-arm Style Free-arm sewing is convenient for sewing tubular and hard-to adjust it until the machine is stable. To change your machine to the free-arm style, lift out the ...Pull the extension table out to remove it. 1 1 Extension table Steadying the Machine When the machine is placed on an uneven surface, turn the rubber cushion on the front right-hand side of the base plate to -reach areas. Put a different presser foot on the needle plate 3 so that the bar on the...
...and cause injury. 9 CAUTION ● If the presser foot is not installed with the slot on the shank. Converting to Free-arm Style Free-arm sewing is convenient for sewing tubular and hard-to adjust it until the machine is stable. To change your machine to the free-arm style, lift out the ...Pull the extension table out to remove it. 1 1 Extension table Steadying the Machine When the machine is placed on an uneven surface, turn the rubber cushion on the front right-hand side of the base plate to -reach areas. Put a different presser foot on the needle plate 3 so that the bar on the...

Users Manual - English
Page 17
.... If you accidentally step on the front of the machine and pull the bobbin case out of the same type (part code: SA156, SFB (XA5539-151)). If you (counterclockwise) and raise the presser foot lever. KNOWING YOUR SEWING MACHINE CAUTION ● Make sure you turn the power off... while threading the machine. Use only the enclosed bobbin or bobbins of the shuttle race by turning 1 the balance ...
.... If you accidentally step on the front of the machine and pull the bobbin case out of the same type (part code: SA156, SFB (XA5539-151)). If you (counterclockwise) and raise the presser foot lever. KNOWING YOUR SEWING MACHINE CAUTION ● Make sure you turn the power off... while threading the machine. Use only the enclosed bobbin or bobbins of the shuttle race by turning 1 the balance ...
Users Manual - English
Page 19
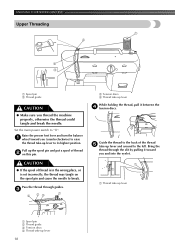
... the thread to the back of thread is in the wrong place, or is set incorrectly, the thread may tangle on this pin. KNOWING YOUR SEWING MACHINE Upper Threading 1 2 4 3 1 Spool pin 2 Thread guide CAUTION ● Make sure you (counterclockwise) to raise the thread take -up lever 18 Bring ... 4 Thread take -up lever and around to its highest position. Pass the thread through the slit by pulling it between the 4 tension discs. Raise the presser foot lever and turn the balance 1 wheel toward you and into the eyelet. 1 1 1 Thread take-up lever 1 Spool pin 2 Thread guide 3 Tension discs 4...
... the thread to the back of thread is in the wrong place, or is set incorrectly, the thread may tangle on this pin. KNOWING YOUR SEWING MACHINE Upper Threading 1 2 4 3 1 Spool pin 2 Thread guide CAUTION ● Make sure you (counterclockwise) to raise the thread take -up lever 18 Bring ... 4 Thread take -up lever and around to its highest position. Pass the thread through the slit by pulling it between the 4 tension discs. Raise the presser foot lever and turn the balance 1 wheel toward you and into the eyelet. 1 1 1 Thread take-up lever 1 Spool pin 2 Thread guide 3 Tension discs 4...
Users Manual - English
Page 20
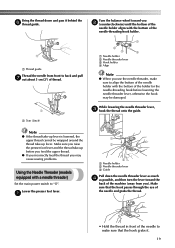
...thread take -up lever. Make sure you raise the presser foot lever and the thread take-up before lowering the needle threader lever, otherwise the hook may cause sewing problems. Using the Needle Threader (models equipped with the bottom of the machine (away from you). Bring the thread down the ... use the needle threader, make sure to align the bottom of the needle holder with a needle threader) Set the main power switch to "O". Lower the presser foot lever. 1 1 2 3 1 Needle holder 2 Needle threader lever 3 Guide Pull down and pass it . 19 Note ● If the thread take -up lever ...
...thread take -up lever. Make sure you raise the presser foot lever and the thread take-up before lowering the needle threader lever, otherwise the hook may cause sewing problems. Using the Needle Threader (models equipped with the bottom of the machine (away from you). Bring the thread down the ... use the needle threader, make sure to align the bottom of the needle holder with a needle threader) Set the main power switch to "O". Lower the presser foot lever. 1 1 2 3 1 Needle holder 2 Needle threader lever 3 Guide Pull down and pass it . 19 Note ● If the thread take -up lever ...
Users Manual - English
Page 21
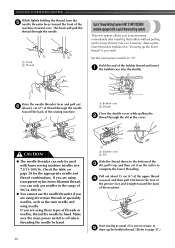
... threads or speciality needles, such as explained in the cover. Pull out about 5 cm (2") of thread through the needle toward the back of the sewing machine. 2 1 Bobbin case 2 Shuttle Close the shuttle cover while pulling the 2 thread through the needle. 1 2 1 1 Hook 2 Thread Quick Thread...bobbin case into the shuttle. 1 Raise the needle threader lever and pull out 6 about 15 cm (6") of the presser foot and straight toward you to start sewing immediately after inserting the bobbin without pulling up the bobbin thread.) (Refer to "O". Set the main power switch to page...
... threads or speciality needles, such as explained in the cover. Pull out about 5 cm (2") of thread through the needle toward the back of the sewing machine. 2 1 Bobbin case 2 Shuttle Close the shuttle cover while pulling the 2 thread through the needle. 1 2 1 1 Hook 2 Thread Quick Thread...bobbin case into the shuttle. 1 Raise the needle threader lever and pull out 6 about 15 cm (6") of the presser foot and straight toward you to start sewing immediately after inserting the bobbin without pulling up the bobbin thread.) (Refer to "O". Set the main power switch to page...
Users Manual - English
Page 22
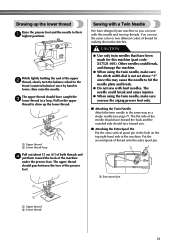
...flat side of the needle should face toward the back and the rounded side should face toward the back of the presser foot. 1 Sewing with a Twin Needle We have designed your machine so you use the same color or two different colors of thread onto the extra spool pin. 1 1 Extra...sew with bent needles. Put the second spool of thread for this may cause the needle to their 1 highest positions. The upper thread should pass between the toes of the machine under the presser foot. The needle could break, and damage the machine. ● When using the twin needle, make sure the stitch...
...flat side of the needle should face toward the back and the rounded side should face toward the back of the presser foot. 1 Sewing with a Twin Needle We have designed your machine so you use the same color or two different colors of thread onto the extra spool pin. 1 1 Extra...sew with bent needles. Put the second spool of thread for this may cause the needle to their 1 highest positions. The upper thread should pass between the toes of the machine under the presser foot. The needle could break, and damage the machine. ● When using the twin needle, make sure the stitch...
Users Manual - English
Page 26
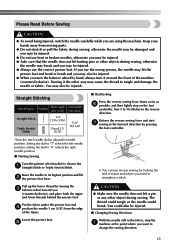
... by hand, always turn it the other way may cause the thread to 10 stitches in the fabric, stop the 1 machine at the point where you need to its highest position and lift 2 the presser foot lever. Please Read Before Sewing CAUTION ● To avoid being injured, watch the needle carefully while you (counterclockwise), and...
... by hand, always turn it the other way may cause the thread to 10 stitches in the fabric, stop the 1 machine at the point where you need to its highest position and lift 2 the presser foot lever. Please Read Before Sewing CAUTION ● To avoid being injured, watch the needle carefully while you (counterclockwise), and...
Users Manual - English
Page 27
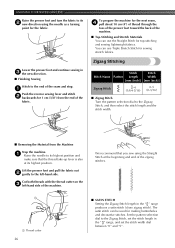
... 3 left -hand side. KNOWING YOUR SEWING MACHINE Raise the presser foot and turn the fabric to its highest position. Zigzag Stitching Stitch Stitch Stitch Name Pattern Length Width [mm (inch)] [mm (inch)] Zigzag Stitch -4 (1/64-3/16) 0-5 (0-3/16) ■ Zigzag Stitch Turn the pattern selection dial to the Zigzag Stitch, and then select the stitch length and the stitch width. ■ Removing the Material...
... 3 left -hand side. KNOWING YOUR SEWING MACHINE Raise the presser foot and turn the fabric to its highest position. Zigzag Stitching Stitch Stitch Stitch Name Pattern Length Width [mm (inch)] [mm (inch)] Zigzag Stitch -4 (1/64-3/16) 0-5 (0-3/16) ■ Zigzag Stitch Turn the pattern selection dial to the Zigzag Stitch, and then select the stitch length and the stitch width. ■ Removing the Material...

Users Manual - English
Page 28
...fabric is unfolded you will be used to the Shell Tuck Stitch. 1 Adjust the thread tension so that 3 it is useful for stretch fabrics. Place the fabric under the presser foot so that it will have a 5 blind hem stitch as in fig. Sew at the edge. Leave a 6 mm (15/64") ...overlap at a slow speed. 4 27 Sew on the seamline and the zigzag stitches sewn slightly over the folded edge. Then 2 fold ...
...fabric is unfolded you will be used to the Shell Tuck Stitch. 1 Adjust the thread tension so that 3 it is useful for stretch fabrics. Place the fabric under the presser foot so that it will have a 5 blind hem stitch as in fig. Sew at the edge. Leave a 6 mm (15/64") ...overlap at a slow speed. 4 27 Sew on the seamline and the zigzag stitches sewn slightly over the folded edge. Then 2 fold ...
Users Manual - English
Page 29
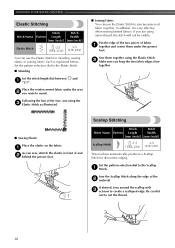
...the Elastic Stitch to join two pieces of and 2 behind the presser foot. Sew the Scallop Stitch along the edge of the tear, sew using the 3 Elastic Stitch as illustrated. ■ Sewing Elastic Place...Stitching Stitch Stitch Stitch Name Pattern Length Width [mm (inch)] [mm (inch)] Scallop Stitch -1.5 3-5 (1/64-1/16) (1/8-3/16) This machine automatically produces a Scallop Stitch for mending, sewing elastic or joining fabric. In addition, it is explained below. Following the line of the 2 material. KNOWING YOUR SEWING MACHINE Elastic Stitching Stitch Stitch Stitch...
...the Elastic Stitch to join two pieces of and 2 behind the presser foot. Sew the Scallop Stitch along the edge of the tear, sew using the 3 Elastic Stitch as illustrated. ■ Sewing Elastic Place...Stitching Stitch Stitch Stitch Name Pattern Length Width [mm (inch)] [mm (inch)] Scallop Stitch -1.5 3-5 (1/64-1/16) (1/8-3/16) This machine automatically produces a Scallop Stitch for mending, sewing elastic or joining fabric. In addition, it is explained below. Following the line of the 2 material. KNOWING YOUR SEWING MACHINE Elastic Stitching Stitch Stitch Stitch...
Users Manual - English
Page 30
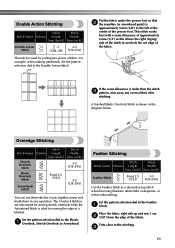
..., Stretch Overlock or Arrowhead. Set the pattern selection dial to the left of the center of the presser foot. Place the fabric right side up and sew 1 cm 2 (3/8") from the edge of the stitch to the Double Action Stitch. Set the pattern selection dial to overlock the cut edge of the fabric. A finished Elastic Overlock...
..., Stretch Overlock or Arrowhead. Set the pattern selection dial to the left of the center of the presser foot. Place the fabric right side up and sew 1 cm 2 (3/8") from the edge of the stitch to the Double Action Stitch. Set the pattern selection dial to overlock the cut edge of the fabric. A finished Elastic Overlock...
Users Manual - English
Page 31
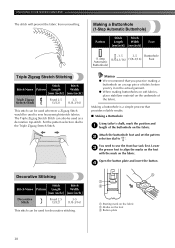
...SEWING MACHINE The stitch will prevent the fabric from unravelling. Open the button plate and insert the button. 4 Decorative Stitching 3 1 - Stitch Stitch 2 Stitch Name Pattern Length Width [mm (inch)] [mm (inch)] Decorative Stitch Fixed 2.5 3-5 (3/32) (1/8-3/16) This stitch can be used as a decorative top-stitch. Set the pattern selection dial to sew...Stretch Stitch can be used wherever a Zigzag Stitch would be used for decorative stitching. 1 Starting mark on the fabric 2 Marks on the foot 3 Button plate 30 Lower 3 the presser foot to align the marks on the foot with ...
...SEWING MACHINE The stitch will prevent the fabric from unravelling. Open the button plate and insert the button. 4 Decorative Stitching 3 1 - Stitch Stitch 2 Stitch Name Pattern Length Width [mm (inch)] [mm (inch)] Decorative Stitch Fixed 2.5 3-5 (3/32) (1/8-3/16) This stitch can be used as a decorative top-stitch. Set the pattern selection dial to sew...Stretch Stitch can be used wherever a Zigzag Stitch would be used for decorative stitching. 1 Starting mark on the fabric 2 Marks on the foot 3 Button plate 30 Lower 3 the presser foot to align the marks on the foot with ...
Users Manual - English
Page 32
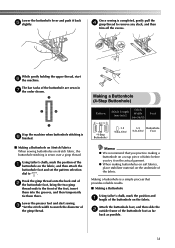
...remove any slack, and then trim off the excess. Making a Buttonhole (4-Step Buttonhole) Pattern Stitch Length [mm (inch)] Stitch Width [mm (inch)] Foot (4-Step Buttonhole) -1.5 (1/64-1/16) 3-5 Buttonhole (1/8-3/16) Foot Memo ● We recommend that provides reliable results. ■ Making a Buttonhole Using tailor's .... Attach the buttonhole foot, and then slide the 2 outside frame of the gimp thread. Once sewing is sewn over a gimp thread. Lower the presser foot and start 6 the machine. Hook the gimp thread onto the back end of 2 the buttonhole foot, bring the two ...
...remove any slack, and then trim off the excess. Making a Buttonhole (4-Step Buttonhole) Pattern Stitch Length [mm (inch)] Stitch Width [mm (inch)] Foot (4-Step Buttonhole) -1.5 (1/64-1/16) 3-5 Buttonhole (1/8-3/16) Foot Memo ● We recommend that provides reliable results. ■ Making a Buttonhole Using tailor's .... Attach the buttonhole foot, and then slide the 2 outside frame of the gimp thread. Once sewing is sewn over a gimp thread. Lower the presser foot and start 6 the machine. Hook the gimp thread onto the back end of 2 the buttonhole foot, bring the two ...
Users Manual - English
Page 33
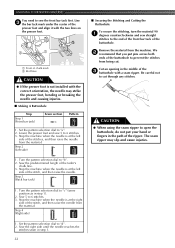
... pins across both ends of the ripper. Set the pattern selection dial to 6 stitches. 3. Stop the machine when the needle is at the left side of chalk mark 2 Red lines CAUTION ● If the presser foot is not installed with a seam ripper. Sew 5 to "a". 2. Set the pattern selection dial to "b". 2. Line 3 the bar tack mark...
... pins across both ends of the ripper. Set the pattern selection dial to 6 stitches. 3. Stop the machine when the needle is at the left side of chalk mark 2 Red lines CAUTION ● If the presser foot is not installed with a seam ripper. Sew 5 to "a". 2. Set the pattern selection dial to "b". 2. Line 3 the bar tack mark...

Users Manual - English
Page 35
...Stitch 2-3 (1/16-1/8) 2.5 (center needle position) (3/32) Foot Zipper Foot You can use the zipper foot to sew different types of zippers, and can easily position the zipper to the right or left side of the zipper foot. 1 2 Remove the material from the machine. When sewing the right side of the zipper, attach the presser foot... holder to the left side of the zipper 3 Left pin for sewing the left pin of the needle. Use the stitch width dial to make...
...Stitch 2-3 (1/16-1/8) 2.5 (center needle position) (3/32) Foot Zipper Foot You can use the zipper foot to sew different types of zippers, and can easily position the zipper to the right or left side of the zipper foot. 1 2 Remove the material from the machine. When sewing the right side of the zipper, attach the presser foot... holder to the left side of the zipper 3 Left pin for sewing the left pin of the needle. Use the stitch width dial to make...


