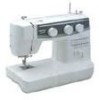

Users Manual - English
Page 2
... near children. 2. Do not use the proper needle plate. The sewing machine should be supervised to break. 14. Replace bulb with any openings. 6. turer as threading the needle, changing the needle, threading the bobbin, or changing the presser foot. 15. Do not operate this machine to the off , then remove plug from outlet. 9. DANGER - Close...
... near children. 2. Do not use the proper needle plate. The sewing machine should be supervised to break. 14. Replace bulb with any openings. 6. turer as threading the needle, changing the needle, threading the bobbin, or changing the presser foot. 15. Do not operate this machine to the off , then remove plug from outlet. 9. DANGER - Close...

Users Manual - English
Page 6
... 16 Reverse Sewing Lever 17 THREADING THE MACHINE 18 Winding the Bobbin 18 Lower Threading 19 Upper (Needle) Threading 20 Using the Needle Threader (when the machine is equipped with a needle threader) .. 22 Quick Thread-setting System FAST START BOBBIN (when the machine is equipped with a quick thread-setting system 24 Drawing Up Lower Thread 25 Twin-Needle Sewing 26 Thread Tension...
... 16 Reverse Sewing Lever 17 THREADING THE MACHINE 18 Winding the Bobbin 18 Lower Threading 19 Upper (Needle) Threading 20 Using the Needle Threader (when the machine is equipped with a needle threader) .. 22 Quick Thread-setting System FAST START BOBBIN (when the machine is equipped with a quick thread-setting system 24 Drawing Up Lower Thread 25 Twin-Needle Sewing 26 Thread Tension...

Users Manual - English
Page 9
.... 8 Pattern selection dial Turn in the reverse direction. E Main power/sewing light switch Turns the main power and sewing light on and off. CONTENTS KNOWING YOUR SEWING MACHINE STRAIGHT AND ZIGZAG STITCHING BUILT-IN STITCHES PRINCIPAL PARTS 34 62 1 1 Bobbin winding assembly Winds the thread onto the bobbin to raise and lower the needle. D C E G F H BUTTONHOLE...
.... 8 Pattern selection dial Turn in the reverse direction. E Main power/sewing light switch Turns the main power and sewing light on and off. CONTENTS KNOWING YOUR SEWING MACHINE STRAIGHT AND ZIGZAG STITCHING BUILT-IN STITCHES PRINCIPAL PARTS 34 62 1 1 Bobbin winding assembly Winds the thread onto the bobbin to raise and lower the needle. D C E G F H BUTTONHOLE...

Users Manual - English
Page 28
... the slit by pulling it to "O". 1. Guide the thread to the left (fig. A.) 1 Spool pin 2 Thread guide 3 Tension discs 4 Thread take -up lever to back and pull out about 5 cm (2") of thread on it. 3. D). CONTENTS KNOWING YOUR SEWING MACHINE STRAIGHT AND ZIGZAG STITCHING BUILT-IN STITCHES 1 2 4 3 BUTTONHOLE AND BUTTON SEWING USING ATTACHMENTS AND APPLICATIONS A 4 23 1 C B D 4 4 E 5 Upper (Needle...
... the slit by pulling it to "O". 1. Guide the thread to the left (fig. A.) 1 Spool pin 2 Thread guide 3 Tension discs 4 Thread take -up lever to back and pull out about 5 cm (2") of thread on it. 3. D). CONTENTS KNOWING YOUR SEWING MACHINE STRAIGHT AND ZIGZAG STITCHING BUILT-IN STITCHES 1 2 4 3 BUTTONHOLE AND BUTTON SEWING USING ATTACHMENTS AND APPLICATIONS A 4 23 1 C B D 4 4 E 5 Upper (Needle...

Users Manual - English
Page 30
... it. 1 Needle holder 2 Needle threader lever 3 Guide 4 Hook holder 5 Align 5. CONTENTS KNOWING YOUR SEWING MACHINE STRAIGHT AND ZIGZAG STITCHING BUILT-IN STITCHES 1 2 3 1 2 4 5 7 6 6 Using the Needle Threader (when the machine is equipped with the bottom of the holder for the needle-threading hook before lowering the needle threader lever. When using the needle threader, be...
... it. 1 Needle holder 2 Needle threader lever 3 Guide 4 Hook holder 5 Align 5. CONTENTS KNOWING YOUR SEWING MACHINE STRAIGHT AND ZIGZAG STITCHING BUILT-IN STITCHES 1 2 3 1 2 4 5 7 6 6 Using the Needle Threader (when the machine is equipped with the bottom of the holder for the needle-threading hook before lowering the needle threader lever. When using the needle threader, be...

Users Manual - English
Page 33
... canette et former une boucle de plus en plus large. 4. CONTENTS KNOWING YOUR SEWING MACHINE STRAIGHT AND ZIGZAG STITCHING BUILT-IN STITCHES 1 2 Drawing Up Lower Thread 1. Pull the upper thread toward the back of the presser foot. 1 Upper thread 2 Lower thread loop 3 Lower thread 1 3 Para sacar el hilo de la canilla Remontée du fil infé...
... canette et former une boucle de plus en plus large. 4. CONTENTS KNOWING YOUR SEWING MACHINE STRAIGHT AND ZIGZAG STITCHING BUILT-IN STITCHES 1 2 Drawing Up Lower Thread 1. Pull the upper thread toward the back of the presser foot. 1 Upper thread 2 Lower thread loop 3 Lower thread 1 3 Para sacar el hilo de la canilla Remontée du fil infé...

Users Manual - English
Page 35
...KNOWING YOUR SEWING MACHINE STRAIGHT AND ZIGZAG STITCHING BUILT-IN STITCHES A 2 1 2 1 B 2 1 2 1 A-1 654 B-1 654 C 2 1 2 1 Thread Tension Thread tension will weaken your seams or cause puckers in a clockwise direction. It may need to be adjusted according to the procedure described below. For most sewing applications,...Upper tension control dial Increase the tension by turning the dial to its original setting before sewing on the surface of your project. Decrease the thread tension by turning the dial to a lower number. Possible Problems and How To Correct ...
...KNOWING YOUR SEWING MACHINE STRAIGHT AND ZIGZAG STITCHING BUILT-IN STITCHES A 2 1 2 1 B 2 1 2 1 A-1 654 B-1 654 C 2 1 2 1 Thread Tension Thread tension will weaken your seams or cause puckers in a clockwise direction. It may need to be adjusted according to the procedure described below. For most sewing applications,...Upper tension control dial Increase the tension by turning the dial to its original setting before sewing on the surface of your project. Decrease the thread tension by turning the dial to a lower number. Possible Problems and How To Correct ...

Users Manual - English
Page 37
...Mercería 50 Algodón: 50/60 Seda: "A" Sintético Mercería 50/60 n° 100/16 Algodón: 40/50 Hilo mercería gruesa PRENDAS DE PUNTO Prendas de punto simple, Prendas de punto doble, Jersey, Tricot n° 90/14 ... (canilla). 29 INDEX Select the correct needle and thread size from the above chart. 2. CONTENTS KNOWING YOUR SEWING MACHINE STRAIGHT AND ZIGZAG STITCHING BUILT-IN STITCHES CHART OF SEWING FABRICS, NEEDLES AND THREAD COMBINATIONS VERY THIN LIGHTWEIGHT MEDIUM WEIGHT HEAVYWEIGHT SEWING FABRICS Fine tricot, Fine lace, Thin linen, Silk...
...Mercería 50 Algodón: 50/60 Seda: "A" Sintético Mercería 50/60 n° 100/16 Algodón: 40/50 Hilo mercería gruesa PRENDAS DE PUNTO Prendas de punto simple, Prendas de punto doble, Jersey, Tricot n° 90/14 ... (canilla). 29 INDEX Select the correct needle and thread size from the above chart. 2. CONTENTS KNOWING YOUR SEWING MACHINE STRAIGHT AND ZIGZAG STITCHING BUILT-IN STITCHES CHART OF SEWING FABRICS, NEEDLES AND THREAD COMBINATIONS VERY THIN LIGHTWEIGHT MEDIUM WEIGHT HEAVYWEIGHT SEWING FABRICS Fine tricot, Fine lace, Thin linen, Silk...
Users Manual - English
Page 43
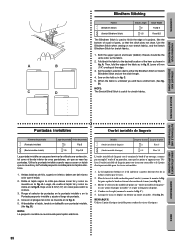
...224; la taille souhaitée pour l'ourlet, (comme le montre la fig. Both the upper (spool) and lower (bobbin) threads should be the same color as in fig. Ponga el selector de puntadas en la puntada invisible o en la Puntada pespunto invisible...La pespunto invisible se recomienda para tejidos elásticos. A) puis replier le bord en faisant chevaucher de 6 mm (voir fig. CONTENTS KNOWING YOUR SEWING MACHINE STRAIGHT AND ZIGZAG STITCHING BUILT-IN STITCHES A B C D Blindhem Stitching Pattern (Blindhem Stitch) (Stretch Blindhem Stitch) Stitch Length -2 -1.5 Stitch Width...
...224; la taille souhaitée pour l'ourlet, (comme le montre la fig. Both the upper (spool) and lower (bobbin) threads should be the same color as in fig. Ponga el selector de puntadas en la puntada invisible o en la Puntada pespunto invisible...La pespunto invisible se recomienda para tejidos elásticos. A) puis replier le bord en faisant chevaucher de 6 mm (voir fig. CONTENTS KNOWING YOUR SEWING MACHINE STRAIGHT AND ZIGZAG STITCHING BUILT-IN STITCHES A B C D Blindhem Stitching Pattern (Blindhem Stitch) (Stretch Blindhem Stitch) Stitch Length -2 -1.5 Stitch Width...

Users Manual - English
Page 50
Buttonhole-making a buttonhole on a scrap piece of the fabric. While gently holding the upper thread, start sewing. * Set the stitch width to " ". 3. Buttonhole stitching is done in the order shown in fig. CONTENTS KNOWING YOUR SEWING MACHINE STRAIGHT AND ZIGZAG STITCHING BUILT-IN STITCHES A B 1 2 - 3 C PUSH D 3 2 4 1 E PUSH Making a Buttonhole (1 Step Automatic Buttonhole) 4 Pattern Stitch Length Stitch...
Buttonhole-making a buttonhole on a scrap piece of the fabric. While gently holding the upper thread, start sewing. * Set the stitch width to " ". 3. Buttonhole stitching is done in the order shown in fig. CONTENTS KNOWING YOUR SEWING MACHINE STRAIGHT AND ZIGZAG STITCHING BUILT-IN STITCHES A B 1 2 - 3 C PUSH D 3 2 4 1 E PUSH Making a Buttonhole (1 Step Automatic Buttonhole) 4 Pattern Stitch Length Stitch...

Users Manual - English
Page 57
...machine. CONTENTS KNOWING YOUR SEWING MACHINE STRAIGHT AND ZIGZAG STITCHING BUILT-IN STITCHES Button Sewing Pattern (Zigzag Stitch) Stitch Length Stitch Width Any Foot Button Sewing Foot 1. Place a button between the holes and set the stitch width to the up position.) 4. Attach the button sewing foot. 3. At a slow speed, sew... approximately 10 stitches. 6. BUTTONHOLE AND BUTTON SEWING USING ATTACHMENTS AND APPLICATIONS MAINTENANCE INDEX 49 Cut the upper and lower threads and tie the two threads at the back of...
...machine. CONTENTS KNOWING YOUR SEWING MACHINE STRAIGHT AND ZIGZAG STITCHING BUILT-IN STITCHES Button Sewing Pattern (Zigzag Stitch) Stitch Length Stitch Width Any Foot Button Sewing Foot 1. Place a button between the holes and set the stitch width to the up position.) 4. Attach the button sewing foot. 3. At a slow speed, sew... approximately 10 stitches. 6. BUTTONHOLE AND BUTTON SEWING USING ATTACHMENTS AND APPLICATIONS MAINTENANCE INDEX 49 Cut the upper and lower threads and tie the two threads at the back of...

Users Manual - English
Page 59
... Straight Stitch. B.) 6. Set the pattern selection dial to about "2") so that the lower thread lies on the underside of the material. 3. Loosen the tension of the upper thread (to the Straight Stitch. 2. INDEX 51 A.) 1. Lower the needle into the notch on... (See fig. The zipper foot is used to select the center needle position. Set the stitch length between "2" and "3". 2. CONTENTS KNOWING YOUR SEWING MACHINE STRAIGHT AND ZIGZAG STITCHING BUILT-IN STITCHES A 1 2 3 B Zipper Inserting Pattern (Straight Stitch) Stitch Length 2-3 Stitch Width 2.5 (Center needle position...
... Straight Stitch. B.) 6. Set the pattern selection dial to about "2") so that the lower thread lies on the underside of the material. 3. Loosen the tension of the upper thread (to the Straight Stitch. 2. INDEX 51 A.) 1. Lower the needle into the notch on... (See fig. The zipper foot is used to select the center needle position. Set the stitch length between "2" and "3". 2. CONTENTS KNOWING YOUR SEWING MACHINE STRAIGHT AND ZIGZAG STITCHING BUILT-IN STITCHES A 1 2 3 B Zipper Inserting Pattern (Straight Stitch) Stitch Length 2-3 Stitch Width 2.5 (Center needle position...

Users Manual - English
Page 68
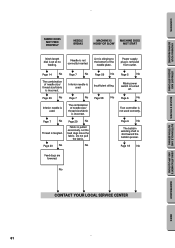
... YOUR SEWING MACHINE STRAIGHT AND ZIGZAG STITCHING BUILT-IN STITCHES Performance Checklist Whenever sewing difficulties are encountered, review the section in the shuttle hook. Thread tension is not correct. w Page 7 No w The combination of needle size/ thread size/fabric is incorrect. w Page 27 No w Lower threading is incorrect. w Page 7 No w The combination of needle size/ thread size...
... YOUR SEWING MACHINE STRAIGHT AND ZIGZAG STITCHING BUILT-IN STITCHES Performance Checklist Whenever sewing difficulties are encountered, review the section in the shuttle hook. Thread tension is not correct. w Page 7 No w The combination of needle size/ thread size/fabric is incorrect. w Page 27 No w Lower threading is incorrect. w Page 7 No w The combination of needle size/ thread size...
Users Manual - English
Page 69
...No w The combination of needle size/ thread size/fabric is slid toward the bobbin presser. w Page 58 No w Page 5 No w Main power switch is removed from outlet. Power supply plug is turned off. CONTENTS KNOWING YOUR SEWING MACHINE STRAIGHT AND ZIGZAG STITCHING BUILT-IN STITCHES... FABRIC DOES NOT FEED PROPERLY NEEDLE BREAKS MACHINE IS NOISY OR SLOW MACHINE DOES NOT START Stitch length dial is used . No w w w w...
...No w The combination of needle size/ thread size/fabric is slid toward the bobbin presser. w Page 58 No w Page 5 No w Main power switch is removed from outlet. Power supply plug is turned off. CONTENTS KNOWING YOUR SEWING MACHINE STRAIGHT AND ZIGZAG STITCHING BUILT-IN STITCHES... FABRIC DOES NOT FEED PROPERLY NEEDLE BREAKS MACHINE IS NOISY OR SLOW MACHINE DOES NOT START Stitch length dial is used . No w w w w...

Users Manual - English
Page 75
CONTENTS KNOWING YOUR SEWING MACHINE STRAIGHT AND ZIGZAG STITCHING BUILT-IN STITCHES Page A Accessories 3 Appliques 54 B Blindhem Stitching 35 Bobbin Threading 19, 24 Winding 18 Bridging Stitch 11 Buttonhole Sewing 42, 44 Buttonhole Fine Adjustment 47 Button Sewing 49 C Chart of Sewing Fabrics, Needles and Thread Combinations .. 29 Cleaning 59 Connecting Plugs 5 D Decorative Stitch 11, 41 Darning 53...
CONTENTS KNOWING YOUR SEWING MACHINE STRAIGHT AND ZIGZAG STITCHING BUILT-IN STITCHES Page A Accessories 3 Appliques 54 B Blindhem Stitching 35 Bobbin Threading 19, 24 Winding 18 Bridging Stitch 11 Buttonhole Sewing 42, 44 Buttonhole Fine Adjustment 47 Button Sewing 49 C Chart of Sewing Fabrics, Needles and Thread Combinations .. 29 Cleaning 59 Connecting Plugs 5 D Decorative Stitch 11, 41 Darning 53...


