Users Manual - English
Page 1
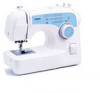
1 KNOWING YOUR SEWING MACHINE 2 STRAIGHT AND ZIGZAG STITCHING 3 BUILT-IN STITCHES 4 SEWING BUTTONHOLES AND BUTTONS 5 USING ATTACHMENTS AND APPLICATIONS 6 APPENDIX Operation Manual
1 KNOWING YOUR SEWING MACHINE 2 STRAIGHT AND ZIGZAG STITCHING 3 BUILT-IN STITCHES 4 SEWING BUTTONHOLES AND BUTTONS 5 USING ATTACHMENTS AND APPLICATIONS 6 APPENDIX Operation Manual
Users Manual - English
Page 2
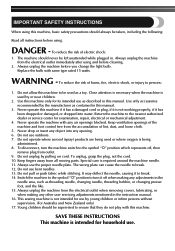
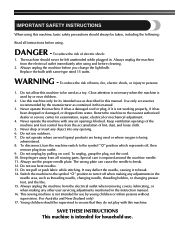
...to ensure that they do not play with this machine to be supervised to the symbol "{" position which represents off when making any adjustments in the needle area, such as contained in this manual. 3. This sewing machine is being used by the manufacturer as threading needle..., changing needle, threading bobbin, or changing presser foot, and the like. 15. Use this machine only for examination, repair, electrical or mechanical adjustment. ...
...to ensure that they do not play with this machine to be supervised to the symbol "{" position which represents off when making any adjustments in the needle area, such as contained in this manual. 3. This sewing machine is being used by the manufacturer as threading needle..., changing needle, threading bobbin, or changing presser foot, and the like. 15. Use this machine only for examination, repair, electrical or mechanical adjustment. ...
Users Manual - English
Page 4
...machine. Plug the machine directly into the wall. Always consult this product are sewing. Please follow the troubleshooting table in the following circumstances: • When you fit them correctly. To use or store the machine...the right packing material, the machine could be used. 3. To give your local authorized dealer. The contents of this manual and specifications of this manual before you replace or fit ... controller. 4. Do not store this machine to prevent damage. For additional product information and updates, visit our web site at www.brother.com. If you are subject to...
...machine. Plug the machine directly into the wall. Always consult this product are sewing. Please follow the troubleshooting table in the following circumstances: • When you fit them correctly. To use or store the machine...the right packing material, the machine could be used. 3. To give your local authorized dealer. The contents of this manual and specifications of this manual before you replace or fit ... controller. 4. Do not store this machine to prevent damage. For additional product information and updates, visit our web site at www.brother.com. If you are subject to...
Users Manual - English
Page 7
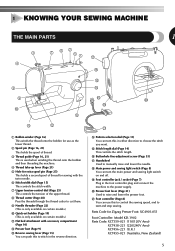
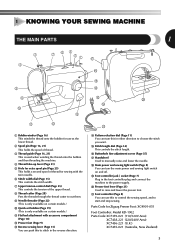
...manually raise and lower the needle. Parts Code for Zigzag Presser Foot: XC4901-051 Foot Controller: Model KD-1902 Parts Code: XC7359-021 (110/120V Area) XC7438-221 (220/240V Area) XC7456-221 (U.K.) XC7455-021 (Australia, New Zealand) 5 E D H J I Foot controller jack / socket (Page 7) Plug in the reverse direction. 1 KNOWING YOUR SEWING MACHINE... THE MAIN PARTS 1 3 4 7 62 51 G F 8 9 0 C A B 1 Bobbin winder (Page 16) This winds the thread onto the bobbin for use this to control the sewing speed, and to start and stop...
...manually raise and lower the needle. Parts Code for Zigzag Presser Foot: XC4901-051 Foot Controller: Model KD-1902 Parts Code: XC7359-021 (110/120V Area) XC7438-221 (220/240V Area) XC7456-221 (U.K.) XC7455-021 (Australia, New Zealand) 5 E D H J I Foot controller jack / socket (Page 7) Plug in the reverse direction. 1 KNOWING YOUR SEWING MACHINE... THE MAIN PARTS 1 3 4 7 62 51 G F 8 9 0 C A B 1 Bobbin winder (Page 16) This winds the thread onto the bobbin for use this to control the sewing speed, and to start and stop...
Users Manual - English
Page 14
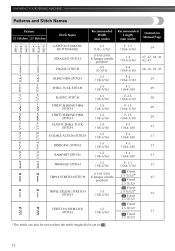
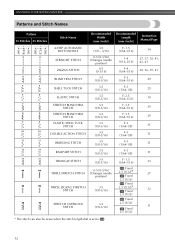
KNOWING YOUR SEWING MACHINE Patterns and Stitch Names Pattern 35 Stitches 25 Stitches Stitch Name Recommended Width (mm (inch)) Recommended Length (mm (inch)) Instruction Manual Page 4-STEP AUTOMATIC BUTTONHOLE STRAIGHT STITCH ZIGZAG STITCH BLIND HEM STITCH SHELL TUCK STITCH ELASTIC STITCH STRETCH BLIND HEM STITCH STRETCH BLIND HEM STITCH ELASTIC ...
KNOWING YOUR SEWING MACHINE Patterns and Stitch Names Pattern 35 Stitches 25 Stitches Stitch Name Recommended Width (mm (inch)) Recommended Length (mm (inch)) Instruction Manual Page 4-STEP AUTOMATIC BUTTONHOLE STRAIGHT STITCH ZIGZAG STITCH BLIND HEM STITCH SHELL TUCK STITCH ELASTIC STITCH STRETCH BLIND HEM STITCH STRETCH BLIND HEM STITCH ELASTIC ...
Users Manual - English
Page 16
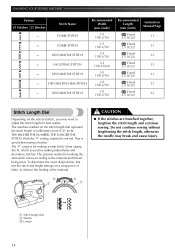
... stitch varies according to the material and thread being used when sewing a button. With the "0" setting, material is used for making buttonholes and decorative stitches. KNOWING YOUR SEWING MACHINE Pattern 35 Stitches 25 Stitches Stitch Name COMB STITCH COMB STITCH...) 3-5 (1/8-3/16) Recommended Length (mm (inch)) Fixed 2.5 (3/32) Fixed 2.5 (3/32) Fixed 2.5 (3/32) Fixed 2.5 (3/32) Fixed 2.5 (3/32) Fixed 2.5 (3/32) Fixed 2.5 (3/32) Instruction Manual Page 31 31 33 31 31 33 33 Stitch Length Dial Depending on the selected stitch, you may break and cause injury. 1 Stitch length dial...
... stitch varies according to the material and thread being used when sewing a button. With the "0" setting, material is used for making buttonholes and decorative stitches. KNOWING YOUR SEWING MACHINE Pattern 35 Stitches 25 Stitches Stitch Name COMB STITCH COMB STITCH...) 3-5 (1/8-3/16) Recommended Length (mm (inch)) Fixed 2.5 (3/32) Fixed 2.5 (3/32) Fixed 2.5 (3/32) Fixed 2.5 (3/32) Fixed 2.5 (3/32) Fixed 2.5 (3/32) Fixed 2.5 (3/32) Instruction Manual Page 31 31 33 31 31 33 33 Stitch Length Dial Depending on the selected stitch, you may break and cause injury. 1 Stitch length dial...
Owner's Manual (Español) - Spanish
Page 1
1 KNOWING YOUR SEWING MACHINE 2 STRAIGHT AND ZIGZAG STITCHING 3 BUILT-IN STITCHES 4 SEWING BUTTONHOLES AND BUTTONS 5 USING ATTACHMENTS AND APPLICATIONS 6 APPENDIX Operation Manual
1 KNOWING YOUR SEWING MACHINE 2 STRAIGHT AND ZIGZAG STITCHING 3 BUILT-IN STITCHES 4 SEWING BUTTONHOLES AND BUTTONS 5 USING ATTACHMENTS AND APPLICATIONS 6 APPENDIX Operation Manual
Owner's Manual (Español) - Spanish
Page 2
...children should never be left unattended while plugged in this manual. The machine should be supervised to ensure that they do not play with this machine. To reduce the risk of electric shock: 1. Never operate the machine with same type rated 15 watts. Keep fingers away... immediately after using and before you change the light bulb. Always unplug the machine before cleaning. 2. This sewing machine is being used as described in . IMPORTANT SAFETY INSTRUCTIONS When using this machine, basic safety precautions should always be taken, including the following: Read all ...
...children should never be left unattended while plugged in this manual. The machine should be supervised to ensure that they do not play with this machine. To reduce the risk of electric shock: 1. Never operate the machine with same type rated 15 watts. Keep fingers away... immediately after using and before you change the light bulb. Always unplug the machine before cleaning. 2. This sewing machine is being used as described in . IMPORTANT SAFETY INSTRUCTIONS When using this machine, basic safety precautions should always be taken, including the following: Read all ...
Owner's Manual (Español) - Spanish
Page 4
...needle, or other hot objects. 2. To give your local authorized dealer. The contents of this manual and specifications of this product are sewing. Do not use the machine safely 1. Always consult this machine in direct sunlight or in the Appendix to make sure you fit them correctly. Make sure you ... additional product information and updates, visit our web site at www.brother.com. Do not store this manual before you replace or fit presser feet, the needle, or any other parts to inspect and adjust the machine yourself. Turn off the main power and unplug the cord in ...
...needle, or other hot objects. 2. To give your local authorized dealer. The contents of this manual and specifications of this product are sewing. Do not use the machine safely 1. Always consult this machine in direct sunlight or in the Appendix to make sure you fit them correctly. Make sure you ... additional product information and updates, visit our web site at www.brother.com. Do not store this manual before you replace or fit presser feet, the needle, or any other parts to inspect and adjust the machine yourself. Turn off the main power and unplug the cord in ...
Owner's Manual (Español) - Spanish
Page 7
... Flat bed attachment with accessory compartment (Page 10) B Presser foot (Page 9) C Reverse sewing lever (Page 15) You can use this to stitch in the foot controller plug and connect the machine to the power supply. I K D Pattern selection dial (Page 11) You can turn this...you want. E D H J I Foot controller jack / socket (Page 7) Plug in the reverse direction. J Presser foot lever (Page 21) Used to manually raise and lower the needle. 1 KNOWING YOUR SEWING MACHINE THE MAIN PARTS 1 3 4 7 62 51 G F 8 9 0 C A B 1 Bobbin winder (Page 16) This winds the thread onto the ...
... Flat bed attachment with accessory compartment (Page 10) B Presser foot (Page 9) C Reverse sewing lever (Page 15) You can use this to stitch in the foot controller plug and connect the machine to the power supply. I K D Pattern selection dial (Page 11) You can turn this...you want. E D H J I Foot controller jack / socket (Page 7) Plug in the reverse direction. J Presser foot lever (Page 21) Used to manually raise and lower the needle. 1 KNOWING YOUR SEWING MACHINE THE MAIN PARTS 1 3 4 7 62 51 G F 8 9 0 C A B 1 Bobbin winder (Page 16) This winds the thread onto the ...
Owner's Manual (Español) - Spanish
Page 14
KNOWING YOUR SEWING MACHINE Patterns and Stitch Names Pattern 35 Stitches 25 Stitches Stitch Name Recommended Width (mm (inch)) Recommended Length (mm (inch)) Instruction Manual Page 4-STEP AUTOMATIC BUTTONHOLE STRAIGHT STITCH ZIGZAG STITCH BLIND HEM STITCH SHELL TUCK STITCH ELASTIC STITCH STRETCH BLIND HEM STITCH STRETCH BLIND HEM STITCH ELASTIC ...
KNOWING YOUR SEWING MACHINE Patterns and Stitch Names Pattern 35 Stitches 25 Stitches Stitch Name Recommended Width (mm (inch)) Recommended Length (mm (inch)) Instruction Manual Page 4-STEP AUTOMATIC BUTTONHOLE STRAIGHT STITCH ZIGZAG STITCH BLIND HEM STITCH SHELL TUCK STITCH ELASTIC STITCH STRETCH BLIND HEM STITCH STRETCH BLIND HEM STITCH ELASTIC ...
Owner's Manual (Español) - Spanish
Page 16
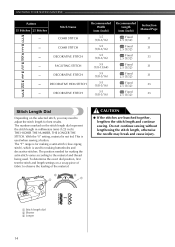
...2 1 3 1 CAUTION ● If the stitches are bunched together, lengthen the stitch length and continue sewing. KNOWING YOUR SEWING MACHINE Pattern 35 Stitches 25 Stitches Stitch Name COMB STITCH COMB STITCH DECORATIVE STITCH FAGOTING STITCH DECORATIVE STITCH DECORATIVE HEM STITCH...(1/8-3/16) Recommended Length (mm (inch)) Fixed 2.5 (3/32) Fixed 2.5 (3/32) Fixed 2.5 (3/32) Fixed 2.5 (3/32) Fixed 2.5 (3/32) Fixed 2.5 (3/32) Fixed 2.5 (3/32) Instruction Manual Page 31 31 33 31 31 33 33 Stitch Length Dial Depending on a scrap piece of fabric to the material and thread being used. The...
...2 1 3 1 CAUTION ● If the stitches are bunched together, lengthen the stitch length and continue sewing. KNOWING YOUR SEWING MACHINE Pattern 35 Stitches 25 Stitches Stitch Name COMB STITCH COMB STITCH DECORATIVE STITCH FAGOTING STITCH DECORATIVE STITCH DECORATIVE HEM STITCH...(1/8-3/16) Recommended Length (mm (inch)) Fixed 2.5 (3/32) Fixed 2.5 (3/32) Fixed 2.5 (3/32) Fixed 2.5 (3/32) Fixed 2.5 (3/32) Fixed 2.5 (3/32) Fixed 2.5 (3/32) Instruction Manual Page 31 31 33 31 31 33 33 Stitch Length Dial Depending on a scrap piece of fabric to the material and thread being used. The...


