Users Manual - English
Page 1
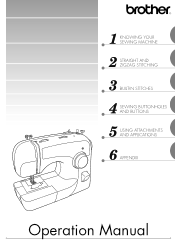
1 KNOWING YOUR SEWING MACHINE 2 STRAIGHT AND ZIGZAG STITCHING 3 BUILT-IN STITCHES 4 SEWING BUTTONHOLES AND BUTTONS 5 USING ATTACHMENTS AND APPLICATIONS 6 APPENDIX Operation Manual
1 KNOWING YOUR SEWING MACHINE 2 STRAIGHT AND ZIGZAG STITCHING 3 BUILT-IN STITCHES 4 SEWING BUTTONHOLES AND BUTTONS 5 USING ATTACHMENTS AND APPLICATIONS 6 APPENDIX Operation Manual
Users Manual - English
Page 2
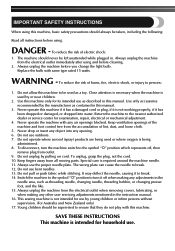
... 7. Do not pull or push fabric while stitching. WARNING - Use only accessories recommended by pulling on cord. Keep ventilation openings of the machine and foot control free from the electrical outlet when removing covers, lubricating, or when making any other user servicing adjustments mentioned in this manual...13. The wrong plate can cause the needle to the nearest authorized dealer or service center for use the proper needle plate. Return the machine to break. 12. Always use by or near children. 2. It may deflect the needle, causing it to the symbol "{" position which ...
... 7. Do not pull or push fabric while stitching. WARNING - Use only accessories recommended by pulling on cord. Keep ventilation openings of the machine and foot control free from the electrical outlet when removing covers, lubricating, or when making any other user servicing adjustments mentioned in this manual...13. The wrong plate can cause the needle to the nearest authorized dealer or service center for use the proper needle plate. Return the machine to break. 12. Always use by or near children. 2. It may deflect the needle, causing it to the symbol "{" position which ...

Users Manual - English
Page 3
... THE LETTER 'E', BY THE EARTH SYMBOL OR COLOURED GREEN OR GREEN AND YELLOW. FOR USERS IN THE UK, EIRE, MALTA AND CYPRUS ONLY If this machine is fitted with the letter 'N' or coloured black or blue. In the event of this equipment, it should be fitted in the plug. The wires...
... THE LETTER 'E', BY THE EARTH SYMBOL OR COLOURED GREEN OR GREEN AND YELLOW. FOR USERS IN THE UK, EIRE, MALTA AND CYPRUS ONLY If this machine is fitted with the letter 'N' or coloured black or blue. In the event of this equipment, it should be fitted in the plug. The wires...
Users Manual - English
Page 4
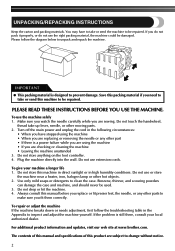
... should never be repaired. PLEASE READ THESE INSTRUCTIONS BEFORE YOU USE THE MACHINE. For additional product information and updates, visit our web site at www.brother.com. To use extension cords. Plug the machine directly into the wall. To give your local authorized dealer. Please follow the ...troubleshooting table in high humidity conditions. To repair or adjust the machine If the machine breaks down or needs adjustment, first...
... should never be repaired. PLEASE READ THESE INSTRUCTIONS BEFORE YOU USE THE MACHINE. For additional product information and updates, visit our web site at www.brother.com. To use extension cords. Plug the machine directly into the wall. To give your local authorized dealer. Please follow the ...troubleshooting table in high humidity conditions. To repair or adjust the machine If the machine breaks down or needs adjustment, first...
Users Manual - English
Page 5
... MAIN PARTS ...5 ACCESSORIES ...6 Optional Accessories ...6 USING YOUR SEWING MACHINE 7 Connecting Plugs ...7 Main Power and Sewing Light Switch ...8 Foot Controller ...8 Checking the Needle ...8 Replacing the Needle ...8 Changing the Presser Foot ...9 Flat Bed Attachment ...10 ... Dial ...11 Patterns and Stitch Names ...12 Stitch Length Dial ...14 Stretch Stitching ...15 Stitch Width Dial ...15 Reverse Sewing Lever ...15 THREADING THE MACHINE 16 Winding the Bobbin ...16 Lower Threading ...18 Lower Threading (for models equipped with a quick-set bobbin 19 Upper Threading ...21 Using the Needle...
... MAIN PARTS ...5 ACCESSORIES ...6 Optional Accessories ...6 USING YOUR SEWING MACHINE 7 Connecting Plugs ...7 Main Power and Sewing Light Switch ...8 Foot Controller ...8 Checking the Needle ...8 Replacing the Needle ...8 Changing the Presser Foot ...9 Flat Bed Attachment ...10 ... Dial ...11 Patterns and Stitch Names ...12 Stitch Length Dial ...14 Stretch Stitching ...15 Stitch Width Dial ...15 Reverse Sewing Lever ...15 THREADING THE MACHINE 16 Winding the Bobbin ...16 Lower Threading ...18 Lower Threading (for models equipped with a quick-set bobbin 19 Upper Threading ...21 Using the Needle...
Users Manual - English
Page 7
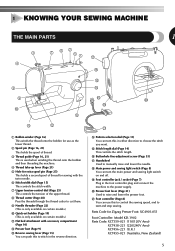
...the needle. I K D Pattern selection dial (Page 11) You can push this to stitch in the foot controller plug and connect the machine to the power supply. F Buttonhole fine-adjustment screw (Page 35) G Handwheel Used to raise and lower the presser foot. E Stitch length... Area) XC7456-221 (U.K.) XC7455-021 (Australia, New Zealand) 5 E D H J I Foot controller jack / socket (Page 7) Plug in the reverse direction. 1 KNOWING YOUR SEWING MACHINE THE MAIN PARTS 1 3 4 7 62 51 G F 8 9 0 C A B 1 Bobbin winder (Page 16) This winds the thread onto the bobbin for use this in ...
...the needle. I K D Pattern selection dial (Page 11) You can push this to stitch in the foot controller plug and connect the machine to the power supply. F Buttonhole fine-adjustment screw (Page 35) G Handwheel Used to raise and lower the presser foot. E Stitch length... Area) XC7456-221 (U.K.) XC7455-021 (Australia, New Zealand) 5 E D H J I Foot controller jack / socket (Page 7) Plug in the reverse direction. 1 KNOWING YOUR SEWING MACHINE THE MAIN PARTS 1 3 4 7 62 51 G F 8 9 0 C A B 1 Bobbin winder (Page 16) This winds the thread onto the bobbin for use this in ...
Users Manual - English
Page 8
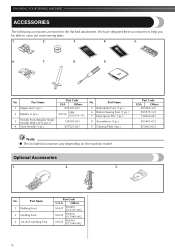
...Others SA107 F034N: XC2165-002 SA129 F005N: XC1948-002 SA125 F001N: XC1944-002 6 Optional Accessories 1. 2. 3. KNOWING YOUR SEWING MACHINE ACCESSORIES The following accessories are stored in the flat bed attachment. Part Name 1 Zipper foot (1 pc.) 2 Bobbin (3 pcs.) ... Plate (1pc.) Part Code USA Others X59369-321 X59375-121 130920-021 X55467-021 XC6063-021 Note ● The included accessories vary depending on the machine model. We have designed these accessories to help you be able to carry out most sewing tasks. 1. 2. 3. 4. 5. 6. 7. 8. 9. No...
...Others SA107 F034N: XC2165-002 SA129 F005N: XC1948-002 SA125 F001N: XC1944-002 6 Optional Accessories 1. 2. 3. KNOWING YOUR SEWING MACHINE ACCESSORIES The following accessories are stored in the flat bed attachment. Part Name 1 Zipper foot (1 pc.) 2 Bobbin (3 pcs.) ... Plate (1pc.) Part Code USA Others X59369-321 X59375-121 130920-021 X55467-021 XC6063-021 Note ● The included accessories vary depending on the machine model. We have designed these accessories to help you be able to carry out most sewing tasks. 1. 2. 3. 4. 5. 6. 7. 8. 9. No...
Users Manual - English
Page 9
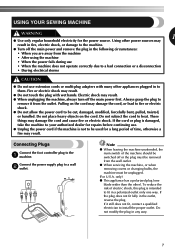
... If the plug does not fit fully in any way. 7 If the cord or plug is not to a wall 2 outlet. USING YOUR SEWING MACHINE WARNING 1 ● Use only regular household electricity for a long period of time, otherwise a fire may result. Electric shock may result in fire, ...connection or a disconnection • During electrical storms CAUTION ● Do not use . ● Unplug the power cord if the machine is damaged, take the machine to your authorized dealer for repairs before continuing use extension cords or multi-plug adapters with wet hands. Pulling on the cord. Note...
... If the plug does not fit fully in any way. 7 If the cord or plug is not to a wall 2 outlet. USING YOUR SEWING MACHINE WARNING 1 ● Use only regular household electricity for a long period of time, otherwise a fire may result. Electric shock may result in fire, ...connection or a disconnection • During electrical storms CAUTION ● Do not use . ● Unplug the power cord if the machine is damaged, take the machine to your authorized dealer for repairs before continuing use extension cords or multi-plug adapters with wet hands. Pulling on the cord. Note...
Users Manual - English
Page 10
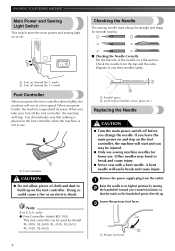
... The sewing needle must always be straight and sharp for Model XL-3500, XL-2600, XL-3510, XL-2610, XL-3520, XL-2620. 8 1 2 1 Parallel space 2 Level surface (bobbin cover, glass, etc.) Replacing the Needle CAUTION ● Turn the main power switch off the foot controller, the machine will stop. You should make sure that the mark on or...
... The sewing needle must always be straight and sharp for Model XL-3500, XL-2600, XL-3510, XL-2610, XL-3520, XL-2620. 8 1 2 1 Parallel space 2 Level surface (bobbin cover, glass, etc.) Replacing the Needle CAUTION ● Turn the main power switch off the foot controller, the machine will stop. You should make sure that the mark on or...
Users Manual - English
Page 11
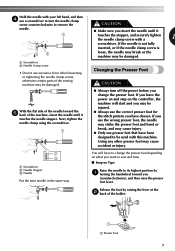
...1 Screwdriver 2 Needle clamp screw • Do not use excessive force when loosening or tightening the needle clamp screw, otherwise certain parts of the machine, insert the needle until it touches the needle stopper. If you leave the power on and step on Type Raise the needle to its highest... correct presser foot for the stitch pattern you insert the needle until it 1 touches the stopper, and securely tighten the needle clamp screw with this machine. If you use the wrong presser foot, the needle may strike the presser foot and bend or break, and may cause accident or injury. 2 ...
...1 Screwdriver 2 Needle clamp screw • Do not use excessive force when loosening or tightening the needle clamp screw, otherwise certain parts of the machine, insert the needle until it touches the needle stopper. If you leave the power on and step on Type Raise the needle to its highest... correct presser foot for the stitch pattern you insert the needle until it 1 touches the stopper, and securely tighten the needle clamp screw with this machine. If you use the wrong presser foot, the needle may strike the presser foot and bend or break, and may cause accident or injury. 2 ...
Users Manual - English
Page 12
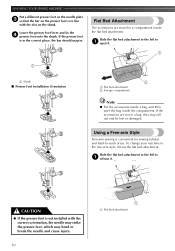
To change your machine to -reach areas. Slide the flat bed attachment to the left to 1 open it . Using a Free-arm Style Free-arm sewing is in a compartment inside ... 2 1 Flat bed attachment 2 Storage compartment Note ● Put the accessories inside a bag, and then store the bag inside the flat bed attachment. KNOWING YOUR SEWING MACHINE Put a different presser foot on the needle plate 3 so that the bar on the shank. If the accessories are stored in line with the correct...
To change your machine to -reach areas. Slide the flat bed attachment to the left to 1 open it . Using a Free-arm Style Free-arm sewing is in a compartment inside ... 2 1 Flat bed attachment 2 Storage compartment Note ● Put the accessories inside a bag, and then store the bag inside the flat bed attachment. KNOWING YOUR SEWING MACHINE Put a different presser foot on the needle plate 3 so that the bar on the shank. If the accessories are stored in line with the correct...
Users Manual - English
Page 14
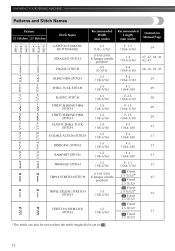
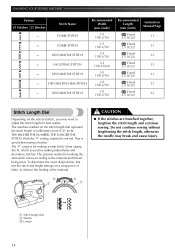
KNOWING YOUR SEWING MACHINE Patterns and Stitch Names Pattern 35 Stitches 25 Stitches Stitch Name Recommended Width (mm (inch)) Recommended Length (mm (inch)) Instruction Manual Page 4-STEP AUTOMATIC BUTTONHOLE ...
KNOWING YOUR SEWING MACHINE Patterns and Stitch Names Pattern 35 Stitches 25 Stitches Stitch Name Recommended Width (mm (inch)) Recommended Length (mm (inch)) Instruction Manual Page 4-STEP AUTOMATIC BUTTONHOLE ...
Users Manual - English
Page 16
... NUMBER, THE LONGER THE STITCH. The numbers marked on the stitch length dial represent the stitch length in millimeters (mm) (1/25 inch). KNOWING YOUR SEWING MACHINE Pattern 35 Stitches 25 Stitches Stitch Name COMB STITCH COMB STITCH DECORATIVE STITCH FAGOTING STITCH DECORATIVE STITCH DECORATIVE HEM STITCH DECORATIVE STITCH Recommended Width (mm...
... NUMBER, THE LONGER THE STITCH. The numbers marked on the stitch length dial represent the stitch length in millimeters (mm) (1/25 inch). KNOWING YOUR SEWING MACHINE Pattern 35 Stitches 25 Stitches Stitch Name COMB STITCH COMB STITCH DECORATIVE STITCH FAGOTING STITCH DECORATIVE STITCH DECORATIVE HEM STITCH DECORATIVE STITCH Recommended Width (mm...
Users Manual - English
Page 17
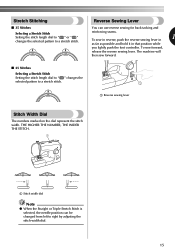
... can be changed from left to a stretch stitch. 1 1 Reverse sewing lever Stitch Width Dial The numbers marked on the dial represent the stitch width. The machine will then sew forward. ■ 25 Stitches Selecting a Stretch Stitch Setting the stitch length dial to " " changes the selected pattern to right by adjusting the...
... can be changed from left to a stretch stitch. 1 1 Reverse sewing lever Stitch Width Dial The numbers marked on the dial represent the stitch width. The machine will then sew forward. ■ 25 Stitches Selecting a Stretch Stitch Setting the stitch length dial to " " changes the selected pattern to right by adjusting the...
Users Manual - English
Page 18
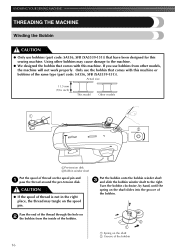
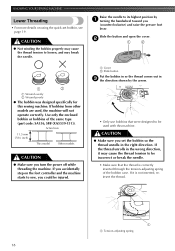
... other bobbins may tangle on the shaft 2 Groove of the bobbin 16 Using other models, the machine will not work properly. Only use the bobbin that have been designed for this sewing machine. Put the bobbin onto the bobbin winder shaft 3 and slide the bobbin winder shaft to the... inside of the bobbin. 2 1 1 Spring on the spool pin. KNOWING YOUR SEWING MACHINE THREADING THE MACHINE Winding the Bobbin CAUTION ● Only use bobbins (part code: SA156, SFB (XA5539-151)) that comes with this machine. CAUTION ● If the spool of thread is not in the right place, the ...
... other bobbins may tangle on the shaft 2 Groove of the bobbin 16 Using other models, the machine will not work properly. Only use the bobbin that have been designed for this sewing machine. Put the bobbin onto the bobbin winder shaft 3 and slide the bobbin winder shaft to the... inside of the bobbin. 2 1 1 Spring on the spool pin. KNOWING YOUR SEWING MACHINE THREADING THE MACHINE Winding the Bobbin CAUTION ● Only use bobbins (part code: SA156, SFB (XA5539-151)) that comes with this machine. CAUTION ● If the spool of thread is not in the right place, the ...
Users Manual - English
Page 19
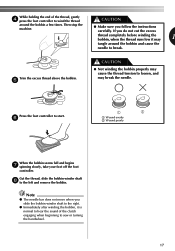
Note ● The needle bar does not move when you follow the instructions carefully. Then stop the machine. ● Make sure you slide the bobbin winder shaft to the right. ● Immediately after winding the bobbin, it may break the needle. If you ...
Note ● The needle bar does not move when you follow the instructions carefully. Then stop the machine. ● Make sure you slide the bobbin winder shaft to the right. ● Immediately after winding the bobbin, it may break the needle. If you ...
Users Manual - English
Page 20
...cause the thread tension to be incorrect or break the needle. • Make sure that were designed to sew, you could be used , the machine will not operate correctly. CAUTION ● Not winding the bobbin properly may break the needle. If bobbins from other models are used with this ...sewing machine. Raise the needle to loosen, and may cause the thread tension to its highest position by the arrow. • Only use bobbins that the...
...cause the thread tension to be incorrect or break the needle. • Make sure that were designed to sew, you could be used , the machine will not operate correctly. CAUTION ● Not winding the bobbin properly may break the needle. If bobbins from other models are used with this ...sewing machine. Raise the needle to loosen, and may cause the thread tension to its highest position by the arrow. • Only use bobbins that the...
Users Manual - English
Page 21
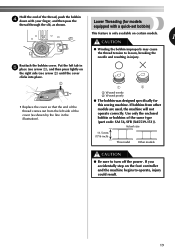
... of the cover (as shown. If you accidentally step on the right side (see arrow 1), and then press lightly on the foot controller and the machine begins to turn off the power. If bobbins from the left tab in 5 place (see arrow 2) until the cover clicks into place. 2 1 ...to loosen, breaking the needle and resulting in the illustration). 1 2 1 Wound evenly 2 Wound poorly ● The bobbin was designed specifically for this sewing machine. Actual size 11.5 mm (7/16 inch) This model Other models CAUTION ● Be sure to operate, injury could result. 19 Put the left side ...
... of the cover (as shown. If you accidentally step on the right side (see arrow 1), and then press lightly on the foot controller and the machine begins to turn off the power. If bobbins from the left tab in 5 place (see arrow 2) until the cover clicks into place. 2 1 ...to loosen, breaking the needle and resulting in the illustration). 1 2 1 Wound evenly 2 Wound poorly ● The bobbin was designed specifically for this sewing machine. Actual size 11.5 mm (7/16 inch) This model Other models CAUTION ● Be sure to operate, injury could result. 19 Put the left side ...
Users Manual - English
Page 22
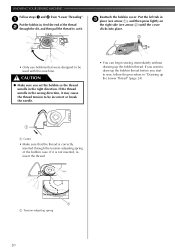
KNOWING YOUR SEWING MACHINE Follow steps 1 and 2 from "Lower Threading". 1 Put the bobbin in, feed the end of the bobbin case. CAUTION ● Make sure you start to sew, ... spring of the thread 2 through the slit, and then pull the thread to cut it may cause the thread tension to be used with this machine. Put the left tab in the wrong direction, it . Reattach the bobbin cover.
KNOWING YOUR SEWING MACHINE Follow steps 1 and 2 from "Lower Threading". 1 Put the bobbin in, feed the end of the bobbin case. CAUTION ● Make sure you start to sew, ... spring of the thread 2 through the slit, and then pull the thread to cut it may cause the thread tension to be used with this machine. Put the left tab in the wrong direction, it . Reattach the bobbin cover.
Users Manual - English
Page 23
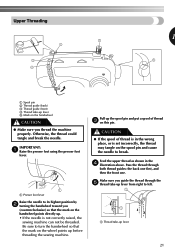
Upper Threading 1 1 Spool pin 2 Thread guide (back) 3 Thread guide (front) 4 Thread take -up before threading the sewing machine. Feed the upper thread as shown in the wrong place, or is not correctly raised, the sewing machine can not be threaded. IMPORTANT: 1 Raise the presser foot using the presser foot lever. 1 1 Presser foot lever... and put a spool of thread is in the 4 illustration above. CAUTION ● If the spool of thread 3 on this pin. Make sure you thread the machine properly. Otherwise, the thread could tangle and break the needle.
Upper Threading 1 1 Spool pin 2 Thread guide (back) 3 Thread guide (front) 4 Thread take -up before threading the sewing machine. Feed the upper thread as shown in the wrong place, or is not correctly raised, the sewing machine can not be threaded. IMPORTANT: 1 Raise the presser foot using the presser foot lever. 1 1 Presser foot lever... and put a spool of thread is in the 4 illustration above. CAUTION ● If the spool of thread 3 on this pin. Make sure you thread the machine properly. Otherwise, the thread could tangle and break the needle.


