

Users Manual - English
Page 2
... machine switch to break. 14. SAVE THESE INSTRUCTIONS This machine is being used as threading needle, changing needle, threading bobbin, or changing presser foot, and the like. 15. Always unplug the machine from all instructions before using and before you change the light bulb. WARNING - Use...spray) products are being administered. 8. The wrong plate can cause the needle to persons: 1. Keep ventilation openings of the machine and foot control free from the accumulation of electric shock: 1. To disconnect, turn it to the symbol "{" position which represents off when making any...
... machine switch to break. 14. SAVE THESE INSTRUCTIONS This machine is being used as threading needle, changing needle, threading bobbin, or changing presser foot, and the like. 15. Always unplug the machine from all instructions before using and before you change the light bulb. WARNING - Use...spray) products are being administered. 8. The wrong plate can cause the needle to persons: 1. Keep ventilation openings of the machine and foot control free from the accumulation of electric shock: 1. To disconnect, turn it to the symbol "{" position which represents off when making any...

Users Manual - English
Page 5
... SEWING MACHINE 5 THE MAIN PARTS ...5 ACCESSORIES ...6 Optional Accessories ...6 USING YOUR SEWING MACHINE 7 Connecting Plugs ...7 Main Power and Sewing Light Switch ...8 Foot Controller ...8 Checking the Needle ...8 Replacing the Needle ...8 Changing the Presser Foot ...9 Flat Bed Attachment ...10 Using a Free-arm Style ...10 THE CONTROLS ...11 Pattern Selection Dial ...11 Patterns and Stitch Names ...12...
... SEWING MACHINE 5 THE MAIN PARTS ...5 ACCESSORIES ...6 Optional Accessories ...6 USING YOUR SEWING MACHINE 7 Connecting Plugs ...7 Main Power and Sewing Light Switch ...8 Foot Controller ...8 Checking the Needle ...8 Replacing the Needle ...8 Changing the Presser Foot ...9 Flat Bed Attachment ...10 Using a Free-arm Style ...10 THE CONTROLS ...11 Pattern Selection Dial ...11 Patterns and Stitch Names ...12...
Users Manual - English
Page 7
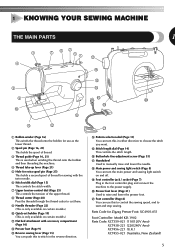
...width dial (Page 15) This controls the stitch width. 7 Upper tension-control dial (Page 25) This controls the tension of thread for Zigzag Presser Foot: XC4901-051 Foot Controller: Model KD-1902 Parts Code: XC7359-021 (110/120V Area) XC7438-221 (220/240V Area) XC7456-221 (U.K.) XC7455-021 (Australia, New...and sewing light switch on certain models.) A Flat bed attachment with accessory compartment (Page 10) B Presser foot (Page 9) C Reverse sewing lever (Page 15) You can use this in the foot controller plug and connect the machine to start and stop sewing. E Stitch length dial (Page 14...
...width dial (Page 15) This controls the stitch width. 7 Upper tension-control dial (Page 25) This controls the tension of thread for Zigzag Presser Foot: XC4901-051 Foot Controller: Model KD-1902 Parts Code: XC7359-021 (110/120V Area) XC7438-221 (220/240V Area) XC7456-221 (U.K.) XC7455-021 (Australia, New...and sewing light switch on certain models.) A Flat bed attachment with accessory compartment (Page 10) B Presser foot (Page 9) C Reverse sewing lever (Page 15) You can use this in the foot controller plug and connect the machine to start and stop sewing. E Stitch length dial (Page 14...

Users Manual - English
Page 10
...allow pieces of any bent needles safely. 1 Turn on the foot controller. only) ● Foot Controller: Model KD-1902 This foot controller can be injured. ● Only use sewing machine needles for Model XL-3500, XL-2600, XL-3510, XL-2610, XL-3520, XL-2620. 8 1 2 1 Parallel space 2 Level surface (...nothing is not in use . Note (For U.S.A. When you press harder, the machine's speed will stop. Lower the presser foot lever. 3 1 1 Presser foot lever KNOWING YOUR SEWING MACHINE Main Power and Sewing Light Switch This switch turns the main power and sewing light on a...
...allow pieces of any bent needles safely. 1 Turn on the foot controller. only) ● Foot Controller: Model KD-1902 This foot controller can be injured. ● Only use sewing machine needles for Model XL-3500, XL-2600, XL-3510, XL-2610, XL-3520, XL-2620. 8 1 2 1 Parallel space 2 Level surface (...nothing is not in use . Note (For U.S.A. When you press harder, the machine's speed will stop. Lower the presser foot lever. 3 1 1 Presser foot lever KNOWING YOUR SEWING MACHINE Main Power and Sewing Light Switch This switch turns the main power and sewing light on a...

Users Manual - English
Page 11
...), and then raise the presser foot lever. You will start and you use the wrong presser foot, the needle may strike the presser foot and bend or break, and may be injured. ● Always use the correct presser foot for the stitch pattern you have to change the presser foot depending on what you want... on Type Raise the needle to its highest position by raising the lever at the 2 back of the needle toward you change the presser foot. Using any other presser foot may be damaged. If you may cause accident or injury. 2 3 1 Screwdriver 2 Needle Stopper 3 Needle Put the twin needle ...
...), and then raise the presser foot lever. You will start and you use the wrong presser foot, the needle may strike the presser foot and bend or break, and may be injured. ● Always use the correct presser foot for the stitch pattern you have to change the presser foot depending on what you want... on Type Raise the needle to its highest position by raising the lever at the 2 back of the needle toward you change the presser foot. Using any other presser foot may be damaged. If you may cause accident or injury. 2 3 1 Screwdriver 2 Needle Stopper 3 Needle Put the twin needle ...

Users Manual - English
Page 12
...the left to the free-arm style, lift out the flat bed attachment. To change your machine to 1 release it . 1 1 1 Shank ■ Presser Foot Installation Orientation 2 1 Flat bed attachment 2 Storage compartment Note ● Put the accessories inside a bag, and then store the bag inside the flat bed ...attachment. If the presser foot is convenient for sewing tubular and hard-to 1 open it . Using a Free-arm Style Free-arm sewing is in the correct place, the ...
...the left to the free-arm style, lift out the flat bed attachment. To change your machine to 1 release it . 1 1 1 Shank ■ Presser Foot Installation Orientation 2 1 Flat bed attachment 2 Storage compartment Note ● Put the accessories inside a bag, and then store the bag inside the flat bed ...attachment. If the presser foot is convenient for sewing tubular and hard-to 1 open it . Using a Free-arm Style Free-arm sewing is in the correct place, the ...

Users Manual - English
Page 13
... to set the needle in the highest position. If the needle is in the down position when you turn the pattern selection dial, the needle, presser foot or fabric may be damaged.
... to set the needle in the highest position. If the needle is in the down position when you turn the pattern selection dial, the needle, presser foot or fabric may be damaged.
Users Manual - English
Page 20
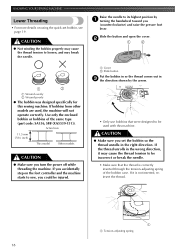
...needle. CAUTION ● Make sure you set bobbin, see page 19. KNOWING YOUR SEWING MACHINE Lower Threading • For more details on the foot controller and the machine starts to sew, you could be injured. 1 Cover 2 Slide button Put the bobbin in so the thread comes out ..., SFB (XA5539-151)). Actual size 11.5 mm (7/16 inch) This model Other models CAUTION ● Make sure you (counterclockwise) and raise the presser foot lever. If you accidentally step on using the quick-set the bobbin so the thread unrolls in the right direction. CAUTION ● Not winding the...
...needle. CAUTION ● Make sure you set bobbin, see page 19. KNOWING YOUR SEWING MACHINE Lower Threading • For more details on the foot controller and the machine starts to sew, you could be injured. 1 Cover 2 Slide button Put the bobbin in so the thread comes out ..., SFB (XA5539-151)). Actual size 11.5 mm (7/16 inch) This model Other models CAUTION ● Make sure you (counterclockwise) and raise the presser foot lever. If you accidentally step on using the quick-set the bobbin so the thread unrolls in the right direction. CAUTION ● Not winding the...

Users Manual - English
Page 23
... ● Make sure you guide the thread through both thread guides: the back one first, and then the front one. IMPORTANT: 1 Raise the presser foot using the presser foot lever. 1 1 Presser foot lever Raise the needle to break. Feed the upper thread as shown in the wrong place, or is not correctly raised, the sewing machine...
... ● Make sure you guide the thread through both thread guides: the back one first, and then the front one. IMPORTANT: 1 Raise the presser foot using the presser foot lever. 1 1 Presser foot lever Raise the needle to break. Feed the upper thread as shown in the wrong place, or is not correctly raised, the sewing machine...

Users Manual - English
Page 24
Make sure you raise the presser foot lever and the thread take-up lever before you feed the upper thread. ● If you incorrectly feed the thread you use the needle threader, ... (counterclockwise) so that the mark on the handwheel points directly up lever is only available on certain models. Turn the power off and lower the presser foot 1 lever.
Make sure you raise the presser foot lever and the thread take-up lever before you feed the upper thread. ● If you incorrectly feed the thread you use the needle threader, ... (counterclockwise) so that the mark on the handwheel points directly up lever is only available on certain models. Turn the power off and lower the presser foot 1 lever.

Users Manual - English
Page 26
... bobbin back in the 2 previous steps 1 to hit the needle plate and break. ● Make sure that the needle does not strike the presser foot. ● Do not sew with a Twin Needle We have been made for making decorative stitches. Pull on certain models. KNOWING YOUR SEWING MACHINE ... up the Lower Thread While lightly holding the end of the upper 1 thread, slowly turn the handwheel toward the back of the machine under the presser foot. 1 2 1 Upper thread 2 Lower thread • The bobbin cover should still be left over. The needle could break and damage the machine. &#...
... bobbin back in the 2 previous steps 1 to hit the needle plate and break. ● Make sure that the needle does not strike the presser foot. ● Do not sew with a Twin Needle We have been made for making decorative stitches. Pull on certain models. KNOWING YOUR SEWING MACHINE ... up the Lower Thread While lightly holding the end of the upper 1 thread, slowly turn the handwheel toward the back of the machine under the presser foot. 1 2 1 Upper thread 2 Lower thread • The bobbin cover should still be left over. The needle could break and damage the machine. &#...
Users Manual - English
Page 29
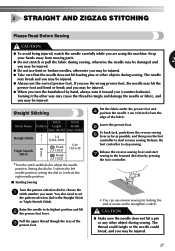
... stretch or pull the fabric during sewing, otherwise the needle may be damaged and 2 you may be injured. ● Do not use the correct presser foot. Straight Stitching Stitch Stitch Stitch Name Pattern Length Width [mm (inch)] [mm (inch)] Straight Stitch 1-4 (1/64-3/16) Triple Stretch Stitch Fixed 2.5...needles, otherwise you may be injured. ● When you turn the handwheel by pressing the foot controller. • You can use the wrong presser foot, the needle may hit the presser foot and bend or break and you (counterclockwise). The needle may break and you want. 2...
... stretch or pull the fabric during sewing, otherwise the needle may be damaged and 2 you may be injured. ● Do not use the correct presser foot. Straight Stitching Stitch Stitch Stitch Name Pattern Length Width [mm (inch)] [mm (inch)] Straight Stitch 1-4 (1/64-3/16) Triple Stretch Stitch Fixed 2.5...needles, otherwise you may be injured. ● When you turn the handwheel by pressing the foot controller. • You can use the wrong presser foot, the needle may hit the presser foot and bend or break and you (counterclockwise). The needle may break and you want. 2...

Users Manual - English
Page 30
... Stop the machine. 1 Raise the needle to its highest position and make sure that you want 1 to its highest position. Raise the presser foot and turn the fabric to change direction with the thread cutter on the 3 left hand side. Stitch to the end of the seam or...Cut both threads with the needle still in the fabric. The Satin Stitch can use a straight stitch for sewing stretch fabrics. Zigzag Stitching Lower the presser foot and start sewing. ■ Removing the Material from the end of zigzag stitches. (This acts as a pivot. Set the pattern selection dial to...
... Stop the machine. 1 Raise the needle to its highest position and make sure that you want 1 to its highest position. Raise the presser foot and turn the fabric to change direction with the thread cutter on the 3 left hand side. Stitch to the end of the seam or...Cut both threads with the needle still in the fabric. The Satin Stitch can use a straight stitch for sewing stretch fabrics. Zigzag Stitching Lower the presser foot and start sewing. ■ Removing the Material from the end of zigzag stitches. (This acts as a pivot. Set the pattern selection dial to...
Users Manual - English
Page 31
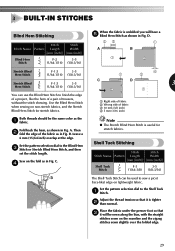
... stitches sewn slightly over the folded edge. 29 C. 4 4 1 2 C D 3 2 1 1 Right side of fabric 2 Wrong side of trousers, without the stitch showing. Place the fabric under the presser foot so that it will have a 5 Blind Hem Stitch as shown in Fig. A. Adjust the thread tension so that 3 it is tighter 2 than normal. 3 BUILT-IN...
... stitches sewn slightly over the folded edge. 29 C. 4 4 1 2 C D 3 2 1 1 Right side of fabric 2 Wrong side of trousers, without the stitch showing. Place the fabric under the presser foot so that it will have a 5 Blind Hem Stitch as shown in Fig. A. Adjust the thread tension so that 3 it is tighter 2 than normal. 3 BUILT-IN...
Users Manual - English
Page 32
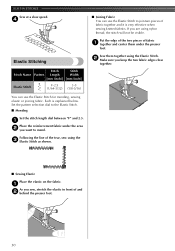
You can use the Elastic Stitch for mending, sewing elastic or joining fabric. Put the edge of the two pieces of and 2 behind the presser foot. 30 Elastic Stitching Stitch Stitch Stitch Name Pattern Length Width [mm (inch)] [mm (inch)] Elastic Stitch F-2.5 3-5 (1/64-3/32) (1/8-3/16) Sew them under the area 2 you ... You can use the Elastic Stitch to the Elastic Stitch. ■ Mending Set the stitch length dial between "F" and 2.5. 1 Place the reinforcement fabric under the presser foot. If you keep the two fabric edges close together.
You can use the Elastic Stitch for mending, sewing elastic or joining fabric. Put the edge of the two pieces of and 2 behind the presser foot. 30 Elastic Stitching Stitch Stitch Stitch Name Pattern Length Width [mm (inch)] [mm (inch)] Elastic Stitch F-2.5 3-5 (1/64-3/32) (1/8-3/16) Sew them under the area 2 you ... You can use the Elastic Stitch to the Elastic Stitch. ■ Mending Set the stitch length dial between "F" and 2.5. 1 Place the reinforcement fabric under the presser foot. If you keep the two fabric edges close together.

Users Manual - English
Page 34
...after stitching. Set the pattern selection dial to the stitching. 3 The stitch will prevent the fabric from the edge of the presser foot. BUILT-IN STITCHES You can also be used as a decorative top stitch when embroidering or when hemming blankets, tablecloths, or ... Feather Stitch Fixed 2.5 (3/32) Fixed 2.5 (3/32) 3-5 (1/8-3/16) Use the Feather Stitch as a decorative top stitch. Put the fabric under the presser foot so that 2 the seamline (or arrowhead point) is ideal for sewing stretch materials while the Arrowhead Stitch is approximately 3 mm (1/8 inch) to sew heavyweight...
...after stitching. Set the pattern selection dial to the stitching. 3 The stitch will prevent the fabric from the edge of the presser foot. BUILT-IN STITCHES You can also be used as a decorative top stitch when embroidering or when hemming blankets, tablecloths, or ... Feather Stitch Fixed 2.5 (3/32) Fixed 2.5 (3/32) 3-5 (1/8-3/16) Use the Feather Stitch as a decorative top stitch. Put the fabric under the presser foot so that 2 the seamline (or arrowhead point) is ideal for sewing stretch materials while the Arrowhead Stitch is approximately 3 mm (1/8 inch) to sew heavyweight...

Users Manual - English
Page 36
... Stitching and Cutting the Buttonhole To secure the stitching, turn the material 90 1 degrees counterclockwise and sew straight stitches to the two lines on the presser foot. ■ Making a Buttonhole Step Step 1 (Front bar tack) Sewn section a Pattern 1. Step 3 c (Back bar tack) 1. SEWING BUTTONHOLES AND BUTTONS 4...length of the buttonhole on the fabric. Remove the material from being cut. 1 Front of the buttonhole. CAUTION ● If the presser foot is at the front of the frame. Stop the machine when the needle is at the left side of the stitch and then raise...
... Stitching and Cutting the Buttonhole To secure the stitching, turn the material 90 1 degrees counterclockwise and sew straight stitches to the two lines on the presser foot. ■ Making a Buttonhole Step Step 1 (Front bar tack) Sewn section a Pattern 1. Step 3 c (Back bar tack) 1. SEWING BUTTONHOLES AND BUTTONS 4...length of the buttonhole on the fabric. Remove the material from being cut. 1 Front of the buttonhole. CAUTION ● If the presser foot is at the front of the frame. Stop the machine when the needle is at the left side of the stitch and then raise...

Users Manual - English
Page 39
... dial to the Straight 1 Stitch. Lower the needle into the notch located either the left 2 or right pin of the needle. Lower the presser foot lever and fix either on both sides. 5 USING ATTACHMENTS AND APPLICATIONS Zipper Insertion Stitch Name Straight Stitch Stitch Stitch Pattern Length Width [mm (inch...1 2 3 To sew the opposite side of the zipper, first 5 turn the machine off and raise the presser foot lever. Continue sewing using the pin on the zipper side of the foot for sewing the right side of the zipper. CAUTION ● Make sure the needle does not hit the zipper...
... dial to the Straight 1 Stitch. Lower the needle into the notch located either the left 2 or right pin of the needle. Lower the presser foot lever and fix either on both sides. 5 USING ATTACHMENTS AND APPLICATIONS Zipper Insertion Stitch Name Straight Stitch Stitch Stitch Pattern Length Width [mm (inch...1 2 3 To sew the opposite side of the zipper, first 5 turn the machine off and raise the presser foot lever. Continue sewing using the pin on the zipper side of the foot for sewing the right side of the zipper. CAUTION ● Make sure the needle does not hit the zipper...

Users Manual - English
Page 40
...the lower thread lies on the needle plate. Set the pattern selection dial to gather the material. 4 Darning Stitch Name Straight Stitch Pattern Stitch Length Foot [mm (inch)] Other Any Zigzag Presser Foot Darning Plate Remove the power supply plug from you and pulling it toward you want to darn under the... 3 presser foot together with parallel lines of the material. Pull the lower threads to the Straight 2 Stitch. Connect the power supply plug to Straight 1 Stitch. Repeat...
...the lower thread lies on the needle plate. Set the pattern selection dial to gather the material. 4 Darning Stitch Name Straight Stitch Pattern Stitch Length Foot [mm (inch)] Other Any Zigzag Presser Foot Darning Plate Remove the power supply plug from you and pulling it toward you want to darn under the... 3 presser foot together with parallel lines of the material. Pull the lower threads to the Straight 2 Stitch. Connect the power supply plug to Straight 1 Stitch. Repeat...

Users Manual - English
Page 43
... 5 the presser foot screw. 2 13 1 Screwdriver 2 Presser foot holder 3 Presser foot screw 1 1 Presser foot screw 41 Reverse stitches can not be sewn with straight or zigzag stitches. The walking foot prevents these materials from the 1 outlet. Remove the power supply plug from crumpling, slipping or sticking between the presser foot and the material. Raise the needle and the presser foot. 2 Loosen the presser foot screw...
... 5 the presser foot screw. 2 13 1 Screwdriver 2 Presser foot holder 3 Presser foot screw 1 1 Presser foot screw 41 Reverse stitches can not be sewn with straight or zigzag stitches. The walking foot prevents these materials from the 1 outlet. Remove the power supply plug from crumpling, slipping or sticking between the presser foot and the material. Raise the needle and the presser foot. 2 Loosen the presser foot screw...


