
Users Manual - English
Page 2
... needle area, such as a toy. IMPORTANT SAFETY INSTRUCTIONS When using this machine, basic safety precautions should always be taken, including the following: Read all moving parts. Keep ventilation openings of the machine and foot control free from the electrical outlet when removing covers, lubricating, or when making any air openings blocked...
... needle area, such as a toy. IMPORTANT SAFETY INSTRUCTIONS When using this machine, basic safety precautions should always be taken, including the following: Read all moving parts. Keep ventilation openings of the machine and foot control free from the electrical outlet when removing covers, lubricating, or when making any air openings blocked...
Users Manual - English
Page 5
... you are replacing or removing the needle or any other hot objects. 2. Do not touch the balance wheel, thread take-up lever, needle, or other part; • if there is still there, please consult your machine a longer life 1. Do not use the machine safely 1. If the problem is a power ... give your local authorized dealer. 4 Always check the operation manual before you replace or fit the presser feet, the needle, or any other moving parts. 2. To repair or adjust the machine If the machine breaks down, or you fit them correctly. Make sure you watch the needle carefully while you...
... you are replacing or removing the needle or any other hot objects. 2. Do not touch the balance wheel, thread take-up lever, needle, or other part; • if there is still there, please consult your machine a longer life 1. Do not use the machine safely 1. If the problem is a power ... give your local authorized dealer. 4 Always check the operation manual before you replace or fit the presser feet, the needle, or any other moving parts. 2. To repair or adjust the machine If the machine breaks down, or you fit them correctly. Make sure you watch the needle carefully while you...
Users Manual - English
Page 6
KNOWING YOUR SEWING MACHINE 7 THE MAIN PARTS ...8 ACCESSORIES ...9 Optional Accessories ...9 USING YOUR SEWING MACHINE 10 Connecting Plugs ...10 Main Power and Sewing Light Switch ...11 Foot Controller ...11 Checking the Needle ...11 ...
KNOWING YOUR SEWING MACHINE 7 THE MAIN PARTS ...8 ACCESSORIES ...9 Optional Accessories ...9 USING YOUR SEWING MACHINE 10 Connecting Plugs ...10 Main Power and Sewing Light Switch ...11 Foot Controller ...11 Checking the Needle ...11 ...
Users Manual - English
Page 9
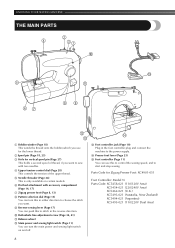
... 13) 8 Pattern selection dial (Page 15) You can turn the main power and sewing light switch on and off. KNOWING YOUR SEWING MACHINE THE MAIN PARTS 2 4 31 0 E 5 A 67 89 B D C 1 Bobbin winder (Page 18) This winds the thread onto the bobbin,which you use this to the power ... (Page 11) You can use for the lower thread. 2 Spool pin (Page 18, 23) 3 Hole for Zigzag Presser Foot: XC4901-051 Foot Controller: Model N Parts Code: XC5458-021 (110/120V Area) XC5454-021 (220/240V Area) XC5462-021 (U.K.) XC5493-021 (Australia, New Zealand) XC5494-021 (Argentina) XC5495-021 (110/220V...
... 13) 8 Pattern selection dial (Page 15) You can turn the main power and sewing light switch on and off. KNOWING YOUR SEWING MACHINE THE MAIN PARTS 2 4 31 0 E 5 A 67 89 B D C 1 Bobbin winder (Page 18) This winds the thread onto the bobbin,which you use this to the power ... (Page 11) You can use for the lower thread. 2 Spool pin (Page 18, 23) 3 Hole for Zigzag Presser Foot: XC4901-051 Foot Controller: Model N Parts Code: XC5458-021 (110/120V Area) XC5454-021 (220/240V Area) XC5462-021 (U.K.) XC5493-021 (Australia, New Zealand) XC5494-021 (Argentina) XC5495-021 (110/220V...
Users Manual - English
Page 10
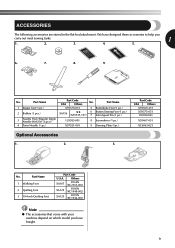
...-001 8 Screwdriver (1 pc.) X57521-001 9 Darning Plate (1pc.) Part Code USA Others X59369-251 X59375-051 130920-021 X55467-051 XC6063-021 Optional Accessories 1. 2. 3. Part Name 1 Walking Foot 2 Quilting Foot 3 1/4-Inch Quilting Foot Part Code U.S.A. Others SA107 F034N (XC2165-002) SA129 F005N (XC1948-002...sewing tasks. 1 1. 2. 3. 4. 5. 6. 7. 8. 9. ACCESSORIES The following accessories are stored in the flat-bed attachment. Part Name 1 Zipper foot (1 pc.) 2 Bobbin (3 pcs.) 3 Needle Pack (Regular Single Needle HAX130 (3 pcs.)) 4 Twin Needle (1 pc...
...-001 8 Screwdriver (1 pc.) X57521-001 9 Darning Plate (1pc.) Part Code USA Others X59369-251 X59375-051 130920-021 X55467-051 XC6063-021 Optional Accessories 1. 2. 3. Part Name 1 Walking Foot 2 Quilting Foot 3 1/4-Inch Quilting Foot Part Code U.S.A. Others SA107 F034N (XC2165-002) SA129 F005N (XC1948-002...sewing tasks. 1 1. 2. 3. 4. 5. 6. 7. 8. 9. ACCESSORIES The following accessories are stored in the flat-bed attachment. Part Name 1 Zipper foot (1 pc.) 2 Bobbin (3 pcs.) 3 Needle Pack (Regular Single Needle HAX130 (3 pcs.)) 4 Twin Needle (1 pc...
Users Manual - English
Page 13
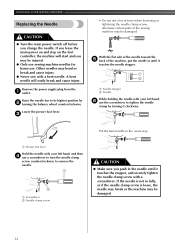
.... 3 1 Needle stopper 2 Needle While holding the needle with your left hand, 6 use a lot of force when loosening or tightening the needle clamp screw, otherwise certain parts of the machine, put the needle in until it touches the needle stopper. 1 2 Remove the power supply plug from the 1 outlet. KNOWING YOUR SEWING MACHINE...
.... 3 1 Needle stopper 2 Needle While holding the needle with your left hand, 6 use a lot of force when loosening or tightening the needle clamp screw, otherwise certain parts of the machine, put the needle in until it touches the needle stopper. 1 2 Remove the power supply plug from the 1 outlet. KNOWING YOUR SEWING MACHINE...
Users Manual - English
Page 19
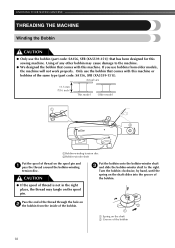
... 3 and slide the bobbin-winder shaft to the machine. ● We designed the bobbin that comes with this machine or bobbins of the same type (part code: SA156, SFB (XA5539-151)). Pass the end of the thread through the hole on 2 the bobbin from older models, the machine will not work....5 mm (7/16 inch) This model Older model 1 2 1Bobbin-winding tension disc 2Bobbin-winder shaft Put the spool of the bobbin 18 Only use the bobbin (part code: SA156, SFB (XA5539-151)) that has been designed for this sewing machine. Using of thread is not in the right place, the thread may...
... 3 and slide the bobbin-winder shaft to the machine. ● We designed the bobbin that comes with this machine or bobbins of the same type (part code: SA156, SFB (XA5539-151)). Pass the end of the thread through the hole on 2 the bobbin from older models, the machine will not work....5 mm (7/16 inch) This model Older model 1 2 1Bobbin-winding tension disc 2Bobbin-winder shaft Put the spool of the bobbin 18 Only use the bobbin (part code: SA156, SFB (XA5539-151)) that has been designed for this sewing machine. Using of thread is not in the right place, the thread may...
Users Manual - English
Page 21
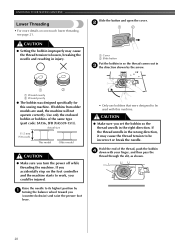
... in 3 the direction shown by 1 turning the balance wheel toward you could be incorrect or break the needle. Hold the end of the same type (part code: SA156, SFB (XA5539-151)). Raise the needle to be used , the machine will not operate correctly.
... in 3 the direction shown by 1 turning the balance wheel toward you could be incorrect or break the needle. Hold the end of the same type (part code: SA156, SFB (XA5539-151)). Raise the needle to be used , the machine will not operate correctly.
Users Manual - English
Page 22
Put the left side of the same type (part code: SA156, SFB (XA5539-151)). If bobbins from the left tab in 5 place (see arrow 1), and then press lightly on certain models. 1 2 CAUTION ● Setting ...
Put the left side of the same type (part code: SA156, SFB (XA5539-151)). If bobbins from the left tab in 5 place (see arrow 1), and then press lightly on certain models. 1 2 CAUTION ● Setting ...
Users Manual - English
Page 28
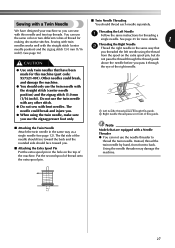
... the right needle. ● Use only twin needles that are equipped with a Needle Threader ● You can sew Threading the Left Needle with this machine (part code: X57521-001). The flat side of the needle should face toward the back and the rounded side should face toward you . ● When using...
... the right needle. ● Use only twin needles that are equipped with a Needle Threader ● You can sew Threading the Left Needle with this machine (part code: X57521-001). The flat side of the needle should face toward the back and the rounded side should face toward you . ● When using...
Users Manual - English
Page 33
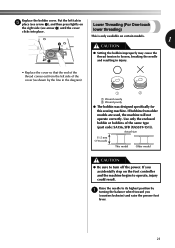
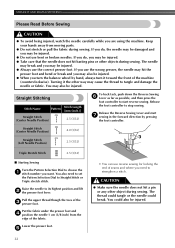
... bent or broken needles. Raise the needle to strengthen a stitch. Put the fabric under the presser foot and 4 position the needle 1 cm (3/8 inch) from moving parts. ● Do not stretch or pull the fabric during sewing. You could break. STRAIGHT AND ZIGZAG STITCHING Please Read Before Sewing CAUTION ● To avoid...
... bent or broken needles. Raise the needle to strengthen a stitch. Put the fabric under the presser foot and 4 position the needle 1 cm (3/8 inch) from moving parts. ● Do not stretch or pull the fabric during sewing. You could break. STRAIGHT AND ZIGZAG STITCHING Please Read Before Sewing CAUTION ● To avoid...
Users Manual - English
Page 50
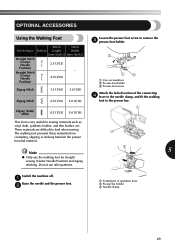
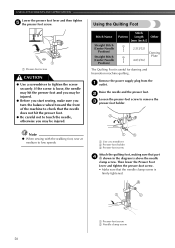
... sticking between the presser foot and material. 3 Note 5 ● Only use other patterns. Switch the machine off. 1 Raise the needle and the presser foot. 2 1 Forked part of the connecting 4 lever to the needle clamp, and fit the walking foot to the presser bar. 1 This foot is very useful for straight sewing...
... sticking between the presser foot and material. 3 Note 5 ● Only use other patterns. Switch the machine off. 1 Raise the needle and the presser foot. 2 1 Forked part of the connecting 4 lever to the needle clamp, and fit the walking foot to the presser bar. 1 This foot is very useful for straight sewing...
Users Manual - English
Page 51
.... If the screw is above the needle clamp screw. Then lower the Presser Foot Lever and tighten the presser-foot screw. • Make sure that part 4 A shown in the diagram is loose, the needle may hit the presser foot and you may be injured. ● Before you start sewing, make sure...
.... If the screw is above the needle clamp screw. Then lower the Presser Foot Lever and tighten the presser-foot screw. • Make sure that part 4 A shown in the diagram is loose, the needle may hit the presser foot and you may be injured. ● Before you start sewing, make sure...
Users Manual - English
Page 57
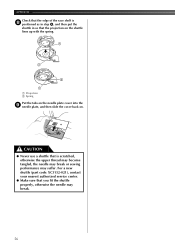
... spring. 1 2 2 1 1 Projection 2 Spring Put the tabs on the needle plate cover into the 9 needle plate, and then slide the cover back on. For a new shuttle (part code: XC3152-021), contact your nearest authorized service center. ● Make sure that you fit the shuttle properly, otherwise the needle may suffer. APPENDIX Check...
... spring. 1 2 2 1 1 Projection 2 Spring Put the tabs on the needle plate cover into the 9 needle plate, and then slide the cover back on. For a new shuttle (part code: XC3152-021), contact your nearest authorized service center. ● Make sure that you fit the shuttle properly, otherwise the needle may suffer. APPENDIX Check...
Users Manual - English
Page 62
... 27 Free-arm Style 17 U 6 G Upper Tension Control Dial 28 Gathering 45 Upper Threading 23 H Hole for Extra Spool Pin 27 L Lower Threading 20 M Main Parts 8 Main Power and Sewing Light Switch 11 Monogramming 47 W Walking Foot 9, 49 Winding the Bobbin 18 Z Zigzag Presser Foot 8, 13 Zigzag Stitch 34, 42, 46...
... 27 Free-arm Style 17 U 6 G Upper Tension Control Dial 28 Gathering 45 Upper Threading 23 H Hole for Extra Spool Pin 27 L Lower Threading 20 M Main Parts 8 Main Power and Sewing Light Switch 11 Monogramming 47 W Walking Foot 9, 49 Winding the Bobbin 18 Z Zigzag Presser Foot 8, 13 Zigzag Stitch 34, 42, 46...

