
Users Manual - English
Page 2
... the cord. 10. Do not use as threading needle, changing needle, threading bobbin, or changing presser foot, and the like. 15. It may deflect the needle causing it off , then remove plug from outlet. 9. Always unplug the machine from the electrical outlet when removing covers, lubricating, or when making any other user servicing adjustments mentioned in the instruction manual. 16. To reduce the risk of electric shock: 1. Never drop or insert any air openings blocked...
... the cord. 10. Do not use as threading needle, changing needle, threading bobbin, or changing presser foot, and the like. 15. It may deflect the needle causing it off , then remove plug from outlet. 9. Always unplug the machine from the electrical outlet when removing covers, lubricating, or when making any other user servicing adjustments mentioned in the instruction manual. 16. To reduce the risk of electric shock: 1. Never drop or insert any air openings blocked...
Users Manual - English
Page 5
... on the foot controller. Always check the operation manual before you replace or fit the presser feet, the needle, or any other parts to make sure you need to adjust it, first follow the troubleshooting table in the Appendix of this machine in direct sunlight or in high humidity conditions. PLEASE READ THESE INSTRUCTIONS BEFORE YOU USE THE MACHINE. Do not touch the balance wheel, thread take-up lever, needle, or other...
... on the foot controller. Always check the operation manual before you replace or fit the presser feet, the needle, or any other parts to make sure you need to adjust it, first follow the troubleshooting table in the Appendix of this machine in direct sunlight or in high humidity conditions. PLEASE READ THESE INSTRUCTIONS BEFORE YOU USE THE MACHINE. Do not touch the balance wheel, thread take-up lever, needle, or other...
Users Manual - English
Page 6
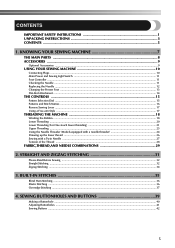
......12 Changing the Presser Foot ...13 Flat-Bed Attachment ...14 THE CONTROLS ...15 Pattern Selection Dial ...15 Patterns and Stitch Names ...16 Reverse Sewing Lever ...17 Using a Free-arm Style ...17 THREADING THE MACHINE 18 Winding the Bobbin ...18 Lower Threading ...20 Lower Threading (For One-touch lower threading 21 Upper Threading ...23 Using the Needle Threader (Models equipped with a needle threader 24 Drawing up the lower thread ...26 Sewing with a Twin Needle ...27 Tension of the Thread ...28 FABRIC,THREAD,AND NEEDLE COMBINATIONS 29 2. SEWING BUTTONHOLES AND BUTTONS 39 Making...
......12 Changing the Presser Foot ...13 Flat-Bed Attachment ...14 THE CONTROLS ...15 Pattern Selection Dial ...15 Patterns and Stitch Names ...16 Reverse Sewing Lever ...17 Using a Free-arm Style ...17 THREADING THE MACHINE 18 Winding the Bobbin ...18 Lower Threading ...20 Lower Threading (For One-touch lower threading 21 Upper Threading ...23 Using the Needle Threader (Models equipped with a needle threader 24 Drawing up the lower thread ...26 Sewing with a Twin Needle ...27 Tension of the Thread ...28 FABRIC,THREAD,AND NEEDLE COMBINATIONS 29 2. SEWING BUTTONHOLES AND BUTTONS 39 Making...
Users Manual - English
Page 9
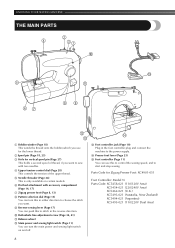
... MAIN PARTS 2 4 31 0 E 5 A 67 89 B D C 1 Bobbin winder (Page 18) This winds the thread onto the bobbin,which you use this to stitch in the foot controller plug and connect the machine to the power supply. C Foot controller jack (Page 10) Plug in the reverse direction. 0 Buttonhole fine-adjustment screw (Page 34, 41) A Balance wheel B Main power and sewing light switch (Page 11) You can use for the lower thread. 2 Spool pin (Page 18, 23) 3 Hole for Zigzag Presser Foot: XC4901-051 Foot Controller: Model N Parts Code...
... MAIN PARTS 2 4 31 0 E 5 A 67 89 B D C 1 Bobbin winder (Page 18) This winds the thread onto the bobbin,which you use this to stitch in the foot controller plug and connect the machine to the power supply. C Foot controller jack (Page 10) Plug in the reverse direction. 0 Buttonhole fine-adjustment screw (Page 34, 41) A Balance wheel B Main power and sewing light switch (Page 11) You can use for the lower thread. 2 Spool pin (Page 18, 23) 3 Hole for Zigzag Presser Foot: XC4901-051 Foot Controller: Model N Parts Code...
Users Manual - English
Page 10
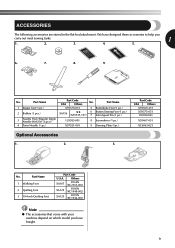
...-002) SA125 F001N (XC1944-002) Note ● The accessories that come with your machine depend on which model you carry out most sewing tasks. 1 1. 2. 3. 4. 5. 6. 7. 8. 9. We have designed these accessories to help you have bought. 9 No. Part Name 1 Walking Foot 2 Quilting Foot 3 1/4-Inch Quilting Foot Part Code U.S.A. ACCESSORIES The following accessories are stored in the flat-bed attachment. Part Name 1 Zipper foot (1 pc.) 2 Bobbin (3 pcs.) 3 Needle Pack (Regular Single Needle HAX130 (3 pcs.)) 4 Twin Needle (1 pc.) Part Code USA Others No. No.
...-002) SA125 F001N (XC1944-002) Note ● The accessories that come with your machine depend on which model you carry out most sewing tasks. 1 1. 2. 3. 4. 5. 6. 7. 8. 9. We have designed these accessories to help you have bought. 9 No. Part Name 1 Walking Foot 2 Quilting Foot 3 1/4-Inch Quilting Foot Part Code U.S.A. ACCESSORIES The following accessories are stored in the flat-bed attachment. Part Name 1 Zipper foot (1 pc.) 2 Bobbin (3 pcs.) 3 Needle Pack (Regular Single Needle HAX130 (3 pcs.)) 4 Twin Needle (1 pc.) Part Code USA Others No. No.

Users Manual - English
Page 12
only) ● Foot Controller: Model N This foot controller can be straight and sharp for Model XL-2121, XL-2125, XL-2230. . 11 Dispose of cloth and dust to build up on a flat surface. 2 Check the needle from the top and the sides. You should make sure that nothing is placed on the foot controller when the machine is not in use. 1 2 1 Parallel space 2 Level surface (bobbin cover, glass, etc.) 1 1 Foot controller CAUTION...
only) ● Foot Controller: Model N This foot controller can be straight and sharp for Model XL-2121, XL-2125, XL-2230. . 11 Dispose of cloth and dust to build up on a flat surface. 2 Check the needle from the top and the sides. You should make sure that nothing is placed on the foot controller when the machine is not in use. 1 2 1 Parallel space 2 Level surface (bobbin cover, glass, etc.) 1 1 Foot controller CAUTION...
Users Manual - English
Page 13
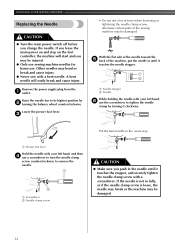
Lower the presser foot lever. 3 1 Needle stopper 2 Needle While holding the needle with your left hand, 6 use the screwdriver to remove the needle. 1 2 1 Screwdriver 2 Needle clamp screw CAUTION ● Make sure you push in the same way. 1 Presser foot lever Hold the needle with a bent needle. If you leave the main power on and step on the foot controller, the machine will easily break and cause injury. • Do not use a lot of force when loosening...
Lower the presser foot lever. 3 1 Needle stopper 2 Needle While holding the needle with your left hand, 6 use the screwdriver to remove the needle. 1 2 1 Screwdriver 2 Needle clamp screw CAUTION ● Make sure you push in the same way. 1 Presser foot lever Hold the needle with a bent needle. If you leave the main power on and step on the foot controller, the machine will easily break and cause injury. • Do not use a lot of force when loosening...
Users Manual - English
Page 19
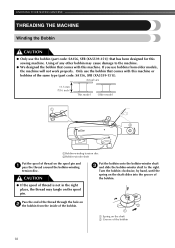
...; If the spool of thread on the spool pin and 1 pass the thread around the bobbin-winding tension disc. KNOWING YOUR SEWING MACHINE THREADING THE MACHINE Winding the Bobbin CAUTION ● Only use the bobbin (part code: SA156, SFB (XA5539-151)) that comes with this machine. CAUTION Put the bobbin onto the bobbin-winder shaft 3 and slide the bobbin-winder shaft to the machine. ● We designed the bobbin that comes with this machine or bobbins of the same type (part code: SA156, SFB...
...; If the spool of thread on the spool pin and 1 pass the thread around the bobbin-winding tension disc. KNOWING YOUR SEWING MACHINE THREADING THE MACHINE Winding the Bobbin CAUTION ● Only use the bobbin (part code: SA156, SFB (XA5539-151)) that comes with this machine. CAUTION Put the bobbin onto the bobbin-winder shaft 3 and slide the bobbin-winder shaft to the machine. ● We designed the bobbin that comes with this machine or bobbins of the same type (part code: SA156, SFB...

Users Manual - English
Page 20
... the instructions carefully. While holding the end of the clutch engaging when beginning to wind the thread CAUTION around the bobbin and cause the needle to loosen, and may cause the thread tension to break. Press the foot controller to the left and remove the bobbin. Cut the thread, slide the bobbin-winder shaft 8 to start. 6 1 2 1 Wound evenly 2 Wound poorly After the machine stops automatically when 7 the bobbin is...
... the instructions carefully. While holding the end of the clutch engaging when beginning to wind the thread CAUTION around the bobbin and cause the needle to loosen, and may cause the thread tension to break. Press the foot controller to the left and remove the bobbin. Cut the thread, slide the bobbin-winder shaft 8 to start. 6 1 2 1 Wound evenly 2 Wound poorly After the machine stops automatically when 7 the bobbin is...
Users Manual - English
Page 21
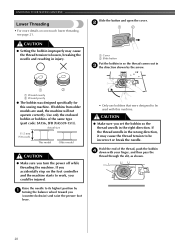
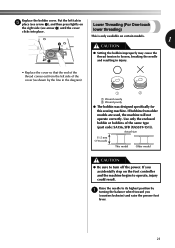
... may cause the thread tension to loosen, breaking the needle and resulting in injury. 1 Cover 2 Slide button Put the bobbin in so the thread comes out in the right direction. Actual size 11.5 mm (7/16 inch) This model Older model CAUTION ● Make sure you turn the power off while threading the machine. KNOWING YOUR SEWING MACHINE Lower Threading • For more details on the foot controller and the machine starts to work, you could be...
... may cause the thread tension to loosen, breaking the needle and resulting in injury. 1 Cover 2 Slide button Put the bobbin in so the thread comes out in the right direction. Actual size 11.5 mm (7/16 inch) This model Older model CAUTION ● Make sure you turn the power off while threading the machine. KNOWING YOUR SEWING MACHINE Lower Threading • For more details on the foot controller and the machine starts to work, you could be...
Users Manual - English
Page 22
... older models are used, the machine will not operate correctly. Raise the needle to loosen, breaking the needle 1 and resulting in the diagram). 1 2 1 Wound evenly 2 Wound poorly ● The bobbin was designed specifically for this sewing machine. Use only the enclosed bobbin or bobbins of the cover (as shown by 1 turning the balance wheel toward you accidentally step on the foot controller and the machine begins to turn off the power. Lower Threading...
... older models are used, the machine will not operate correctly. Raise the needle to loosen, breaking the needle 1 and resulting in the diagram). 1 2 1 Wound evenly 2 Wound poorly ● The bobbin was designed specifically for this sewing machine. Use only the enclosed bobbin or bobbins of the cover (as shown by 1 turning the balance wheel toward you accidentally step on the foot controller and the machine begins to turn off the power. Lower Threading...
Users Manual - English
Page 28
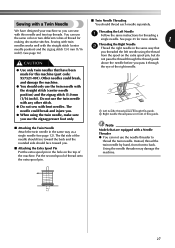
... threads. Do not use the twin needle with the straight stitch (center needle 2 1 position) and the zigzag stitch (3.0 mm (1/16 inch)). You can not use the zigzag presser foot only. ■ Attaching the Twin Needle Attach the twin needle in the hole on the extra spool pin, but do not pass the thread through the thread guide CAUTION above the needle before you pass it through this machine (part code: X57521-001). you can sew Threading the Left Needle with this guide. The needle could break...
... threads. Do not use the twin needle with the straight stitch (center needle 2 1 position) and the zigzag stitch (3.0 mm (1/16 inch)). You can not use the zigzag presser foot only. ■ Attaching the Twin Needle Attach the twin needle in the hole on the extra spool pin, but do not pass the thread through the thread guide CAUTION above the needle before you pass it through this machine (part code: X57521-001). you can sew Threading the Left Needle with this guide. The needle could break...
Users Manual - English
Page 29
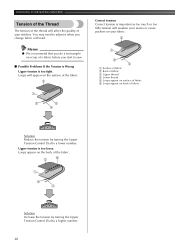
... you do a test sample on scrap of a fabric before you change fabric or thread. KNOWING YOUR SEWING MACHINE Tension of the Thread The tension of the thread will appear on the surface of the fabric. 2 1 3 5 4 1 3 4 1 Surface of fabric 2 Back of fabric 3 Upper thread 4 Lower thread 5 Loops appear on surface of fabric 6 Loops appear on back of fabric. 54 3 Solution Reduce the tension by turning the Upper Tension Control Dial to a lower number. Correct tension Correct tension is too loose.
... you do a test sample on scrap of a fabric before you change fabric or thread. KNOWING YOUR SEWING MACHINE Tension of the Thread The tension of the thread will appear on the surface of the fabric. 2 1 3 5 4 1 3 4 1 Surface of fabric 2 Back of fabric 3 Upper thread 4 Lower thread 5 Loops appear on surface of fabric 6 Loops appear on back of fabric. 54 3 Solution Reduce the tension by turning the Upper Tension Control Dial to a lower number. Correct tension Correct tension is too loose.
Users Manual - English
Page 30
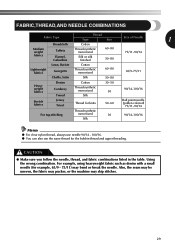
... can also use the same thread for example, 65/9 - 75/11) may skip stitches. 29 For example, using heavyweight fabric such as denim with a small needle (for the bobbin thread and upper threading. Using the wrong combination. CAUTION ● Make sure you follow the needle, thread, and fabric combinations listed in the table. Also, the seam may be uneven, the fabric may pucker, or the machine may bend or break the needle.
... can also use the same thread for example, 65/9 - 75/11) may skip stitches. 29 For example, using heavyweight fabric such as denim with a small needle (for the bobbin thread and upper threading. Using the wrong combination. CAUTION ● Make sure you follow the needle, thread, and fabric combinations listed in the table. Also, the seam may be uneven, the fabric may pucker, or the machine may bend or break the needle.
Users Manual - English
Page 33
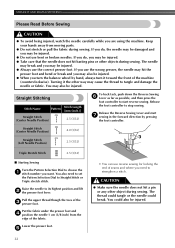
Straight Stitching Stitch Name Pattern Stitch Length [mm (inch.)] Straight Stitch (Center Needle Position) 2.5 (3/32) To back tack, push down the Reverse Sewing 6 Lever as far as possible, and then press the foot controller to Straight Stitch or Triple stretch stitch. You also need to strengthen a stitch. Lower the presser foot. 5 • You can use reverse sewing for locking the end of the fabric. If you use the wrong presser, the needle may hit the presser foot and bend or break and you may also be...
Straight Stitching Stitch Name Pattern Stitch Length [mm (inch.)] Straight Stitch (Center Needle Position) 2.5 (3/32) To back tack, push down the Reverse Sewing 6 Lever as far as possible, and then press the foot controller to Straight Stitch or Triple stretch stitch. You also need to strengthen a stitch. Lower the presser foot. 5 • You can use reverse sewing for locking the end of the fabric. If you use the wrong presser, the needle may hit the presser foot and bend or break and you may also be...
Users Manual - English
Page 43
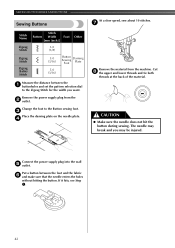
....)] Other Zigzag 3.0 Stitch (1/8) Zigzag Stitch Zigzag (Satin) Stitch 5.0 (3/16) 5.0 (3/16) Button Sewing Foot Darning Plate Measure the distance between the foot and the fabric 6 and make sure that the needle enters the holes without hitting the button. Change the foot to the Zigzag Stitch for the width you may be injured. Put a button between the 1 buttonholes and set the pattern selection dial to the Button sewing foot. 3 Place the darning plate on the needle plate. 4 Remove the material from the 2 outlet. Cut 8 the upper and lower threads and...
....)] Other Zigzag 3.0 Stitch (1/8) Zigzag Stitch Zigzag (Satin) Stitch 5.0 (3/16) 5.0 (3/16) Button Sewing Foot Darning Plate Measure the distance between the foot and the fabric 6 and make sure that the needle enters the holes without hitting the button. Change the foot to the Zigzag Stitch for the width you may be injured. Put a button between the 1 buttonholes and set the pattern selection dial to the Button sewing foot. 3 Place the darning plate on the needle plate. 4 Remove the material from the 2 outlet. Cut 8 the upper and lower threads and...
Users Manual - English
Page 46
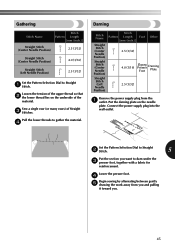
...or many rows) of the material. Connect the power supply plug into the wall outlet. Pull the lower threads to gather the material. 4 Darning Stitch Name Straight Stitch (Center Needle Position) Straight Stitch (Center Needle Position) Straight Stitch (Left Needle Position) Stitch Pattern Length Foot [mm (inch.)] Other 2.5 (3/32) 4.0 (3/16) Zigzag Presser Foot Darning Plate 2.5 (3/32) Remove the power supply plug from you and pulling it toward you want to darn under the 3 presser foot, together with a fabric for reinforcement. Set the Pattern Selection Dial to Straight 1 Stitch.
...or many rows) of the material. Connect the power supply plug into the wall outlet. Pull the lower threads to gather the material. 4 Darning Stitch Name Straight Stitch (Center Needle Position) Straight Stitch (Center Needle Position) Straight Stitch (Left Needle Position) Stitch Pattern Length Foot [mm (inch.)] Other 2.5 (3/32) 4.0 (3/16) Zigzag Presser Foot Darning Plate 2.5 (3/32) Remove the power supply plug from you and pulling it toward you want to darn under the 3 presser foot, together with a fabric for reinforcement. Set the Pattern Selection Dial to Straight 1 Stitch.
Users Manual - English
Page 48
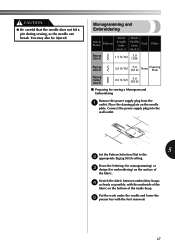
... design (for sewing a Monogram and Embroidering Remove the power supply plug from the 1 outlet. Stretch the fabric between embroidery hoops 4 as firmly as the needle can break. Monogramming and Embroidering Stitch Name Pattern Stitch Length [mm (inch.)] Stitch Width [mm Foot (inch.)] Other Zigzag Stitch 1.5 (1/16) 3.0 (1/8) Zigzag Stitch 2.0 (1/16) 5.0 (3/16) None Darning Plate Zigzag (Satin) Stitch 0.5 (1/32) 5.0 (3/16) ■ Preparing for embroidering) on the surface of the inside hoop. Place the darning plate on the needle plate. Connect the power supply...
... design (for sewing a Monogram and Embroidering Remove the power supply plug from the 1 outlet. Stretch the fabric between embroidery hoops 4 as firmly as the needle can break. Monogramming and Embroidering Stitch Name Pattern Stitch Length [mm (inch.)] Stitch Width [mm Foot (inch.)] Other Zigzag Stitch 1.5 (1/16) 3.0 (1/8) Zigzag Stitch 2.0 (1/16) 5.0 (3/16) None Darning Plate Zigzag (Satin) Stitch 0.5 (1/32) 5.0 (3/16) ■ Preparing for embroidering) on the surface of the inside hoop. Place the darning plate on the needle plate. Connect the power supply...
Users Manual - English
Page 60
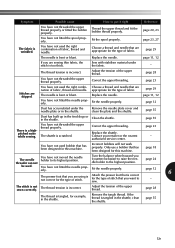
... be used bobbin that you (counterclockwise) to raise the needle holder to its highest position. Fit the needle properly. Clean the shuttle. Incorrect bobbins will not work properly. Symptom Possible cause How to sew. - Adjust the tension of the upper thread. The needle is scratched. Fit the needle properly. page 11, 12 If you are appropriate for this machine. Replace the needle. Attach the presser foot that is tangled, for the type of fabric, thread and needle...
... be used bobbin that you (counterclockwise) to raise the needle holder to its highest position. Fit the needle properly. Clean the shuttle. Incorrect bobbins will not work properly. Symptom Possible cause How to sew. - Adjust the tension of the upper thread. The needle is scratched. Fit the needle properly. page 11, 12 If you are appropriate for this machine. Replace the needle. Attach the presser foot that is tangled, for the type of fabric, thread and needle...
Users Manual - English
Page 62
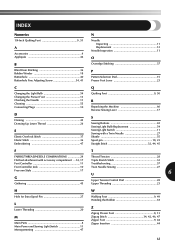
... Twin Needle 27 Shuttle 55 Spool pin 18, 23 Straight Stitch 32, 44, 45 F T FABRIC/THREAD/NEEDLE COMBINATIONS 29 Thread Tension 28 Flat bed attachment with accessory compartment ...14, 17 Triple Stretch Stitch 32 Foot Controller 11 Troubleshooting 57 Foot Controller Jack 10 Twin Needle Sewing 27 Free-arm Style 17 U 6 G Upper Tension Control Dial 28 Gathering 45 Upper Threading 23 H Hole for Extra Spool Pin 27 L Lower Threading 20 M Main Parts 8 Main Power and Sewing Light Switch 11 Monogramming 47 W Walking Foot 9, 49 Winding the Bobbin 18 Z Zigzag Presser...
... Twin Needle 27 Shuttle 55 Spool pin 18, 23 Straight Stitch 32, 44, 45 F T FABRIC/THREAD/NEEDLE COMBINATIONS 29 Thread Tension 28 Flat bed attachment with accessory compartment ...14, 17 Triple Stretch Stitch 32 Foot Controller 11 Troubleshooting 57 Foot Controller Jack 10 Twin Needle Sewing 27 Free-arm Style 17 U 6 G Upper Tension Control Dial 28 Gathering 45 Upper Threading 23 H Hole for Extra Spool Pin 27 L Lower Threading 20 M Main Parts 8 Main Power and Sewing Light Switch 11 Monogramming 47 W Walking Foot 9, 49 Winding the Bobbin 18 Z Zigzag Presser...


