
Users Manual - English
Page 1
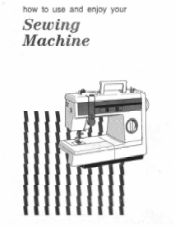
how to use and enjoy your Sewing Machine 41
how to use and enjoy your Sewing Machine 41
Users Manual - English
Page 2
CAUTION When leaving the sewing machine unatended, the plug must be removed from the socket-outlet. When servicing the sewing machine, or when removing covers or changing lamps, the machine must be disconnected from the supply by removing the plug from the socket-outlet.
CAUTION When leaving the sewing machine unatended, the plug must be removed from the socket-outlet. When servicing the sewing machine, or when removing covers or changing lamps, the machine must be disconnected from the supply by removing the plug from the socket-outlet.
Users Manual - English
Page 3
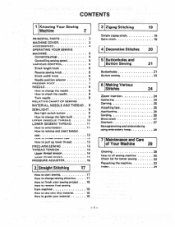
CONTENTS 1 Knowing Your Sewing Machine 2 PRINCIPAL PARTS 2 MACHINE COVER 3 ACCESSORIES 4 OPERATING YOUR SEWING MACHINE 5 Connecting plugs 5 Controlling sewing speed 5 VARIOUS CONTROL 6 Stitch length knob 6 Reverse sewing knob 6 Stitch width knob 6 Needle position selector 7 PRESSER FOOT 7 NEEDLE 8 How to change the needle 8 How to check the needle 8 Twin needle 8 RELATIVE CHART OF SEWING MATERIAL, NEEDLE AND THREAD . 9 SEW-LIGHT 9 Sew light switch...
CONTENTS 1 Knowing Your Sewing Machine 2 PRINCIPAL PARTS 2 MACHINE COVER 3 ACCESSORIES 4 OPERATING YOUR SEWING MACHINE 5 Connecting plugs 5 Controlling sewing speed 5 VARIOUS CONTROL 6 Stitch length knob 6 Reverse sewing knob 6 Stitch width knob 6 Needle position selector 7 PRESSER FOOT 7 NEEDLE 8 How to change the needle 8 How to check the needle 8 Twin needle 8 RELATIVE CHART OF SEWING MATERIAL, NEEDLE AND THREAD . 9 SEW-LIGHT 9 Sew light switch...
Users Manual - English
Page 4
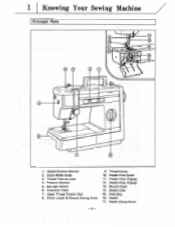
Presser Foot Screw 11. Presser Foot (Zigzag) 12. Bobbin Case 15. Shuttle Hook 14. Sew-light Switch 6. Thread Cutter 10. Needle Plate (Zigzag) 13. Extension Table 7. Stitch Length & Reverse Sewing Knob 9. Needle Clamp Screw -2- Needle 17. Thread Take-up Lever 4. Needle Position Selector 2. Pressure Adjuster 5. Stitch Width Knob 3. Feed Dog 16. Upper Thread Tension Dial 8. 1 Knowing Your Sewing Machine Principal Parts 10 11 15 12 0 0 0 2 5 IF I 1.
Presser Foot Screw 11. Presser Foot (Zigzag) 12. Bobbin Case 15. Shuttle Hook 14. Sew-light Switch 6. Thread Cutter 10. Needle Plate (Zigzag) 13. Extension Table 7. Stitch Length & Reverse Sewing Knob 9. Needle Clamp Screw -2- Needle 17. Thread Take-up Lever 4. Needle Position Selector 2. Pressure Adjuster 5. Stitch Width Knob 3. Feed Dog 16. Upper Thread Tension Dial 8. 1 Knowing Your Sewing Machine Principal Parts 10 11 15 12 0 0 0 2 5 IF I 1.
Users Manual - English
Page 6
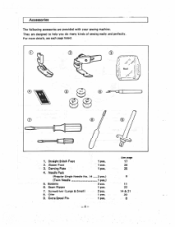
Straight Stitch Foot 2. Needle Pack (Regular Single Needle No. 14 (Twin Needle 5. Seam Flipper 7. Oiler 9. For more details, see each page listed. Darning Plate 4. O0 %\ O O As -CFC - 1) 1. Extra Spool Pin. 1 pce. 1 pce. 1 pce. 3 pcs.) 1 pce.) 3 pcs. 1 pce. 2 pcs. 1 pce. 1 pce. - 4 - See page 17 24 25 8 11 22 14 & 31 30 8 They are provided with your sewing machine. Zipper Foot 3. Accessories The following accessories are designed to help you do many kinds of sewing easily and perfectly. Bobbins 6. Screwdriver (Large & Small) 8.
Straight Stitch Foot 2. Needle Pack (Regular Single Needle No. 14 (Twin Needle 5. Seam Flipper 7. Oiler 9. For more details, see each page listed. Darning Plate 4. O0 %\ O O As -CFC - 1) 1. Extra Spool Pin. 1 pce. 1 pce. 1 pce. 3 pcs.) 1 pce.) 3 pcs. 1 pce. 2 pcs. 1 pce. 1 pce. - 4 - See page 17 24 25 8 11 22 14 & 31 30 8 They are provided with your sewing machine. Zipper Foot 3. Accessories The following accessories are designed to help you do many kinds of sewing easily and perfectly. Bobbins 6. Screwdriver (Large & Small) 8.
Users Manual - English
Page 7
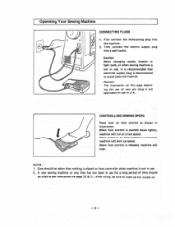
... foot control is disconnected to wipe up speed. Caution When changing needle, bobbin or light bulb, or when sewing machine is not in use . 2. fit When foot control is not in illustration. After oiling, be oiled as per instruction on foot control as ... in use for a long period of two pin plug is increased, machine will pick up any excess oil. -5- Care should be sure to avoid electrical hazards. NOTE: 1. CONTROLLING SEWING SPEED Place foot on page 30 Si 31. Operating Your Sewing Machine "nl»",4' It CONNECTING PLUGS 1. First connect the three-prong plug...
... foot control is disconnected to wipe up speed. Caution When changing needle, bobbin or light bulb, or when sewing machine is not in use . 2. fit When foot control is not in illustration. After oiling, be oiled as per instruction on foot control as ... in use for a long period of two pin plug is increased, machine will pick up any excess oil. -5- Care should be sure to avoid electrical hazards. NOTE: 1. CONTROLLING SEWING SPEED Place foot on page 30 Si 31. Operating Your Sewing Machine "nl»",4' It CONNECTING PLUGS 1. First connect the three-prong plug...
Users Manual - English
Page 10
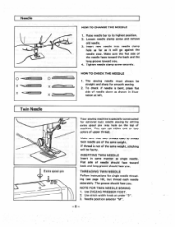
TO CHANGE THE NEEDLE 1. HOW TO CHECK THE NEEDLE 1. THREADING TWIN NEEDLE Follow instructions for optional twin needle sewing by setting extra spool pin into needle clamp hole as far as single needle. Use ZIGZAG PRESSER FOOT. 2. To check if needle is bent, ...place flat side of needle down as shown in same manner as it will be straight and sharp for smooth sewing. 2. Twin Needle tI 4 ) Extra spool pin Your sewing machine is not of machine. If thread is specially constructed for single needle threading (see page 10), but thread each needle separately. Use stitch ...
TO CHANGE THE NEEDLE 1. HOW TO CHECK THE NEEDLE 1. THREADING TWIN NEEDLE Follow instructions for optional twin needle sewing by setting extra spool pin into needle clamp hole as far as single needle. Use ZIGZAG PRESSER FOOT. 2. To check if needle is bent, ...place flat side of needle down as shown in same manner as it will be straight and sharp for smooth sewing. 2. Twin Needle tI 4 ) Extra spool pin Your sewing machine is not of machine. If thread is specially constructed for single needle threading (see page 10), but thread each needle separately. Use stitch ...
Users Manual - English
Page 14
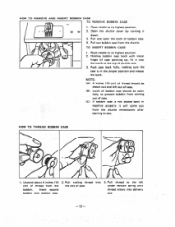
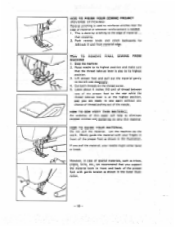
... coming out of case pointing up, fit it 3. Pull out bobbin case from the bobbin. Raise needle to sew. Holding bobbin case latch with metal finger of case. (C) If bobbin case is in machine properly it will come out from the shuttle immediately after starting to its highest position. 2. Push case back...
... coming out of case pointing up, fit it 3. Pull out bobbin case from the bobbin. Raise needle to sew. Holding bobbin case latch with metal finger of case. (C) If bobbin case is in machine properly it will come out from the shuttle immediately after starting to its highest position. 2. Push case back...
Users Manual - English
Page 15
... and with right hand, turn balance wheel toward you until the needle moves down and up and slide out extension table. -13 - To make your machine a free-arm model, lift -up again to the rear leaving about 4 inches (10 cm). With left hand, hold the end of presser foot and place... the lower thread in a large loop from the presser foot. 3. Pull thread toward you so that lower thread will come up in a loop. Free-Arm Sewing For sewing tubular and hard to the highest position. Raise needle and presser foot to reach garment areas, free-arm...
... and with right hand, turn balance wheel toward you until the needle moves down and up and slide out extension table. -13 - To make your machine a free-arm model, lift -up again to the rear leaving about 4 inches (10 cm). With left hand, hold the end of presser foot and place... the lower thread in a large loop from the presser foot. 3. Pull thread toward you so that lower thread will come up in a loop. Free-Arm Sewing For sewing tubular and hard to the highest position. Raise needle and presser foot to reach garment areas, free-arm...

Users Manual - English
Page 19
... used where reinforcement is in forward direction. NOTE: Use straight stitch foot when sewing light or elastic type materials with straight stitch. Stop machine at the turning point while the needle is needed. 6. For reverse sewing, push reverse sewing knob as far as the axis. Place material under presser foot and position needle 3/8 inch...
... used where reinforcement is in forward direction. NOTE: Use straight stitch foot when sewing light or elastic type materials with straight stitch. Stop machine at the turning point while the needle is needed. 6. For reverse sewing, push reverse sewing knob as far as the axis. Place material under presser foot and position needle 3/8 inch...
Users Manual - English
Page 20
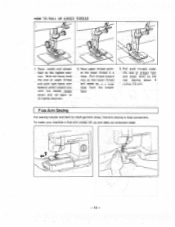
...presser foot and pull out the material gently to eliminate skipped stitches and puckering on the thread cutter. 5. Let the machine do the work. HOW TO FINISH YOUR SEWING PROJECT (REVERSE STITCHING) Reverse stitching is used to reinforce stitches near the edge of material or wherever reinforcement is done... the material. However, in case of the presser foot with your needle might either bend or break. then stopping. 2. HOW TO REMOVE FINAL SEWING FROM MACHINE 1. Leave about 4 inches (10 cm) of thread between toes of the presser foot to the rear while the thread take -up lever is...
...presser foot and pull out the material gently to eliminate skipped stitches and puckering on the thread cutter. 5. Let the machine do the work. HOW TO FINISH YOUR SEWING PROJECT (REVERSE STITCHING) Reverse stitching is used to reinforce stitches near the edge of material or wherever reinforcement is done... the material. However, in case of the presser foot with your needle might either bend or break. then stopping. 2. HOW TO REMOVE FINAL SEWING FROM MACHINE 1. Leave about 4 inches (10 cm) of thread between toes of the presser foot to the rear while the thread take -up lever is...
Users Manual - English
Page 21
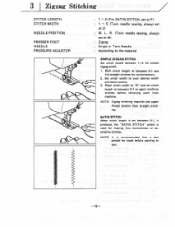
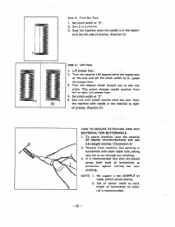
Set stitch width to your desired width and begin sewing. 3. L. SATIN STITCH When stitch length is set between 0-1, it produces the "SATIN STITCH" which is recommended that a test sample be made before removing work from machine. Reset stitch width to "0" and set stitch length to... between 0.1 to again reinforce stitches before starting to sew. - 19 - NOTE: Zigzag stitching requires less upper thread tension than straight stitching....
Set stitch width to your desired width and begin sewing. 3. L. SATIN STITCH When stitch length is set between 0-1, it produces the "SATIN STITCH" which is recommended that a test sample be made before removing work from machine. Reset stitch width to "0" and set stitch length to... between 0.1 to again reinforce stitches before starting to sew. - 19 - NOTE: Zigzag stitching requires less upper thread tension than straight stitching....
Users Manual - English
Page 23
... ADJUSTER For SATIN STITCH set dial to between 0 - 1 (F) See Instruction Below R (Right Position) Zigzag Single According to 3 stitches. 3. Sew predetermined length. 3. Stop the machine when the needle is in the materi- Set stitch width at "5" and needle position at "2". 2. Set stitch width at "Rn. 2. al...the right side of stitches. (Position B) - 21 - al at the right side of stitches. (Position A) Step B: Right Row 1. Stop the machine when the needle is in the materi- Lower presser foot and sew 2 to the material PROCEDURE FOR MAKING BUTTONHOLE Step A: Bar Tack 1.
... ADJUSTER For SATIN STITCH set dial to between 0 - 1 (F) See Instruction Below R (Right Position) Zigzag Single According to 3 stitches. 3. Sew predetermined length. 3. Stop the machine when the needle is in the materi- Set stitch width at "5" and needle position at "2". 2. Set stitch width at "Rn. 2. al...the right side of stitches. (Position B) - 21 - al at the right side of stitches. (Position A) Step B: Right Row 1. Stop the machine when the needle is in the materi- Lower presser foot and sew 2 to the material PROCEDURE FOR MAKING BUTTONHOLE Step A: Bar Tack 1.
Users Manual - English
Page 24
..."5". 2. Remove from left side of buttonhole on material is in the material to 0. We suggest a test SAMPLE be made, before actual sewing. 2. Turn the material 180 degrees while the needle acts as protection against cutting bar tack stitching. NOTE: 1. Lift presser foot. 2.... This action changes needle position from machine. Stop (E) the machine with seam ripper tool, taking care not to mark length of stitches. (Position C) Step D: Left Row 1. To secure stitching...
..."5". 2. Remove from left side of buttonhole on material is in the material to 0. We suggest a test SAMPLE be made, before actual sewing. 2. Turn the material 180 degrees while the needle acts as protection against cutting bar tack stitching. NOTE: 1. Lift presser foot. 2.... This action changes needle position from machine. Stop (E) the machine with seam ripper tool, taking care not to mark length of stitches. (Position C) Step D: Left Row 1. To secure stitching...
Users Manual - English
Page 25
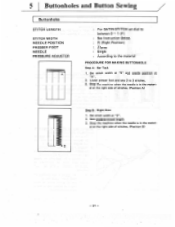
... LENGTH STITCH WIDTH NEEDLE POSITION PRESSER FOOT NEEDLE PRESSURE ADJUSTER : 0 : According to the distance of button. 3. Slowly sew about 10 stitches, remove the fabric from machine. After about 10 stitches. 5. Place button between the button and the material through to back of button and tie. ...enters into both holes of button fitting. 2. Place a needle on the button as illust• rated and sew as regular method of button without any obstruction. 4. Stop machine and raise needle from the material. 6. Kit BUTTON FITTING WITH THREAD SHANK You will often need the thread shank...
... LENGTH STITCH WIDTH NEEDLE POSITION PRESSER FOOT NEEDLE PRESSURE ADJUSTER : 0 : According to the distance of button. 3. Slowly sew about 10 stitches, remove the fabric from machine. After about 10 stitches. 5. Place button between the button and the material through to back of button and tie. ...enters into both holes of button fitting. 2. Place a needle on the button as illust• rated and sew as regular method of button without any obstruction. 4. Stop machine and raise needle from the material. 6. Kit BUTTON FITTING WITH THREAD SHANK You will often need the thread shank...
Users Manual - English
Page 30
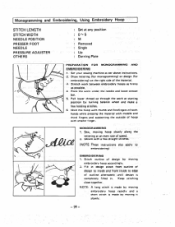
... the hoop with thumb and forefingers of both hands while pressing the material with middle and third fingers and supporting the outside of the material. 3. Sew, moving embroidery hoop accordingly. 2. Set your sewing machine as possible. 4.
... the hoop with thumb and forefingers of both hands while pressing the material with middle and third fingers and supporting the outside of the material. 3. Sew, moving embroidery hoop accordingly. 2. Set your sewing machine as possible. 4.
Users Manual - English
Page 32
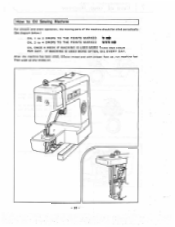
IF MACHINE IS USED MORE OFTEN, OIL EVERY DAY. How to Oil Sewing Machine For smooth and silent operation, the moving parts of the machine should be oiled periodically. (See diagram below.) OIL 1 to 2 DROPS TO THE POINTS MARKED OIL 3 to 4 DROPS TO THE POINTS MARKED * 140. *VS OIL ONCE A WEEK IF MACHINE IS USED MORE THAN ONE HOUR PER DAY. After the machine has been oiled, remove thread and with presser toot up, run machine fast Then wipe up any excess oil. z - 30 -
IF MACHINE IS USED MORE OFTEN, OIL EVERY DAY. How to Oil Sewing Machine For smooth and silent operation, the moving parts of the machine should be oiled periodically. (See diagram below.) OIL 1 to 2 DROPS TO THE POINTS MARKED OIL 3 to 4 DROPS TO THE POINTS MARKED * 140. *VS OIL ONCE A WEEK IF MACHINE IS USED MORE THAN ONE HOUR PER DAY. After the machine has been oiled, remove thread and with presser toot up, run machine fast Then wipe up any excess oil. z - 30 -
Users Manual - English
Page 34
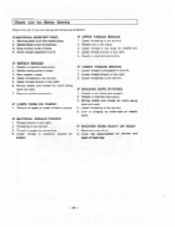
...3. Threading is caught by something. 4. Thread is not correct. 3. Lower thread tension is not correct. Lower threading is too tight. 3. IF MACHINE SKIPS STITCHES 1. Wrong needle and thread for cloth being sewn are used . 4. Needle eye is too tight. 2. Thread tension is not sharp. ...3. Lint is unevenly wound on the needle plate. 2. Machine is out of upper or lower thread is too large for Better Sewing Check this list if you are used. 7. Material pulled excessively. IF MATERIAL SHOULD PUCKER 1. Upper thread is...
...3. Threading is caught by something. 4. Thread is not correct. 3. Lower thread tension is not correct. Lower threading is too tight. 3. IF MACHINE SKIPS STITCHES 1. Wrong needle and thread for cloth being sewn are used . 4. Needle eye is too tight. 2. Thread tension is not sharp. ...3. Lint is unevenly wound on the needle plate. 2. Machine is out of upper or lower thread is too large for Better Sewing Check this list if you are used. 7. Material pulled excessively. IF MATERIAL SHOULD PUCKER 1. Upper thread is...
Users Manual - English
Page 35
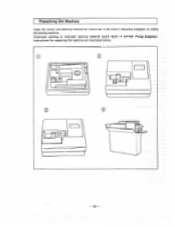
w O -33- Repacking the Machine Keep the carton and packing material for future use in the event it becomes necessary to reship the sewing machine. (Improper packing or improper packing material could result in damage during shipping.) Instructions for repacking the machine are illustrated below.
w O -33- Repacking the Machine Keep the carton and packing material for future use in the event it becomes necessary to reship the sewing machine. (Improper packing or improper packing material could result in damage during shipping.) Instructions for repacking the machine are illustrated below.
Users Manual - English
Page 36
... Monogram and Embroidery Needle Needle position selector Oiling Overlock Presser foot Pressure adjuster Principal parts Relative chart of sewing material, needle, thread Repacking the machine Reverse sewing knob Reverse itItchI ng Satin stitching Sew-I ight Stitch length knob Stitch width knob Straight stitching Thread tension Twin needle Upper (needle) thread Various control Zigzag stitching...
... Monogram and Embroidery Needle Needle position selector Oiling Overlock Presser foot Pressure adjuster Principal parts Relative chart of sewing material, needle, thread Repacking the machine Reverse sewing knob Reverse itItchI ng Satin stitching Sew-I ight Stitch length knob Stitch width knob Straight stitching Thread tension Twin needle Upper (needle) thread Various control Zigzag stitching...


