Users Guide
Page 3
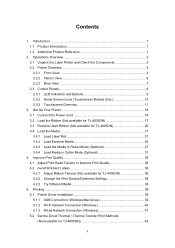
... 5. Improve Print Quality 36 4.1 Adjust Print Head Tension to Improve Print Quality 36 4.2 Avoid Wrinkled Labels 36 4.2.1 Adjust Ribbon Tension (Not available for TJ-4005DN 20 3.4 Load the Media 21 3.4.1 Load Label Roll 21 3.4.2 Load External Media 24 3.4.3 Load the Media in Peeler Mode (Optional 27 3.4.4 Load Media in Cutter Mode (Optional 31 4. Printing...39 5.1 Printer Driver Installation 39 5.1.1 USB Connection (Windows/Mac/Linux 39 5.1.2 Wi-Fi Network Connection (Windows 40 5.1.3 Wired Network Connection (Windows 41 5.2 Set the Direct Thermal / Thermal Transfer Print Methods...
... 5. Improve Print Quality 36 4.1 Adjust Print Head Tension to Improve Print Quality 36 4.2 Avoid Wrinkled Labels 36 4.2.1 Adjust Ribbon Tension (Not available for TJ-4005DN 20 3.4 Load the Media 21 3.4.1 Load Label Roll 21 3.4.2 Load External Media 24 3.4.3 Load the Media in Peeler Mode (Optional 27 3.4.4 Load Media in Cutter Mode (Optional 31 4. Printing...39 5.1 Printer Driver Installation 39 5.1.1 USB Connection (Windows/Mac/Linux 39 5.1.2 Wi-Fi Network Connection (Windows 40 5.1.3 Wired Network Connection (Windows 41 5.2 Set the Direct Thermal / Thermal Transfer Print Methods...

Users Guide
Page 43
... support.brother.com, go to your printer to the computer using a USB cable. 2. Run the Seagull Driver Wizard application and select Install printer drivers and USB. 4. Note If you download the correct driver for your model: • TJ-4005DN: Brother TJ-4005DN • TJ-4010TN: Brother TJ-4010TN • TJ-4020TN/TJ-4021TN/TJ-4021TNR: Brother TJ-40 • TJ-4120TN/TJ-4121TN/TJ-4121TNR: Brother TJ-41 The driver installation method depends on the connection type: USB Connection (Windows/Mac/Linux) Wi-Fi Network Connection (Windows) Wired Network...
... support.brother.com, go to your printer to the computer using a USB cable. 2. Run the Seagull Driver Wizard application and select Install printer drivers and USB. 4. Note If you download the correct driver for your model: • TJ-4005DN: Brother TJ-4005DN • TJ-4010TN: Brother TJ-4010TN • TJ-4020TN/TJ-4021TN/TJ-4021TNR: Brother TJ-40 • TJ-4120TN/TJ-4121TN/TJ-4121TNR: Brother TJ-41 The driver installation method depends on the connection type: USB Connection (Windows/Mac/Linux) Wi-Fi Network Connection (Windows) Wired Network...
Users Guide
Page 44
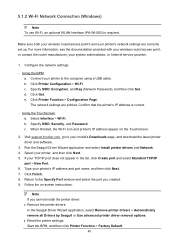
... address appear on -screen instructions. Return to the Specify Port window and select the port you cannot install the printer driver: Remove the printer drivers: In the Seagull Driver Wizard application, select Remove printer drivers > Automatically remove all Drivers by Seagull or Use advanced printer driver removal options. Reset the printer settings: Start the BPM, and then click Printer Function > Factory Default. 40 b. c. Make sure both your wireless router/access point's and your model's Downloads page, and download the latest printer driver and software...
... address appear on -screen instructions. Return to the Specify Port window and select the port you cannot install the printer driver: Remove the printer drivers: In the Seagull Driver Wizard application, select Remove printer drivers > Automatically remove all Drivers by Seagull or Use advanced printer driver removal options. Reset the printer settings: Start the BPM, and then click Printer Function > Factory Default. 40 b. c. Make sure both your wireless router/access point's and your model's Downloads page, and download the latest printer driver and software...
Users Guide
Page 45
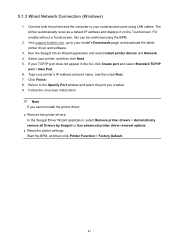
... cables. Run the Seagull Driver Wizard application and select Install printer drivers and Network. 4. Return to the Specify Port window and select the port you cannot install the printer driver: Remove the printer drivers: In the Seagull Driver Wizard application, select Remove printer drivers > Automatically remove all Drivers by Seagull or Use advanced printer driver removal options. Reset the printer settings: Start the BPM, and then click Printer Function > Factory Default. 41 Select your model's Downloads page, and download the latest printer driver and software...
... cables. Run the Seagull Driver Wizard application and select Install printer drivers and Network. 4. Return to the Specify Port window and select the port you cannot install the printer driver: Remove the printer drivers: In the Seagull Driver Wizard application, select Remove printer drivers > Automatically remove all Drivers by Seagull or Use advanced printer driver removal options. Reset the printer settings: Start the BPM, and then click Printer Function > Factory Default. 41 Select your model's Downloads page, and download the latest printer driver and software...

Users Guide
Page 48
Follow the on using BarTender, click Help. 3. Click File > Print to create a label. Launch BarTender. 2. Note For more information on -screen steps to print the label. 44 5.3 Create and Print Labels Using BarTender BarTender is a label creation tool, which can be downloaded for free from the product's page at support.brother.com. 1.
Follow the on using BarTender, click Help. 3. Click File > Print to create a label. Launch BarTender. 2. Note For more information on -screen steps to print the label. 44 5.3 Create and Print Labels Using BarTender BarTender is a label creation tool, which can be downloaded for free from the product's page at support.brother.com. 1.

Users Guide
Page 49
... test the printer's functions. Release the button when the Power LED lights, and the printer feed the labels. 1. Press and hold the Feed Button, and then turn on the Power Self-test Switch. 3. Press and hold the right Selection button, and then turn on the Power Switch. 3. TJ-4021TN/TJ-4021TNR/TJ-4121TN/TJ-4121TNR Use power-on the Touchscreen. 45 Turn off the printer. 2. TJ-4005DN/TJ-4010TN/TJ-4020TN/TJ-4120TN Use the power-on utilities to set or...
... test the printer's functions. Release the button when the Power LED lights, and the printer feed the labels. 1. Press and hold the Feed Button, and then turn on the Power Self-test Switch. 3. Press and hold the right Selection button, and then turn on the Power Switch. 3. TJ-4021TN/TJ-4021TNR/TJ-4121TN/TJ-4121TNR Use power-on the Touchscreen. 45 Turn off the printer. 2. TJ-4005DN/TJ-4010TN/TJ-4020TN/TJ-4120TN Use the power-on utilities to set or...

Users Guide
Page 55
... following factory settings will be restored: Parameter Speed Density Label Width Label Height Sensor Type Gap Setting Print Direction Reference Point Offset Tear Mode Peeler Mode Cutter Mode Rewinder Mode Code Page Country Code Clear Flash Memory Default setting 127 mm/sec (5 ips) (203 DPI) 76 mm/sec (3 ips) (300 DPI) 8 101.5 mm 101.5 mm Gap sensor: TJ-4005DN, TJ-4010TN, TJ-4020TN, TJ-4021TN, TJ-4120TN, TJ-4121TN Black sensor: TJ-4021TNR, TJ-4121TNR 3 mm 0 0,0 (upper left corner...
... following factory settings will be restored: Parameter Speed Density Label Width Label Height Sensor Type Gap Setting Print Direction Reference Point Offset Tear Mode Peeler Mode Cutter Mode Rewinder Mode Code Page Country Code Clear Flash Memory Default setting 127 mm/sec (5 ips) (203 DPI) 76 mm/sec (3 ips) (300 DPI) 8 101.5 mm 101.5 mm Gap sensor: TJ-4005DN, TJ-4010TN, TJ-4020TN, TJ-4021TN, TJ-4120TN, TJ-4121TN Black sensor: TJ-4021TNR, TJ-4121TNR 3 mm 0 0,0 (upper left corner...

Users Guide
Page 74
... the printer settings to 100). Set the Cutter Type. Check the printer serial number, printed mileage (in./m), number of printed labels (pcs), and cutting counter. Adjust the date and time displayed on the Touchscreen. The default password is 8888. Set the Media Low Warning message. 70 Set the password for locking the menu or favorites. 7.4 Advanced Settings Language Printer Information Initialization Display Brightness Touchscreen Calibration Date & Time Menu Advanced Security Cutter Type Media Low Warning Ribbon Low Warning Printer Head Maintain...
... the printer settings to 100). Set the Cutter Type. Check the printer serial number, printed mileage (in./m), number of printed labels (pcs), and cutting counter. Adjust the date and time displayed on the Touchscreen. The default password is 8888. Set the Media Low Warning message. 70 Set the password for locking the menu or favorites. 7.4 Advanced Settings Language Printer Information Initialization Display Brightness Touchscreen Calibration Date & Time Menu Advanced Security Cutter Type Media Low Warning Ribbon Low Warning Printer Head Maintain...

Users Guide
Page 79
... media on your printer before accepting them. 9. Consistent, tag-to the center. The pitch is more than 12.7 mm. To avoid back-feeding, for TJ-4021TNR and TJ-4121TNR only) 9.1 Introduction When printing smart labels that may result in typical label sizes and will work with most major inlays embedded in a short pause between each printed label, but is necessary...
... media on your printer before accepting them. 9. Consistent, tag-to the center. The pitch is more than 12.7 mm. To avoid back-feeding, for TJ-4021TNR and TJ-4121TNR only) 9.1 Introduction When printing smart labels that may result in typical label sizes and will work with most major inlays embedded in a short pause between each printed label, but is necessary...
Users Guide
Page 88
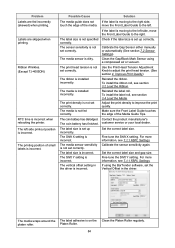
.... Set the correct label size and gap size. If the label is moving to the right side, touch the edge of small labels is incorrect. The print head tension is incorrect. customer service or your local dealer. For more information, see 7.1.1 FBPL Settings. Labels are fed incorrectly (skewed) when printing. To install the label roll, see section 3.2 Load the Ribbon. The left side, move the Front Label Guide to adjust the print head tension...
.... Set the correct label size and gap size. If the label is moving to the right side, touch the edge of small labels is incorrect. The print head tension is incorrect. customer service or your local dealer. For more information, see 7.1.1 FBPL Settings. Labels are fed incorrectly (skewed) when printing. To install the label roll, see section 3.2 Load the Ribbon. The left side, move the Front Label Guide to adjust the print head tension...
FBPL Command Reference
Page 50
... the barcode in the Y direction (dots) Code 128, switching code subset A, B, C automatically Code 128, switching code subset A, B, C manually Control code A B C 096 FNC3 FNC3 NONE 097 FNC2 FNC2 NONE 098 SHIFT SHIFT NONE 099 CODE C CODE C NONE 100 CODE B FNC4 CODE B 101 FNC4 CODE A CODE A 102 FNC1 FNC1 FNC1 103 Start (CODE A) 104 Start (CODE B) 105 Start (CODE C) Use "!" as a starting subset is not set, the default starting character for the control code followed...
... the barcode in the Y direction (dots) Code 128, switching code subset A, B, C automatically Code 128, switching code subset A, B, C manually Control code A B C 096 FNC3 FNC3 NONE 097 FNC2 FNC2 NONE 098 SHIFT SHIFT NONE 099 CODE C CODE C NONE 100 CODE B FNC4 CODE B 101 FNC4 CODE A CODE A 102 FNC1 FNC1 FNC1 103 Start (CODE A) 104 Start (CODE B) 105 Start (CODE C) Use "!" as a starting subset is not set, the default starting character for the control code followed...

FBPL Command Reference
Page 92
... the height in garbled printing or missing text. • Check if the printer's CODEPAGE setting matches the print data encoding. • Check if the font is compatible with the current printer's CODEPAGE setting. Specify the alignment of text. 0: Default (Left) 1: Left 2: Center 3: Right content Characters to be printed Note: If the content itself includes double quotes ("), use \["]instead of ("). Change the printer's CODEPAGE setting or the font if needed. y-multiplication = 1/72 inch). ...
... the height in garbled printing or missing text. • Check if the printer's CODEPAGE setting matches the print data encoding. • Check if the font is compatible with the current printer's CODEPAGE setting. Specify the alignment of text. 0: Default (Left) 1: Left 2: Center 3: Right content Characters to be printed Note: If the content itself includes double quotes ("), use \["]instead of ("). Change the printer's CODEPAGE setting or the font if needed. y-multiplication = 1/72 inch). ...

FBPL Command Reference
Page 96
Example: "Brother \["]At your side\["]" \[R] means carriage return character 0x0D. \[L] means line feed character 0x0A. The mismatched encoding might result in garbled printing or missing text. • Check if the printer's CODEPAGE setting matches the print data encoding. • Check if the font is 4092 bytes. Change the printer's CODEPAGE setting or the font if needed. The maximum data length is compatible with the current printer's CODEPAGE setting. y-multiplication Character width magnification...
Example: "Brother \["]At your side\["]" \[R] means carriage return character 0x0D. \[L] means line feed character 0x0A. The mismatched encoding might result in garbled printing or missing text. • Check if the printer's CODEPAGE setting matches the print data encoding. • Check if the font is 4092 bytes. Change the printer's CODEPAGE setting or the font if needed. The maximum data length is compatible with the current printer's CODEPAGE setting. y-multiplication Character width magnification...

FBPL Command Reference
Page 200
... below: Model KEY0 KEY1 TD-4T series RJ series TJ series FEED FEED FEED KEY2 MENU KEY3 UP KEY4 RIGHT KEY5 LEFT KEY6 DOWN Example Sample code DOWNLOAD "DEMO.BAS" SIZE 3,1 GAP 0,0 DENSITY 8 SPEED 3 DIRECTION 0 REFERENCE 0,0 SET CUTTER OFF SET KEY1 OFF SET KEY2 OFF SET KEY3 OFF KEY1=0 KEY2=0 KEY3=0 194 Before setting KEYn function, make sure you disable the default function of printing labels per print. (0 < m < 32000) Set to BACKFEED...
... below: Model KEY0 KEY1 TD-4T series RJ series TJ series FEED FEED FEED KEY2 MENU KEY3 UP KEY4 RIGHT KEY5 LEFT KEY6 DOWN Example Sample code DOWNLOAD "DEMO.BAS" SIZE 3,1 GAP 0,0 DENSITY 8 SPEED 3 DIRECTION 0 REFERENCE 0,0 SET CUTTER OFF SET KEY1 OFF SET KEY2 OFF SET KEY3 OFF KEY1=0 KEY2=0 KEY3=0 194 Before setting KEYn function, make sure you disable the default function of printing labels per print. (0 < m < 32000) Set to BACKFEED...

FBPL Command Reference
Page 205
... Also SET PEEL, SET CUTTER 199 Syntax SET TEAR ON/OFF Parameter ON OFF Description The label gap will NOT stop at the tear off position after print. The beginning of label will be aligned to the tear-off the power. This setting will be saved in the printer memory when turning off position. 11.10 SET TEAR Description Feed the label to the print head.
... Also SET PEEL, SET CUTTER 199 Syntax SET TEAR ON/OFF Parameter ON OFF Description The label gap will NOT stop at the tear off position after print. The beginning of label will be aligned to the tear-off the power. This setting will be saved in the printer memory when turning off position. 11.10 SET TEAR Description Feed the label to the print head.

FBPL Command Reference
Page 215
... printer memory. Syntax SET PRINTEKY OFF/ON/AUTO/ Parameter OFF ON AUTO Description Disable this function Enable this function Enable this function Numbers of labels. Example Sample code SIZE 4,2.5 GAP 0.12,0 SET PRINTKEY ON SET COUNTER @0 1 @0= "0001" CLS TEXT 10,10, "5",0,1,1,@0 PRINT 1 209 If the label content includes serial text or barcode, it will change the serial number accordingly. 11.19 SET PRINTKEY Description Print one label and feed label gap to print the next label...
... printer memory. Syntax SET PRINTEKY OFF/ON/AUTO/ Parameter OFF ON AUTO Description Disable this function Enable this function Enable this function Numbers of labels. Example Sample code SIZE 4,2.5 GAP 0.12,0 SET PRINTKEY ON SET COUNTER @0 1 @0= "0001" CLS TEXT 10,10, "5",0,1,1,@0 PRINT 1 209 If the label content includes serial text or barcode, it will change the serial number accordingly. 11.19 SET PRINTKEY Description Print one label and feed label gap to print the next label...
FBPL Command Reference
Page 281
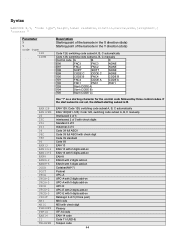
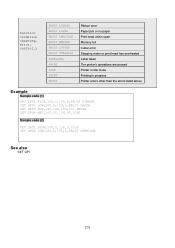
..., error, control...) FAULT RIBBON FAULT PAPER FAULT CARRIAGE FAULT MEMORY FAULT CUTTER FAULT OVERHEAT TAKELABEL PAUSE IDLE PRINT FAULT Ribbon error Paper jam or no paper Print head unit is open Memory full Cutter error Stepping motor or print head has overheated Label taken The printer's operations are paused Printer in idle mode Printing in progress Printer errors other than the errors listed above Example Sample code (1) SET GPO1 HIGH,100,0,100,0,FAULT RIBBON SET GPO2 LOW,100,0,100,0,FAULT PAPER SET...
..., error, control...) FAULT RIBBON FAULT PAPER FAULT CARRIAGE FAULT MEMORY FAULT CUTTER FAULT OVERHEAT TAKELABEL PAUSE IDLE PRINT FAULT Ribbon error Paper jam or no paper Print head unit is open Memory full Cutter error Stepping motor or print head has overheated Label taken The printer's operations are paused Printer in idle mode Printing in progress Printer errors other than the errors listed above Example Sample code (1) SET GPO1 HIGH,100,0,100,0,FAULT RIBBON SET GPO2 LOW,100,0,100,0,FAULT PAPER SET...

DPL Emulation Command Reference
Page 12
... C: Supported Barcodes Barcode ID A / a B / b C / c D / d E / e F / f G / g H / h I / i J / j K / k L / l M / m N / n O / o p Q / q R / r S / s T / t U u v z Z W1c W1C W1d W1D W1f W1F W1I W1J Type Code 3 of 9 UPC-A UPC-E Interleaved 2 of 5 (12 of 5) Code 128 EAN-13 EAN-8 HBIC Codabar Interleaved 2 of 5 with a modulo 10 checksum Plessey Interleaved 2 of 5 with a modulo 10 checksum & shipping bearer bars 2 digit UPC addendum 5 digit UPC addendum Code 93 Postnet UCC/EAN Code 128 UCC/EAN Code...
... C: Supported Barcodes Barcode ID A / a B / b C / c D / d E / e F / f G / g H / h I / i J / j K / k L / l M / m N / n O / o p Q / q R / r S / s T / t U u v z Z W1c W1C W1d W1D W1f W1F W1I W1J Type Code 3 of 9 UPC-A UPC-E Interleaved 2 of 5 (12 of 5) Code 128 EAN-13 EAN-8 HBIC Codabar Interleaved 2 of 5 with a modulo 10 checksum Plessey Interleaved 2 of 5 with a modulo 10 checksum & shipping bearer bars 2 digit UPC addendum 5 digit UPC addendum Code 93 Postnet UCC/EAN Code 128 UCC/EAN Code...

Mac Driver Installation Guide
Page 4
Double-click the downloaded PKG file. 2. Install the Printer Driver To install your printer's driver on a Mac, download the driver from support.brother.com, and then do the following: 1. Click Install. 2 Click Continue. 3. The Installation Type information appears. 1.
Double-click the downloaded PKG file. 2. Install the Printer Driver To install your printer's driver on a Mac, download the driver from support.brother.com, and then do the following: 1. Click Install. 2 Click Continue. 3. The Installation Type information appears. 1.

Brother Printer Management Tool Quick Start Guide
Page 6
... Speed Density Paper Width Paper Height Media Sensor Gap Gap Offset Post-Print Action Cut Pieces Code Page Maximum Length Reference Description Set the print speed. Set the gap distance between each automated cut. Set the offset distance of the printer coordinate system vertically and horizontally: Left: X (Horizontal) coordinate, Right: Y (Vertical) coordinate. Settings range from 0 to 999 dots. Set the media sensor type. Set the maximum length for example a wristband), set code page. For...
... Speed Density Paper Width Paper Height Media Sensor Gap Gap Offset Post-Print Action Cut Pieces Code Page Maximum Length Reference Description Set the print speed. Set the gap distance between each automated cut. Set the offset distance of the printer coordinate system vertically and horizontally: Left: X (Horizontal) coordinate, Right: Y (Vertical) coordinate. Settings range from 0 to 999 dots. Set the media sensor type. Set the maximum length for example a wristband), set code page. For...


