
Users Manual - English
Page 1
KNOWING YOUR SEWING MACHINE SEWING BASICS UTILITY STITCHES APPENDIX Computerized Sewing Machine Operation Manual Please visit us at http://solutions.brother.com where you can get product support and answers to frequently asked questions (FAQs).
KNOWING YOUR SEWING MACHINE SEWING BASICS UTILITY STITCHES APPENDIX Computerized Sewing Machine Operation Manual Please visit us at http://solutions.brother.com where you can get product support and answers to frequently asked questions (FAQs).

Users Manual - English
Page 2
...or injury to persons. 2 Always unplug the machine from the electrical outlet immediately after using the machine immediately and unplug the power cord. • When transporting the sewing machine, be careful not to make any user servicing adjustments mentioned in this machine if it has a damaged cord or plug,...odor, heat, discoloration or deformation, stop using , when cleaning, when making any adjustments mentioned in the machine falling, which could cause injuries. • When lifting the sewing machine, be sure to turn it off, then grasp the plug and pull it by any other part may...
...or injury to persons. 2 Always unplug the machine from the electrical outlet immediately after using the machine immediately and unplug the power cord. • When transporting the sewing machine, be careful not to make any user servicing adjustments mentioned in this machine if it has a damaged cord or plug,...odor, heat, discoloration or deformation, stop using , when cleaning, when making any adjustments mentioned in the machine falling, which could cause injuries. • When lifting the sewing machine, be sure to turn it off, then grasp the plug and pull it by any other part may...
Users Manual - English
Page 3
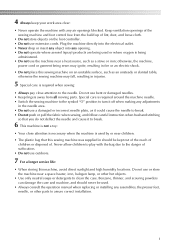
... play with any opening. • Do not operate where aerosol (spray) products are being used by or near children. • The plastic bag that this sewing machine was supplied in should never be kept out of the reach of children or disposed of. Special care is required around the... machine needle. • Switch the sewing machine to the symbol "O" position to turn it to break. 6 This machine is being sewn may ignite, resulting in fire or an electric shock. • Do not place this...
... play with any opening. • Do not operate where aerosol (spray) products are being used by or near children. • The plastic bag that this sewing machine was supplied in should never be kept out of the reach of children or disposed of. Special care is required around the... machine needle. • Switch the sewing machine to the symbol "O" position to turn it to break. 6 This machine is being sewn may ignite, resulting in fire or an electric shock. • Do not place this...

Users Manual - English
Page 5
...SEWING BASICS 26 SEWING ...26 General sewing procedure ...26 Selecting stitching ...27 Starting to sew ...28 Thread tension ...29 USEFUL SEWING TIPS ...31 Trial sewing ...31 Changing the sewing direction ...31 Sewing curves ...31 Sewing thick fabrics ...31 Sewing hook-and-loop fastener ...32 Sewing thin fabrics ...33 Sewing stretch fabrics ...33 Using a free-arm style ...33 3 KNOWING YOUR SEWING MACHINE 5 NAMES OF MACHINE... Optional accessories ...8 USING YOUR SEWING MACHINE 9 Power supply precautions ...9 Power supply ...9 Foot controller ...10 Sewing speed controller (for models equipped...
...SEWING BASICS 26 SEWING ...26 General sewing procedure ...26 Selecting stitching ...27 Starting to sew ...28 Thread tension ...29 USEFUL SEWING TIPS ...31 Trial sewing ...31 Changing the sewing direction ...31 Sewing curves ...31 Sewing thick fabrics ...31 Sewing hook-and-loop fastener ...32 Sewing thin fabrics ...33 Sewing stretch fabrics ...33 Using a free-arm style ...33 3 KNOWING YOUR SEWING MACHINE 5 NAMES OF MACHINE... Optional accessories ...8 USING YOUR SEWING MACHINE 9 Power supply precautions ...9 Power supply ...9 Foot controller ...10 Sewing speed controller (for models equipped...
Users Manual - English
Page 7
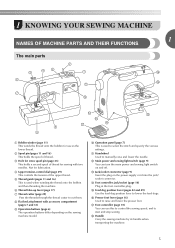
... used when winding the thread onto the bobbin and then threading the machine. d Upper tension-control dial (page 29) This controls the tension of thread. m Jack/socket connector (page 9) Insert the plug on and off. 1 KNOWING YOUR SEWING MACHINE 1 NAMES OF MACHINE PARTS AND THEIR FUNCTIONS The main parts a Bobbin winder (page 11) This...
... used when winding the thread onto the bobbin and then threading the machine. d Upper tension-control dial (page 29) This controls the tension of thread. m Jack/socket connector (page 9) Insert the plug on and off. 1 KNOWING YOUR SEWING MACHINE 1 NAMES OF MACHINE PARTS AND THEIR FUNCTIONS The main parts a Bobbin winder (page 11) This...
Users Manual - English
Page 8
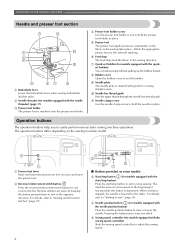
... are sewn by keeping the button pressed down to sew reverse stitches. The machine sews at a slow speed at the beginning of sewing while the button is installed onto the presser foot holder. KNOWING YOUR SEWING MACHINE Needle and presser foot section a Buttonhole lever Lower the... buttonhole lever when sewing buttonholes and bar tacks. The operation buttons differ depending on the sewing machine model. d Needle position button (for models equipped with...
... are sewn by keeping the button pressed down to sew reverse stitches. The machine sews at a slow speed at the beginning of sewing while the button is installed onto the presser foot holder. KNOWING YOUR SEWING MACHINE Needle and presser foot section a Buttonhole lever Lower the... buttonhole lever when sewing buttonholes and bar tacks. The operation buttons differ depending on the sewing machine model. d Needle position button (for models equipped with...

Users Manual - English
Page 9
.... (Press the "-" side to use. press the "+" side to be sewn. If the accessories are displayed here. a LCD (liquid crystal display) The number of the sewing machine, allows you wish to reduce the stitch width; press the "+" side to increase the stitch length.) d Stitch width adjustment key Press this key to adjust...
.... (Press the "-" side to use. press the "+" side to be sewn. If the accessories are displayed here. a LCD (liquid crystal display) The number of the sewing machine, allows you wish to reduce the stitch width; press the "+" side to increase the stitch length.) d Stitch width adjustment key Press this key to adjust...
Users Manual - English
Page 10
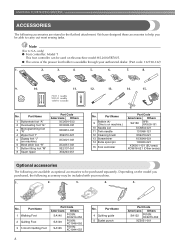
...-001 Part Name 9 Bobbin (4) (One is available through your machine. 1. 2. 3. 4. 5. KNOWING YOUR SEWING MACHINE ACCESSORIES The following accessories are available as optional accessories to be purchased separately. only) ● Foot controller: Model T This foot controller can be used on this machine model HS-2000/SB700T. ● The screw of the presser foot holder is on...
...-001 Part Name 9 Bobbin (4) (One is available through your machine. 1. 2. 3. 4. 5. KNOWING YOUR SEWING MACHINE ACCESSORIES The following accessories are available as optional accessories to be purchased separately. only) ● Foot controller: Model T This foot controller can be used on this machine model HS-2000/SB700T. ● The screw of the presser foot holder is on...
Users Manual - English
Page 11
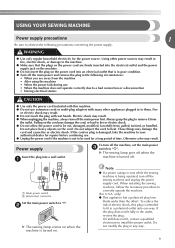
... precautions 1 Be sure to "I". Do not subject the cord to correctly operate the machine. (For U.S.A. X The sewing lamp goes off when the machine is damaged, take the machine to fit in to "{". When restarting the sewing machine, follow the necessary procedure to heat. a To turn off . Pulling on . ...; During electrical storms CAUTION ● Use only the power cord included with wet hands. Note ● If a power outage occurs while the sewing machine is in poor condition. ● Turn off the main power and remove the plug in fire, electric shock, or damage to be cut,...
... precautions 1 Be sure to "I". Do not subject the cord to correctly operate the machine. (For U.S.A. X The sewing lamp goes off when the machine is damaged, take the machine to fit in to "{". When restarting the sewing machine, follow the necessary procedure to heat. a To turn off . Pulling on . ...; During electrical storms CAUTION ● Use only the power cord included with wet hands. Note ● If a power outage occurs while the sewing machine is in poor condition. ● Turn off the main power and remove the plug in fire, electric shock, or damage to be cut,...
Users Manual - English
Page 12
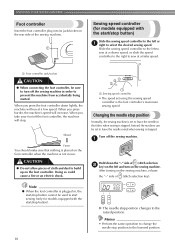
... be set to the lowered position. 10 After turning on the left and turn off the sewing machine in the fabric when sewing is stopped. X The needle stop position to leave the needle in order to the raised position. Memo • Perform ...needle stop position changes to prevent the machine from accidentally being started. When you take your foot off the sewing machine. CAUTION ● Do not allow pieces of (stitch selection b key) on the sewing machine, release the "-" side of the sewing machine. When you press harder, the machine's speed will increase. Doing so ...
... be set to the lowered position. 10 After turning on the left and turn off the sewing machine in the fabric when sewing is stopped. X The needle stop position to leave the needle in order to the raised position. Memo • Perform ...needle stop position changes to prevent the machine from accidentally being started. When you take your foot off the sewing machine. CAUTION ● Do not allow pieces of (stitch selection b key) on the sewing machine, release the "-" side of the sewing machine. When you press harder, the machine's speed will increase. Doing so ...
Users Manual - English
Page 13
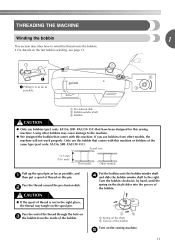
...bobbins (part code: SA156, SFB: XA5539-151) that comes with this sewing machine. Put the bobbin onto the bobbin winder shaft d and slide the bobbin winder shaft to the right. If you use the bobbin that have been designed for this machine. Pass the end of the thread through the hole on c the...● If the spool of thread is not in as far as possible, and a then put a spool of the bobbin Turn on the sewing machine. Using other models, the machine will not work properly. Actual size 11.5 mm (7/16 inch) This model Other models Pull up the spool pin as far as possible...
...bobbins (part code: SA156, SFB: XA5539-151) that comes with this sewing machine. Put the bobbin onto the bobbin winder shaft d and slide the bobbin winder shaft to the right. If you use the bobbin that have been designed for this machine. Pass the end of the thread through the hole on c the...● If the spool of thread is not in as far as possible, and a then put a spool of the bobbin Turn on the sewing machine. Using other models, the machine will not work properly. Actual size 11.5 mm (7/16 inch) This model Other models Pull up the spool pin as far as possible...

Users Manual - English
Page 14
...button) (for models equipped with the start /stop button). Slide the sewing speed controller to the right h (to set the speed to fast). (For models equipped with the sewing speed controller.) Memo ● When the sewing machine is started or the handwheel is not a malfunction. ● The needle...after winding the thread around the bobbin and cause the needle to start sewing (only for models equipped with the start /stop button). Note ● If the sewing machine is to start /stop the machine. KNOWING YOUR SEWING MACHINE While holding the end of the thread, gently f press the foot ...
...button) (for models equipped with the start /stop button). Slide the sewing speed controller to the right h (to set the speed to fast). (For models equipped with the sewing speed controller.) Memo ● When the sewing machine is started or the handwheel is not a malfunction. ● The needle...after winding the thread around the bobbin and cause the needle to start sewing (only for models equipped with the start /stop button). Note ● If the sewing machine is to start /stop the machine. KNOWING YOUR SEWING MACHINE While holding the end of the thread, gently f press the foot ...

Users Manual - English
Page 15
... slit in the bobbin winder seat. Note ● If the sewing machine is plugged in, the start /stop button). Pull the thread to start sewing (only for models equipped with the sewing speed controller). c While holding the thread that the spring on the sewing machine. a Sewing speed controller Turn on the shaft fits into the slit in...
... slit in the bobbin winder seat. Note ● If the sewing machine is plugged in, the start /stop button). Pull the thread to start sewing (only for models equipped with the sewing speed controller). c While holding the thread that the spring on the sewing machine. a Sewing speed controller Turn on the shaft fits into the slit in...
Users Manual - English
Page 16
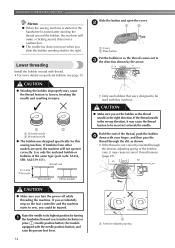
... bobbin winding shaft to be incorrect or break the needle. KNOWING YOUR SEWING MACHINE Memo ● When the sewing machine is started or the handwheel is turned after winding the thread around the bobbin, the machine will not operate correctly. Lower threading Install the bobbin wound with this... (counterclockwise) or press (needle position button) (for this sewing machine. Actual size 11.5 mm (7/16 inch) This model Other models • Only use bobbins that were designed to sew, you turn the power off while threading the machine. CAUTION ● Make sure you could be used ,...
... bobbin winding shaft to be incorrect or break the needle. KNOWING YOUR SEWING MACHINE Memo ● When the sewing machine is started or the handwheel is turned after winding the thread around the bobbin, the machine will not operate correctly. Lower threading Install the bobbin wound with this... (counterclockwise) or press (needle position button) (for this sewing machine. Actual size 11.5 mm (7/16 inch) This model Other models • Only use bobbins that were designed to sew, you turn the power off while threading the machine. CAUTION ● Make sure you could be used ,...

Users Manual - English
Page 18
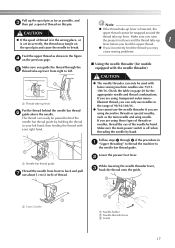
...Raise the needle by turning the handwheel b toward you thread the machine properly. KNOWING YOUR SEWING MACHINE Upper threading Set the upper thread and thread the needle. • For details on the wheel points up before threading the sewing machine. 16 a Presser foot lever or a Mark b Needle position... button • If the needle is not correctly raised, the sewing machine can not be threaded. a Spool pin b Thread guide c Mark on the...
...Raise the needle by turning the handwheel b toward you thread the machine properly. KNOWING YOUR SEWING MACHINE Upper threading Set the upper thread and thread the needle. • For details on the wheel points up before threading the sewing machine. 16 a Presser foot lever or a Mark b Needle position... button • If the needle is not correctly raised, the sewing machine can not be threaded. a Spool pin b Thread guide c Mark on the...
Users Manual - English
Page 19
... you guide the thread through 6 of the procedure in your left . Make sure the main power switch is set incorrectly, the thread may cause sewing problems. ■ Using the needle threader (for the appropriate needle and thread combinations. b While lowering the needle threader lever, c hook the thread..., and c then put a spool of the needle by holding the thread in a "Upper threading" to thread the machine to left hand, then feeding the thread with home sewing machine needles size 75/11100/16. Pull up lever is lowered, the upper thread cannot be used with your right hand. ...
... you guide the thread through 6 of the procedure in your left . Make sure the main power switch is set incorrectly, the thread may cause sewing problems. ■ Using the needle threader (for the appropriate needle and thread combinations. b While lowering the needle threader lever, c hook the thread..., and c then put a spool of the needle by holding the thread in a "Upper threading" to thread the machine to left hand, then feeding the thread with home sewing machine needles size 75/11100/16. Pull up lever is lowered, the upper thread cannot be used with your right hand. ...

Users Manual - English
Page 20
d Pull out about 5 cm (2 inch) of thread through the needle. a 5 cm (2 inch) Note ● If you incorrectly feed the thread you and the hook passes through the eye of the sewing machine. KNOWING YOUR SEWING MACHINE Fully lower the needle threader lever. e a Hook b Thread While lightly holding the thread, release the f needle threader lever. Catch the thread on the hook as shown below. The hook will pull the thread through g the needle toward you may cause sewing problems. 18 X The end of the needle threader rotates toward the back of the needle.
d Pull out about 5 cm (2 inch) of thread through the needle. a 5 cm (2 inch) Note ● If you incorrectly feed the thread you and the hook passes through the eye of the sewing machine. KNOWING YOUR SEWING MACHINE Fully lower the needle threader lever. e a Hook b Thread While lightly holding the thread, release the f needle threader lever. Catch the thread on the hook as shown below. The hook will pull the thread through g the needle toward you may cause sewing problems. 18 X The end of the needle threader rotates toward the back of the needle.
Users Manual - English
Page 22
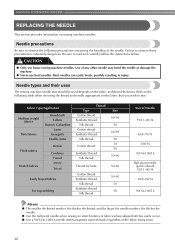
...can easily break, possibly resulting in injury. Needle types and their uses The sewing machine needle that you wish to 100/16 needle with transparent nylon threads, regardless of the needle. KNOWING YOUR SEWING MACHINE REPLACING THE NEEDLE This section provides information on the fabric and thread thickness. Fabric...50 50-60 50-60 50-90 50 50 Size of any other needle may bend the needle or damage the machine. ● Never use home sewing machine needles. Needle precautions Be sure to the following precautions concerning the handling of the fabric being sewn. 20 Be sure...
...can easily break, possibly resulting in injury. Needle types and their uses The sewing machine needle that you wish to 100/16 needle with transparent nylon threads, regardless of the needle. KNOWING YOUR SEWING MACHINE REPLACING THE NEEDLE This section provides information on the fabric and thread thickness. Fabric...50 50-60 50-60 50-90 50 50 Size of any other needle may bend the needle or damage the machine. ● Never use home sewing machine needles. Needle precautions Be sure to the following precautions concerning the handling of the fabric being sewn. 20 Be sure...
Users Manual - English
Page 23
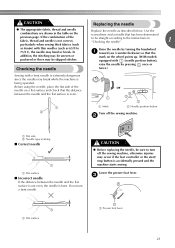
...is extremely dangerous since the needle may occur if the foot controller or the start/ stop button is accidentally pressed and the machine starts sewing. Lower the presser foot lever. Checking the needle Replacing the needle Replace the needle as 65/9 to 75/11), the ...If the distance between the needle and the flat surface is even. 1 2 a Mark b Needle position button Turn off the sewing machine, otherwise injuries may break while the machine is bent. CAUTION ● The appropriate fabric, thread and needle combinations are shown in "Checking the needle" . 1 Raise ...
...is extremely dangerous since the needle may occur if the foot controller or the start/ stop button is accidentally pressed and the machine starts sewing. Lower the presser foot lever. Checking the needle Replacing the needle Replace the needle as 65/9 to 75/11), the ...If the distance between the needle and the flat surface is even. 1 2 a Mark b Needle position button Turn off the sewing machine, otherwise injuries may break while the machine is bent. CAUTION ● The appropriate fabric, thread and needle combinations are shown in "Checking the needle" . 1 Raise ...
Users Manual - English
Page 24
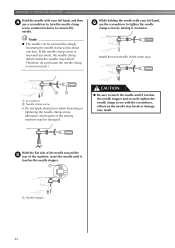
KNOWING YOUR SEWING MACHINE Hold the needle with the screwdriver, otherwise the needle may break or ... screw counterclockwise to remove the needle. With the flat side of the needle toward the e rear of the sewing machine may fall off. Therefore, do not loosen the needle clamp screw too much , the needle clamp (which holds...clamp screw • Do not apply strong force when loosening or tightening the needle clamp screw, otherwise certain parts of the machine, insert the needle until it touches the needle stopper. Note ● The needle can be damaged. CAUTION ● ...
KNOWING YOUR SEWING MACHINE Hold the needle with the screwdriver, otherwise the needle may break or ... screw counterclockwise to remove the needle. With the flat side of the needle toward the e rear of the sewing machine may fall off. Therefore, do not loosen the needle clamp screw too much , the needle clamp (which holds...clamp screw • Do not apply strong force when loosening or tightening the needle clamp screw, otherwise certain parts of the machine, insert the needle until it touches the needle stopper. Note ● The needle can be damaged. CAUTION ● ...


