Operation Manual
Page 1
We recommend that you keep this document before using the machine. Operation Manual Embroidery and Sewing Machine Product Code: 888-M20 Be sure to read this document nearby for future reference.
We recommend that you keep this document before using the machine. Operation Manual Embroidery and Sewing Machine Product Code: 888-M20 Be sure to read this document nearby for future reference.

Operation Manual
Page 3
... , contact a qualified electrician. • This machine is stored or in the machine falling, which may fall, resulting in the instruction manual. • To unplug the machine, switch the machine to the symbol "O" position to the needle. Do not use if you notice ...failure. 3 Electrical Hazards: • This machine should be accessed for future reference. DANGER - WARNING - Return the machine to the nearest authorized Brother dealer for examination, repair, electrical or mechanical adjustment. • While the machine is approved for use in the needle area. • Do not...
... , contact a qualified electrician. • This machine is stored or in the machine falling, which may fall, resulting in the instruction manual. • To unplug the machine, switch the machine to the symbol "O" position to the needle. Do not use if you notice ...failure. 3 Electrical Hazards: • This machine should be accessed for future reference. DANGER - WARNING - Return the machine to the nearest authorized Brother dealer for examination, repair, electrical or mechanical adjustment. • While the machine is approved for use in the needle area. • Do not...

Operation Manual
Page 4
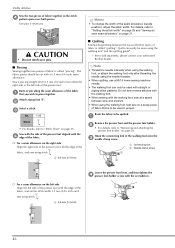
... This appliance is not intended for household use as contained in this manual. Use this machine, avoid direct sunlight and high humidity locations. Cleaning and user maintenance shall not be replaced by an authorized Brother dealer. • In the event a malfunction occurs or adjustment is...For repair or adjustment: • If the light unit is damaged, it must be made by the manufacturer as described in the manual. The contents of this manual and specifications of suffocation. • Do not use outdoors. 8 For a longer service life: • When storing this machine only...
... This appliance is not intended for household use as contained in this manual. Use this machine, avoid direct sunlight and high humidity locations. Cleaning and user maintenance shall not be replaced by an authorized Brother dealer. • In the event a malfunction occurs or adjustment is...For repair or adjustment: • If the light unit is damaged, it must be made by the manufacturer as described in the manual. The contents of this manual and specifications of suffocation. • Do not use outdoors. 8 For a longer service life: • When storing this machine only...

Operation Manual
Page 5
... Store is not suitable for the plug supplied with this equipment, you should contact your model's home page of Brother Solutions Center at " http://s.brother/cpjab ". 3 Never use a fuse approved by ASTA to the manual download section on plug. • Always replace the fuse cover. Use of these trademarks are trademarks of Google..., please go to BS 1362, i.e. Android and Google Play are subject to obtain the correct lead. carrying the mark, rating as marked on your authorized Brother dealer to Google Permissions.
... Store is not suitable for the plug supplied with this equipment, you should contact your model's home page of Brother Solutions Center at " http://s.brother/cpjab ". 3 Never use a fuse approved by ASTA to the manual download section on plug. • Always replace the fuse cover. Use of these trademarks are trademarks of Google..., please go to BS 1362, i.e. Android and Google Play are subject to obtain the correct lead. carrying the mark, rating as marked on your authorized Brother dealer to Google Permissions.
Operation Manual
Page 9
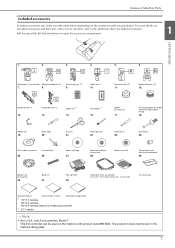
... machine) 17. Blind stitch foot "R" 11. Scissors 21. Cleaning brush 22. Needle set (medium) 10 cm (H) × 10 cm (W) (4 inches (H) × 4 inches (W)) Accessory bag Operation Manual Quick Reference Guide Embroidery Design Guide *1 75/11 2 needles, 90/14 2 needles, 90/14 2 needles: Ball point needle (gold colored) *2 2/11 needle Note • (For...
... machine) 17. Blind stitch foot "R" 11. Scissors 21. Cleaning brush 22. Needle set (medium) 10 cm (H) × 10 cm (W) (4 inches (H) × 4 inches (W)) Accessory bag Operation Manual Quick Reference Guide Embroidery Design Guide *1 75/11 2 needles, 90/14 2 needles, 90/14 2 needles: Ball point needle (gold colored) *2 2/11 needle Note • (For...
Operation Manual
Page 13
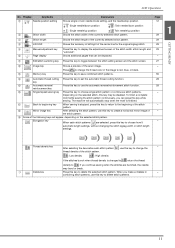
... - 55 28 28 - - - - Press this key may bend or break. Shows the tendency of left/right of the center line for the original zigzag stitch. 9 Manual adjustment key Press this key to change the thread density of the currently selected stitch pattern. Press this key to . Display Key Name 5 Needle position...
... - 55 28 28 - - - - Press this key may bend or break. Shows the tendency of left/right of the center line for the original zigzag stitch. 9 Manual adjustment key Press this key to change the thread density of the currently selected stitch pattern. Press this key to . Display Key Name 5 Needle position...

Operation Manual
Page 37
... foot can be used by attaching zigzag foot "J". Stitch (Presser No. Straight stitch (Middle) 1-04* General sewing, gather, pintuck, etc. (J) Stitch width (mm (inch)) Auto. Manual 2.5 (3/32) 0.2 - 5.0 (1/64 - 3/16) 2.5 (3/32) 0.2 - 5.0 (1/64 - 3/16) 2.5 (3/32) 0.2 - 5.0 (1/64 - 3/16) 2.5 (3/32) 0.2 - 5.0 (1/64 - 3/16) Stitch (Presser No. Stitch name/Applications foot) Stitch width (mm (inch)) Auto. If...
... foot can be used by attaching zigzag foot "J". Stitch (Presser No. Straight stitch (Middle) 1-04* General sewing, gather, pintuck, etc. (J) Stitch width (mm (inch)) Auto. Manual 2.5 (3/32) 0.2 - 5.0 (1/64 - 3/16) 2.5 (3/32) 0.2 - 5.0 (1/64 - 3/16) 2.5 (3/32) 0.2 - 5.0 (1/64 - 3/16) 2.5 (3/32) 0.2 - 5.0 (1/64 - 3/16) Stitch (Presser No. Stitch name/Applications foot) Stitch width (mm (inch)) Auto. If...

Operation Manual
Page 38
...) Shell tuck edge stitch 2-05* Shell tuck edge finish on appliqué (0 - 1/4) (0 - 3/16) quilt pieces Stitch (Presser No. Manual Overcasting stitch Reinforcing of the fabric. Stitch name/Applications foot) Stitch width (mm (inch)) Auto. Stitch name/Applications foot) Stitch width (mm (inch...)) Auto. Use a needle between 90/ 14 and 100/16. Manual Stitch length (mm (inch)) Auto. Manual (J) 1-29 Quilting appliqué stitch Quilting stitch for the bobbin thread. (J) Sew with a tight thread 0.0 (0) 2.5 ...
...) Shell tuck edge stitch 2-05* Shell tuck edge finish on appliqué (0 - 1/4) (0 - 3/16) quilt pieces Stitch (Presser No. Manual Overcasting stitch Reinforcing of the fabric. Stitch name/Applications foot) Stitch width (mm (inch)) Auto. Stitch name/Applications foot) Stitch width (mm (inch...)) Auto. Use a needle between 90/ 14 and 100/16. Manual Stitch length (mm (inch)) Auto. Manual (J) 1-29 Quilting appliqué stitch Quilting stitch for the bobbin thread. (J) Sew with a tight thread 0.0 (0) 2.5 ...

Operation Manual
Page 39
... Auto. Stitch Chart Stitch (Presser No. Stitch name/Applications foot) Stitch width (mm (inch)) Auto. Manual Bound buttonhole stitch 5.0 (3/16) 2.0 (1/16) 4-07 The first step in medium to 3.0 - 7.0...4-10 stitch Buttonholes with vertical bar tack for heirloom (A) and stretch fabrics 6.0 (15/64) 1.5 (1/16) 3.0 - 6.0 1.0 - 3.0 (1/8 - 15/64) (1/16 - 1/8) Stitch (Presser No. Manual Serpentine stitch 2-17* Decorative stitching and (N) attaching elastic Hemstitching zigzag 3-01* Decorative hems, top (N) stitching 5.0 (3/16) 1.0 (1/16) 0.0 - 7.0 0.2 - 5.0 (0 - 1/4) (1/64 - 3/16...
... Auto. Stitch Chart Stitch (Presser No. Stitch name/Applications foot) Stitch width (mm (inch)) Auto. Manual Bound buttonhole stitch 5.0 (3/16) 2.0 (1/16) 4-07 The first step in medium to 3.0 - 7.0...4-10 stitch Buttonholes with vertical bar tack for heirloom (A) and stretch fabrics 6.0 (15/64) 1.5 (1/16) 3.0 - 6.0 1.0 - 3.0 (1/8 - 15/64) (1/16 - 1/8) Stitch (Presser No. Manual Serpentine stitch 2-17* Decorative stitching and (N) attaching elastic Hemstitching zigzag 3-01* Decorative hems, top (N) stitching 5.0 (3/16) 1.0 (1/16) 0.0 - 7.0 0.2 - 5.0 (0 - 1/4) (1/64 - 3/16...
Operation Manual
Page 48
...set the stitch width 1.5 mm (1/16 inch) and sew using the walking foot* and the quilting guide*. * Items sold separately, please contact your authorized Brother dealer. c No. 1-25 Stitch • For details, refer to "Removing and attaching the presser foot holder" on the left side Align the left... side of the presser foot. Note • Thread the needle manually when using the walking foot, or attach the walking foot only after threading the needle using stitch . 1 6.5 mm (1/4 inch) 1 Memo •...
...set the stitch width 1.5 mm (1/16 inch) and sew using the walking foot* and the quilting guide*. * Items sold separately, please contact your authorized Brother dealer. c No. 1-25 Stitch • For details, refer to "Removing and attaching the presser foot holder" on the left side Align the left... side of the presser foot. Note • Thread the needle manually when using the walking foot, or attach the walking foot only after threading the needle using stitch . 1 6.5 mm (1/4 inch) 1 Memo •...

Operation Manual
Page 54
... "Replacing the Needle" on page 17. Press a and install the twin needle. • For details on installing a needle, refer to "Stitch Chart" on page 35. Manually thread the left needle with the twin needle. Turn the fabric over the seam allowance of the fabric. Unfold the e fabric, and then iron the...
... "Replacing the Needle" on page 17. Press a and install the twin needle. • For details on installing a needle, refer to "Stitch Chart" on page 35. Manually thread the left needle with the twin needle. Turn the fabric over the seam allowance of the fabric. Unfold the e fabric, and then iron the...

Operation Manual
Page 55
Start sewing. e Without passing the thread behind the needle bar thread guide, manually thread the right needle with the wing needle, the needle holes are enlarged, creating a lace-like decorative stitch. Select a stitch. You can also sew with ... to the back. 1 Needle bar thread guide a Attach zigzag foot "J". j Thread the machine with the wing needle, otherwise the machine may bend or break. 53 Manually pass the thread through the eye of the needle from the front to attach zigzag foot "J". Press g to [ON]. i • For stitch selection refer to...
Start sewing. e Without passing the thread behind the needle bar thread guide, manually thread the right needle with the wing needle, the needle holes are enlarged, creating a lace-like decorative stitch. Select a stitch. You can also sew with ... to the back. 1 Needle bar thread guide a Attach zigzag foot "J". j Thread the machine with the wing needle, otherwise the machine may bend or break. 53 Manually pass the thread through the eye of the needle from the front to attach zigzag foot "J". Press g to [ON]. i • For stitch selection refer to...
Operation Manual
Page 72
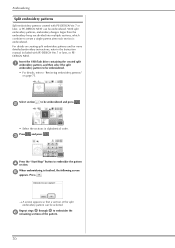
... of the pattern. 70 With split embroidery patterns, embroidery designs larger than the embroidery hoop are divided into multiple sections, which combine to the Instruction manual included with PE-DESIGN Ver.7 or later, or PE-DESIGN NEXT can be embroidered and press . For details on page 75. Press c and press . b •...
... of the pattern. 70 With split embroidery patterns, embroidery designs larger than the embroidery hoop are divided into multiple sections, which combine to the Instruction manual included with PE-DESIGN Ver.7 or later, or PE-DESIGN NEXT can be embroidered and press . For details on page 75. Press c and press . b •...
Operation Manual
Page 85
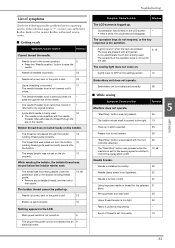
...17 The needle threader lever is not attached correctly. 58 ■ While sewing Symptom, Cause/solution Reference Machine does not operate. Manually pass the thread through the eye of the operation keys is not set for the user. 6, 13 The sewing light does not... breaks. The sensitivity of the needle. The operation keys do not respond, or the key response is "*", contact your authorized Brother dealer or the nearest Brother authorized service center. ■ Getting ready Symptom, Cause/solution Reference Cannot thread the needle. A glove is set incorrectly. 13...
...17 The needle threader lever is not attached correctly. 58 ■ While sewing Symptom, Cause/solution Reference Machine does not operate. Manually pass the thread through the eye of the operation keys is not set for the user. 6, 13 The sewing light does not... breaks. The sensitivity of the needle. The operation keys do not respond, or the key response is "*", contact your authorized Brother dealer or the nearest Brother authorized service center. ■ Getting ready Symptom, Cause/solution Reference Cannot thread the needle. A glove is set incorrectly. 13...

Quick Reference Guide
Page 4
...del mismo tipo. Gebruik uitsluitend de bijgeleverde spoel of the same type. Volg onderstaande stappen in dotazione dello stesso tipo. Consulte o Manual de Operações para obter instruções detalhadas Use only the included bobbin or bobbins of spoelen van hetzelfde ... in der Bedienungsanleitung. Siga los pasos descritos a continuación, en orden numérico. Refer to the Operation Manual for detailed instructions. Reportez-vous au manuel d'instructions pour des informations détaillées. Consulte las instrucciones detalladas en el...
...del mismo tipo. Gebruik uitsluitend de bijgeleverde spoel of the same type. Volg onderstaande stappen in dotazione dello stesso tipo. Consulte o Manual de Operações para obter instruções detalhadas Use only the included bobbin or bobbins of spoelen van hetzelfde ... in der Bedienungsanleitung. Siga los pasos descritos a continuación, en orden numérico. Refer to the Operation Manual for detailed instructions. Reportez-vous au manuel d'instructions pour des informations détaillées. Consulte las instrucciones detalladas en el...


