
Operation Manual
Page 6
...Replacing the presser foot 23 Removing and attaching the presser foot holder 24 Chapter 2 SEWING BASICS 25 Sewing 25 Stitch types 25 Basic sewing 25 Sewing reverse/reinforcement stitches 27 Combining Stitch Patterns 27 Automatic reverse/reinforcement stitching 28 Automatically cutting the thread 28 Setting the stitch width/stitch length/"L/R Shift 29 Adjusting the thread tension 29 Useful Sewing Tips 30 Sewing Tips 30 Sewing an even seam allowance 31 Sewing Various Fabrics 32 Chapter 3 VARIOUS STITCHES 35 Stitch Chart 35 Utility stitches 38 Overcasting Stitches 38 Blind...
...Replacing the presser foot 23 Removing and attaching the presser foot holder 24 Chapter 2 SEWING BASICS 25 Sewing 25 Stitch types 25 Basic sewing 25 Sewing reverse/reinforcement stitches 27 Combining Stitch Patterns 27 Automatic reverse/reinforcement stitching 28 Automatically cutting the thread 28 Setting the stitch width/stitch length/"L/R Shift 29 Adjusting the thread tension 29 Useful Sewing Tips 30 Sewing Tips 30 Sewing an even seam allowance 31 Sewing Various Fabrics 32 Chapter 3 VARIOUS STITCHES 35 Stitch Chart 35 Utility stitches 38 Overcasting Stitches 38 Blind...
Operation Manual
Page 7
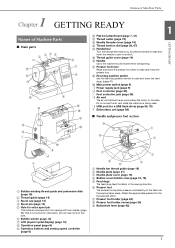
... B Needle threader lever (page 19) C Thread tension dial (page 29, 67) D Handwheel Turn the handwheel toward you (counterclockwise) to raise and lower the needle to raise and lower the presser foot. Do not insert oil into this hole. 6 Bobbin winder (page 13) 7 LCD (liquid crystal display) (page 10) 8 Operation panel (page 6) 9 Operation buttons and sewing speed controller (page 6) g c f d e 1 Needle bar thread guide (page 18) 2 Needle plate (page 31) 3 Needle plate cover (page 16) 4 Bobbin cover/bobbin case (page 16, 78) 5 Feed dogs The feed dogs feed the fabric in the sewing direction...
... B Needle threader lever (page 19) C Thread tension dial (page 29, 67) D Handwheel Turn the handwheel toward you (counterclockwise) to raise and lower the needle to raise and lower the presser foot. Do not insert oil into this hole. 6 Bobbin winder (page 13) 7 LCD (liquid crystal display) (page 10) 8 Operation panel (page 6) 9 Operation buttons and sewing speed controller (page 6) g c f d e 1 Needle bar thread guide (page 18) 2 Needle plate (page 31) 3 Needle plate cover (page 16) 4 Bobbin cover/bobbin case (page 16, 78) 5 Feed dogs The feed dogs feed the fabric in the sewing direction...

Operation Manual
Page 8
... machine is winding the bobbin thread, or the bobbin winder shaft is moved to the right side. 2 Reverse/Reinforcement stitch button Press the reverse/reinforcement button to sew reverse/ reinforcement stitches. (page 27) 3 Needle position button Press the needle position button to perform operations. This key locks all key and button functions to prevent operation of the keys varies according to the user. Red: The machine cannot sew. i b h c g d fe 1 LCD (liquid crystal display) (touch panel) Selected pattern settings and...
... machine is winding the bobbin thread, or the bobbin winder shaft is moved to the right side. 2 Reverse/Reinforcement stitch button Press the reverse/reinforcement button to sew reverse/ reinforcement stitches. (page 27) 3 Needle position button Press the needle position button to perform operations. This key locks all key and button functions to prevent operation of the keys varies according to the user. Red: The machine cannot sew. i b h c g d fe 1 LCD (liquid crystal display) (touch panel) Selected pattern settings and...
Operation Manual
Page 9
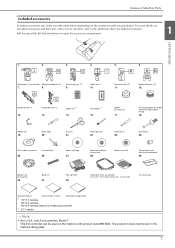
...Buttonhole foot "A" 13. Cleaning brush 22. Disc-shaped screwdriver 25. Spool cap (small) Thread spool insert (mini king thread spool) 29. Button fitting foot "M" 12. Seam ripper 20. Spool cap (medium) (on the machine rating plate. 7 Embroidery foot "Q" 14. Zipper foot "I R MM Zigzag foot "J" (on machine) Monogramming foot "N" 7. 8. Extra spool pin 26. Embroidery frame set *1 15. Names of your machine, refer to open the accessory compartment. 1 GETTING READY 1. 2. 3. 4. 5. 6. Blind stitch foot "R" 11. Spool net 31. The product code...
...Buttonhole foot "A" 13. Cleaning brush 22. Disc-shaped screwdriver 25. Spool cap (small) Thread spool insert (mini king thread spool) 29. Button fitting foot "M" 12. Seam ripper 20. Spool cap (medium) (on the machine rating plate. 7 Embroidery foot "Q" 14. Zipper foot "I R MM Zigzag foot "J" (on machine) Monogramming foot "N" 7. 8. Extra spool pin 26. Embroidery frame set *1 15. Names of your machine, refer to open the accessory compartment. 1 GETTING READY 1. 2. 3. 4. 5. 6. Blind stitch foot "R" 11. Spool net 31. The product code...

Operation Manual
Page 27
... stitches, including straight line stitching, overcasting, buttonhole and basic decorative stitches. 2 Decorative stitches 3 Decorative satin stitches 4 Satin stitches 5 Cross stitch stitches 6 Stitch patterns stored in the machine's memory (page 55) 7 Stitch patterns stored in USB flash drive (page 55) Check which presser foot is used for presser foot recommendations. 25 Stitch types 1 2 3 5 Basic sewing Note • First, perform a trial sewing, using a piece of fabric and thread that the needle does not strike basting pins, otherwise the needle may break. • Never use...
... stitches, including straight line stitching, overcasting, buttonhole and basic decorative stitches. 2 Decorative stitches 3 Decorative satin stitches 4 Satin stitches 5 Cross stitch stitches 6 Stitch patterns stored in the machine's memory (page 55) 7 Stitch patterns stored in USB flash drive (page 55) Check which presser foot is used for presser foot recommendations. 25 Stitch types 1 2 3 5 Basic sewing Note • First, perform a trial sewing, using a piece of fabric and thread that the needle does not strike basting pins, otherwise the needle may break. • Never use...

Operation Manual
Page 28
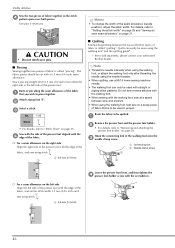
... fabric. Lower the presser foot lever. Sewing Set the fabric under the presser foot. a Insert the foot controller plug into the foot controller b jack on the machine. 1 Foot controller jack 1 Turn on the left hand, and rotate the handwheel counterclockwise or press (Needle position button) to adjust sewing speed during sewing. c 26 Note • When cutting thread such as nylon monofilament thread, or other decorative threads, use this controller to set in , slowly press down on the foot controller.) Guide the fabric lightly by pressing the "Start...
... fabric. Lower the presser foot lever. Sewing Set the fabric under the presser foot. a Insert the foot controller plug into the foot controller b jack on the machine. 1 Foot controller jack 1 Turn on the left hand, and rotate the handwheel counterclockwise or press (Needle position button) to adjust sewing speed during sewing. c 26 Note • When cutting thread such as nylon monofilament thread, or other decorative threads, use this controller to set in , slowly press down on the foot controller.) Guide the fabric lightly by pressing the "Start...
Operation Manual
Page 31
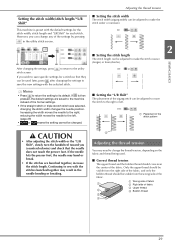
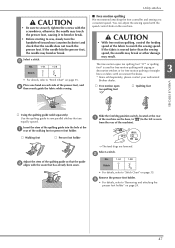
... stitch length can be adjusted to the machine instead of fabric 3 Upper thread 2 4 Bobbin thread 3 4 29 Increasing the width moves the needle to its default. Setting the stitch width/stitch length/"L/R Shift" This machine is then pressed, the default settings are bunched together, increase the stitch length. After changing the settings, press stitch screen. If the needle hits the presser foot, the needle may need to change any of the settings by pressing in the needle bending or breaking. 1 Adjusting the thread tension...
... stitch length can be adjusted to the machine instead of fabric 3 Upper thread 2 4 Bobbin thread 3 4 29 Increasing the width moves the needle to its default. Setting the stitch width/stitch length/"L/R Shift" This machine is then pressed, the default settings are bunched together, increase the stitch length. After changing the settings, press stitch screen. If the needle hits the presser foot, the needle may need to change any of the settings by pressing in the needle bending or breaking. 1 Adjusting the thread tension...

Operation Manual
Page 32
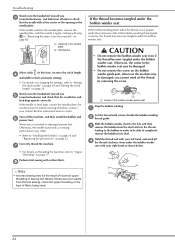
...; When sewing decorative satin stitch or satin stitch patterns, there may be too loose. Raise the presser foot lever, and then turn the fabric. c ■ Sewing curves Sew slowly while slightly changing the sewing direction to tighten the upper thread tension. Lower the presser foot lever and continue sewing. Turn the thread tension dial clockwise to sew around the curve. b Turn the fabric using a zigzag stitch, select a shorter stitch length in the fabric). If the needle remains up when the machine stops sewing, press (Needle position button) to obtain a finer stitch. 30...
...; When sewing decorative satin stitch or satin stitch patterns, there may be too loose. Raise the presser foot lever, and then turn the fabric. c ■ Sewing curves Sew slowly while slightly changing the sewing direction to tighten the upper thread tension. Lower the presser foot lever and continue sewing. Turn the thread tension dial clockwise to sew around the curve. b Turn the fabric using a zigzag stitch, select a shorter stitch length in the fabric). If the needle remains up when the machine stops sewing, press (Needle position button) to obtain a finer stitch. 30...

Operation Manual
Page 35
... fabric sticks to the flat bed attachment, sew with the walking foot, sew at a slow speed. For details, refer to the needle or the bobbin case, it does not cover the needle plate, the paper will not be used with the needle size for sewing. ■ Sewing leathers or vinyl fabrics When sewing fabrics that may stick to the presser foot, such as leather or vinyl fabrics, replace the presser foot with the fabric. If the paper is positioned...
... fabric sticks to the flat bed attachment, sew with the walking foot, sew at a slow speed. For details, refer to the needle or the bobbin case, it does not cover the needle plate, the paper will not be used with the needle size for sewing. ■ Sewing leathers or vinyl fabrics When sewing fabrics that may stick to the presser foot, such as leather or vinyl fabrics, replace the presser foot with the fabric. If the paper is positioned...

Operation Manual
Page 37
...machine (page 20). No. 1-01 1-03 1-08 Stitch When any of the following stitches are selected, pressing (Reverse/Reinforcement stitch button) will sew reinforcement stitches. • , , or in the tables and some of the illustrations shows the needle position of the stitch. 1 Left needle position a b c 2 Middle (center) needle position 3 Right needle position Note • The walking foot can be used by attaching zigzag foot "J". Do not sew reverse stitches with the walking foot. * Twin needle can only be used with straight or zigzag stitch patterns. Zigzag...
...machine (page 20). No. 1-01 1-03 1-08 Stitch When any of the following stitches are selected, pressing (Reverse/Reinforcement stitch button) will sew reinforcement stitches. • , , or in the tables and some of the illustrations shows the needle position of the stitch. 1 Left needle position a b c 2 Middle (center) needle position 3 Right needle position Note • The walking foot can be used by attaching zigzag foot "J". Do not sew reverse stitches with the walking foot. * Twin needle can only be used with straight or zigzag stitch patterns. Zigzag...

Operation Manual
Page 46
...) Attach the presser foot holder to the left (so that the needle does not touch the button, otherwise the needle may bend or break. a Align the seam with the bobbin thread. Utility stitches CAUTION • When sewing, be sure that the speed will be slow). → The machine automatically stops after reaching the zipper opening. 1 Reverse stitches 2 End of zipper opening . Start sewing. Memo • The feed dogs come up to the zipper opening a b Using a basting stitch, continue sewing to raise the feed dogs. h Set the sewing speed controller...
...) Attach the presser foot holder to the left (so that the needle does not touch the button, otherwise the needle may bend or break. a Align the seam with the bobbin thread. Utility stitches CAUTION • When sewing, be sure that the speed will be slow). → The machine automatically stops after reaching the zipper opening. 1 Reverse stitches 2 End of zipper opening . Start sewing. Memo • The feed dogs come up to the zipper opening a b Using a basting stitch, continue sewing to raise the feed dogs. h Set the sewing speed controller...
Operation Manual
Page 48
... using stitch . 1 6.5 mm (1/4 inch) 1 Lower the presser foot lever, and then tighten the d presser foot holder screw with the edge of fabric is called "piecing". Do not sew reverse stitches with the walking foot. • When sewing with the edge of the fabric, and sew using the needle threader. • When quilting, use a 90/14 home sewing machine needle. • The walking foot can easily be used in project. Hook the connecting fork of the walking foot onto the c needle clamp screw. 1 Connecting fork 2 Needle clamp screw a b … For a seam...
... using stitch . 1 6.5 mm (1/4 inch) 1 Lower the presser foot lever, and then tighten the d presser foot holder screw with the edge of fabric is called "piecing". Do not sew reverse stitches with the walking foot. • When sewing with the edge of the fabric, and sew using the needle threader. • When quilting, use a 90/14 home sewing machine needle. • The walking foot can easily be used in project. Hook the connecting fork of the walking foot onto the c needle clamp screw. 1 Connecting fork 2 Needle clamp screw a b … For a seam...
Operation Manual
Page 49
... foot "O" … Quilting foot 3 VARIOUS STITCHES … Using the quilting guide (sold separately) Use the quilting guide to "Removing and attaching the presser foot holder" on the machine. If the fabric is used for free motion quilting with zigzag or decorative stitches or for free motion quilting of the quilting guide so that the guide b aligns with the speed control slide on page 24. 47 Insert the stem of the quilting guide into the hole at the a rear of the walking foot or presser foot holder. … Walking foot … Presser foot holder Slide the feed dog position...
... foot "O" … Quilting foot 3 VARIOUS STITCHES … Using the quilting guide (sold separately) Use the quilting guide to "Removing and attaching the presser foot holder" on the machine. If the fabric is used for free motion quilting with zigzag or decorative stitches or for free motion quilting of the quilting guide so that the guide b aligns with the speed control slide on page 24. 47 Insert the stem of the quilting guide into the hole at the a rear of the walking foot or presser foot holder. … Walking foot … Presser foot holder Slide the feed dog position...

Operation Manual
Page 82
... "Replacing the Presser Foot" on page 77. Check the upper threading and bobbin threading first, and then adjust the thread tension. • If the bobbin thread is visible from the right side of the fabric Turn the thread tension dial counterclockwise to tighten the upper thread tension. a Turn off the machine. f • Refer to remove the presser foot. The machine needle that should be used depends on the type of the fabric Turn the thread tension dial clockwise to loosen the upper thread tension...
... "Replacing the Presser Foot" on page 77. Check the upper threading and bobbin threading first, and then adjust the thread tension. • If the bobbin thread is visible from the right side of the fabric Turn the thread tension dial counterclockwise to tighten the upper thread tension. a Turn off the machine. f • Refer to remove the presser foot. The machine needle that should be used depends on the type of the fabric Turn the thread tension dial clockwise to loosen the upper thread tension...
Operation Manual
Page 84
... the needle bar and feed dogs operate correctly. At this time, increase the stitch length d and width to their maximum settings. • For details on changing the settings, refer to "Setting the stitch width" on page 29 and "Setting the stitch length" on page 17. Turn off the thread by removing the screw. Perform trial sewing with scissors beside the bobbin-winding b thread guide. Otherwise, the cutter in order to be malfunctioning; Slide the bobbin winder shaft...
... the needle bar and feed dogs operate correctly. At this time, increase the stitch length d and width to their maximum settings. • For details on changing the settings, refer to "Setting the stitch width" on page 29 and "Setting the stitch length" on page 17. Turn off the thread by removing the screw. Perform trial sewing with scissors beside the bobbin-winding b thread guide. Otherwise, the cutter in order to be malfunctioning; Slide the bobbin winder shaft...
Operation Manual
Page 85
... bobbin thread cannot be moved or * returned to control the zigzag stitch width. 12, 48 Needle breaks. The thread was used . 19 • The needle is not in the settings screen. 12 Embroidery unit does not operate. Manually pass the thread through the eye of the power cord is pulled during sewing. - The needle threader hook is turned or bent. 22 Using improper needle or thread for the sewing speed controller to its original position. Needle is installed incorrectly. 22 Needle clamp screw...
... bobbin thread cannot be moved or * returned to control the zigzag stitch width. 12, 48 Needle breaks. The thread was used . 19 • The needle is not in the settings screen. 12 Embroidery unit does not operate. Manually pass the thread through the eye of the power cord is pulled during sewing. - The needle threader hook is turned or bent. 22 Using improper needle or thread for the sewing speed controller to its original position. Needle is installed incorrectly. 22 Needle clamp screw...
Operation Manual
Page 86
... opening in the * needle plate. * There is a notch on the left side of the presser foot holder is loose. 24 Fabric is too thick. 21, 32 Fabric is fed forcefully when sewing thick fabric 32 or thick seams. Stitch length is too short. 29 Stabilizer is not attached to fabric being used . a 1 Notch There are scratches on the bobbin case. * A bobbin designed specifically for this machine is loose, the thread did not catch the needle bar threader, etc.). Upper threading...
... opening in the * needle plate. * There is a notch on the left side of the presser foot holder is loose. 24 Fabric is too thick. 21, 32 Fabric is fed forcefully when sewing thick fabric 32 or thick seams. Stitch length is too short. 29 Stabilizer is not attached to fabric being used . a 1 Notch There are scratches on the bobbin case. * A bobbin designed specifically for this machine is loose, the thread did not catch the needle bar threader, etc.). Upper threading...
Operation Manual
Page 87
... presser foot was used . 35 Stitch pattern adjustment settings were set incorrectly. 16, 79 Using improper needle or thread for the selected 21 fabric. Thread is 13 not used. Upper threading is incorrect. 17, 79 Bobbin is incorrect. The fabric feeds in the bobbin case. 77, 79, 80 ■ After sewing Symptom, Cause/solution Reference Thread tension is set 54 incorrectly. The needle clamp screw is loose. 22 Needle is turned, bent or the point is damaged. * The needle contacts the needle plate...
... presser foot was used . 35 Stitch pattern adjustment settings were set incorrectly. 16, 79 Using improper needle or thread for the selected 21 fabric. Thread is 13 not used. Upper threading is incorrect. 17, 79 Bobbin is incorrect. The fabric feeds in the bobbin case. 77, 79, 80 ■ After sewing Symptom, Cause/solution Reference Thread tension is set 54 incorrectly. The needle clamp screw is loose. 22 Needle is turned, bent or the point is damaged. * The needle contacts the needle plate...
Operation Manual
Page 90
... save a pattern while no USB flash drive is loaded. Although a few stitches can be sewn when the "Start/Stop" button is pressed, replace with plenty of the embroidery unit will display several more times until the appropriate maintenance is performed. 17 Raise the buttonhole lever. Load USB media. This message is displayed when the speed control lever is set to cut the threads, raise the presser foot, remove the embroidery frame...
... save a pattern while no USB flash drive is loaded. Although a few stitches can be sewn when the "Start/Stop" button is pressed, replace with plenty of the embroidery unit will display several more times until the appropriate maintenance is performed. 17 Raise the buttonhole lever. Load USB media. This message is displayed when the speed control lever is set to cut the threads, raise the presser foot, remove the embroidery frame...

Operation Manual
Page 92
... Needle threader 19 O , Operation beep 12 89 Optional accessories 8 Overcasting stitches 38 P Patchwork 45 Piecing 46 Power supply 9 Presser foot 10, 23, 26, 35 Presser foot holder 5 Pulling up bobbin thread 20 Q Quilting 46 Quilting guide 47 R Race 78 , Reinforcement stitch 27 28 , Retrieving 55 75 , Reverse stitch 27 28 , Rotate 71 73 S , Satin stitch 11 25 , Saving 55 75 Scallop stitching 51 Sewing speed controller 6 Shell tuck stitch 52 Size 71 Smocking 51 , Speed 15 26 Split embroidery patterns...
... Needle threader 19 O , Operation beep 12 89 Optional accessories 8 Overcasting stitches 38 P Patchwork 45 Piecing 46 Power supply 9 Presser foot 10, 23, 26, 35 Presser foot holder 5 Pulling up bobbin thread 20 Q Quilting 46 Quilting guide 47 R Race 78 , Reinforcement stitch 27 28 , Retrieving 55 75 , Reverse stitch 27 28 , Rotate 71 73 S , Satin stitch 11 25 , Saving 55 75 Scallop stitching 51 Sewing speed controller 6 Shell tuck stitch 52 Size 71 Smocking 51 , Speed 15 26 Split embroidery patterns...


