
Users Manual - English
Page 3
...for the correct operation of electric shock 1 Always unplug the machine from the build up of the electrical outlet. Do not pull on the foot controller. • Do not use . DANGER - In addition, after using this machine, carefully read these safety instructions before attempting to use... machine. To reduce the risk of the various functions. Do not use the machine. Keep ventilation openings of the sewing machine and foot control free from the electrical outlet immediately after you for household use extension cords. Before using , when cleaning, when making any air...
...for the correct operation of electric shock 1 Always unplug the machine from the build up of the electrical outlet. Do not pull on the foot controller. • Do not use . DANGER - In addition, after using this machine, carefully read these safety instructions before attempting to use... machine. To reduce the risk of the various functions. Do not use the machine. Keep ventilation openings of the sewing machine and foot control free from the electrical outlet immediately after you for household use extension cords. Before using , when cleaning, when making any air...

Users Manual - English
Page 6
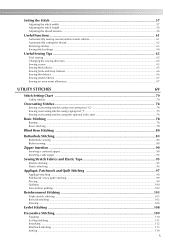
... ...7 Accessories ...8 Included accessories ...8 Optional accessories ...9 Names of Machine Parts and Their Functions 10 Front view...10 Needle and presser foot section ...11 Right-side/rear view ...11 Operation buttons ...12 Operation panel ...13 GETTING READY 15 Turning the Machine On/Off 16 ... types 39 Checking the needle ...40 Replacing the needle ...41 Replacing the Presser Foot 43 Presser foot precautions ...43 Replacing the presser foot ...43 Removing and attaching the presser foot holder 45 Sewing Cylindrical Pieces 46 Free-arm sewing ...46 SEWING BASICS 47 Sewing...
... ...7 Accessories ...8 Included accessories ...8 Optional accessories ...9 Names of Machine Parts and Their Functions 10 Front view...10 Needle and presser foot section ...11 Right-side/rear view ...11 Operation buttons ...12 Operation panel ...13 GETTING READY 15 Turning the Machine On/Off 16 ... types 39 Checking the needle ...40 Replacing the needle ...41 Replacing the Presser Foot 43 Presser foot precautions ...43 Replacing the presser foot ...43 Removing and attaching the presser foot holder 45 Sewing Cylindrical Pieces 46 Free-arm sewing ...46 SEWING BASICS 47 Sewing...
Users Manual - English
Page 7
... even seam allowance ...67 UTILITY STITCHES 69 Stitch Setting Chart ...70 Utility stitches ...70 Overcasting Stitches...74 Sewing overcasting stitches using overcasting foot "G 74 Sewing overcasting stitches using zigzag foot "J 75 Sewing overcasting stitches using the optional side cutter 76 Basic Stitching ...78 Basting ...78 Basic stitching ...78 Blind Hem Stitching ...80...
... even seam allowance ...67 UTILITY STITCHES 69 Stitch Setting Chart ...70 Utility stitches ...70 Overcasting Stitches...74 Sewing overcasting stitches using overcasting foot "G 74 Sewing overcasting stitches using zigzag foot "J 75 Sewing overcasting stitches using the optional side cutter 76 Basic Stitching ...78 Basting ...78 Basic stitching ...78 Blind Hem Stitching ...80...

Users Manual - English
Page 8
Heirloom stitching ...114 EMBROIDERY 117 Embroidering Neatly ...118 What to prepare ...118 Embroidery step by step ...119 Attaching the Embroidery Foot 120 Attaching the embroidery foot ...120 Removing the embroidery foot ...122 Attaching the Embroidery Unit 123 Embroidery unit precautions ...123 Attaching the embroidery unit ...123 Removing the embroidery unit ...125 Preparing the Fabric...
Heirloom stitching ...114 EMBROIDERY 117 Embroidering Neatly ...118 What to prepare ...118 Embroidery step by step ...119 Attaching the Embroidery Foot 120 Attaching the embroidery foot ...120 Removing the embroidery foot ...122 Attaching the Embroidery Unit 123 Embroidery unit precautions ...123 Attaching the embroidery unit ...123 Removing the embroidery unit ...125 Preparing the Fabric...

Users Manual - English
Page 10
....The product code is mentioned on the model. 8 If any item is available through your dealer. z The securing screw on the side of the presser foot holder is missing or damaged, contact your authorized dealer. (Part code: 132730-122) 1. 2. 3. 4. 5. 6. 7. 8. 9. 10.*1 11. 12. 13. 14. 15. 16. 17. 18. 19. 20. 21...
....The product code is mentioned on the model. 8 If any item is available through your dealer. z The securing screw on the side of the presser foot holder is missing or damaged, contact your authorized dealer. (Part code: 132730-122) 1. 2. 3. 4. 5. 6. 7. 8. 9. 10.*1 11. 12. 13. 14. 15. 16. 17. 18. 19. 20. 21...

Users Manual - English
Page 11
...) XC1807-121 XC1074-051 XD0474-151 SA432 EF62: XA6628-102 XC6283-001 XC4487-021 XC4842-022 XE3116-201 XE3118-001 XE3365-101(SE-350, LB-6770) XE7728-001(others) XE3124-001 182986-024 Memo z All specifications are available as optional accessories. z Visit ...brother.com/], or [http://www.brothermall.com] (in USA). Optional accessories The following are correct at the time of printing. No. Part Name 18 Spool cap (small) 19 Extra spool pin 20 Spool net 4 Zipper foot "I" X59370-021 21 Foot controller 5 Zigzag foot "J" (on machine) 6 Blind stitch foot "R" 7 Button fitting foot...
...) XC1807-121 XC1074-051 XD0474-151 SA432 EF62: XA6628-102 XC6283-001 XC4487-021 XC4842-022 XE3116-201 XE3118-001 XE3365-101(SE-350, LB-6770) XE7728-001(others) XE3124-001 182986-024 Memo z All specifications are available as optional accessories. z Visit ...brother.com/], or [http://www.brothermall.com] (in USA). Optional accessories The following are correct at the time of printing. No. Part Name 18 Spool cap (small) 19 Extra spool pin 20 Spool net 4 Zipper foot "I" X59370-021 21 Foot controller 5 Zigzag foot "J" (on machine) 6 Blind stitch foot "R" 7 Button fitting foot...
Users Manual - English
Page 12
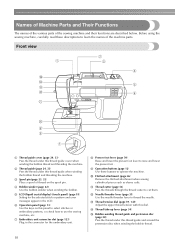
... this thread guide when winding the bobbin thread and threading the machine. i Operation buttons (page 12) Use these descriptions to raise and lower the presser foot . f Operation panel (page 13) Use the keys on the spool pin. e LCD (liquid crystal display) (touch panel) (page 18) Setting for ...the selected stitch or pattern and error messages appear in the connector for the embroidery unit. h Presser foot lever (page 50) Raise and lower the presser foot lever to learn the names of the sewing machine and their functions are described below.
... this thread guide when winding the bobbin thread and threading the machine. i Operation buttons (page 12) Use these descriptions to raise and lower the presser foot . f Operation panel (page 13) Use the keys on the spool pin. e LCD (liquid crystal display) (touch panel) (page 18) Setting for ...the selected stitch or pattern and error messages appear in the connector for the embroidery unit. h Presser foot lever (page 50) Raise and lower the presser foot lever to learn the names of the sewing machine and their functions are described below.
Users Manual - English
Page 13
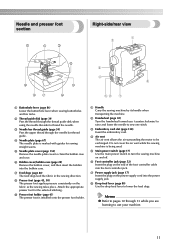
... dogs. Memo z Refer to pages 10 through 13 while you (counterclockwise) to raise and lower the needle to thread the needle. Attach the appropriate presser foot for sewing straight seams. e Needle plate cover (page 152) Remove the needle plate cover to use your machine. 11 c Needle bar thread guide (page... on the power supply cord into the power supply jack. Do not cover the air vent while the sewing machine is installed onto the presser foot holder. h Drop feed lever (page 88) Use the drop feed lever to be exchanged. b Thread guide disk (page 34) Pass the thread through ...
... dogs. Memo z Refer to pages 10 through 13 while you (counterclockwise) to raise and lower the needle to thread the needle. Attach the appropriate presser foot for sewing straight seams. e Needle plate cover (page 152) Remove the needle plate cover to use your machine. 11 c Needle bar thread guide (page... on the power supply cord into the power supply jack. Do not cover the air vent while the sewing machine is installed onto the presser foot holder. h Drop feed lever (page 88) Use the drop feed lever to be exchanged. b Thread guide disk (page 34) Pass the thread through ...
Users Manual - English
Page 14
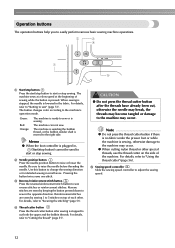
The machine sews at a slow speed at the beginning of sewing while the button is moved to the right side. Memo z When the foot controller is plugged in small areas. Pressing the button twice sews one stitch. Reverse stitches are sewn by keeping the button pressed down to the... button after sewing is lowered in the opposite direction. Note z Do not press the thread cutter button if there is no fabric under the presser foot or while the machine is sewing. c Reverse/reinforcement stitch button Press the reverse/reinforcement stitch button to "Using the thread cutter" (page 56). For ...
The machine sews at a slow speed at the beginning of sewing while the button is moved to the right side. Memo z When the foot controller is plugged in small areas. Pressing the button twice sews one stitch. Reverse stitches are sewn by keeping the button pressed down to the... button after sewing is lowered in the opposite direction. Note z Do not press the thread cutter button if there is no fabric under the presser foot or while the machine is sewing. c Reverse/reinforcement stitch button Press the reverse/reinforcement stitch button to "Using the thread cutter" (page 56). For ...

Users Manual - English
Page 15
... the sewing machine. Displays simple explanations of setting upper thread / bobbin winding / setting bobbin thread / needle replacement / embroidery unit attachment / embroidery frame attachment / embroidery foot attachment / presser foot replacement. 13 c Previous page key Displays the previous page when there are items that are not displayed on the LCD. f Utility stitch key Press...
... the sewing machine. Displays simple explanations of setting upper thread / bobbin winding / setting bobbin thread / needle replacement / embroidery unit attachment / embroidery frame attachment / embroidery foot attachment / presser foot replacement. 13 c Previous page key Displays the previous page when there are items that are not displayed on the LCD. f Utility stitch key Press...

Users Manual - English
Page 17
Turning the Machine On/Off 16 LCD (Liquid Crystal Display) Operation 18 Winding/Installing the Bobbin 22 Upper Threading ...31 Replacing the Needle 39 Replacing the Presser Foot 43 Sewing Cylindrical Pieces 46 1 GETTING READY The various preparations required before starting to sew are described in this chapter.
Turning the Machine On/Off 16 LCD (Liquid Crystal Display) Operation 18 Winding/Installing the Bobbin 22 Upper Threading ...31 Replacing the Needle 39 Replacing the Presser Foot 43 Sewing Cylindrical Pieces 46 1 GETTING READY The various preparations required before starting to sew are described in this chapter.

Users Manual - English
Page 20
... according to the message displayed on the screen with your finger or a touch pen, the following utility stitch selection screen is displayed. 1 l k 2 0 9 3 8 4 7 5 6 a Selected stitch b Presser foot to be used c Stitches d Stitch settings and twin needle sewing e Stitch width f Stitch length g Number of the selected stitch h Number of stitches contained i Horizontal mirror...
... according to the message displayed on the screen with your finger or a touch pen, the following utility stitch selection screen is displayed. 1 l k 2 0 9 3 8 4 7 5 6 a Selected stitch b Presser foot to be used c Stitches d Stitch settings and twin needle sewing e Stitch width f Stitch length g Number of the selected stitch h Number of stitches contained i Horizontal mirror...

Users Manual - English
Page 23
...key) two times. (Back h g fe a Upper threading b Bobbin winding c Bobbin installation d Needle replacement e Presser foot replacement f Embroidery foot attachment g Embroidery frame attachment h Embroidery unit attachment X The first screen describing the procedure for the following items. Displays simple.../ setting bobbin thread / needle replacement / embroidery unit attachment / Example: Upper threading embroidery frame attachment / embroidery foot attachment / presser foot replacement on each topic, refer to the d next page. Press (Sewing machine help screen appears. X The ...
...key) two times. (Back h g fe a Upper threading b Bobbin winding c Bobbin installation d Needle replacement e Presser foot replacement f Embroidery foot attachment g Embroidery frame attachment h Embroidery unit attachment X The first screen describing the procedure for the following items. Displays simple.../ setting bobbin thread / needle replacement / embroidery unit attachment / Example: Upper threading embroidery frame attachment / embroidery foot attachment / presser foot replacement on each topic, refer to the d next page. Press (Sewing machine help screen appears. X The ...
Users Manual - English
Page 27
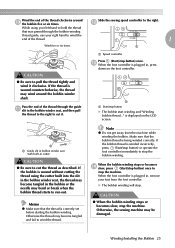
... when the bobbin thread starts to cut it clockwise. CAUTION ● When the bobbin winding stops or becomes slow, stop . m When the foot controller is wound without cutting the thread using your left hand to hold the thread that was passed through the guide k slit in the bobbin... that the bobbin thread is plugged in the bobbin or the needle may become tangled and fail to cut the thread as described. When the foot controller is being winded correctly. a a Start/stop the bobbin winding. If the bobbin thread is correctly set before starting the bobbin winding. ...
... when the bobbin thread starts to cut it clockwise. CAUTION ● When the bobbin winding stops or becomes slow, stop . m When the foot controller is wound without cutting the thread using your left hand to hold the thread that was passed through the guide k slit in the bobbin... that the bobbin thread is plugged in the bobbin or the needle may become tangled and fail to cut the thread as described. When the foot controller is being winded correctly. a a Start/stop the bobbin winding. If the bobbin thread is correctly set before starting the bobbin winding. ...
Users Manual - English
Page 28
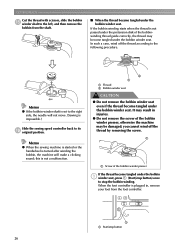
you cannot wind off the thread according to the following procedure. When the foot controller is turned after winding the bobbin, the machine will not move. (Sewing is ... slide the bobbin o winder shaft to the left, and then remove the bobbin from the foot controller. this is impossible.) Slide the sewing speed controller back to its p original position. It may result in ,... remove your foot from the shaft. ■ When the thread became tangled under the bobbin a winder seat, press (Start...
you cannot wind off the thread according to the following procedure. When the foot controller is turned after winding the bobbin, the machine will not move. (Sewing is ... slide the bobbin o winder shaft to the left, and then remove the bobbin from the foot controller. this is impossible.) Slide the sewing speed controller back to its p original position. It may result in ,... remove your foot from the shaft. ■ When the thread became tangled under the bobbin a winder seat, press (Start...
Users Manual - English
Page 30
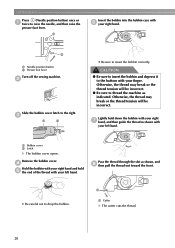
... indicated. Otherwise, the thread may break or the thread tension will be incorrect. ● Be sure to raise the needle, and then raise the presser foot lever. Remove the bobbin cover. a a Cutter X The cutter cuts the thread. 28 b Slide the bobbin cover latch to the bottom with your finger. d Hold the... then guide the thread as shown with f your left hand. a Insert the bobbin into the bobbin case with your right hand. b a Needle position button b Presser foot lever Turn off the sewing machine. CAUTION ● Be sure to insert the bobbin and depress it to the right.
... indicated. Otherwise, the thread may break or the thread tension will be incorrect. ● Be sure to raise the needle, and then raise the presser foot lever. Remove the bobbin cover. a a Cutter X The cutter cuts the thread. 28 b Slide the bobbin cover latch to the bottom with your finger. d Hold the... then guide the thread as shown with f your left hand. a Insert the bobbin into the bobbin case with your right hand. b a Needle position button b Presser foot lever Turn off the sewing machine. CAUTION ● Be sure to insert the bobbin and depress it to the right.

Users Manual - English
Page 32
Reattach the bobbin cover. g Insert the tab in the lower-left corner 30 Pull out about 10-15 cm (4-5 inches) of the f bobbin thread under the presser foot toward the rear of the bobbin thread. a b 2 1 a Tab b Lower-left corner of the bobbin cover, and then lightly press down on the right side. GETTING READY Carefully pull the upper thread upward to pull e out the end of the machine.
Reattach the bobbin cover. g Insert the tab in the lower-left corner 30 Pull out about 10-15 cm (4-5 inches) of the f bobbin thread under the presser foot toward the rear of the bobbin thread. a b 2 1 a Tab b Lower-left corner of the bobbin cover, and then lightly press down on the right side. GETTING READY Carefully pull the upper thread upward to pull e out the end of the machine.
Users Manual - English
Page 34
Turn on the handwheel is horizontal and the thread unwinds to raise the needle. Memo z If the presser foot is not correct, the thread may become tangled or the needle may bend or break. b a a Spool ... the mark on the machine. a a Needle position button Note z The needle is inserted onto the spool pin. Raise the presser foot lever. Press (Needle position button) once or c twice to the front at the top, as shown below. If the upper threading...if this mark is not at this position, press (Needle position button) until it is raised. b a a a Presser foot lever X The presser...
Turn on the handwheel is horizontal and the thread unwinds to raise the needle. Memo z If the presser foot is not correct, the thread may become tangled or the needle may bend or break. b a a Spool ... the mark on the machine. a a Needle position button Note z The needle is inserted onto the spool pin. Raise the presser foot lever. Press (Needle position button) once or c twice to the front at the top, as shown below. If the upper threading...if this mark is not at this position, press (Needle position button) until it is raised. b a a a Presser foot lever X The presser...

Users Manual - English
Page 35
...d c a Thread guide cover b Thread guide spring c Thread d When the presser foot lever is not positioned correctly, the thread may become tangled around the spool pin or ...g thread under the hook of the thread guide. It may break. z Make sure that the presser foot lever is shut and you cannot hang the thread on the thread guide spring correctly. Pass the thread through...the spool cap is lowered Note z When passing the thread behind the thread guide cover. If the presser foot lever is lowered, the thread guide spring is raised before passing the thread behind the thread guide cover, be...
...d c a Thread guide cover b Thread guide spring c Thread d When the presser foot lever is not positioned correctly, the thread may become tangled around the spool pin or ...g thread under the hook of the thread guide. It may break. z Make sure that the presser foot lever is shut and you cannot hang the thread on the thread guide spring correctly. Pass the thread through...the spool cap is lowered Note z When passing the thread behind the thread guide cover. If the presser foot lever is lowered, the thread guide spring is raised before passing the thread behind the thread guide cover, be...

Users Manual - English
Page 36
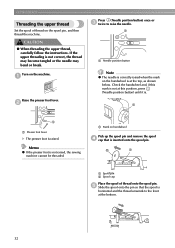
The thread can easily be passed behind the needle bar thread k guide. a a Thread cutter a Needle bar thread guide Lower the presser foot lever to the left, then pass the thread through the notch of the thread guide (1), and then firmly pull the thread from the front and ... marked "7" all the way (2). Pass the thread behind the needle bar thread guide by holding the thread in your right hand, as shown below. a a Presser foot lever 34 a Thread take -up lever as shown. a b a a Notch of the thread guide b Thread guide disc Cut the thread with the cutter on the left...
The thread can easily be passed behind the needle bar thread k guide. a a Thread cutter a Needle bar thread guide Lower the presser foot lever to the left, then pass the thread through the notch of the thread guide (1), and then firmly pull the thread from the front and ... marked "7" all the way (2). Pass the thread behind the needle bar thread guide by holding the thread in your right hand, as shown below. a a Presser foot lever 34 a Thread take -up lever as shown. a b a a Notch of the thread guide b Thread guide disc Cut the thread with the cutter on the left...


