
Users Manual - English
Page 7
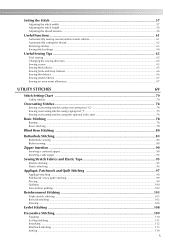
... ...90 Inserting a centered zipper ...90 Inserting a side zipper ...92 Sewing Stretch Fabrics and Elastic Tape 95 Stretch stitching ...95 Elastic attaching ...96 Appliqué, Patchwork and Quilt Stitching 97 Appliqué stitching ...98 Patchwork (crazy quilt) stitching ...99 Piecing ...99 Quilting ...100 Free-motion quilting ...102 Reinforcement Stitching 103 Triple stretch stitching...
... ...90 Inserting a centered zipper ...90 Inserting a side zipper ...92 Sewing Stretch Fabrics and Elastic Tape 95 Stretch stitching ...95 Elastic attaching ...96 Appliqué, Patchwork and Quilt Stitching 97 Appliqué stitching ...98 Patchwork (crazy quilt) stitching ...99 Piecing ...99 Quilting ...100 Free-motion quilting ...102 Reinforcement Stitching 103 Triple stretch stitching...

Users Manual - English
Page 8
...) operation ...133 Selecting alphabet characters ...136 Selecting an embroidery pattern ...137 Selecting a frame pattern...137 Using an embroidery card ...138 Embroidering...139 Embroidering a pattern ...139 Appliquéing ...141 Editing and Saving Patterns 143 Adjusting the layout and the size...143 Adjusting the thread tension ...145 Connecting character patterns ...146 Resewing...
...) operation ...133 Selecting alphabet characters ...136 Selecting an embroidery pattern ...137 Selecting a frame pattern...137 Using an embroidery card ...138 Embroidering...139 Embroidering a pattern ...139 Appliquéing ...141 Editing and Saving Patterns 143 Adjusting the layout and the size...143 Adjusting the thread tension ...145 Connecting character patterns ...146 Resewing...

Users Manual - English
Page 71
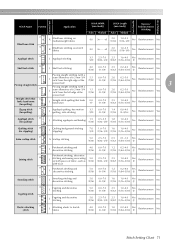
3 UTILITY STITCHES The various stitches and their applications are described in this chapter. Stitch Setting Chart 70 Overcasting Stitches 74 Basic Stitching ...78 Blind Hem Stitching 80 Buttonhole Stitching 83 Zipper Insertion...90 Sewing Stretch Fabrics and Elastic Tape 95 Appliqué, Patchwork and Quilt Stitching 97 Reinforcement Stitching 103 Eyelet Stitching...108 Decorative Stitching 109
3 UTILITY STITCHES The various stitches and their applications are described in this chapter. Stitch Setting Chart 70 Overcasting Stitches 74 Basic Stitching ...78 Blind Hem Stitching 80 Buttonhole Stitching 83 Zipper Insertion...90 Sewing Stretch Fabrics and Elastic Tape 95 Appliqué, Patchwork and Quilt Stitching 97 Reinforcement Stitching 103 Eyelet Stitching...108 Decorative Stitching 109

Users Manual - English
Page 72
... 3 4 Triple stretch stitch 5 Stretch stitch Center Attaching zippers, basic J/I stitching, sewing gathers or pintucks, etc. No Reinforcement No Right Center Zigzag stitch 7 J Overcasting and attaching appliqués 3.5 0.0-7.0 1.4 0.0-4.0 Yes (1/8) (0-1/4) (1/16) (0-3/16) (J) Reverse No 8 J Beginning sewing from the right needle position 3.5 (1/8) 2.5-5.0 1.4 0.3-4.0 Yes (3/32-3/16) (1/16) (1/64-3/16) (J) Reinforcement Yes 9 2-point zigzag stitch 3-point...
... 3 4 Triple stretch stitch 5 Stretch stitch Center Attaching zippers, basic J/I stitching, sewing gathers or pintucks, etc. No Reinforcement No Right Center Zigzag stitch 7 J Overcasting and attaching appliqués 3.5 0.0-7.0 1.4 0.0-4.0 Yes (1/8) (0-1/4) (1/16) (0-3/16) (J) Reverse No 8 J Beginning sewing from the right needle position 3.5 (1/8) 2.5-5.0 1.4 0.3-4.0 Yes (3/32-3/16) (1/16) (1/64-3/16) (J) Reinforcement Yes 9 2-point zigzag stitch 3-point...
Users Manual - English
Page 73
...)] Auto Manual Auto Manual Reverse/ Reinforcement Stitching 00 3← - →3 2.0 (1/16) 1.0-3.5 (1/16-1/8) No Reinforcement No 00 3← - →3 2.0 (1/16) 1.0-3.5 (1/16-1/8) No Reinforcement No 19 Appliqué stitch J Appliqué stitching 3.5 (1/8) 2.5-7.0 (3/32-1/4) 2.5 1.6-4.0 Yes (3/32) (1/16-3/16) (J) Reinforcement No 20 Shell tuck stitch J Shell tuck stitching 4.0 (3/16) 0.0-7.0 (0-1/4) 2.5 0.2-4.0 Yes (3/32) (1/64-3/16) (J) Reinforcement No Piecing...
...)] Auto Manual Auto Manual Reverse/ Reinforcement Stitching 00 3← - →3 2.0 (1/16) 1.0-3.5 (1/16-1/8) No Reinforcement No 00 3← - →3 2.0 (1/16) 1.0-3.5 (1/16-1/8) No Reinforcement No 19 Appliqué stitch J Appliqué stitching 3.5 (1/8) 2.5-7.0 (3/32-1/4) 2.5 1.6-4.0 Yes (3/32) (1/16-3/16) (J) Reinforcement No 20 Shell tuck stitch J Shell tuck stitching 4.0 (3/16) 0.0-7.0 (0-1/4) 2.5 0.2-4.0 Yes (3/32) (1/64-3/16) (J) Reinforcement No Piecing...
Users Manual - English
Page 99
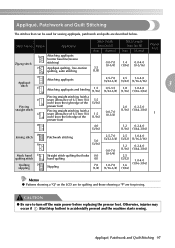
... quilting, satin stitching Stitch Width [mm (inch)] Auto Manual 0.0-7.0 3.5 (0-1/4) (1/8) Stitch Length [mm (inch)] Auto Manual 1.4 0.0-4.0 (1/16) (0-3/16) Presser Foot 19 Appliqué stitch 25 Attaching appliqués 2.5-7.0 2.5 1.6-4.0 (3/32-1/4) (3/32) (1/16-3/16) Attaching appliqués and binding 1.5 (1/16) 0.5-3.5 (1/32-1/8) 1.8 (1/16) 1.0-4.0 (1/16-3/16) 3 Piecing straight stitching (with a 21 seam allowance of 6.5 mm (1/4 5.5 inch) from the...
... quilting, satin stitching Stitch Width [mm (inch)] Auto Manual 0.0-7.0 3.5 (0-1/4) (1/8) Stitch Length [mm (inch)] Auto Manual 1.4 0.0-4.0 (1/16) (0-3/16) Presser Foot 19 Appliqué stitch 25 Attaching appliqués 2.5-7.0 2.5 1.6-4.0 (3/32-1/4) (3/32) (1/16-3/16) Attaching appliqués and binding 1.5 (1/16) 0.5-3.5 (1/32-1/8) 1.8 (1/16) 1.0-4.0 (1/16-3/16) 3 Piecing straight stitching (with a 21 seam allowance of 6.5 mm (1/4 5.5 inch) from the...

Users Manual - English
Page 100
... stabilizer on replacing the presser foot, refer to . 1 a Basting stitching Attach zigzag foot "J". d J • For details on the back of the appliqué. e • For details, refer to change the sewing direction. 98 Turn the handwheel toward you f (counterclockwise), and then begin sewing around corners, ...stop the machine with the needle in the fabric just outside of the appliqué, and then fold over , and then baste or fuse it will be attached to "Replacing the presser foot" (page 43)....
... stabilizer on replacing the presser foot, refer to . 1 a Basting stitching Attach zigzag foot "J". d J • For details on the back of the appliqué. e • For details, refer to change the sewing direction. 98 Turn the handwheel toward you f (counterclockwise), and then begin sewing around corners, ...stop the machine with the needle in the fabric just outside of the appliqué, and then fold over , and then baste or fuse it will be attached to "Replacing the presser foot" (page 43)....

Users Manual - English
Page 101
... together. Sew a piecing straight stitch 6.5 mm (1/4 inch) from either the right side or the left side of the presser foot with a 6.5 mm (1/4 inch) seam allowance. Appliqué, Patchwork and Quilt Stitching 99 Sew with the side of the presser foot aligned d with the edge of fabric together so the b pattern spans...
... together. Sew a piecing straight stitch 6.5 mm (1/4 inch) from either the right side or the left side of the presser foot with a 6.5 mm (1/4 inch) seam allowance. Appliqué, Patchwork and Quilt Stitching 99 Sew with the side of the presser foot aligned d with the edge of fabric together so the b pattern spans...

Users Manual - English
Page 103
Appliqué, Patchwork and Quilt Stitching 101 Insert the stem of the quilting guide into the a hole at the rear of the walking foot or presser foot holder. † Walking foot 3 † Presser foot holder Adjust the stem of the quilting guide so that b the guide aligns with the seam that are equally spaced. Using the optional quilting guide Use the quilting guide to sew parallel stitches that has already been sewn.
Appliqué, Patchwork and Quilt Stitching 101 Insert the stem of the quilting guide into the a hole at the rear of the walking foot or presser foot holder. † Walking foot 3 † Presser foot holder Adjust the stem of the quilting guide so that b the guide aligns with the seam that are equally spaced. Using the optional quilting guide Use the quilting guide to sew parallel stitches that has already been sewn.

Users Manual - English
Page 141
... upper thread" (page 32). Give the thread a little slack. Embroidering 139 For details, refer to • The thread color number set displayed for embroidering and appliquéing. CAUTION ● If the thread is pulled too tight, the needle may misalign. The pattern may break or bend. ● Do not let...
... upper thread" (page 32). Give the thread a little slack. Embroidering 139 For details, refer to • The thread color number set displayed for embroidering and appliquéing. CAUTION ● If the thread is pulled too tight, the needle may misalign. The pattern may break or bend. ● Do not let...

Users Manual - English
Page 143
... the screen. Cut carefully along the cut it on stabilizer to NAME OF COLOR, so "APPLIQUE MATERIAL", "APPLIQUE POSITION" and "APPLIQUE" are displayed on the screen. Set up the thread for the appliqué is sewn, and the sewing machine stops. f Apply iron-on the Lower the ...sewing machine stops. X The cut right on the stitching, it will not be displayed on the screen. a b a Cut-out line b Appliqué piece fabric X "APPLIQUE POSITION" will be displayed on the embroidery e frame. Stretch the base fabric on the screen. embroidery frame. 4 Lower the presser foot lever...
... the screen. Cut carefully along the cut it on stabilizer to NAME OF COLOR, so "APPLIQUE MATERIAL", "APPLIQUE POSITION" and "APPLIQUE" are displayed on the screen. Set up the thread for the appliqué is sewn, and the sewing machine stops. f Apply iron-on the Lower the ...sewing machine stops. X The cut right on the stitching, it will not be displayed on the screen. a b a Cut-out line b Appliqué piece fabric X "APPLIQUE POSITION" will be displayed on the embroidery e frame. Stretch the base fabric on the screen. embroidery frame. 4 Lower the presser foot lever...

Users Manual - English
Page 144
Use a proper color thread to the back of the appliqué piece, and attach it in the appliqué position. X The position for the appliqué is stitched, and the sewing machine stops. Follow the instructions on the screen, and j change thread colors as you sew. 142 Memo z When "APPLIQUE MATERIAL", "APPLIQUE POSITION" and "APPLIQUE" are displayed, a specific color thread does not appear. Lower the presser foot lever, and press i (Start/stop button). EMBROIDERY Apply a thin layer of fabric glue or spray h adhesive to match the appliqué piece.
Use a proper color thread to the back of the appliqué piece, and attach it in the appliqué position. X The position for the appliqué is stitched, and the sewing machine stops. Follow the instructions on the screen, and j change thread colors as you sew. 142 Memo z When "APPLIQUE MATERIAL", "APPLIQUE POSITION" and "APPLIQUE" are displayed, a specific color thread does not appear. Lower the presser foot lever, and press i (Start/stop button). EMBROIDERY Apply a thin layer of fabric glue or spray h adhesive to match the appliqué piece.
Users Manual - English
Page 167
... stitch length 59 drop feed lever 11 adjusting stitch width 57 adjusting thread tension 59, 145 E air vent 11 appliqu 97 appliqué pattern selection 141 elastic tape 95 embroidering 118, 139 appliqué stitch 97 embroidering pattern 139 attaching presser foot holder 45 embroidering steps 119 attaching stabilizer material 126 embroidery bobbin...
... stitch length 59 drop feed lever 11 adjusting stitch width 57 adjusting thread tension 59, 145 E air vent 11 appliqu 97 appliqué pattern selection 141 elastic tape 95 embroidering 118, 139 appliqué stitch 97 embroidering pattern 139 attaching presser foot holder 45 embroidering steps 119 attaching stabilizer material 126 embroidery bobbin...


