
Users Manual - English
Page 1
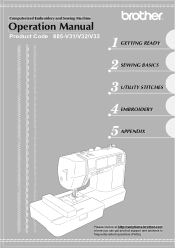
Computerized Embroidery and Sewing Machine Operation Manual Product Code 885-V31/V32/V33 GETTING READY SEWING BASICS UTILITY STITCHES EMBROIDERY APPENDIX Please visit us at http://solutions.brother.com where you can get product support and answers to frequently asked questions (FAQs).
Computerized Embroidery and Sewing Machine Operation Manual Product Code 885-V31/V32/V33 GETTING READY SEWING BASICS UTILITY STITCHES EMBROIDERY APPENDIX Please visit us at http://solutions.brother.com where you can get product support and answers to frequently asked questions (FAQs).
Users Manual - English
Page 4
..., as contained in this machine, avoid direct sunlight and high humidity locations. If the problem persists, please consult your local authorized Brother dealer. Save these instructions. otherwise, the machine, power cord or garment being sewn may fall, resulting in the manual. Use ...the sewing machine to the symbol "O" position to turn it to break. 6 This machine is required, first follow careful instruction when freehand stitching so that this product are being administered. • Do not use as an unsteady or slanted table, otherwise the sewing machine may ...
..., as contained in this machine, avoid direct sunlight and high humidity locations. If the problem persists, please consult your local authorized Brother dealer. Save these instructions. otherwise, the machine, power cord or garment being sewn may fall, resulting in the manual. Use ...the sewing machine to the symbol "O" position to turn it to break. 6 This machine is required, first follow careful instruction when freehand stitching so that this product are being administered. • Do not use as an unsteady or slanted table, otherwise the sewing machine may ...

Users Manual - English
Page 6
... and attaching the presser foot holder 45 Sewing Cylindrical Pieces 46 Free-arm sewing ...46 SEWING BASICS 47 Sewing...48 General sewing procedure ...48 Selecting stitching ...49 Positioning the fabric ...50 Starting to sew...51 Securing the...
... and attaching the presser foot holder 45 Sewing Cylindrical Pieces 46 Free-arm sewing ...46 SEWING BASICS 47 Sewing...48 General sewing procedure ...48 Selecting stitching ...49 Positioning the fabric ...50 Starting to sew...51 Securing the...
Users Manual - English
Page 7
... an even seam allowance ...67 UTILITY STITCHES 69 Stitch Setting Chart ...70 Utility stitches ...70 Overcasting Stitches...74 Sewing overcasting stitches using overcasting foot "G 74 Sewing overcasting stitches using zigzag foot "J 75 Sewing overcasting stitches using the optional side cutter 76 Basic Stitching ...78 Basting ...78 Basic stitching ...78 Blind Hem Stitching ...80 Buttonhole Stitching ...83 Buttonhole sewing ...84 Button sewing...
... an even seam allowance ...67 UTILITY STITCHES 69 Stitch Setting Chart ...70 Utility stitches ...70 Overcasting Stitches...74 Sewing overcasting stitches using overcasting foot "G 74 Sewing overcasting stitches using zigzag foot "J 75 Sewing overcasting stitches using the optional side cutter 76 Basic Stitching ...78 Basting ...78 Basic stitching ...78 Blind Hem Stitching ...80 Buttonhole Stitching ...83 Buttonhole sewing ...84 Button sewing...

Users Manual - English
Page 8
Heirloom stitching ...114 EMBROIDERY 117 Embroidering Neatly ...118 What to prepare ...118 Embroidery step by step ...119 Attaching the Embroidery Foot 120 Attaching the embroidery foot ...120 ...
Heirloom stitching ...114 EMBROIDERY 117 Embroidering Neatly ...118 What to prepare ...118 Embroidery step by step ...119 Attaching the Embroidery Foot 120 Attaching the embroidery foot ...120 ...

Users Manual - English
Page 9
... machine is ready to work on dark fabrics. i Embroidery You can embroider built-in embroidery patterns, characters, framed decorations, and designs from the built-in stitches You can wind bobbins with one press of fabric weights (page 11). g Lighting Start/Stop button When the green light is on, the machine is...
... machine is ready to work on dark fabrics. i Embroidery You can embroider built-in embroidery patterns, characters, framed decorations, and designs from the built-in stitches You can wind bobbins with one press of fabric weights (page 11). g Lighting Start/Stop button When the green light is on, the machine is...

Users Manual - English
Page 11
...CEN X81164-001 SAEBT999 EBT-CEBN XC5520-001 Memo z To obtain optional accessories or parts, visit [http://www.brother.com/], or [http://www.brothermall.com] (in USA). Part Name 18 Spool cap (small) 19 Extra spool...pin 20 Spool net 4 Zipper foot "I" X59370-021 21 Foot controller 5 Zigzag foot "J" (on machine) 6 Blind stitch foot "R" 7 Button fitting foot "M" 8 Seam ripper 9 Bobbin (4) Bobbin clip (3) 10 Needle set 11 Twin needle ...001 XC4487-021 XC4842-022 XE3116-201 XE3118-001 XE3365-101(SE-350, LB-6770) XE7728-001(others) XE3124-001 182986-024 Memo z All specifications are available ...
...CEN X81164-001 SAEBT999 EBT-CEBN XC5520-001 Memo z To obtain optional accessories or parts, visit [http://www.brother.com/], or [http://www.brothermall.com] (in USA). Part Name 18 Spool cap (small) 19 Extra spool...pin 20 Spool net 4 Zipper foot "I" X59370-021 21 Foot controller 5 Zigzag foot "J" (on machine) 6 Blind stitch foot "R" 7 Button fitting foot "M" 8 Seam ripper 9 Bobbin (4) Bobbin clip (3) 10 Needle set 11 Twin needle ...001 XC4487-021 XC4842-022 XE3116-201 XE3118-001 XE3365-101(SE-350, LB-6770) XE7728-001(others) XE3124-001 182986-024 Memo z All specifications are available ...
Users Manual - English
Page 12
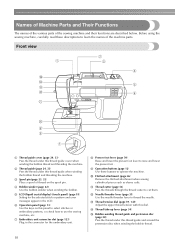
...this thread guide when winding the bobbin thread and threading the machine. e LCD (liquid crystal display) (touch panel) (page 18) Setting for the selected stitch or pattern and error messages appear in the connector for the embroidery unit. c Spool pin (page 23, 32) Place a spool of the machine parts.... disc when winding the bobbin thread. 10 Front view a Thread guide cover (page 24, 33) Pass the thread under this panel to select stitches or embroidery patterns, or check how to thread the needle. k Thread cutter (page 56) Pass the threads through the thread cutter to raise ...
...this thread guide when winding the bobbin thread and threading the machine. e LCD (liquid crystal display) (touch panel) (page 18) Setting for the selected stitch or pattern and error messages appear in the connector for the embroidery unit. c Spool pin (page 23, 32) Place a spool of the machine parts.... disc when winding the bobbin thread. 10 Front view a Thread guide cover (page 24, 33) Pass the thread under this panel to select stitches or embroidery patterns, or check how to thread the needle. k Thread cutter (page 56) Pass the threads through the thread cutter to raise ...
Users Manual - English
Page 13
... the end of the foot controller cable into the foot controller jack. h Drop feed lever (page 88) Use the drop feed lever to sew one stitch. i Presser foot holder (page 45) The presser foot is being used. c Embroidery card slot (page 138) Insert the embroidery card. e Main power switch (...to raise and lower the needle to lower the feed dogs. d Needle plate (page 67) The needle plate is marked with guides for the selected stitching. a Handle Carry the sewing machine by its handle when transporting the machine. Do not cover the air vent while the sewing machine is installed onto...
... the end of the foot controller cable into the foot controller jack. h Drop feed lever (page 88) Use the drop feed lever to sew one stitch. i Presser foot holder (page 45) The presser foot is being used. c Embroidery card slot (page 138) Insert the embroidery card. e Main power switch (...to raise and lower the needle to lower the feed dogs. d Needle plate (page 67) The needle plate is marked with guides for the selected stitching. a Handle Carry the sewing machine by its handle when transporting the machine. Do not cover the air vent while the sewing machine is installed onto...
Users Manual - English
Page 14
...details, refer to change the sewing direction or for detailed sewing in the fabric. c Reverse/reinforcement stitch button Press the reverse/reinforcement stitch button to 5 stitches on the side of sewing while the button is sewing, otherwise damage to the machine may occur. ... button after the threads have already been cut both the upper and the bobbin threads. Reinforcement stitches are sewn by sewing 3 to sew reverse stitches or reinforcement stitches. e Sewing speed controller Slide the sewing speed controller to easily perform various basic sewing machine operations...
...details, refer to change the sewing direction or for detailed sewing in the fabric. c Reverse/reinforcement stitch button Press the reverse/reinforcement stitch button to 5 stitches on the side of sewing while the button is sewing, otherwise damage to the machine may occur. ... button after the threads have already been cut both the upper and the bobbin threads. Reinforcement stitches are sewn by sewing 3 to sew reverse stitches or reinforcement stitches. e Sewing speed controller Slide the sewing speed controller to easily perform various basic sewing machine operations...

Users Manual - English
Page 15
... Press this key to select a utility stitch. Operation panel The front operation panel has an LCD (liquid crystal display) and operation keys. c Previous page key Displays the previous page when there are ... attachment / embroidery foot attachment / presser foot replacement. 13 Touch the keys displayed on the LCD. a LCD (liquid crystal display) (touch panel) Setting for the selected stitch or pattern and error messages appear in the LCD. into the sewing machine memory.
... Press this key to select a utility stitch. Operation panel The front operation panel has an LCD (liquid crystal display) and operation keys. c Previous page key Displays the previous page when there are ... attachment / embroidery foot attachment / presser foot replacement. 13 Touch the keys displayed on the LCD. a LCD (liquid crystal display) (touch panel) Setting for the selected stitch or pattern and error messages appear in the LCD. into the sewing machine memory.

Users Manual - English
Page 20
... are explained in "Selecting an embroidery pattern" (page 137). For details, refer to be used c Stitches d Stitch settings and twin needle sewing e Stitch width f Stitch length g Number of the selected stitch h Number of the sewing machine. z Refer to the message displayed on the right side of the LCD...to "Error messages" (page 159) for messages displayed on . Viewing the LCD When the power is displayed. 1 l k 2 0 9 3 8 4 7 5 6 a Selected stitch b Presser foot to "Operation panel" (page 13). The details are displayed on the LCD (liquid crystal display) on the front of...
... are explained in "Selecting an embroidery pattern" (page 137). For details, refer to be used c Stitches d Stitch settings and twin needle sewing e Stitch width f Stitch length g Number of the selected stitch h Number of the sewing machine. z Refer to the message displayed on the right side of the LCD...to "Error messages" (page 159) for messages displayed on . Viewing the LCD When the power is displayed. 1 l k 2 0 9 3 8 4 7 5 6 a Selected stitch b Presser foot to "Operation panel" (page 13). The details are displayed on the LCD (liquid crystal display) on the front of...

Users Manual - English
Page 21
... to the next page. 1 Attribute Needle position Stitch width control Thread color display Icon Details Settings Specifies where the needle is positioned when the sewing machine is selected) Embroidery/Country...). Lighter Darker Product number NO.: The "NO." Initial needle position Language Selects whether "1 Straight stitch (left)" or "3 Straight stitch (middle)" that can be changed . Program version Version: Display the program version. - The stitch or machine attributes that is automatically selected when the machine is turned on. Allows the language used...
... to the next page. 1 Attribute Needle position Stitch width control Thread color display Icon Details Settings Specifies where the needle is positioned when the sewing machine is selected) Embroidery/Country...). Lighter Darker Product number NO.: The "NO." Initial needle position Language Selects whether "1 Straight stitch (left)" or "3 Straight stitch (middle)" that can be changed . Program version Version: Display the program version. - The stitch or machine attributes that is automatically selected when the machine is turned on. Allows the language used...

Users Manual - English
Page 22
... are changed are complete, press d (Back key). X The LCD comes on the display Example: Changing the needle stop position X The setting screen appears. X The initial stitch screen appears again. When settings are saved even if the power is installed in the sewing machine. Memo z "NO" is the initial setting. GETTING READY...
... are changed are complete, press d (Back key). X The LCD comes on the display Example: Changing the needle stop position X The setting screen appears. X The initial stitch screen appears again. When settings are saved even if the power is installed in the sewing machine. Memo z "NO" is the initial setting. GETTING READY...

Users Manual - English
Page 23
... screen. Press (Sewing machine help screen appears. Turn on b the display panel. Press the item to the corresponding page in this Operation Manual. X The initial stitch screen appears again. Memo z For details on each topic, refer to be referred on the LCD display for the selected topic appears. X The sewing machine...
... screen. Press (Sewing machine help screen appears. Turn on b the display panel. Press the item to the corresponding page in this Operation Manual. X The initial stitch screen appears again. Memo z For details on each topic, refer to be referred on the LCD display for the selected topic appears. X The sewing machine...
Users Manual - English
Page 38
...and your finger may break. b a a Presser foot lever Pass the thread through k on installing a needle, refer to steps a through the eye of the same stitch with the upper c thread. Bent needles can sew two parallel lines of the needle c from the front. Thread the upper thread for the left needle... Thread the machine to the needle bar thread a guide according to "Replacing the needle" (page 41). Use of the needle from front to "Stitch Setting Chart" (page 70). Pass the thread through the eye of any other needle may be used with the needle threader, thread the needle as...
...and your finger may break. b a a Presser foot lever Pass the thread through k on installing a needle, refer to steps a through the eye of the same stitch with the upper c thread. Bent needles can sew two parallel lines of the needle c from the front. Thread the upper thread for the left needle... Thread the machine to the needle bar thread a guide according to "Replacing the needle" (page 41). Use of the needle from front to "Stitch Setting Chart" (page 70). Pass the thread through the eye of any other needle may be used with the needle threader, thread the needle as...
Users Manual - English
Page 39
...CAUTION ● When using the twin needle, be damaged. CAUTION ● When using the twin needle, be sure to select an appropriate stitch, otherwise the needle may break or the machine may be sure to attach zigzag foot "J". Without passing the thread through j of the d ...bobbin winder shaft, and install the thread spool on the sewing machine and select a h stitch. • For stitch selection see "Selecting stitching" (page 49). • See "Stitch Setting Chart" (page 70) for the left side was threaded. g For details on changing the presser foot, refer ...
...CAUTION ● When using the twin needle, be damaged. CAUTION ● When using the twin needle, be sure to select an appropriate stitch, otherwise the needle may break or the machine may be sure to attach zigzag foot "J". Without passing the thread through j of the d ...bobbin winder shaft, and install the thread spool on the sewing machine and select a h stitch. • For stitch selection see "Selecting stitching" (page 49). • See "Stitch Setting Chart" (page 70) for the left side was threaded. g For details on changing the presser foot, refer ...

Users Manual - English
Page 40
... turning the fabric with the twin needle left down in reverse highlight. GETTING READY Press . X The initial screen appears again, and appears. X Two lines of stitching are sewn parallel to sew" (page 51). i Start sewing. X The screen for setting the twin needle appears. Note z When changing the sewing direction, press (Needle...
... turning the fabric with the twin needle left down in reverse highlight. GETTING READY Press . X The initial screen appears again, and appears. X Two lines of stitching are sewn parallel to sew" (page 51). i Start sewing. X The screen for setting the twin needle appears. Note z When changing the sewing direction, press (Needle...
Users Manual - English
Page 41
... fabrics Thin fabrics Broadcloth Taffeta Flannel, Gabardine Lawn Georgette Challis, Satin Thick fabrics Stretch fabrics Denim Corduroy Tweed Jersey Tricot Easily frayed fabrics For top-stitching Thread Type Cotton thread Synthetic thread Silk thread Cotton thread Synthetic thread Silk thread Cotton thread Synthetic thread Silk thread Thread for the fabric that...
... fabrics Thin fabrics Broadcloth Taffeta Flannel, Gabardine Lawn Georgette Challis, Satin Thick fabrics Stretch fabrics Denim Corduroy Tweed Jersey Tricot Easily frayed fabrics For top-stitching Thread Type Cotton thread Synthetic thread Silk thread Cotton thread Synthetic thread Silk thread Cotton thread Synthetic thread Silk thread Thread for the fabric that...

Users Manual - English
Page 42
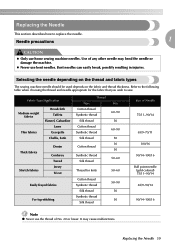
... even. Checking the needle Sewing with thin needles (such as denim) with a bent needle is purchased. ■ Ball point needle (gold colored) To avoid skipped stitches use a 90/14 or 100/16 home sewing machine needle. Do not use a bent needle. a a a Flat surface 40 CAUTION z The appropriate fabric, thread and needle... thread. ■ Embroidery needles Use a 75/11 home sewing machine needle. GETTING READY Memo z The lower the thread number is being operated. In addition, the stitching may be uneven or puckered or there may be skipped...
... even. Checking the needle Sewing with thin needles (such as denim) with a bent needle is purchased. ■ Ball point needle (gold colored) To avoid skipped stitches use a 90/14 or 100/16 home sewing machine needle. Do not use a bent needle. a a a Flat surface 40 CAUTION z The appropriate fabric, thread and needle... thread. ■ Embroidery needles Use a 75/11 home sewing machine needle. GETTING READY Memo z The lower the thread number is being operated. In addition, the stitching may be uneven or puckered or there may be skipped...


