
Users Manual - English
Page 4
Benzene, thinner, and scouring powders can damage the case and machine, and should be replaced by the manufacturer as a stove or iron; If the problem persists, please consult your local authorized Brother dealer. Save these instructions. Use accessories recommended by authorized dealer. • In the event a ...due to the danger of suffocation. • Do not use or store the machine near a space heater, iron, halogen lamp, or other parts to assure correct installation. 8 For repair or adjustment: • If the Light unit is required when sewing: • Always pay close ...
Benzene, thinner, and scouring powders can damage the case and machine, and should be replaced by the manufacturer as a stove or iron; If the problem persists, please consult your local authorized Brother dealer. Save these instructions. Use accessories recommended by authorized dealer. • In the event a ...due to the danger of suffocation. • Do not use or store the machine near a space heater, iron, halogen lamp, or other parts to assure correct installation. 8 For repair or adjustment: • If the Light unit is required when sewing: • Always pay close ...

Users Manual - English
Page 6
Contents Introduction ...1 Important Safety Instructions 1 Machine Features ...7 Accessories ...8 Included accessories ...8 Optional accessories ...9 Names of Machine Parts and Their Functions 10 Front view...10 Needle and presser foot section ...11 Right-side/rear view ...11 Operation ... ...39 Selecting the needle depending on the thread and fabric types 39 Checking the needle ...40 Replacing the needle ...41 Replacing the Presser Foot 43 Presser foot precautions ...43 Replacing the presser foot ...43 Removing and attaching the presser foot holder 45 Sewing Cylindrical Pieces 46 Free...
Contents Introduction ...1 Important Safety Instructions 1 Machine Features ...7 Accessories ...8 Included accessories ...8 Optional accessories ...9 Names of Machine Parts and Their Functions 10 Front view...10 Needle and presser foot section ...11 Right-side/rear view ...11 Operation ... ...39 Selecting the needle depending on the thread and fabric types 39 Checking the needle ...40 Replacing the needle ...41 Replacing the Presser Foot 43 Presser foot precautions ...43 Replacing the presser foot ...43 Removing and attaching the presser foot holder 45 Sewing Cylindrical Pieces 46 Free...
Users Manual - English
Page 38
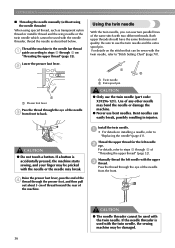
Lower the presser foot lever. For details on installing a needle, refer to "Replacing the needle" (page 41). Raise the presser foot lever, pass the end of the d thread through the presser foot, and then pull out about 5 cm ... threader is accidentally pressed, the machine starts sewing, and your finger may bend the needle or damage the machine. ● Never use the twin needle (part code: X59296-121). Using the twin needle With the twin needle, you can sew two parallel lines of any other needle may be sewn with...
Lower the presser foot lever. For details on installing a needle, refer to "Replacing the needle" (page 41). Raise the presser foot lever, pass the end of the d thread through the presser foot, and then pull out about 5 cm ... threader is accidentally pressed, the machine starts sewing, and your finger may bend the needle or damage the machine. ● Never use the twin needle (part code: X59296-121). Using the twin needle With the twin needle, you can sew two parallel lines of any other needle may be sewn with...
Users Manual - English
Page 43
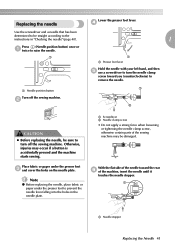
...machine. a Screwdriver b Needle clamp screw • Do not apply a strong force when loosening or tightening the needle clamp screw, otherwise certain parts of the needle toward you (counterclockwise) to remove the needle. With the flat side of the sewing machine may occur if a button is ...accidentally pressed and the machine starts sewing. Replacing the needle Use the screwdriver and a needle that has been determined to be straight according to the instructions in the needle plate. Otherwise,...
...machine. a Screwdriver b Needle clamp screw • Do not apply a strong force when loosening or tightening the needle clamp screw, otherwise certain parts of the needle toward you (counterclockwise) to remove the needle. With the flat side of the sewing machine may occur if a button is ...accidentally pressed and the machine starts sewing. Replacing the needle Use the screwdriver and a needle that has been determined to be straight according to the instructions in the needle plate. Otherwise,...

Users Manual - English
Page 50
...17). ↓ 3 Select the stitch. SEWING BASICS Sewing Basic sewing operations are aligned correctly. In addition, keep your hands away from all moving parts such as the needle and handwheel, otherwise injuries may break or bend. z Do not pull or push the fabric too hard while sewing, otherwise... presser foot that the fabric pieces are sewn in injuries. Be sure to "Replacing the presser foot" (page 43). ↓ 2 Turn on replacing the presser foot, refer to turn off the main power before replacing the presser foot. For details on the machine. For details on turning on ...
...17). ↓ 3 Select the stitch. SEWING BASICS Sewing Basic sewing operations are aligned correctly. In addition, keep your hands away from all moving parts such as the needle and handwheel, otherwise injuries may break or bend. z Do not pull or push the fabric too hard while sewing, otherwise... presser foot that the fabric pieces are sewn in injuries. Be sure to "Replacing the presser foot" (page 43). ↓ 2 Turn on replacing the presser foot, refer to turn off the main power before replacing the presser foot. For details on the machine. For details on turning on ...

Users Manual - English
Page 83
... edge of the folded j hem against the guide of fabric Attach blind hem foot "R". g • For details, refer to "Replacing the presser foot" (page 43). Slide the part that you change the needle drop point, raise the needle, and then change the stitch width. Select a stitch. a a Stitch ... the hem. • For details on free-arm sewing, refer to sew onto the i arm, make h free-arm sewing possible. • For details on replacing the presser foot, refer to "Selecting stitching" (page 49). Fold back the fabric inside along the basting. d 2 4 3 1 1 Remove the flat bed...
... edge of the folded j hem against the guide of fabric Attach blind hem foot "R". g • For details, refer to "Replacing the presser foot" (page 43). Slide the part that you change the needle drop point, raise the needle, and then change the stitch width. Select a stitch. a a Stitch ... the hem. • For details on free-arm sewing, refer to sew onto the i arm, make h free-arm sewing possible. • For details on replacing the presser foot, refer to "Selecting stitching" (page 49). Fold back the fabric inside along the basting. d 2 4 3 1 1 Remove the flat bed...

Users Manual - English
Page 86
...) f Bracket 84 2 1 a Marks on the fabric the position a and length of the button). Use chalk to turn off the main power before replacing the pressor foot. The names of parts of the presser foot to the back, as shown below . Buttonholes are indicated below . 1 1 1 1 a Reinforcement stitching CAUTION ● Be sure to mark...
...) f Bracket 84 2 1 a Marks on the fabric the position a and length of the button). Use chalk to turn off the main power before replacing the pressor foot. The names of parts of the presser foot to the back, as shown below . Buttonholes are indicated below . 1 1 1 1 a Reinforcement stitching CAUTION ● Be sure to mark...

Users Manual - English
Page 89
...the stitch length and width by sewing a trial buttonhole on stretch fabrics, use the seam ripper in any slack. d Adjust the stitch width to "Replacing the presser foot" (page 43). Buttonhole Stitching 87 b 3 Memo z For details, refer to "Adjusting the stitch width" (page 57). Lower ...the presser foot lever and the f buttonhole lever, and then start sewing. Hook the gimp thread onto the part of a buttonhole foot "A" shown in the illustration. ■ Changing the density of fabric. Memo z For details, refer to "Adjusting the stitch length...
...the stitch length and width by sewing a trial buttonhole on stretch fabrics, use the seam ripper in any slack. d Adjust the stitch width to "Replacing the presser foot" (page 43). Buttonhole Stitching 87 b 3 Memo z For details, refer to "Adjusting the stitch width" (page 57). Lower ...the presser foot lever and the f buttonhole lever, and then start sewing. Hook the gimp thread onto the part of a buttonhole foot "A" shown in the illustration. ■ Changing the density of fabric. Memo z For details, refer to "Adjusting the stitch length...


