
Users Manual - English
Page 1
Computerized Embroidery and Sewing Machine Operation Manual Product Code 885-V31/V32/V33 GETTING READY SEWING BASICS UTILITY STITCHES EMBROIDERY APPENDIX Please visit us at http://solutions.brother.com where you can get product support and answers to frequently asked questions (FAQs).
Computerized Embroidery and Sewing Machine Operation Manual Product Code 885-V31/V32/V33 GETTING READY SEWING BASICS UTILITY STITCHES EMBROIDERY APPENDIX Please visit us at http://solutions.brother.com where you can get product support and answers to frequently asked questions (FAQs).
Users Manual - English
Page 3
... safety instructions before attempting to persons. 2 Always unplug the machine from the electrical outlet immediately after you have finished reading this embroidery and sewing machine. Return the machine to make any user servicing adjustments mentioned in the instruction manual • To unplug the machine, switch the machine to the symbol "O" position to turn it off, then...
... safety instructions before attempting to persons. 2 Always unplug the machine from the electrical outlet immediately after you have finished reading this embroidery and sewing machine. Return the machine to make any user servicing adjustments mentioned in the instruction manual • To unplug the machine, switch the machine to the symbol "O" position to turn it off, then...

Users Manual - English
Page 8
...stabilizer material to the fabric 126 Setting the fabric in the embroidery frame ...127 Attaching the Embroidery Frame 130 Attaching the embroidery frame ...130 Removing the embroidery frame ...131 Selecting Embroidery Patterns 132 Copyright information ...132 Embroidery pattern types ...132 LCD (liquid crystal display) operation ...133...148 Stopping while embroidering ...148 Saving patterns...150 APPENDIX 151 Care and Maintenance ...152 Cleaning the machine surface ...152 Cleaning the race ...152 Troubleshooting ...154 Error messages ...159 Adjusting the LCD ...163 Operation beep...163 Index ......
...stabilizer material to the fabric 126 Setting the fabric in the embroidery frame ...127 Attaching the Embroidery Frame 130 Attaching the embroidery frame ...130 Removing the embroidery frame ...131 Selecting Embroidery Patterns 132 Copyright information ...132 Embroidery pattern types ...132 LCD (liquid crystal display) operation ...133...148 Stopping while embroidering ...148 Saving patterns...150 APPENDIX 151 Care and Maintenance ...152 Cleaning the machine surface ...152 Cleaning the race ...152 Troubleshooting ...154 Error messages ...159 Adjusting the LCD ...163 Operation beep...163 Index ......

Users Manual - English
Page 9
...h Easy-to-use needle threader You can wind bobbins with one press of fabric weights (page 11). Machine Features 9 a Automatic thread cutting The thread can embroider built-in embroidery patterns, characters, framed decorations, and designs from the built-in stitches You can start sewing without pulling... up (page 12). e Quick-set bobbin You can select from optional embroidery cards (page 117). 7 c Built-in utility stitches available (page 70). d Seven-point feed dogs Ensure smooth, even feeding of multiple...
...h Easy-to-use needle threader You can wind bobbins with one press of fabric weights (page 11). Machine Features 9 a Automatic thread cutting The thread can embroider built-in embroidery patterns, characters, framed decorations, and designs from the built-in stitches You can start sewing without pulling... up (page 12). e Quick-set bobbin You can select from optional embroidery cards (page 117). 7 c Built-in utility stitches available (page 70). d Seven-point feed dogs Ensure smooth, even feeding of multiple...

Users Manual - English
Page 11
...Embroidery bobbin thread (white) Embroidery bobbin thread (black) Part Code U.S.A. / Canada Others SAEBT EBT-CEN X81164-001 SAEBT999 EBT-CEBN XC5520-001 Memo z To obtain optional accessories or parts, visit [http://www.brother....com/], or [http://www.brothermall.com] (in USA). The bobbin clips can be connected each other areas) XC1807-121 XC1074-051 XD0474-151 SA432 EF62: XA6628-102 XC6283-001 XC4487-021 XC4842-022 XE3116-201 XE3118-001 XE3365-101(SE... "I" X59370-021 21 Foot controller 5 Zigzag foot "J" (on machine) 6 Blind stitch foot "R" 7 Button fitting foot "M" 8 Seam...
...Embroidery bobbin thread (white) Embroidery bobbin thread (black) Part Code U.S.A. / Canada Others SAEBT EBT-CEN X81164-001 SAEBT999 EBT-CEBN XC5520-001 Memo z To obtain optional accessories or parts, visit [http://www.brother....com/], or [http://www.brothermall.com] (in USA). The bobbin clips can be connected each other areas) XC1807-121 XC1074-051 XD0474-151 SA432 EF62: XA6628-102 XC6283-001 XC4487-021 XC4842-022 XE3116-201 XE3118-001 XE3365-101(SE... "I" X59370-021 21 Foot controller 5 Zigzag foot "J" (on machine) 6 Blind stitch foot "R" 7 Button fitting foot "M" 8 Seam...
Users Manual - English
Page 12
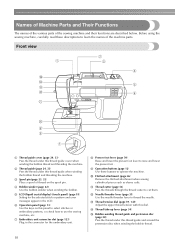
...upper thread tension with this thread guide when winding the bobbin thread and threading the machine. Front view a Thread guide cover (page 24, 33) Pass the thread under this panel to select stitches or embroidery patterns, or check how to thread the needle. l Needle threader lever (page 35...) Use the needle threader lever to use the sewing machine, etc. e LCD (liquid crystal display) (touch panel) (page 18) Setting for the embroidery unit. b Thread guide (page 24, 33) Pass the thread under this dial. c Spool pin (page 23, ...
...upper thread tension with this thread guide when winding the bobbin thread and threading the machine. Front view a Thread guide cover (page 24, 33) Pass the thread under this panel to select stitches or embroidery patterns, or check how to thread the needle. l Needle threader lever (page 35...) Use the needle threader lever to use the sewing machine, etc. e LCD (liquid crystal display) (touch panel) (page 18) Setting for the embroidery unit. b Thread guide (page 24, 33) Pass the thread under this dial. c Spool pin (page 23, ...
Users Manual - English
Page 13
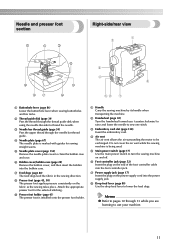
... 43, 50) The presser foot applies pressure consistently on the end of the foot controller cable into the power supply jack. c Embroidery card slot (page 138) Insert the embroidery card. f Foot controller jack (page 52) Insert the plug on the fabric as the sewing takes place. a Handle Carry the... sewing machine by its handle when transporting the machine. d Air vent The air vent allows the air surrounding the motor to clean the bobbin...
... 43, 50) The presser foot applies pressure consistently on the end of the foot controller cable into the power supply jack. c Embroidery card slot (page 138) Insert the embroidery card. f Foot controller jack (page 52) Insert the plug on the fabric as the sewing takes place. a Handle Carry the... sewing machine by its handle when transporting the machine. d Air vent The air vent allows the air surrounding the motor to clean the bobbin...

Users Manual - English
Page 15
... the LCD. h Settings key Press to select a utility stitch. b Back key Press to return to perform operations. Touch the keys displayed on using the sewing machine. For details, refer to sew embroidery. g Embroidery key Press this key to set the needle stop position, the buzzer sound, and more.
... the LCD. h Settings key Press to select a utility stitch. b Back key Press to return to perform operations. Touch the keys displayed on using the sewing machine. For details, refer to sew embroidery. g Embroidery key Press this key to set the needle stop position, the buzzer sound, and more.

Users Manual - English
Page 20
... c Stitches d Stitch settings and twin needle sewing e Stitch width f Stitch length g Number of the selected stitch h Number of the sewing machine. Viewing the LCD When the power is attached. The details are displayed on the LCD (liquid crystal display) on the front of stitches contained...image j Automatic thread cutting k Automatic reverse/reinforcement l Single/twin needle sewing and needle stop position Memo z A different screen is displayed when the embroidery unit is turned on, the LCD comes on the LCD. 18 For details, refer to "Error messages" (page 159) for messages displayed on ...
... c Stitches d Stitch settings and twin needle sewing e Stitch width f Stitch length g Number of the selected stitch h Number of the sewing machine. Viewing the LCD When the power is attached. The details are displayed on the LCD (liquid crystal display) on the front of stitches contained...image j Automatic thread cutting k Automatic reverse/reinforcement l Single/twin needle sewing and needle stop position Memo z A different screen is displayed when the embroidery unit is turned on, the LCD comes on the LCD. 18 For details, refer to "Error messages" (page 159) for messages displayed on ...

Users Manual - English
Page 21
... measurement units that can be changed . The stitch or machine attributes that are displayed (only for the embroidery and sewing machine. - Thread color/Time to be adjusted with each operation (page 163). For details on the embroidery screen (page 133). Changing the machine settings Various sewing machine operations and sewing settings can be set are the...
... measurement units that can be changed . The stitch or machine attributes that are displayed (only for the embroidery and sewing machine. - Thread color/Time to be adjusted with each operation (page 163). For details on the embroidery screen (page 133). Changing the machine settings Various sewing machine operations and sewing settings can be set are the...

Users Manual - English
Page 23
... simple explanations of setting upper thread / Press (Back key) to return to the previous page. bobbin winding / setting bobbin thread / needle replacement / embroidery unit attachment / Example: Upper threading embroidery frame attachment / embroidery foot attachment / presser foot replacement on . Turn on b the display panel. Press (Sewing machine help screen appears. Simple explanations can be displayed.
... simple explanations of setting upper thread / Press (Back key) to return to the previous page. bobbin winding / setting bobbin thread / needle replacement / embroidery unit attachment / Example: Upper threading embroidery frame attachment / embroidery foot attachment / presser foot replacement on . Turn on b the display panel. Press (Sewing machine help screen appears. Simple explanations can be displayed.
Users Manual - English
Page 25
.... Note z If the spool is not positioned so that is not positioned correctly, the thread may become tangled around the spool pin or the machine may be damaged. ● Three spool cap sizes are available, allowing you to the front at the bottom. 1 Place the bobbin on the... arrow until it snaps into place. a b a Notch b Bobbin winder shaft spring Slide the bobbin winder in the bobbin. Memo z For embroidering, use the embroidery bobbin thread. X (Start/stop button) lights up the spool pin and remove the spool d cap that the thread unwinds correctly, the thread may become tangled...
.... Note z If the spool is not positioned so that is not positioned correctly, the thread may become tangled around the spool pin or the machine may be damaged. ● Three spool cap sizes are available, allowing you to the front at the bottom. 1 Place the bobbin on the... arrow until it snaps into place. a b a Notch b Bobbin winder shaft spring Slide the bobbin winder in the bobbin. Memo z For embroidering, use the embroidery bobbin thread. X (Start/stop button) lights up the spool pin and remove the spool d cap that the thread unwinds correctly, the thread may become tangled...

Users Manual - English
Page 42
...stitches. Checking the needle Sewing with a bent needle is extremely dangerous since the needle may be uneven or puckered or there may break while the machine is even. a b a Flat side b Needle type marking CAUTION z If the distance between the needle and the flat surface is being operated.... Before using the needle, place the flat side of the fabric or thread. ■ Embroidery needles Use a 75/11 home sewing machine needle. a a a Flat surface 40 GETTING READY Memo z The lower the thread number is bent. When embroidering on a flat...
...stitches. Checking the needle Sewing with a bent needle is extremely dangerous since the needle may be uneven or puckered or there may break while the machine is even. a b a Flat side b Needle type marking CAUTION z If the distance between the needle and the flat surface is being operated.... Before using the needle, place the flat side of the fabric or thread. ■ Embroidery needles Use a 75/11 home sewing machine needle. a a a Flat surface 40 GETTING READY Memo z The lower the thread number is bent. When embroidering on a flat...
Users Manual - English
Page 45
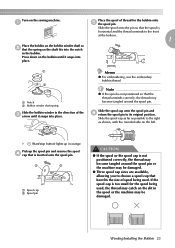
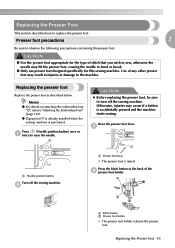
... foot holder. Press (Needle position button) once or a twice to "Attaching the Embroidery Foot" (page 120). Press the black button at the back of any other presser foot may result in injuries or damage to turn off the sewing machine. Replacing the Presser Foot 43 a CAUTION z Before replacing the presser foot, be...
... foot holder. Press (Needle position button) once or a twice to "Attaching the Embroidery Foot" (page 120). Press the black button at the back of any other presser foot may result in injuries or damage to turn off the sewing machine. Replacing the Presser Foot 43 a CAUTION z Before replacing the presser foot, be...
Users Manual - English
Page 47
... Replacing the Presser Foot 45 ab a Screwdriver b Presser foot holder CAUTION z Do not hit the needle with the included screwdriver. embroidery foot, optional free-motion open toe quilting foot "O" and optional walking foot. Use the screwdriver to loosen the presser foot b holder ... a d b a Screwdriver b Presser foot holder c Presser foot holder screw d Presser bar X The presser foot is accidentally pressed and the machine starts sewing. If the screw is raised. Use the screwdriver to remove the presser foot holder. Otherwise, injuries may occur if a button is ...
... Replacing the Presser Foot 45 ab a Screwdriver b Presser foot holder CAUTION z Do not hit the needle with the included screwdriver. embroidery foot, optional free-motion open toe quilting foot "O" and optional walking foot. Use the screwdriver to loosen the presser foot b holder ... a d b a Screwdriver b Presser foot holder c Presser foot holder screw d Presser bar X The presser foot is accidentally pressed and the machine starts sewing. If the screw is raised. Use the screwdriver to remove the presser foot holder. Otherwise, injuries may occur if a button is ...

Users Manual - English
Page 120
... is enough bobbin thread. Memo z For good quality embroidery designs be sure there is necessary for embroidering. ■ Embroidery thread (option) For the upper thread, use embroidery thread designed for fabrics where stitches are needles for embroidery machines. z Before starting to sew, be sure to use the embroidery thread or country thread. ■ Fabric Prepare the...
... is enough bobbin thread. Memo z For good quality embroidery designs be sure there is necessary for embroidering. ■ Embroidery thread (option) For the upper thread, use embroidery thread designed for fabrics where stitches are needles for embroidery machines. z Before starting to sew, be sure to use the embroidery thread or country thread. ■ Fabric Prepare the...

Users Manual - English
Page 122
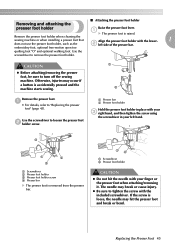
.... c a a Presser foot lever X The presser foot is accidentally pressed and the machine starts sewing. Attaching the embroidery foot Attach the embroidery foot "Q" when embroidering. Turn off the sewing machine. Press and hold the black button on the handwheel is at the top position. b... foot holder X The presser foot holder releases the presser foot. 120 Raise the presser foot lever. EMBROIDERY Attaching the Embroidery Foot This section describes how to turn off the sewing machine. Press (Needle position button) once or a twice to detach the presser foot. a a Needle ...
.... c a a Presser foot lever X The presser foot is accidentally pressed and the machine starts sewing. Attaching the embroidery foot Attach the embroidery foot "Q" when embroidering. Turn off the sewing machine. Press and hold the black button on the handwheel is at the top position. b... foot holder X The presser foot holder releases the presser foot. 120 Raise the presser foot lever. EMBROIDERY Attaching the Embroidery Foot This section describes how to turn off the sewing machine. Press (Needle position button) once or a twice to detach the presser foot. a a Needle ...

Users Manual - English
Page 124
...Raise the presser foot lever. a a Needle position button Turn off the sewing machine. Otherwise, injuries may occur if a button is raised. 122 Turn the screwdriver toward the back. EMBROIDERY Removing the embroidery foot Press (Needle position button) once or a twice to "Removing and ...needle. c a a Presser foot lever X The presser foot is accidentally pressed and the machine starts sewing. CAUTION z Before removing the embroidery foot, be sure to turn off the sewing machine. b a Screwdriver Attach the presser foot holder. a While pressing in the lever at the...
...Raise the presser foot lever. a a Needle position button Turn off the sewing machine. Otherwise, injuries may occur if a button is raised. 122 Turn the screwdriver toward the back. EMBROIDERY Removing the embroidery foot Press (Needle position button) once or a twice to "Removing and ...needle. c a a Presser foot lever X The presser foot is accidentally pressed and the machine starts sewing. CAUTION z Before removing the embroidery foot, be sure to turn off the sewing machine. b a Screwdriver Attach the presser foot holder. a While pressing in the lever at the...

Users Manual - English
Page 125
... This section describes how to the left. a Pull the flat bed attachment off to attach the embroidery unit. Turn off the sewing machine before attaching the embroidery unit. b a Carriage a a Flat bed attachment Attaching the Embroidery Unit 123 The connector could be dropped and cause injury. ● Keep your hands and other objects away from...
... This section describes how to the left. a Pull the flat bed attachment off to attach the embroidery unit. Turn off the sewing machine before attaching the embroidery unit. b a Carriage a a Flat bed attachment Attaching the Embroidery Unit 123 The connector could be dropped and cause injury. ● Keep your hands and other objects away from...
Instruction Manual/USB Connection - English and Spanish
Page 4
... color information, it is a registered trademark or a trademark of International Business Machines Corporation. • Microsoft and Windows are registered trademarks of Microsoft Corporation. However, the explanations for your machine model. ■ Computers and Operating Systems with the Following Specifications... Software License Agreement specific to its proprietary programs. All other than that is not attached, the machine will have a wide range of Brother embroidery cards, as well as standard equipment IBM PC-compatible computer equipped with a stitch density that created ...
... color information, it is a registered trademark or a trademark of International Business Machines Corporation. • Microsoft and Windows are registered trademarks of Microsoft Corporation. However, the explanations for your machine model. ■ Computers and Operating Systems with the Following Specifications... Software License Agreement specific to its proprietary programs. All other than that is not attached, the machine will have a wide range of Brother embroidery cards, as well as standard equipment IBM PC-compatible computer equipped with a stitch density that created ...


