
Users Manual - English
Page 7
Setting the Stitch ...57 Adjusting the stitch width ...57 Adjusting the stitch length ...59 Adjusting the thread tension ...59 Useful Functions...61 Automatically sewing reverse/reinforcement stitches 61 Automatically cutting the thread ...62 Mirroring stitches ...63 Saving stitch settings ...64 Useful Sewing Tips ......
Setting the Stitch ...57 Adjusting the stitch width ...57 Adjusting the stitch length ...59 Adjusting the thread tension ...59 Useful Functions...61 Automatically sewing reverse/reinforcement stitches 61 Automatically cutting the thread ...62 Mirroring stitches ...63 Saving stitch settings ...64 Useful Sewing Tips ......

Users Manual - English
Page 8
... ...138 Embroidering...139 Embroidering a pattern ...139 Appliquéing ...141 Editing and Saving Patterns 143 Adjusting the layout and the size...143 Adjusting the thread tension ...145 Connecting character patterns ...146 Resewing ...147 Thread runs out partway through a design...148 Stopping while embroidering ...148 Saving patterns...150 APPENDIX 151 Care and...
... ...138 Embroidering...139 Embroidering a pattern ...139 Appliquéing ...141 Editing and Saving Patterns 143 Adjusting the layout and the size...143 Adjusting the thread tension ...145 Connecting character patterns ...146 Resewing ...147 Thread runs out partway through a design...148 Stopping while embroidering ...148 Saving patterns...150 APPENDIX 151 Care and...
Users Manual - English
Page 12
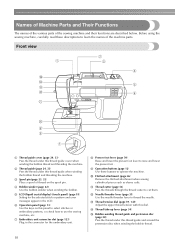
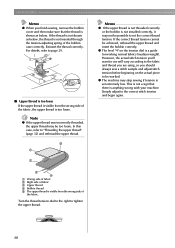
... embroidery patterns, or check how to thread the needle. i Operation buttons (page 12) Use these descriptions to operate the machine. m Thread tension dial (page 59, 145) Adjust the upper thread tension with this thread guide when winding the bobbin thread and threading the machine. b Thread guide (page 24, 33) Pass the thread...
... embroidery patterns, or check how to thread the needle. i Operation buttons (page 12) Use these descriptions to operate the machine. m Thread tension dial (page 59, 145) Adjust the upper thread tension with this thread guide when winding the bobbin thread and threading the machine. b Thread guide (page 24, 33) Pass the thread...

Users Manual - English
Page 26
... a a Bobbin-winding thread guide Make sure that winds off quickly, such as shown below. If the spool net is used, the upper thread tension may become tighter. GETTING READY Note z When sewing with your left hand as transparent nylon thread or metallic thread, place the spool net over the... spool before placing the spool of thread onto the spool pin. Pass the thread behind the thread guide cover h and to "Adjusting the thread tension" (page 59). c d a Spool net b Spool c Spool cap d Spool pin Pull the thread from the spool and pass the g thread under the pretension disc,...
... a a Bobbin-winding thread guide Make sure that winds off quickly, such as shown below. If the spool net is used, the upper thread tension may become tighter. GETTING READY Note z When sewing with your left hand as transparent nylon thread or metallic thread, place the spool net over the... spool before placing the spool of thread onto the spool pin. Pass the thread behind the thread guide cover h and to "Adjusting the thread tension" (page 59). c d a Spool net b Spool c Spool cap d Spool pin Pull the thread from the spool and pass the g thread under the pretension disc,...
Users Manual - English
Page 29
... be passed through the bobbin case is indicated by marks that has been correctly wound with thread, otherwise the needle may break or the thread tension will not operate correctly. a Bobbin-winding thread guide Slide the bobbin winder shaft to the left hand, and d wind off the thread clockwise near the...
... be passed through the bobbin case is indicated by marks that has been correctly wound with thread, otherwise the needle may break or the thread tension will not operate correctly. a Bobbin-winding thread guide Slide the bobbin winder shaft to the left hand, and d wind off the thread clockwise near the...
Users Manual - English
Page 30
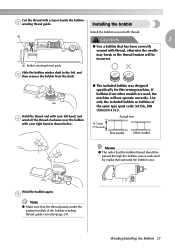
...once or a twice to insert the bobbin correctly. b Slide the bobbin cover latch to drop the bobbin. Otherwise, the thread may break or the thread tension will be incorrect. d Hold the bobbin with your right hand and hold down the bobbin with your right g hand, and then guide the thread as... bobbin into the bobbin case with your left hand. a Bobbin cover b Latch X The bobbin cover opens. Otherwise, the thread may break or the thread tension will be incorrect. ● Be sure to thread the machine as shown, and h then pull the thread out toward the front. • Be careful ...
...once or a twice to insert the bobbin correctly. b Slide the bobbin cover latch to drop the bobbin. Otherwise, the thread may break or the thread tension will be incorrect. d Hold the bobbin with your right hand and hold down the bobbin with your right g hand, and then guide the thread as... bobbin into the bobbin case with your left hand. a Bobbin cover b Latch X The bobbin cover opens. Otherwise, the thread may break or the thread tension will be incorrect. ● Be sure to thread the machine as shown, and h then pull the thread out toward the front. • Be careful ...

Users Manual - English
Page 31
... X The bobbin threading is looped around the upper thread and can begin sewing without pulling up the bobbin thread. case, it may cause incorrect thread tension (page 59). i Insert the tab in the lower-left corner of "Installing the bobbin" (page 28). a a Needle position button X The bobbin ... bobbin thread may be Note necessary z If the thread is not correctly inserted through When making gathers or before free-motion quilting, the tension-adjusting spring of the bobbin first pull up the bobbin thread as described below. You can be pulled up. Next, thread the upper ...
... X The bobbin threading is looped around the upper thread and can begin sewing without pulling up the bobbin thread. case, it may cause incorrect thread tension (page 59). i Insert the tab in the lower-left corner of "Installing the bobbin" (page 28). a a Needle position button X The bobbin ... bobbin thread may be Note necessary z If the thread is not correctly inserted through When making gathers or before free-motion quilting, the tension-adjusting spring of the bobbin first pull up the bobbin thread as described below. You can be pulled up. Next, thread the upper ...

Users Manual - English
Page 35
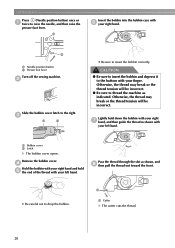
... lowered, the thread guide spring is not positioned correctly, the thread may become tangled around the spool pin or the needle may cause incorrect thread tension. Pass the thread through the guides in the order i shown below . 1 CAUTION ● If the spool or the spool cap is shut and you cannot...
... lowered, the thread guide spring is not positioned correctly, the thread may become tangled around the spool pin or the needle may cause incorrect thread tension. Pass the thread through the guides in the order i shown below . 1 CAUTION ● If the spool or the spool cap is shut and you cannot...

Users Manual - English
Page 51
... stitch to be used , the needle may hit the presser foot and bend or break. Turn on adjusting the stitch width, stitch length and thread tension, refer to "Stitch Setting Chart" (page 70). If the wrong presser foot is attached before starting to "Useful Functions" (page 61). Selecting stitching Stitches are...
... stitch to be used , the needle may hit the presser foot and bend or break. Turn on adjusting the stitch width, stitch length and thread tension, refer to "Stitch Setting Chart" (page 70). If the wrong presser foot is attached before starting to "Useful Functions" (page 61). Selecting stitching Stitches are...

Users Manual - English
Page 61
... the upper thread. CAUTION z If the stitches are bunched together, increase the stitch length. Setting the Stitch 59 Turn the thread tension dial to the left to "Installing the bobbin" (page 27) and rethread the bobbin thread. Adjusting the stitch length Adjusting the thread... tension The stitch length can be adjusted to change the thread tension, depending on the fabric and thread being used. ■ Correct thread tension The upper thread and the bobbin thread should be visible from the wrong ...
... the upper thread. CAUTION z If the stitches are bunched together, increase the stitch length. Setting the Stitch 59 Turn the thread tension dial to the left to "Installing the bobbin" (page 27) and rethread the bobbin thread. Adjusting the stitch length Adjusting the thread... tension The stitch length can be adjusted to change the thread tension, depending on the fabric and thread being used. ■ Correct thread tension The upper thread and the bobbin thread should be visible from the wrong ...
Users Manual - English
Page 62
... Upper thread d Bobbin thread e The upper thread is visible from the wrong side of the fabric, the upper thread is too loose. Turn the thread tension dial to the right to set extremely low. Reinsert the thread correctly. e a Memo z If the upper thread is not threaded correctly or the bobbin is... upper thread. z The level "4" on the actual piece to be achieved, rethread the upper thread and insert the bobbin correctly. However, the actual stitch tension you'll want to use will vary according to the fabric and thread you are using, so you finish sewing, remove the bobbin cover and...
... Upper thread d Bobbin thread e The upper thread is visible from the wrong side of the fabric, the upper thread is too loose. Turn the thread tension dial to the right to set extremely low. Reinsert the thread correctly. e a Memo z If the upper thread is not threaded correctly or the bobbin is... upper thread. z The level "4" on the actual piece to be achieved, rethread the upper thread and insert the bobbin correctly. However, the actual stitch tension you'll want to use will vary according to the fabric and thread you are using, so you finish sewing, remove the bobbin cover and...
Users Manual - English
Page 67
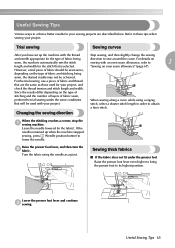
... tips when sewing your sewing projects are the same as a pivot. If the needle remained up the machine with your project, and check the thread tension and stitch length and width. Useful Sewing Tips Various ways to achieve better results for your project.
... tips when sewing your sewing projects are the same as a pivot. If the needle remained up the machine with your project, and check the thread tension and stitch length and width. Useful Sewing Tips Various ways to achieve better results for your project.
Users Manual - English
Page 114
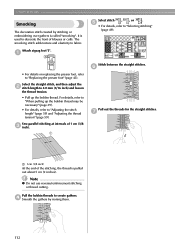
... STITCHES Smocking The decorative stitch created by ironing them. 112 e • For details, refer to "Adjusting the stitch length" (page 59) and "Adjusting the thread tension" (page 59). a J • For details on replacing the presser foot, refer to 4.0 mm (3/16 inch) and loosen the thread... tension. • Pull up the bobbin thread may be necessary" (page 29). • For details, refer to "Selecting stitching" (page 49). Select the straight stitch, and ...
... STITCHES Smocking The decorative stitch created by ironing them. 112 e • For details, refer to "Adjusting the stitch length" (page 59) and "Adjusting the thread tension" (page 59). a J • For details on replacing the presser foot, refer to 4.0 mm (3/16 inch) and loosen the thread... tension. • Pull up the bobbin thread may be necessary" (page 29). • For details, refer to "Selecting stitching" (page 49). Select the straight stitch, and ...

Users Manual - English
Page 115
Attach zigzag foot "J". 3 b J • For details, refer to "Selecting stitching" (page 49) and "Adjusting the thread tension" (page 59). Select stitch 20 , and then increase the c thread tension. • For details, refer to "Replacing the presser foot" (page 43). Sew while making sure that look like shells are used to one side. a Unfold...
Attach zigzag foot "J". 3 b J • For details, refer to "Selecting stitching" (page 49) and "Adjusting the thread tension" (page 59). Select stitch 20 , and then increase the c thread tension. • For details, refer to "Replacing the presser foot" (page 43). Sew while making sure that look like shells are used to one side. a Unfold...
Users Manual - English
Page 147
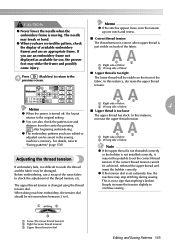
...● Never lower the needle when the embroidery frame is not a sign that anything's broken. In this instance, decrease the upper thread tension. z The embroidery patterns you have revised the pattern, check the display of fabric 4 Memo z When the power is turned off, the... Right side of fabric b Wrong side of the fabric. For details, refer to 6. be saved in the sewing machine's memory. The upper thread tension is not installed correctly, it is too loose The upper thread has slack. The needle may stop stitching during sewing. z You can be achieved, ...
...● Never lower the needle when the embroidery frame is not a sign that anything's broken. In this instance, decrease the upper thread tension. z The embroidery patterns you have revised the pattern, check the display of fabric 4 Memo z When the power is turned off, the... Right side of fabric b Wrong side of the fabric. For details, refer to 6. be saved in the sewing machine's memory. The upper thread tension is not installed correctly, it is too loose The upper thread has slack. The needle may stop stitching during sewing. z You can be achieved, ...
Users Manual - English
Page 156
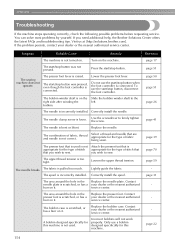
... a thread and needle that you wish to sew. The presser foot that is not turned on the machine. The upper thread tension is raised. The needle breaks. Lightly guide the fabric. The bobbin case is scratched, or has a your dealer or the nearest... not correct. The sewing machine does not operate. service center. page 22 154 Visit us at [http://solutions.brother.com]. Loosen the upper thread tension. APPENDIX Troubleshooting If the machine stops operating correctly, check the following possible problems before requesting service. The area around...
... a thread and needle that you wish to sew. The presser foot that is not turned on the machine. The upper thread tension is raised. The needle breaks. Lightly guide the fabric. The bobbin case is scratched, or has a your dealer or the nearest... not correct. The sewing machine does not operate. service center. page 22 154 Visit us at [http://solutions.brother.com]. Loosen the upper thread tension. APPENDIX Troubleshooting If the machine stops operating correctly, check the following possible problems before requesting service. The area around...
Users Manual - English
Page 157
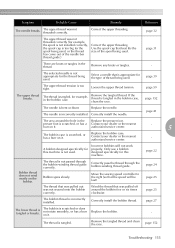
.... Remove any knots or tangles. - Select a needle that is tangled in the Replace the presser foot. page 39 The upper thread tension is not used. Loosen the upper thread tension. If the thread is appropriate for this machine is too tight. authorized service center. 5 The bobbin case is scratched or does not...
.... Remove any knots or tangles. - Select a needle that is tangled in the Replace the presser foot. page 39 The upper thread tension is not used. Loosen the upper thread tension. If the thread is appropriate for this machine is too tight. authorized service center. 5 The bobbin case is scratched or does not...
Users Manual - English
Page 158
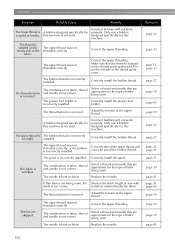
...this machine is tangled on the left side of fabric, thread and needle is wrinkled. The bobbin thread is incorrect. The thread tension is incorrectly installed. Incorrect bobbins will not work properly. Correctly install the bobbin thread. Correctly thread the upper thread and correctly ... stitch is incorrectly installed. The needle is not correct. Select a thread and needle that are appropriate for this machine. Adjust the tension of the upper thread. Correctly install the spool. Stitches are being sewn. The thread is not used . The upper thread was not...
...this machine is tangled on the left side of fabric, thread and needle is wrinkled. The bobbin thread is incorrect. The thread tension is incorrectly installed. Incorrect bobbins will not work properly. Correctly install the bobbin thread. Correctly thread the upper thread and correctly ... stitch is incorrectly installed. The needle is not correct. Select a thread and needle that are appropriate for this machine. Adjust the tension of the upper thread. Correctly install the spool. Stitches are being sewn. The thread is not used . The upper thread was not...
Users Manual - English
Page 159
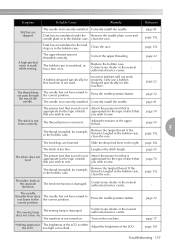
...not sewn correctly. The needle has not been raised to the right. page 70 The stitch is made while sewing. The thread tension is too fine. page 102 The stitch is incorrect. If the thread is either too light or too dark. Contact your ... turned on it. Turn on . Contact your dealer or the nearest authorized service center. Incorrect bobbins will not work properly. Adjust the tension of the needle. Lengthen the stitch length. correct position. Correct the upper threading. Press the needle position button. direction. Correctly install the...
...not sewn correctly. The needle has not been raised to the right. page 70 The stitch is made while sewing. The thread tension is too fine. page 102 The stitch is incorrect. If the thread is either too light or too dark. Contact your ... turned on it. Turn on . Contact your dealer or the nearest authorized service center. Incorrect bobbins will not work properly. Adjust the tension of the needle. Lengthen the stitch length. correct position. Correct the upper threading. Press the needle position button. direction. Correctly install the...

Users Manual - English
Page 160
..., the pattern may be misaligned. The fabric is plugged up. The thread is tangled and the bobbin case, etc., is loose. Adjust the tension of embroidery frame motion. When the bobbin case is catching. A heavy fabric is not set the fabric up , clean the race. No pattern...so that the thread is hanged on the thread guide spring which is not fully stretched on the embroidery frame. installed. The thread tension is incorrectly Correctly install the bobbin thread. Objects are placed near the carriage or embroidery frame. Reference page 123 page 132 page ...
..., the pattern may be misaligned. The fabric is plugged up. The thread is tangled and the bobbin case, etc., is loose. Adjust the tension of embroidery frame motion. When the bobbin case is catching. A heavy fabric is not set the fabric up , clean the race. No pattern...so that the thread is hanged on the thread guide spring which is not fully stretched on the embroidery frame. installed. The thread tension is incorrectly Correctly install the bobbin thread. Objects are placed near the carriage or embroidery frame. Reference page 123 page 132 page ...


