

Users Manual - English
Page 8
... display) operation ...133 Selecting alphabet characters ...136 Selecting an embroidery pattern ...137 Selecting a frame pattern...137 Using an embroidery card ...138 Embroidering...139 Embroidering a pattern ...139 Appliquéing ...141 Editing and Saving Patterns 143 Adjusting the layout and the size...143 Adjusting the thread tension ...145 Connecting character patterns ...146 Resewing ...147...
... display) operation ...133 Selecting alphabet characters ...136 Selecting an embroidery pattern ...137 Selecting a frame pattern...137 Using an embroidery card ...138 Embroidering...139 Embroidering a pattern ...139 Appliquéing ...141 Editing and Saving Patterns 143 Adjusting the layout and the size...143 Adjusting the thread tension ...145 Connecting character patterns ...146 Resewing ...147...

Users Manual - English
Page 9
... winding system With the fast and simple bobbin winder, you can start sewing without pulling up (page 12). i Embroidery You can embroider built-in embroidery patterns, characters, framed decorations, and designs from the built-in stitches You can be cut automatically after sewing (page... 55, 62). g Lighting Start/Stop button When the green light is warming up the bobbin thread (page 27). Machine Features 9 a Automatic thread cutting The thread can select from optional embroidery cards (page 117). 7 d Seven-point feed dogs Ensure smooth, even feeding of multiple fabric ...
... winding system With the fast and simple bobbin winder, you can start sewing without pulling up (page 12). i Embroidery You can embroider built-in embroidery patterns, characters, framed decorations, and designs from the built-in stitches You can be cut automatically after sewing (page... 55, 62). g Lighting Start/Stop button When the green light is warming up the bobbin thread (page 27). Machine Features 9 a Automatic thread cutting The thread can select from optional embroidery cards (page 117). 7 d Seven-point feed dogs Ensure smooth, even feeding of multiple fabric ...

Users Manual - English
Page 11
Part Name Embroidery bobbin thread (white) Embroidery bobbin thread (black) Part Code U.S.A. / Canada Others SAEBT EBT-CEN X81164-001 SAEBT999 EBT-CEBN XC5520-001 Memo z To obtain optional accessories or parts, visit [http://www.brother.com/], or [http://www.brothermall.com] (in USA). The part codes are available as optional ... the end of the thread wound onto the bobbin from loosening. The bobbin clips can be connected each other areas) XC1807-121 XC1074-051 XD0474-151 SA432 EF62: XA6628-102 XC6283-001 XC4487-021 XC4842-022 XE3116-201 XE3118-001 XE3365-101(SE-350, LB-6770)...
Part Name Embroidery bobbin thread (white) Embroidery bobbin thread (black) Part Code U.S.A. / Canada Others SAEBT EBT-CEN X81164-001 SAEBT999 EBT-CEBN XC5520-001 Memo z To obtain optional accessories or parts, visit [http://www.brother.com/], or [http://www.brothermall.com] (in USA). The part codes are available as optional ... the end of the thread wound onto the bobbin from loosening. The bobbin clips can be connected each other areas) XC1807-121 XC1074-051 XD0474-151 SA432 EF62: XA6628-102 XC6283-001 XC4487-021 XC4842-022 XE3116-201 XE3118-001 XE3365-101(SE-350, LB-6770)...
Users Manual - English
Page 12
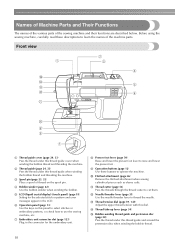
...) Plug in the LCD. i Operation buttons (page 12) Use these descriptions to cut them. n Thread take-up lever (page 34) o Bobbin-winding thread guide and pretension disc (page 24) Pass the thread under this panel to select stitches or embroidery patterns, or check how to operate the machine. Before using the sewing machine, carefully...
...) Plug in the LCD. i Operation buttons (page 12) Use these descriptions to cut them. n Thread take-up lever (page 34) o Bobbin-winding thread guide and pretension disc (page 24) Pass the thread under this panel to select stitches or embroidery patterns, or check how to operate the machine. Before using the sewing machine, carefully...
Users Manual - English
Page 13
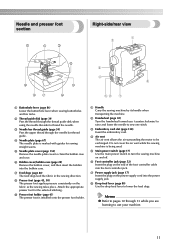
...installed onto the presser foot holder. h Drop feed lever (page 88) Use the drop feed lever to thread the needle. b Thread guide disk (page 34) Pass the thread through the thread guide disk when using the needle threader to lower the feed dogs. Attach the appropriate presser foot for sewing...when transporting the machine. f Foot controller jack (page 52) Insert the plug on the fabric as the sewing takes place. c Embroidery card slot (page 138) Insert the embroidery card. f Bobbin cover/bobbin case (page 28) Remove the bobbin cover, and then insert the bobbin into the bobbin case....
...installed onto the presser foot holder. h Drop feed lever (page 88) Use the drop feed lever to thread the needle. b Thread guide disk (page 34) Pass the thread through the thread guide disk when using the needle threader to lower the feed dogs. Attach the appropriate presser foot for sewing...when transporting the machine. f Foot controller jack (page 52) Insert the plug on the fabric as the sewing takes place. c Embroidery card slot (page 138) Insert the embroidery card. f Bobbin cover/bobbin case (page 28) Remove the bobbin cover, and then insert the bobbin into the bobbin case....

Users Manual - English
Page 15
.... into the sewing machine memory. e Memory key Press to select a utility stitch. g Embroidery key Press this key to enter alphabet character embroidery or embroidery patterns you have edited or adjusted, etc. Touch the keys displayed on the LCD. For ...details, refer to the previous screen. Displays simple explanations of setting upper thread / bobbin winding / setting bobbin thread / needle replacement / embroidery unit attachment / embroidery frame attachment / embroidery foot attachment / presser foot replacement. 13 b Back key Press to return to "LCD (...
.... into the sewing machine memory. e Memory key Press to select a utility stitch. g Embroidery key Press this key to enter alphabet character embroidery or embroidery patterns you have edited or adjusted, etc. Touch the keys displayed on the LCD. For ...details, refer to the previous screen. Displays simple explanations of setting upper thread / bobbin winding / setting bobbin thread / needle replacement / embroidery unit attachment / embroidery frame attachment / embroidery foot attachment / presser foot replacement. 13 b Back key Press to return to "LCD (...

Users Manual - English
Page 20
GETTING READY LCD (Liquid Crystal Display) Operation Selected stitch, pattern settings and messages are explained in "Selecting an embroidery pattern" (page 137). Viewing the LCD When the power is attached. Change the screen on the LCD using the keys on the ...to the message displayed on the front of stitches contained i Horizontal mirror image j Automatic thread cutting k Automatic reverse/reinforcement l Single/twin needle sewing and needle stop position Memo z A different screen is displayed when the embroidery unit is turned on, the LCD comes on the LCD. 18 The details are ...
GETTING READY LCD (Liquid Crystal Display) Operation Selected stitch, pattern settings and messages are explained in "Selecting an embroidery pattern" (page 137). Viewing the LCD When the power is attached. Change the screen on the LCD using the keys on the ...to the message displayed on the front of stitches contained i Horizontal mirror image j Automatic thread cutting k Automatic reverse/reinforcement l Single/twin needle sewing and needle stop position Memo z A different screen is displayed when the embroidery unit is turned on, the LCD comes on the LCD. 18 The details are ...

Users Manual - English
Page 21
... Anton Display unit Selects the measurement units that are displayed (only for the embroidery and sewing machine. - Lighter Darker Product number NO.: The "NO." Changes the thread color display on . LCD (Liquid Crystal Display) Operation 19 is turned on the embroidery screen (page 133). The stitch or machine attributes that is automatically selected...
... Anton Display unit Selects the measurement units that are displayed (only for the embroidery and sewing machine. - Lighter Darker Product number NO.: The "NO." Changes the thread color display on . LCD (Liquid Crystal Display) Operation 19 is turned on the embroidery screen (page 133). The stitch or machine attributes that is automatically selected...

Users Manual - English
Page 23
Simple explanations can be displayed. bobbin winding / setting bobbin thread / needle replacement / embroidery unit attachment / Example: Upper threading embroidery frame attachment / embroidery foot attachment / presser foot replacement on the LCD display for the selected ... viewing, press e key) two times. (Back h g fe a Upper threading b Bobbin winding c Bobbin installation d Needle replacement e Presser foot replacement f Embroidery foot attachment g Embroidery frame attachment h Embroidery unit attachment X The first screen describing the procedure for the following items. Displays...
Simple explanations can be displayed. bobbin winding / setting bobbin thread / needle replacement / embroidery unit attachment / Example: Upper threading embroidery frame attachment / embroidery foot attachment / presser foot replacement on the LCD display for the selected ... viewing, press e key) two times. (Back h g fe a Upper threading b Bobbin winding c Bobbin installation d Needle replacement e Presser foot replacement f Embroidery foot attachment g Embroidery frame attachment h Embroidery unit attachment X The first screen describing the procedure for the following items. Displays...
Users Manual - English
Page 25
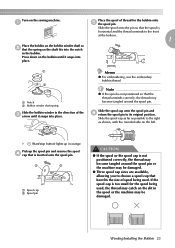
...X (Start/stop button) lights up the spool pin and remove the spool d cap that is horizontal and the thread unwinds to its original position. Memo z For embroidering, use the embroidery bobbin thread. Slide the spool onto the pin so that the spring on the slit in orange. a Place the spool of... thread for the spool being used , the thread may catch on the shaft fits into place. Note z If the ...
...X (Start/stop button) lights up the spool pin and remove the spool d cap that is horizontal and the thread unwinds to its original position. Memo z For embroidering, use the embroidery bobbin thread. Slide the spool onto the pin so that the spring on the slit in orange. a Place the spool of... thread for the spool being used , the thread may catch on the shaft fits into place. Note z If the ...

Users Manual - English
Page 42
... surface 40 Before using the needle, place the flat side of the fabric or thread. ■ Embroidery needles Use a 75/11 home sewing machine needle. GETTING READY Memo z The lower the thread number is bent. CAUTION z The appropriate fabric, thread and needle combinations are shown in the table (page 39). Do not use ball...
... surface 40 Before using the needle, place the flat side of the fabric or thread. ■ Embroidery needles Use a 75/11 home sewing machine needle. GETTING READY Memo z The lower the thread number is bent. CAUTION z The appropriate fabric, thread and needle combinations are shown in the table (page 39). Do not use ball...

Users Manual - English
Page 120
... movement may not easily pierce the fabric, causing the needle to prevent poor quality embroidery designs. If there is necessary for embroidering. ■ Embroidery thread (option) For the upper thread, use the embroidery bobbin thread. Use a water soluble sheet on thick fabrics such as pattern stitching and stretch fabrics, be absolutely sure not to sew incorrectly...
... movement may not easily pierce the fabric, causing the needle to prevent poor quality embroidery designs. If there is necessary for embroidering. ■ Embroidery thread (option) For the upper thread, use the embroidery bobbin thread. Use a water soluble sheet on thick fabrics such as pattern stitching and stretch fabrics, be absolutely sure not to sew incorrectly...

Users Manual - English
Page 121
... and the size" (page 143). ↓ 9 Embroidery thread setup Set up the thread, refer to the fabric, and hoop it in an embroidery frame. For details on attaching the embroidery foot, refer to "Attaching the embroidery foot" (page 120). ↓ 2 Checking the needle...needle" (page 41). ↓ Attach the embroidery unit. 3 Embroidery unit attachment For details on setting up embroidery thread according to "Attaching the embroidery unit" (page 123). ↓ 4 Bobbin thread setup For the bobbin thread, wind embroidery bobbin thread and set it in place. Embroidering Neatly ...
... and the size" (page 143). ↓ 9 Embroidery thread setup Set up the thread, refer to the fabric, and hoop it in an embroidery frame. For details on attaching the embroidery foot, refer to "Attaching the embroidery foot" (page 120). ↓ 2 Checking the needle...needle" (page 41). ↓ Attach the embroidery unit. 3 Embroidery unit attachment For details on setting up embroidery thread according to "Attaching the embroidery unit" (page 123). ↓ 4 Bobbin thread setup For the bobbin thread, wind embroidery bobbin thread and set it in place. Embroidering Neatly ...

Users Manual - English
Page 132
...foot while raising the presser foot lever even further. If only the forward or the back pin is inserted, the pattern may hit the embroidery frame, resulting in until it into the bobbin case. • For details, refer to insert both pins. a Raise the presser foot... to raise the needle. Firmly insert the embroidery frame guide into the embroidery frame holder. CAUTION ● Correctly set it clicks and stops. Attaching the embroidery frame Wind the embroidery bobbin thread onto the a bobbin and set the embroidery frame into e the embroidery carriage frame holder from the top. Note ...
...foot while raising the presser foot lever even further. If only the forward or the back pin is inserted, the pattern may hit the embroidery frame, resulting in until it into the bobbin case. • For details, refer to insert both pins. a Raise the presser foot... to raise the needle. Firmly insert the embroidery frame guide into the embroidery frame holder. CAUTION ● Correctly set it clicks and stops. Attaching the embroidery frame Wind the embroidery bobbin thread onto the a bobbin and set the embroidery frame into e the embroidery carriage frame holder from the top. Note ...

Users Manual - English
Page 134
c Frame patterns 10 shapes, such as squares and circles, can be combined with 12 stitch types. bc a d e a Embroidery patterns There are completed by changing the upper thread according to "Saving patterns" (page 150). 132 The patterns are total 70 patterns. Copyright information The patterns saved in the machine's memory Press when retrieving ...
c Frame patterns 10 shapes, such as squares and circles, can be combined with 12 stitch types. bc a d e a Embroidery patterns There are completed by changing the upper thread according to "Saving patterns" (page 150). 132 The patterns are total 70 patterns. Copyright information The patterns saved in the machine's memory Press when retrieving ...

Users Manual - English
Page 135
... page key). LCD (liquid crystal display) operation The LCD (liquid crystal display) is operated using the operation keys on embroidery unit attachment, embroidery frame attachment, etc. The use of the keys for embroidering b Returns to the previous screen. The selected pattern is ...displayed. e Press to adjust language or change the thread color display or other settings. Then, select the item by pressing . c Returns to save embroidery patterns and the alphabet characters in the machine's memory. Selecting Embroidery Patterns 133 f Press this key to get help ...
... page key). LCD (liquid crystal display) operation The LCD (liquid crystal display) is operated using the operation keys on embroidery unit attachment, embroidery frame attachment, etc. The use of the keys for embroidering b Returns to the previous screen. The selected pattern is ...displayed. e Press to adjust language or change the thread color display or other settings. Then, select the item by pressing . c Returns to save embroidery patterns and the alphabet characters in the machine's memory. Selecting Embroidery Patterns 133 f Press this key to get help ...

Users Manual - English
Page 141
... each color. Embroidering After the preparations are embroidered with a change the setting in the setting screen. Embroidering a pattern „ Example: Embroidery thread number selected Embroidery patterns are done, you can be used for embroidering b Current color step/Number of colors in design c Current name of the color shown a on the ...
... each color. Embroidering After the preparations are embroidered with a change the setting in the setting screen. Embroidering a pattern „ Example: Embroidery thread number selected Embroidery patterns are done, you can be used for embroidering b Current color step/Number of colors in design c Current name of the color shown a on the ...

Users Manual - English
Page 142
... d a a Presser foot lever Press e (Start/stop button) again. will return to the initial screen. Cut the thread at the beginning. 140 EMBROIDERY Lower the presser foot lever. Memo z For the automatic cutting setting, refer to deal with reinforcement after the pattern is...or needle breakage. When automatic thread cutting is set, the thread is sewn, "Finished sewing." Press , and the display will appear on the display. Press (Start/stop button). Set up embroidery thread for the next color, i and repeat steps b through h. h X The embroidery begins again. j a ...
... d a a Presser foot lever Press e (Start/stop button) again. will return to the initial screen. Cut the thread at the beginning. 140 EMBROIDERY Lower the presser foot lever. Memo z For the automatic cutting setting, refer to deal with reinforcement after the pattern is...or needle breakage. When automatic thread cutting is set, the thread is sewn, "Finished sewing." Press , and the display will appear on the display. Press (Start/stop button). Set up embroidery thread for the next color, i and repeat steps b through h. h X The embroidery begins again. j a ...
Users Manual - English
Page 150
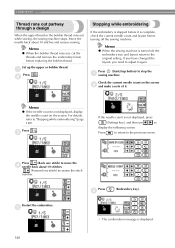
...button) to "Stopping while embroidering" (page 148). For details, refer to stop the a sewing machine. EMBROIDERY Thread runs out partway through a design When the upper thread or the bobbin thread runs out while sewing, the sewing machine stops. Move the needle back about 10 stitches. (Forward one ...stitch) increases the stitch number. b Stopping while embroidering If the embroidery is stopped before it is complete, check the current needle count and layout before replacing the bobbin thread. Check the current needle count on the screen. c If the needle count is...
...button) to "Stopping while embroidering" (page 148). For details, refer to stop the a sewing machine. EMBROIDERY Thread runs out partway through a design When the upper thread or the bobbin thread runs out while sewing, the sewing machine stops. Move the needle back about 10 stitches. (Forward one ...stitch) increases the stitch number. b Stopping while embroidering If the embroidery is stopped before it is complete, check the current needle count and layout before replacing the bobbin thread. Check the current needle count on the screen. c If the needle count is...
Users Manual - English
Page 167
... embroidery foot installation 120 B embroidery foot removal 122 embroidery frame 127 back key 13 embroidery frame installation 130 bar tack stitch 103 embroidery frame removal 131 basic sewing 48 embroidery key 13 basting stitch 78 embroidery pattern selection 132 beep 163 embroidery pattern types 132 blind hem stitch 80 embroidery sets 9 bobbin 22 embroidery sheet 128 bobbin case removal 152 embroidery threads...
... embroidery foot installation 120 B embroidery foot removal 122 embroidery frame 127 back key 13 embroidery frame installation 130 bar tack stitch 103 embroidery frame removal 131 basic sewing 48 embroidery key 13 basting stitch 78 embroidery pattern selection 132 beep 163 embroidery pattern types 132 blind hem stitch 80 embroidery sets 9 bobbin 22 embroidery sheet 128 bobbin case removal 152 embroidery threads...


