
Users Manual - English
Page 13
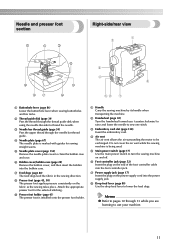
...foot holder. h Drop feed lever (page 88) Use the drop feed lever to turn the sewing machine on the power supply cord into the bobbin case. h Presser foot (page 43, 50) The presser foot applies pressure consistently on the end of the foot controller cable into the foot controller... slot (page 138) Insert the embroidery card. g Power supply jack (page 17) Insert the plug on and off. f Bobbin cover/bobbin case (page 28) Remove the bobbin cover, and then insert the bobbin into the power supply jack. i Presser foot holder (page 45) The presser foot is being used. e Main power switch ...
...foot holder. h Drop feed lever (page 88) Use the drop feed lever to turn the sewing machine on the power supply cord into the bobbin case. h Presser foot (page 43, 50) The presser foot applies pressure consistently on the end of the foot controller cable into the foot controller... slot (page 138) Insert the embroidery card. g Power supply jack (page 17) Insert the plug on and off. f Bobbin cover/bobbin case (page 28) Remove the bobbin cover, and then insert the bobbin into the power supply jack. i Presser foot holder (page 45) The presser foot is being used. e Main power switch ...
Users Manual - English
Page 28
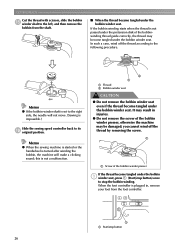
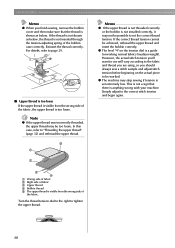
... seat even if the thread become tangled under the bobbin winder seat. a a Screw of the bobbin winder presser If the thread become tangled under the bobbin a winder seat, press (Start/stop button) once to stop button 26 In such a case, wind off the thread by removing the screw. Memo z ....) Slide the sewing speed controller back to its p original position. Memo z If the bobbin winder shaft is set to the right side, the needle will make a clicking sound; a a Start/stop the bobbin winding. you cannot wind off the thread according to the following procedure. GETTING READY Cut ...
... seat even if the thread become tangled under the bobbin winder seat. a a Screw of the bobbin winder presser If the thread become tangled under the bobbin a winder seat, press (Start/stop button) once to stop button 26 In such a case, wind off the thread by removing the screw. Memo z ....) Slide the sewing speed controller back to its p original position. Memo z If the bobbin winder shaft is set to the right side, the needle will make a clicking sound; a a Start/stop the bobbin winding. you cannot wind off the thread according to the following procedure. GETTING READY Cut ...
Users Manual - English
Page 29
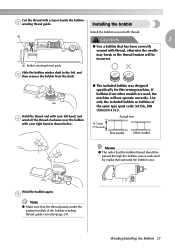
..., SFB (XA5539-151)). Hold the thread end with your left , and c then remove the bobbin from other models are used, the machine will be passed through the bobbin case is indicated by marks that has been correctly wound with your right hand as shown below. ●...not operate correctly. Winding/Installing the Bobbin 27 a CAUTION 1 ● Use a bobbin that surround the bobbin case. Actual size 11.5 mm (7/16 inch) This model Other model Memo z The order that the bobbin thread should be incorrect. Installing the bobbin Install the bobbin wound with scissors beside the bobbinb ...
..., SFB (XA5539-151)). Hold the thread end with your left , and c then remove the bobbin from other models are used, the machine will be passed through the bobbin case is indicated by marks that has been correctly wound with your right hand as shown below. ●...not operate correctly. Winding/Installing the Bobbin 27 a CAUTION 1 ● Use a bobbin that surround the bobbin case. Actual size 11.5 mm (7/16 inch) This model Other model Memo z The order that the bobbin thread should be incorrect. Installing the bobbin Install the bobbin wound with scissors beside the bobbinb ...
Users Manual - English
Page 30
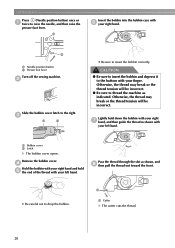
a Insert the bobbin into the bobbin case with your left hand. c a b • Be sure to the bottom with your left hand. CAUTION ● Be sure to insert the bobbin and depress it to insert the bobbin correctly. Lightly hold e the end of the thread with your right hand. d Hold the bobbin with your right hand and hold...
a Insert the bobbin into the bobbin case with your left hand. c a b • Be sure to the bottom with your left hand. CAUTION ● Be sure to insert the bobbin and depress it to insert the bobbin correctly. Lightly hold e the end of the thread with your right hand. d Hold the bobbin with your right hand and hold...

Users Manual - English
Page 31
... through When making gathers or before free-motion quilting, the tension-adjusting spring of the bobbin first pull up the bobbin thread as described below. Pass the bobbin thread through f of the bobbin cover, and then lightly press down on the right side. c a a Tension-adjusting...holding the upper thread with d your left corner of "Installing the bobbin" (page 28). case, it may cause incorrect thread tension (page 59). Thread the upper thread. 1 a • Refer to raise the needle. Insert the bobbin into the bobbin case. b • Refer to steps c through the slot. i Insert...
... through When making gathers or before free-motion quilting, the tension-adjusting spring of the bobbin first pull up the bobbin thread as described below. Pass the bobbin thread through f of the bobbin cover, and then lightly press down on the right side. c a a Tension-adjusting...holding the upper thread with d your left corner of "Installing the bobbin" (page 28). case, it may cause incorrect thread tension (page 59). Thread the upper thread. 1 a • Refer to raise the needle. Insert the bobbin into the bobbin case. b • Refer to steps c through the slot. i Insert...

Users Manual - English
Page 61
... fabric. 2 a Each press of the fabric. CAUTION z If the stitches are bunched together, increase the stitch length. Note z If the bobbin thread was incorrectly threaded, the upper thread may need to sew with the stitches bunched together may result in the needle bending or breaking. Setting... the Stitch 59 In this case, refer to loosen the upper thread. Turn the thread tension dial to the left to "Installing the bobbin" (page 27) and rethread the bobbin thread. Continuing to change the thread tension, depending on the fabric ...
... fabric. 2 a Each press of the fabric. CAUTION z If the stitches are bunched together, increase the stitch length. Note z If the bobbin thread was incorrectly threaded, the upper thread may need to sew with the stitches bunched together may result in the needle bending or breaking. Setting... the Stitch 59 In this case, refer to loosen the upper thread. Turn the thread tension dial to the left to "Installing the bobbin" (page 27) and rethread the bobbin thread. Continuing to change the thread tension, depending on the fabric ...
Users Manual - English
Page 62
... , the thread is not installed correctly, it may be possible to set extremely low. In this case, refer to tighten the upper thread. 60 b c d a Wrong side of fabric b Right side of the bobbin case correctly. If the correct thread tension cannot be worked. However, the actual stitch tension you'll want... to use will vary according to the fabric and thread you are using, so you finish sewing, remove the bobbin cover and then make sure that ...
... , the thread is not installed correctly, it may be possible to set extremely low. In this case, refer to tighten the upper thread. 60 b c d a Wrong side of fabric b Right side of the bobbin case correctly. If the correct thread tension cannot be worked. However, the actual stitch tension you'll want... to use will vary according to the fabric and thread you are using, so you finish sewing, remove the bobbin cover and then make sure that ...

Users Manual - English
Page 132
If only the forward or the back pin is inserted, the pattern may hit the embroidery frame, resulting in until it into the bobbin case. • For details, refer to attach the embroidery frame. Otherwise, the presser foot may not turn out correctly. Firmly insert the embroidery...break. 130 Note z Be sure to raise the needle. a Raise the presser foot lever. Attaching the embroidery frame Wind the embroidery bobbin thread onto the a bobbin and set the embroidery frame into e the embroidery carriage frame holder from the top. Line up the embroidery frame guide tabs and ...
If only the forward or the back pin is inserted, the pattern may hit the embroidery frame, resulting in until it into the bobbin case. • For details, refer to attach the embroidery frame. Otherwise, the presser foot may not turn out correctly. Firmly insert the embroidery...break. 130 Note z Be sure to raise the needle. a Raise the presser foot lever. Attaching the embroidery frame Wind the embroidery bobbin thread onto the a bobbin and set the embroidery frame into e the embroidery carriage frame holder from the top. Line up the embroidery frame guide tabs and ...
Users Manual - English
Page 154
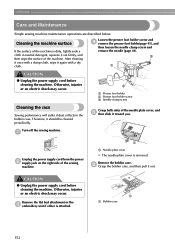
... side of the machine is removed. a a Needle plate cover X The needle plate cover is dirty, lightly soak a cloth in the bobbin case. CAUTION ● Unplug the power supply cord before cleaning the machine. Cleaning the machine surface If the surface of the sewing machine. APPENDIX... the surface of the needle plate cover, and e then slide it out. Remove the bobbin case. Remove the flat bed attachment or the c embroidery unit if either is attached. a a Bobbin case 152 f Grasp the bobbin case, and then pull it toward you. c a CAUTION ● Unplug the power supply cord...
... side of the machine is removed. a a Needle plate cover X The needle plate cover is dirty, lightly soak a cloth in the bobbin case. CAUTION ● Unplug the power supply cord before cleaning the machine. Cleaning the machine surface If the surface of the sewing machine. APPENDIX... the surface of the needle plate cover, and e then slide it out. Remove the bobbin case. Remove the flat bed attachment or the c embroidery unit if either is attached. a a Bobbin case 152 f Grasp the bobbin case, and then pull it toward you. c a CAUTION ● Unplug the power supply cord...
Users Manual - English
Page 155
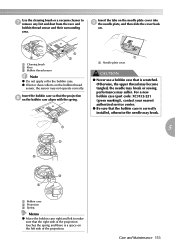
... the cover back on the left to make sure that the projection h on the bobbin thread sensor, the sensor may suffer. a a Needle plate cover CAUTION ● Never use a bobbin case that the bobbin case is scratched. a 5 b c c b a Bobbin case b Projection c Spring Memo z Move the bobbin case right and left side of the projection touches the spring and there is a space...
... the cover back on the left to make sure that the projection h on the bobbin thread sensor, the sensor may suffer. a a Needle plate cover CAUTION ● Never use a bobbin case that the bobbin case is scratched. a 5 b c c b a Bobbin case b Projection c Spring Memo z Move the bobbin case right and left side of the projection touches the spring and there is a space...
Users Manual - English
Page 156
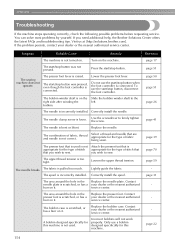
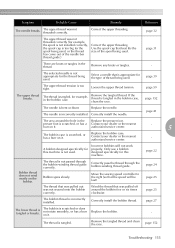
Visit us at [http://solutions.brother.com]. If the problem persists, contact your dealer or the nearest authorized service center. The start/stop ...50 page 51 page 26 page 41 page 39 page 70 page 59 page 31 - The needle is raised. Replace the bobbin case. Only use the start /stop button. Symptom Probable Cause Remedy The machine is not correct. The needle clamp screw is ...after winding the left. You can solve most problems by yourself. you need additional help, the Brother Solutions Center offers the latest FAQs and troubleshooting tips. Contact needle plate is bent or blunt.
Visit us at [http://solutions.brother.com]. If the problem persists, contact your dealer or the nearest authorized service center. The start/stop ...50 page 51 page 26 page 41 page 39 page 70 page 59 page 31 - The needle is raised. Replace the bobbin case. Only use the start /stop button. Symptom Probable Cause Remedy The machine is not correct. The needle clamp screw is ...after winding the left. You can solve most problems by yourself. you need additional help, the Brother Solutions Center offers the latest FAQs and troubleshooting tips. Contact needle plate is bent or blunt.
Users Manual - English
Page 157
...is not appropriate for example, the spool is not installed correctly, the spool cap is too tight. authorized service center. 5 The bobbin case is tangled or breaks. The thread that best fits the size of the needle bar thread guide.) Correct the upper threading. page 27.... page 59 The upper thread breaks. page 24 page 25 page 25 The bobbin thread is not passed through the bobbin-winding thread guide. Replace the bobbin case. Correctly install the bobbin thread. Replace the bobbin. - Use the spool cap that was pulled out was not threaded correctly (...
...is not appropriate for example, the spool is not installed correctly, the spool cap is too tight. authorized service center. 5 The bobbin case is tangled or breaks. The thread that best fits the size of the needle bar thread guide.) Correct the upper threading. page 27.... page 59 The upper thread breaks. page 24 page 25 page 25 The bobbin thread is not passed through the bobbin-winding thread guide. Replace the bobbin case. Correctly install the bobbin thread. Replace the bobbin. - Use the spool cap that was pulled out was not threaded correctly (...
Users Manual - English
Page 159
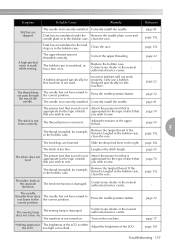
...feed mechanism is incorrectly installed. Remove the tangled thread. If the thread is too fine. page 152 The fabric feeds in the bobbin case, clean the race. direction. clean the race. Contact your dealer or the nearest authorized service center. The needle is damaged. ...feed dogs are skipped. page 163 Troubleshooting 157 page 41 page 152 Dust has accumulated in the feed dogs or in the bobbin case. Incorrect bobbins will not work properly. The needle has not been raised to the the correct position. Correct the upper threading. The thread...
...feed mechanism is incorrectly installed. Remove the tangled thread. If the thread is too fine. page 152 The fabric feeds in the bobbin case, clean the race. direction. clean the race. Contact your dealer or the nearest authorized service center. The needle is damaged. ...feed dogs are skipped. page 163 Troubleshooting 157 page 41 page 152 Dust has accumulated in the feed dogs or in the bobbin case. Incorrect bobbins will not work properly. The needle has not been raised to the the correct position. Correct the upper threading. The thread...

Users Manual - English
Page 160
...was moved while the embroidery frame was not threaded correctly. Attach the embroidery unit. No pattern selected. The thread is tangled and the bobbin case, etc., is loose. Do not place objects within the range of the upper thread. Stretch the fabric properly on the left side of... the thread guide cover. No stabilizer material is plugged up correctly. When the bobbin case is attached. Make sure that the material coming out of the embroidery frame does not cause problems, rotate the pattern and embroider. ...
...was moved while the embroidery frame was not threaded correctly. Attach the embroidery unit. No pattern selected. The thread is tangled and the bobbin case, etc., is loose. Do not place objects within the range of the upper thread. Stretch the fabric properly on the left side of... the thread guide cover. No stabilizer material is plugged up correctly. When the bobbin case is attached. Make sure that the material coming out of the embroidery frame does not cause problems, rotate the pattern and embroider. ...
Users Manual - English
Page 163
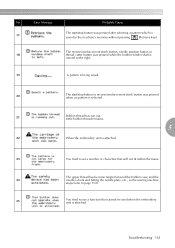
... tried to set a number of characters that cannot be used when the embroidery unit is selected. 21 Bobbin thread has run out. Troubleshooting 161 The upper thread has become tangled around the bobbin case, and the 24 needle is bent and hitting the needle plate, etc., so the sewing machine stops ...(refer to page 154). 25 You tried to use a function that will not fit within the frame. Little bobbin thread remains. 5 22 When the embroidery...
... tried to set a number of characters that cannot be used when the embroidery unit is selected. 21 Bobbin thread has run out. Troubleshooting 161 The upper thread has become tangled around the bobbin case, and the 24 needle is bent and hitting the needle plate, etc., so the sewing machine stops ...(refer to page 154). 25 You tried to use a function that will not fit within the frame. Little bobbin thread remains. 5 22 When the embroidery...
Users Manual - English
Page 167
... dogs 11 flat bed attachment 10 foot controller 9, 52 changing sewing direction 65 foot controller jack 11 checking needle 40 frame pattern selection 137 cleaning bobbin case 152 fraying, preventing 74 cleaning brush 9 free-arm sewing 46 cleaning machine surface 152 free-motion quilting 102 concealed seams 90 front view 10 connecting...
... dogs 11 flat bed attachment 10 foot controller 9, 52 changing sewing direction 65 foot controller jack 11 checking needle 40 frame pattern selection 137 cleaning bobbin case 152 fraying, preventing 74 cleaning brush 9 free-arm sewing 46 cleaning machine surface 152 free-motion quilting 102 concealed seams 90 front view 10 connecting...


