
Users Manual - English
Page 6
...on the machine ...17 Turning off the machine ...17 LCD (Liquid Crystal Display) Operation 18 Viewing the LCD ...18 Changing the machine settings ...19 Checking machine operating procedures ...21 Winding/Installing the Bobbin 22 Bobbin precautions ...22 Winding the bobbin ...22 Installing the bobbin ...27...43 Removing and attaching the presser foot holder 45 Sewing Cylindrical Pieces 46 Free-arm sewing ...46 SEWING BASICS 47 Sewing...48 General sewing procedure ...48 Selecting stitching ...49 Positioning the fabric ...50 Starting to sew...51 Securing the stitching ...53 Cutting the thread ...
...on the machine ...17 Turning off the machine ...17 LCD (Liquid Crystal Display) Operation 18 Viewing the LCD ...18 Changing the machine settings ...19 Checking machine operating procedures ...21 Winding/Installing the Bobbin 22 Bobbin precautions ...22 Winding the bobbin ...22 Installing the bobbin ...27...43 Removing and attaching the presser foot holder 45 Sewing Cylindrical Pieces 46 Free-arm sewing ...46 SEWING BASICS 47 Sewing...48 General sewing procedure ...48 Selecting stitching ...49 Positioning the fabric ...50 Starting to sew...51 Securing the stitching ...53 Cutting the thread ...
Users Manual - English
Page 9
... embroider built-in utility stitches available (page 70). h Easy-to work on , the machine is ready to sew. b Fast bobbin winding system With the fast and simple bobbin winder, you can be cut automatically after sewing (page 55, 62). i Embroidery You can start sewing without pulling up (page 12). g Lighting Start/Stop button When the green light...
... embroider built-in utility stitches available (page 70). h Easy-to work on , the machine is ready to sew. b Fast bobbin winding system With the fast and simple bobbin winder, you can be cut automatically after sewing (page 55, 62). i Embroidery You can start sewing without pulling up (page 12). g Lighting Start/Stop button When the green light...
Users Manual - English
Page 11
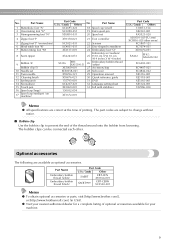
...All specifications are subject to change without notice. ■ Bobbin clip Use the bobbin clip to prevent the end of optional accessories available for your machine. 9 Part Name Embroidery bobbin thread (white) Embroidery bobbin thread (black) Part Code U.S.A. / Canada Other SAEBT... EBT-CEN X81164-001 SAEBT999 EBT-CEBN XC5520-001 Memo z To obtain optional accessories or parts, visit [http://www.brother.com/], or [...
...All specifications are subject to change without notice. ■ Bobbin clip Use the bobbin clip to prevent the end of optional accessories available for your machine. 9 Part Name Embroidery bobbin thread (white) Embroidery bobbin thread (black) Part Code U.S.A. / Canada Other SAEBT... EBT-CEN X81164-001 SAEBT999 EBT-CEBN XC5520-001 Memo z To obtain optional accessories or parts, visit [http://www.brother.com/], or [...

Users Manual - English
Page 12
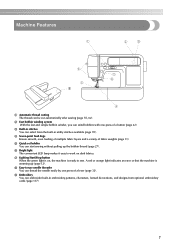
... panel to select stitches or embroidery patterns, or check how to operate the machine. Before using the sewing machine, carefully read these buttons to use the sewing machine, etc. Front view a Thread guide cover (page 24, 33) Pass the thread under this thread guide when winding the bobbin thread and threading the machine. k Thread cutter (page 56) Pass...
... panel to select stitches or embroidery patterns, or check how to operate the machine. Before using the sewing machine, carefully read these buttons to use the sewing machine, etc. Front view a Thread guide cover (page 24, 33) Pass the thread under this thread guide when winding the bobbin thread and threading the machine. k Thread cutter (page 56) Pass...

Users Manual - English
Page 13
... 152) Remove the needle plate cover to clean the bobbin case and race. a Handle Carry the sewing machine by its handle when transporting the machine. i Presser foot holder (page 45) The presser foot is installed onto the presser foot holder. c Embroidery card slot (page 138) Insert the embroidery card. f Foot controller jack (page 52) Insert the...
... 152) Remove the needle plate cover to clean the bobbin case and race. a Handle Carry the sewing machine by its handle when transporting the machine. i Presser foot holder (page 45) The presser foot is installed onto the presser foot holder. c Embroidery card slot (page 138) Insert the embroidery card. f Foot controller jack (page 52) Insert the...
Users Manual - English
Page 14
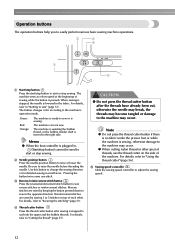
...). Operation buttons The operation buttons help you to the right side. The machine is winding the bobbin thread, or the bobbin winder shaft is lowered in small areas. For details, refer to the machine may occur. Pressing the button twice sews one stitch. When sewing is stopped, the needle is moved to easily perform various basic...
...). Operation buttons The operation buttons help you to the right side. The machine is winding the bobbin thread, or the bobbin winder shaft is lowered in small areas. For details, refer to the machine may occur. Pressing the button twice sews one stitch. When sewing is stopped, the needle is moved to easily perform various basic...

Users Manual - English
Page 15
... to set the needle stop position, the buzzer sound, and more. g Embroidery key Press this key to sew embroidery. Displays simple explanations of setting upper thread / bobbin winding / setting bobbin thread / needle replacement / embroidery unit attachment / embroidery frame attachment / embroidery foot attachment / presser foot replacement. 13 into the sewing machine memory. f Utility stitch key Press this key to select a utility...
... to set the needle stop position, the buzzer sound, and more. g Embroidery key Press this key to sew embroidery. Displays simple explanations of setting upper thread / bobbin winding / setting bobbin thread / needle replacement / embroidery unit attachment / embroidery frame attachment / embroidery foot attachment / presser foot replacement. 13 into the sewing machine memory. f Utility stitch key Press this key to select a utility...

Users Manual - English
Page 17
1 GETTING READY The various preparations required before starting to sew are described in this chapter. Turning the Machine On/Off 16 LCD (Liquid Crystal Display) Operation 18 Winding/Installing the Bobbin 22 Upper Threading ...31 Replacing the Needle 39 Replacing the Presser Foot 43 Sewing Cylindrical Pieces 46
1 GETTING READY The various preparations required before starting to sew are described in this chapter. Turning the Machine On/Off 16 LCD (Liquid Crystal Display) Operation 18 Winding/Installing the Bobbin 22 Upper Threading ...31 Replacing the Needle 39 Replacing the Presser Foot 43 Sewing Cylindrical Pieces 46

Users Manual - English
Page 23
... details on each topic, refer to be referred on . bobbin winding / setting bobbin thread / needle replacement / embroidery unit attachment / Example: Upper threading embroidery frame attachment / embroidery foot attachment / presser foot replacement on the sewing machine. a X The LCD comes on the LCD display for the selected topic appears. Press (Sewing machine help screen appears. Press the item to the corresponding...
... details on each topic, refer to be referred on . bobbin winding / setting bobbin thread / needle replacement / embroidery unit attachment / Example: Upper threading embroidery frame attachment / embroidery foot attachment / presser foot replacement on the sewing machine. a X The LCD comes on the LCD display for the selected topic appears. Press (Sewing machine help screen appears. Press the item to the corresponding...
Users Manual - English
Page 24
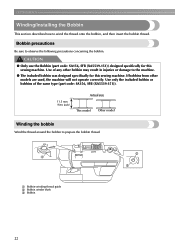
...)) designed specifically for this sewing machine. Bobbin precautions Be sure to prepare the bobbin thread. Use only the included bobbin or bobbins of any other models are used, the machine will not operate correctly. If bobbins from other bobbin may result in injuries or damage to wind the thread onto the bobbin, and then insert the bobbin thread. Use of the...
...)) designed specifically for this sewing machine. Bobbin precautions Be sure to prepare the bobbin thread. Use only the included bobbin or bobbins of any other models are used, the machine will not operate correctly. If bobbins from other bobbin may result in injuries or damage to wind the thread onto the bobbin, and then insert the bobbin thread. Use of the...
Users Manual - English
Page 25
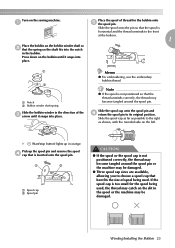
...of the c arrow until it snaps into place. Press down on the bobbin until it snaps into the notch in the spool or the machine may catch on the shaft fits into place. Memo z For embroidering, use the embroidery bobbin thread. Note z If the spool is inserted onto the spool pin. ...a Place the spool of thread for the spool being used , the thread may be damaged. ● Three spool cap sizes are available, allowing you to the right as shown, with the rounded side on the sewing machine....
...of the c arrow until it snaps into place. Press down on the bobbin until it snaps into the notch in the spool or the machine may catch on the shaft fits into place. Memo z For embroidering, use the embroidery bobbin thread. Note z If the spool is inserted onto the spool pin. ...a Place the spool of thread for the spool being used , the thread may be damaged. ● Three spool cap sizes are available, allowing you to the right as shown, with the rounded side on the sewing machine....
Users Manual - English
Page 26
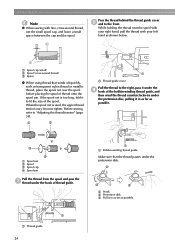
... and pass the g thread under the hook of the spool. a a Thread guide 24 a a Bobbin-winding thread guide Make sure that winds off quickly, such as shown below. GETTING READY Note z When sewing with your left hand as transparent nylon thread or metallic thread, place the spool net over the...When the spool net is too long, fold it in as far as possible. Before sewing, refer to the front. a b a a Thread guide cover Pull the thread to the right, pass it under the i hook of the bobbin-winding thread guide, and then wind the thread counterclockwise under the pretension disk.
... and pass the g thread under the hook of the spool. a a Thread guide 24 a a Bobbin-winding thread guide Make sure that winds off quickly, such as shown below. GETTING READY Note z When sewing with your left hand as transparent nylon thread or metallic thread, place the spool net over the...When the spool net is too long, fold it in as far as possible. Before sewing, refer to the front. a b a a Thread guide cover Pull the thread to the right, pass it under the i hook of the bobbin-winding thread guide, and then wind the thread counterclockwise under the pretension disk.
Users Manual - English
Page 27
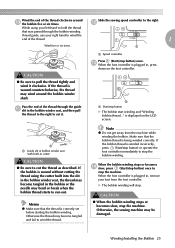
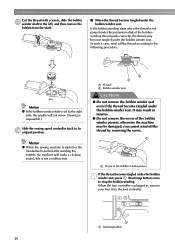
... described. a Speed controller Press (Start/stop the machine. a a Guide slit in bobbin winder seat (with built-in the bobbin winder seat, and then pull the thread to the right to wind the thread. Otherwise, the sewing machine may become tangled in the bobbin or the needle may wind around j the bobbin five or six times. a CAUTION ●...
... described. a Speed controller Press (Start/stop the machine. a a Guide slit in bobbin winder seat (with built-in the bobbin winder seat, and then pull the thread to the right to wind the thread. Otherwise, the sewing machine may become tangled in the bobbin or the needle may wind around j the bobbin five or six times. a CAUTION ●...
Users Manual - English
Page 28
... p original position. a a Start/stop the bobbin winding. Memo z When the sewing machine is started or the handwheel is turned after winding the bobbin, the machine will not move. (Sewing is not passed under the pretension disk of the bobbin winder presser If the thread become tangled under the bobbin winder seat. b a a Thread b Bobbin winder seat CAUTION ● Do not...
... p original position. a a Start/stop the bobbin winding. Memo z When the sewing machine is started or the handwheel is turned after winding the bobbin, the machine will not move. (Sewing is not passed under the pretension disk of the bobbin winder presser If the thread become tangled under the bobbin winder seat. b a a Thread b Bobbin winder seat CAUTION ● Do not...
Users Manual - English
Page 29
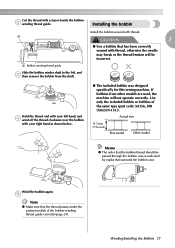
... hand as shown below. ● The included bobbin was designed specifically for this sewing machine. a CAUTION 1 ● Use a bobbin that surround the bobbin case. If bobbins from the shaft. Use only the included bobbin or bobbins of the bobbin-winding thread guide correctly (page 24). Wind the bobbin again. Installing the bobbin Install the bobbin wound with thread, otherwise the needle may...
... hand as shown below. ● The included bobbin was designed specifically for this sewing machine. a CAUTION 1 ● Use a bobbin that surround the bobbin case. If bobbins from the shaft. Use only the included bobbin or bobbins of the bobbin-winding thread guide correctly (page 24). Wind the bobbin again. Installing the bobbin Install the bobbin wound with thread, otherwise the needle may...
Users Manual - English
Page 30
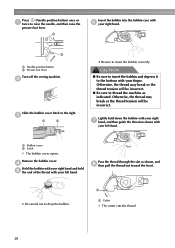
...tension will be incorrect. a a Cutter X The cutter cuts the thread. 28 a Insert the bobbin into the bobbin case with your finger. b a Needle position button b Presser foot lever Turn off the sewing machine. Otherwise, the thread may break or the thread tension will be incorrect. ● Be sure to... thread the machine as shown, and h then pull the thread out toward the front. • Be careful not to drop the bobbin. Lightly hold e the ...
...tension will be incorrect. a a Cutter X The cutter cuts the thread. 28 a Insert the bobbin into the bobbin case with your finger. b a Needle position button b Presser foot lever Turn off the sewing machine. Otherwise, the thread may break or the thread tension will be incorrect. ● Be sure to... thread the machine as shown, and h then pull the thread out toward the front. • Be careful not to drop the bobbin. Lightly hold e the ...
Users Manual - English
Page 31
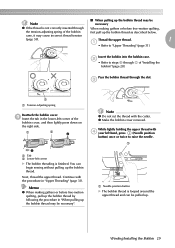
... thread with d your left corner X The bobbin threading is finished. Winding/Installing the Bobbin 29 a a Needle position button X The bobbin thread is looped around the upper thread and can begin sewing without pulling up . Pass the bobbin thread through f of "Installing the bobbin" (page 28). c a a Tension-adjusting spring Reattach the bobbin cover. Next, thread the upper thread...
... thread with d your left corner X The bobbin threading is finished. Winding/Installing the Bobbin 29 a a Needle position button X The bobbin thread is looped around the upper thread and can begin sewing without pulling up . Pass the bobbin thread through f of "Installing the bobbin" (page 28). c a a Tension-adjusting spring Reattach the bobbin cover. Next, thread the upper thread...
Users Manual - English
Page 32
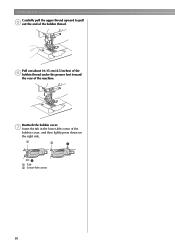
Reattach the bobbin cover. g Insert the tab in the lower-left corner 30 a b 2 1 a Tab b Lower-left corner of the machine. Pull out about 10-15 cm (4-5 inches) of the f bobbin thread under the presser foot toward the rear of the bobbin cover, and then lightly press down on the right side. GETTING READY Carefully pull the upper thread upward to pull e out the end of the bobbin thread.
Reattach the bobbin cover. g Insert the tab in the lower-left corner 30 a b 2 1 a Tab b Lower-left corner of the machine. Pull out about 10-15 cm (4-5 inches) of the f bobbin thread under the presser foot toward the rear of the bobbin cover, and then lightly press down on the right side. GETTING READY Carefully pull the upper thread upward to pull e out the end of the bobbin thread.

Users Manual - English
Page 39
... for the right side in e the same way that the thread winds off from the front. 1 a Bobbin winder shaft b Extra spool pin c Thread spool Memo z When setting the thread spool, set it . Turn on the sewing machine and select a h stitch. • For stitch selection see "Selecting stitching" (page 49). • See... needle, be sure to select an appropriate stitch, otherwise the needle may break or the machine may be used with the twin needle. Insert the extra spool pin into the end of the d bobbin winder shaft, and install the thread spool on changing the presser foot, refer to "Replacing...
... for the right side in e the same way that the thread winds off from the front. 1 a Bobbin winder shaft b Extra spool pin c Thread spool Memo z When setting the thread spool, set it . Turn on the sewing machine and select a h stitch. • For stitch selection see "Selecting stitching" (page 49). • See... needle, be sure to select an appropriate stitch, otherwise the needle may break or the machine may be used with the twin needle. Insert the extra spool pin into the end of the d bobbin winder shaft, and install the thread spool on changing the presser foot, refer to "Replacing...
Users Manual - English
Page 53
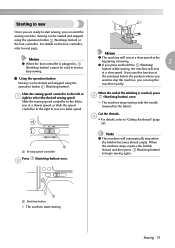
... to stop the machine, you can stop the machine exactly. a a Start/stop button) to begin sewing again. X The machine stops sewing with the needle lowered (in , (Start/stop button) cannot be used to start the sewing machine. Cut the threads. When the machine stops, replace the bobbin thread, and then press (Start/stop button X The machine starts sewing. Sewing can be started...
... to stop the machine, you can stop the machine exactly. a a Start/stop button) to begin sewing again. X The machine stops sewing with the needle lowered (in , (Start/stop button) cannot be used to start the sewing machine. Cut the threads. When the machine stops, replace the bobbin thread, and then press (Start/stop button X The machine starts sewing. Sewing can be started...


