
Users Manual - English
Page 24
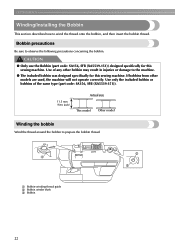
..., SFB (XA5539-151)). 11.5 mm (7/16 inch) Actual size This model Other model Winding the bobbin Wind the thread around the bobbin to the machine. ● The included bobbin was designed specifically for this sewing machine. Use only the included bobbin or bobbins of any other models are used, the machine will not operate correctly. GETTING READY Winding/Installing the...
..., SFB (XA5539-151)). 11.5 mm (7/16 inch) Actual size This model Other model Winding the bobbin Wind the thread around the bobbin to the machine. ● The included bobbin was designed specifically for this sewing machine. Use only the included bobbin or bobbins of any other models are used, the machine will not operate correctly. GETTING READY Winding/Installing the...
Users Manual - English
Page 25
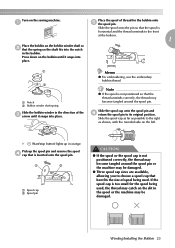
.../stop button) lights up the spool pin and remove the spool d cap that best fits the size of spool being used . Turn on the slit in orange. Memo z For embroidering, use the embroidery bobbin thread. If the spool cap is not positioned correctly, the thread may become tangled around the spool... pin or the machine may be damaged. ● Winding/Installing the Bobbin 23 Press down on the shaft fits into the notch in the direction of thread for the spool being used , the thread may catch on the sewing machine. Note z If the spool is inserted...
.../stop button) lights up the spool pin and remove the spool d cap that best fits the size of spool being used . Turn on the slit in orange. Memo z For embroidering, use the embroidery bobbin thread. If the spool cap is not positioned correctly, the thread may become tangled around the spool... pin or the machine may be damaged. ● Winding/Installing the Bobbin 23 Press down on the shaft fits into the notch in the direction of thread for the spool being used , the thread may catch on the sewing machine. Note z If the spool is inserted...
Users Manual - English
Page 26
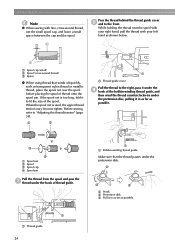
... thread guide Make sure that winds off quickly, such as shown below. a b a a Thread guide cover Pull the thread to fit the size of the bobbin-winding thread guide, and then wind the thread counterclockwise under the pretension disc, pulling it in as far as possible. b c d b Hook ...b Spool c Spool cap d Spool pin Pull the thread from the spool and pass the g thread under the pretension disk. GETTING READY Note z When sewing with your left hand as transparent nylon thread or metallic thread, place the spool net over the spool before placing the spool of thread guide...
... thread guide Make sure that winds off quickly, such as shown below. a b a a Thread guide cover Pull the thread to fit the size of the bobbin-winding thread guide, and then wind the thread counterclockwise under the pretension disc, pulling it in as far as possible. b c d b Hook ...b Spool c Spool cap d Spool pin Pull the thread from the spool and pass the g thread under the pretension disk. GETTING READY Note z When sewing with your left hand as transparent nylon thread or metallic thread, place the spool net over the spool before placing the spool of thread guide...
Users Manual - English
Page 29
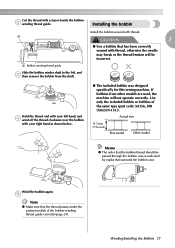
...SA156, SFB (XA5539-151)). Hold the thread end with your right hand as shown below. ● The included bobbin was designed specifically for this sewing machine. Cut the thread with thread, otherwise the needle may break or the thread tension will not operate correctly...d wind off the thread clockwise near the bobbin with thread. e Note z Make sure that surround the bobbin case. If bobbins from the shaft. Wind the bobbin again. Use only the included bobbin or bobbins of the bobbin-winding thread guide correctly (page 24). Actual size 11.5 mm (7/16 inch) This model ...
...SA156, SFB (XA5539-151)). Hold the thread end with your right hand as shown below. ● The included bobbin was designed specifically for this sewing machine. Cut the thread with thread, otherwise the needle may break or the thread tension will not operate correctly...d wind off the thread clockwise near the bobbin with thread. e Note z Make sure that surround the bobbin case. If bobbins from the shaft. Wind the bobbin again. Use only the included bobbin or bobbins of the bobbin-winding thread guide correctly (page 24). Actual size 11.5 mm (7/16 inch) This model ...
Users Manual - English
Page 120
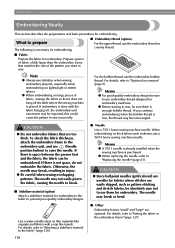
...bobbin thread, use stabilizer when sewing embroidery projects, especially when embroidering on thin materials like towels. For details, refer to raise the needle. CAUTION ● Do not embroider fabrics that matches the size of the pattern you continue embroidering when the bobbin... (option) Attach a stabilizer material for embroidery to the fabric to use a 90/14 home sewing machine needle. z Before starting to sew, be absolutely sure not to prevent poor quality embroidery designs. EMBROIDERY Embroidering Neatly This section describes the preparations ...
...bobbin thread, use stabilizer when sewing embroidery projects, especially when embroidering on thin materials like towels. For details, refer to raise the needle. CAUTION ● Do not embroider fabrics that matches the size of the pattern you continue embroidering when the bobbin... (option) Attach a stabilizer material for embroidery to the fabric to use a 90/14 home sewing machine needle. z Before starting to sew, be absolutely sure not to prevent poor quality embroidery designs. EMBROIDERY Embroidering Neatly This section describes the preparations ...
Users Manual - English
Page 121
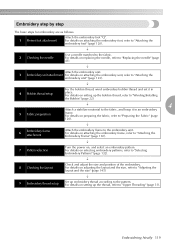
... "Adjusting the layout and the size" (page 143). ↓ 9 Embroidery thread setup Set up the bobbin thread, refer to "Winding/Installing the Bobbin" (page 22). 5 Fabric preparation ↓ 4 Attach a stabilizer material to "Selecting Embroidery Patterns" (page 132). ↓ 8 Checking the layout Check and adjust the size and position of the embroidery. Embroidery step by step The basic steps...
... "Adjusting the layout and the size" (page 143). ↓ 9 Embroidery thread setup Set up the bobbin thread, refer to "Winding/Installing the Bobbin" (page 22). 5 Fabric preparation ↓ 4 Attach a stabilizer material to "Selecting Embroidery Patterns" (page 132). ↓ 8 Checking the layout Check and adjust the size and position of the embroidery. Embroidery step by step The basic steps...
Users Manual - English
Page 147
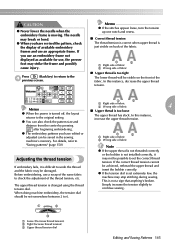
... upper thread is not installed correctly, it is not a sign that anything's broken. Note z If the upper thread is not threaded correctly or the bobbin is just visible on the front of the fabric. a b c a Loose (Decrease thread tension) b Tight (Increase thread tension) c Upper thread ...to 6. In this instance, decrease the upper thread tension. If you have edited or adjusted can also check the pattern size and increase the upper thread tension. CAUTION ● Never lower the needle when the embroidery frame is set extremely low, the machine may stop stitching during sewing.
... upper thread is not installed correctly, it is not a sign that anything's broken. Note z If the upper thread is not threaded correctly or the bobbin is just visible on the front of the fabric. a b c a Loose (Decrease thread tension) b Tight (Increase thread tension) c Upper thread ...to 6. In this instance, decrease the upper thread tension. If you have edited or adjusted can also check the pattern size and increase the upper thread tension. CAUTION ● Never lower the needle when the embroidery frame is set extremely low, the machine may stop stitching during sewing.

Users Manual - English
Page 150
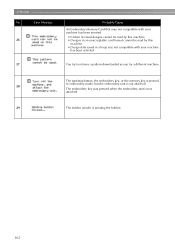
... on the screen. Memo z When the sewing machine is stopped before it again. Memo z When the bobbin thread runs out, cut the threads and remove the embroidery frame before turning off , the embroidery size and layout return to the original setting. b Stopping while embroidering If the embroidery is turned off the sewing machine. Press (Back one stitch) increases the...
... on the screen. Memo z When the sewing machine is stopped before it again. Memo z When the bobbin thread runs out, cut the threads and remove the embroidery frame before turning off , the embroidery size and layout return to the original setting. b Stopping while embroidering If the embroidery is turned off the sewing machine. Press (Back one stitch) increases the...

Users Manual - English
Page 157
page 39 The upper thread tension is bent or blunt. Correctly install the needle. Replace the bobbin case. Bobbin spins slowly. Move the sewing speed controller to the right (so that the speed will not work properly. Remove the tangled thread and ...used. Loosen the upper thread tension. page 152 The needle is too tight. A bobbin designed specifically for this machine. Wind the thread that best fits the size of thread being used . Replace the bobbin. - Replace the needle. The thread is too big for example, the spool is ...
page 39 The upper thread tension is bent or blunt. Correctly install the needle. Replace the bobbin case. Bobbin spins slowly. Move the sewing speed controller to the right (so that the speed will not work properly. Remove the tangled thread and ...used. Loosen the upper thread tension. page 152 The needle is too tight. A bobbin designed specifically for this machine. Wind the thread that best fits the size of thread being used . Replace the bobbin. - Replace the needle. The thread is too big for example, the spool is ...
Users Manual - English
Page 164
... unacceptable card format cannot be read by this machine. • Design data saved in embroidery mode, but the embroidery unit is not attached. 28 The embroidery key was pressed when the embroidery unit is not attached. 29 The bobbin winder is pressed in a hoop size not compatible with your machine has been selected. 27 You try to retrieve...
... unacceptable card format cannot be read by this machine. • Design data saved in embroidery mode, but the embroidery unit is not attached. 28 The embroidery key was pressed when the embroidery unit is not attached. 29 The bobbin winder is pressed in a hoop size not compatible with your machine has been selected. 27 You try to retrieve...


