
Operation Manual
Page 7
...the bobbin 15 Installing the bobbin 18 Upper Threading 21 Threading the upper thread 21 Threading the needle 23 Threading the needle manually (without using the needle threader 24 Pulling up the bobbin thread 25 Using the twin needle 26 Fabric/Thread/Needle Combinations 28 Replacing the Needle 29 Checking... the Stitch 40 Setting the stitch width 40 Setting the stitch length 40 Setting the thread tension 41 Saving stitch settings 42 Useful Functions 43 Automatically cutting the thread 43 Mirroring stitches 43 Adjusting the presser foot pressure 44 Hands-free raising and lifting...
...the bobbin 15 Installing the bobbin 18 Upper Threading 21 Threading the upper thread 21 Threading the needle 23 Threading the needle manually (without using the needle threader 24 Pulling up the bobbin thread 25 Using the twin needle 26 Fabric/Thread/Needle Combinations 28 Replacing the Needle 29 Checking... the Stitch 40 Setting the stitch width 40 Setting the stitch length 40 Setting the thread tension 41 Saving stitch settings 42 Useful Functions 43 Automatically cutting the thread 43 Mirroring stitches 43 Adjusting the presser foot pressure 44 Hands-free raising and lifting...

Operation Manual
Page 8
... LCD screen 2 Cleaning the machine surface 2 Cleaning the race 2 Troubleshooting 4 Frequent troubleshooting topics 4 Upper thread tightened up 4 Tangled thread on wrong side of fabric 5 Incorrect thread tension 6 Fabric is caught in the machine and cannot be removed ........ 8 If the thread becomes tangled under the bobbin winder seat..... 10 List of symptoms 12 Error messages...
... LCD screen 2 Cleaning the machine surface 2 Cleaning the race 2 Troubleshooting 4 Frequent troubleshooting topics 4 Upper thread tightened up 4 Tangled thread on wrong side of fabric 5 Incorrect thread tension 6 Fabric is caught in the machine and cannot be removed ........ 8 If the thread becomes tangled under the bobbin winder seat..... 10 List of symptoms 12 Error messages...

Operation Manual
Page 10
... controller jack. Machine ■ Front view a bc de o n m f g h i C Thread cutter Pass the threads through the thread cutter to thread the needle. Refer to page B-8) Use the dial to adjust the upper thread tension. (page B-41) ■ Right-side/rear view a b c j l k 1 Top... Open the top cover to place the spool of thread on the spool pin. 2 Thread guide plate Pass the thread around the thread guide plate when threading the upper thread. 3 Bobbin winding thread guide and pretension disk Pass the thread under this thread guide and around the pretension disk when winding the ...
... controller jack. Machine ■ Front view a bc de o n m f g h i C Thread cutter Pass the threads through the thread cutter to thread the needle. Refer to page B-8) Use the dial to adjust the upper thread tension. (page B-41) ■ Right-side/rear view a b c j l k 1 Top... Open the top cover to place the spool of thread on the spool pin. 2 Thread guide plate Pass the thread around the thread guide plate when threading the upper thread. 3 Bobbin winding thread guide and pretension disk Pass the thread under this thread guide and around the pretension disk when winding the ...

Operation Manual
Page 11
... and presser foot section i h a b Operation buttons bc de a B f GETTING READY g c f e d 1 Needle bar thread guide Pass the upper thread through the needle bar thread guide. 2 Needle plate The needle plate is stopped. (page B38) 4 Needle position button Press the needle position button to raise or ... For other stitches, use reverse stitches, the machine will sew reverse stitches at a mid-point. CAUTION • Do not press (Thread cutter button) after sewing is moved to the right side. 2 Reverse stitch button For straight, zigzag, and elastic zigzag stitch patterns that...
... and presser foot section i h a b Operation buttons bc de a B f GETTING READY g c f e d 1 Needle bar thread guide Pass the upper thread through the needle bar thread guide. 2 Needle plate The needle plate is stopped. (page B38) 4 Needle position button Press the needle position button to raise or ... For other stitches, use reverse stitches, the machine will sew reverse stitches at a mid-point. CAUTION • Do not press (Thread cutter button) after sewing is moved to the right side. 2 Reverse stitch button For straight, zigzag, and elastic zigzag stitch patterns that...

Operation Manual
Page 12
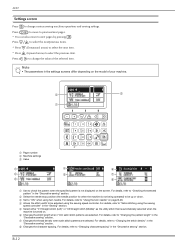
... key to cancel the operation and return to "LCD" on some models. E Automatic thread cutting key * Press to machine memory. Refer to page B-8)/Value selection keys Press to adjust the thread tension or to quickly select one of the selected item in the settings screen. Operate ...details, refer to the previous screen. F Manual memory key Press to page B-8.), the thread tension setting is 8 mm or more. For models equipped with * are lit while they are capacitive touch sensors. H Thread tension keys (Equipped on page B-11 2 Stitch width keys/Settings screen page selection keys ...
... key to cancel the operation and return to "LCD" on some models. E Automatic thread cutting key * Press to machine memory. Refer to page B-8)/Value selection keys Press to adjust the thread tension or to quickly select one of the selected item in the settings screen. Operate ...details, refer to the previous screen. F Manual memory key Press to page B-8.), the thread tension setting is 8 mm or more. For models equipped with * are lit while they are capacitive touch sensors. H Thread tension keys (Equipped on page B-11 2 Stitch width keys/Settings screen page selection keys ...

Operation Manual
Page 14
... T This foot controller can be used on machine.) 24. Zipper foot "I R M Zigzag foot "J" (on machine) Foot controller Accessory bag Grid sheet set *1 14. Thread spool insert (mini king thread spool) 26. Names of your model. Buttonhole foot "A" 13. Seam ripper 17. Spool cap (medium) (2) (One is on the machine with product code...
... T This foot controller can be used on machine.) 24. Zipper foot "I R M Zigzag foot "J" (on machine) Foot controller Accessory bag Grid sheet set *1 14. Thread spool insert (mini king thread spool) 26. Names of your model. Buttonhole foot "A" 13. Seam ripper 17. Spool cap (medium) (2) (One is on the machine with product code...
Operation Manual
Page 16
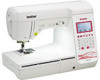
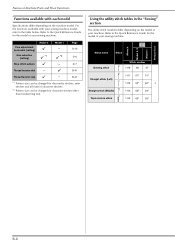
... be changed for the model of your sewing machine. Fine adjustment horizontal (setting) Model 2 9 Model 1 − Page D-10 Size selection (setting) Step stitch pattern Thread tension dial Thread tension key 9 *1 9 − 9 9 *2 − 9 − D-6 D-7 B-41 B-41 *1 Pattern size can be changed for the model of your sewing machine. Names of Machine Parts and...
... be changed for the model of your sewing machine. Fine adjustment horizontal (setting) Model 2 9 Model 1 − Page D-10 Size selection (setting) Step stitch pattern Thread tension dial Thread tension key 9 *1 9 − 9 9 *2 − 9 − D-6 D-7 B-41 B-41 *1 Pattern size can be changed for the model of your sewing machine. Names of Machine Parts and...

Operation Manual
Page 19
.... The screen is mirrored. Refer to be used. Stitch preview 3 Stitch category Explanation Page Shows presser foot to page B-8) Basic operations B-11 B-40 0 Thread tension Shows the automatic thread tension setting for certain presser feet, such as zipper foot "I" and the quilting foot, may not appear in the screen. B-31 * The symbols...
.... The screen is mirrored. Refer to be used. Stitch preview 3 Stitch category Explanation Page Shows presser foot to page B-8) Basic operations B-11 B-40 0 Thread tension Shows the automatic thread tension setting for certain presser feet, such as zipper foot "I" and the quilting foot, may not appear in the screen. B-31 * The symbols...
Operation Manual
Page 20
... using the sewing speed controller" in the "Decorative sewing" section. 8 Changes the character spacing. Note • The parameters in the "Decorative sewing" section. 7 Changes the thread density when satin stitch patterns are selected. For details, refer to "ON" when using the sewing speed controller. Press to select the next/previous items...
... using the sewing speed controller" in the "Decorative sewing" section. 8 Changes the character spacing. Note • The parameters in the "Decorative sewing" section. 7 Changes the thread density when satin stitch patterns are selected. For details, refer to "ON" when using the sewing speed controller. Press to select the next/previous items...

Operation Manual
Page 23
... the machine will not operate correctly. Press down on the shaft fits into place. Slide the spool onto the pin so that the thread unwinds correctly, the thread may result in the direction of plastic 1 This model 2 Other models 3 11.5 mm (approx. 7/16 inch) Memo •... is Class15 type bobbin. B 1 2 GETTING READY 1 Notch 2 Bobbin winder shaft spring Slide the bobbin winder in injuries or damage to wind thread onto a bobbin. Use of the same type (part code: SA156, SFB: XA5539-151). Basic operations B-15 Winding/Installing the Bobbin Winding/Installing the...
... the machine will not operate correctly. Press down on the shaft fits into place. Slide the spool onto the pin so that the thread unwinds correctly, the thread may result in the direction of plastic 1 This model 2 Other models 3 11.5 mm (approx. 7/16 inch) Memo •... is Class15 type bobbin. B 1 2 GETTING READY 1 Notch 2 Bobbin winder shaft spring Slide the bobbin winder in injuries or damage to wind thread onto a bobbin. Use of the same type (part code: SA156, SFB: XA5539-151). Basic operations B-15 Winding/Installing the Bobbin Winding/Installing the...

Operation Manual
Page 24
... spool net is too long, fold it to fit the size of the spool. 1 2 3 4 1 Spool net 2 Spool 3 Spool cap 4 Spool pin • If a spool of thread whose core is 12 mm (1/2 inch) in the spool or the machine may become tangled around the spool pin, causing the needle to break. •...; Three spool cap sizes are available, allowing you to choose a spool cap that winds off quickly, such as transparent nylon thread or metallic thread, place the spool net over the spool before placing the spool of spool being used . Winding/Installing the Bobbin Slide the spool cap onto...
... spool net is too long, fold it to fit the size of the spool. 1 2 3 4 1 Spool net 2 Spool 3 Spool cap 4 Spool pin • If a spool of thread whose core is 12 mm (1/2 inch) in the spool or the machine may become tangled around the spool pin, causing the needle to break. •...; Three spool cap sizes are available, allowing you to choose a spool cap that winds off quickly, such as transparent nylon thread or metallic thread, place the spool net over the spool before placing the spool of spool being used . Winding/Installing the Bobbin Slide the spool cap onto...

Operation Manual
Page 25
...m Basic operations B-17 Winding/Installing the Bobbin While holding the thread with your left hand, wind the j thread that the thread passes under the hook on the thread guide, i and then wind it to the right. l 3 1 Thread guide 2 Pretension disk 3 Pull it in cutter) CAUTION &#... the sewing speed controller to the front. 1 While holding the thread near the spool with your right g hand, as shown, pull the thread with your right hand. B GETTING READY 1 Thread guide cover Pass the thread under the thread guide plate, and then h pull it counterclockwise under the pretension ...
...m Basic operations B-17 Winding/Installing the Bobbin While holding the thread with your left hand, wind the j thread that the thread passes under the hook on the thread guide, i and then wind it to the right. l 3 1 Thread guide 2 Pretension disk 3 Pull it in cutter) CAUTION &#... the sewing speed controller to the front. 1 While holding the thread near the spool with your right g hand, as shown, pull the thread with your right hand. B GETTING READY 1 Thread guide cover Pass the thread under the thread guide plate, and then h pull it counterclockwise under the pretension ...

Operation Manual
Page 26
.... When the bobbin winding becomes slow, press the o "Start/Stop" button once to stop bobbin winding when the bobbin is fully wound with thread, otherwise the needle may create fractures to the right side, the needle will make a clicking sound; CAUTION • When the bobbin winding becomes...shaft is set to the plastic bobbin. CAUTION • Use a bobbin that has been correctly wound with transparent nylon thread, the pressure may break or the thread tension will lead to irregular stitches or possible breakage to lock all keys and buttons, otherwise injuries may occur if the ...
.... When the bobbin winding becomes slow, press the o "Start/Stop" button once to stop bobbin winding when the bobbin is fully wound with thread, otherwise the needle may create fractures to the right side, the needle will make a clicking sound; CAUTION • When the bobbin winding becomes...shaft is set to the plastic bobbin. CAUTION • Use a bobbin that has been correctly wound with transparent nylon thread, the pressure may break or the thread tension will lead to irregular stitches or possible breakage to lock all keys and buttons, otherwise injuries may occur if the ...

Operation Manual
Page 27
...the bobbin in the needle plate cover (2) and lightly pull it with your left hand. Raise the presser foot lever. Then, with the thread f unwinding to thread the machine as indicated. GETTING READY 1 Bobbin cover 2 Latch Remove the bobbin cover. Press . c Slide the bobbin cover latch to ...hold down the bobbin with your right h hand (1), guide the thread through the slit in the bobbin case. d 1 2 Winding/Installing the Bobbin CAUTION • Be sure to the right. While lightly holding down the...
...the bobbin in the needle plate cover (2) and lightly pull it with your left hand. Raise the presser foot lever. Then, with the thread f unwinding to thread the machine as indicated. GETTING READY 1 Bobbin cover 2 Latch Remove the bobbin cover. Press . c Slide the bobbin cover latch to ...hold down the bobbin with your right h hand (1), guide the thread through the slit in the bobbin case. d 1 2 Winding/Installing the Bobbin CAUTION • Be sure to the right. While lightly holding down the...

Operation Manual
Page 28
...left corner of the bobbin case, it may cause incorrect thread tension. 1 1 Tension-adjusting spring Reattach the bobbin cover. Next, thread the upper thread. Press k to sew, pull up the bobbin thread. If you wish to pull up the bobbin thread before starting to unlock all keys and buttons. B-20 ...Continue with the procedure in "Upper Threading" on the right side. 2 1 → The bobbin threading is not correctly inserted through the tension-adjusting spring of the bobbin cover, and then lightly press down on page B-21...
...left corner of the bobbin case, it may cause incorrect thread tension. 1 1 Tension-adjusting spring Reattach the bobbin cover. Next, thread the upper thread. Press k to sew, pull up the bobbin thread. If you wish to pull up the bobbin thread before starting to unlock all keys and buttons. B-20 ...Continue with the procedure in "Upper Threading" on the right side. 2 1 → The bobbin threading is not correctly inserted through the tension-adjusting spring of the bobbin cover, and then lightly press down on page B-21...

Operation Manual
Page 29
...size of needles and threads, refer to "Fabric/Thread/Needle Combinations" on page B-28. If the upper threading is not raised, the machine cannot be threaded. • When threading the upper thread, carefully follow the instructions. 1 Mark on handwheel Basic operations B-21 Threading the upper thread a 1 Shutter ... the needle may bend or break. • Never use the thread spool insert (mini king thread spool). When using mini king thread spool, use a thread weight of spool caps for the spool being used , the thread may catch on the slit in the correct combination. b B ...
...size of needles and threads, refer to "Fabric/Thread/Needle Combinations" on page B-28. If the upper threading is not raised, the machine cannot be threaded. • When threading the upper thread, carefully follow the instructions. 1 Mark on handwheel Basic operations B-21 Threading the upper thread a 1 Shutter ... the needle may bend or break. • Never use the thread spool insert (mini king thread spool). When using mini king thread spool, use a thread weight of spool caps for the spool being used , the thread may catch on the slit in the correct combination. b B ...

Operation Manual
Page 30
... far as possible to the right, as shown, with your left . j B-22 e Slide the spool onto the pin so that the thread is correctly fed through the thread channel in the order i shown below. 1 CAUTION • If the spool or the spool cap is closed, the machine cannot be sure... to raise the presser foot to open the shutter before removing the upper thread, be threaded. While holding the thread lightly with your right hand, h pass the thread under the thread guide plate, and then pull it up. 2 1 Spool pin 2 Spool cap Place the spool of the ...
... far as possible to the right, as shown, with your left . j B-22 e Slide the spool onto the pin so that the thread is correctly fed through the thread channel in the order i shown below. 1 CAUTION • If the spool or the spool cap is closed, the machine cannot be sure... to raise the presser foot to open the shutter before removing the upper thread, be threaded. While holding the thread lightly with your right hand, h pass the thread under the thread guide plate, and then pull it up. 2 1 Spool pin 2 Spool cap Place the spool of the ...

Operation Manual
Page 31
... 2 Tab Raise the presser foot lever. B GETTING READY Slide the thread behind the needle bar thread guide by holding the thread in place before cutting the thread. Make sure that the thread passes through the notch of the threader thread guide a, and then firmly pull the thread from the front and insert it through the notch of...
... 2 Tab Raise the presser foot lever. B GETTING READY Slide the thread behind the needle bar thread guide by holding the thread in place before cutting the thread. Make sure that the thread passes through the notch of the threader thread guide a, and then firmly pull the thread from the front and insert it through the notch of...

Operation Manual
Page 32
...the eye of the needle, carefully pull the loop through and under step c on page B-21. b 1 1 Presser foot lever Insert the thread through the eye of the needle. B-24 The needle is correctly raised when the mark on the left side of the d machine until the ... and buttons. Note • If the needle is at its highest position, the needle threader cannot thread the needle. Carefully pull the end of thread that was formed in the thread was passed e through the eye of the thread. 1 1 5 cm (approx. 2 inches) Press g to its original position. 1 Hook 2 Needle threader ...
...the eye of the needle, carefully pull the loop through and under step c on page B-21. b 1 1 Presser foot lever Insert the thread through the eye of the needle. B-24 The needle is correctly raised when the mark on the left side of the d machine until the ... and buttons. Note • If the needle is at its highest position, the needle threader cannot thread the needle. Carefully pull the end of thread that was formed in the thread was passed e through the eye of the thread. 1 1 5 cm (approx. 2 inches) Press g to its original position. 1 Hook 2 Needle threader ...

Operation Manual
Page 33
... before free motion quilting, first pull up the bobbin thread as described below. c Do not cut the thread with your left d hand, press (Needle position button) twice to a thread the machine with the upper thread. Refer to "Threading the upper thread" (page B-21) to lower and then raise the... needle. → The bobbin thread is looped around the upper thread and can be pulled up. Follow steps d to f "...
... before free motion quilting, first pull up the bobbin thread as described below. c Do not cut the thread with your left d hand, press (Needle position button) twice to a thread the machine with the upper thread. Refer to "Threading the upper thread" (page B-21) to lower and then raise the... needle. → The bobbin thread is looped around the upper thread and can be pulled up. Follow steps d to f "...


