

Fly Indexer Instruction Manual - English
Page 14
... the power switch and disconnect the power cord from the wall outlet before starting installation, otherwise the machine may operate if the start switch is ")1, 7'3--- .y 1- 0 02 L O -Ca/VISO- is depressed by mistake, which could result in injury. 2-1. it. giftarta. .L b 0D1M:331 tit Lz- < ₹-0)- M, IthorAsNirogroJ- 7k i;t fia...
... the power switch and disconnect the power cord from the wall outlet before starting installation, otherwise the machine may operate if the start switch is ")1, 7'3--- .y 1- 0 02 L O -Ca/VISO- is depressed by mistake, which could result in injury. 2-1. it. giftarta. .L b 0D1M:331 tit Lz- < ₹-0)- M, IthorAsNirogroJ- 7k i;t fia...

Fly Indexer Instruction Manual - English
Page 31
... rea- NOTE: If home position starting will stop flashing and illuminate steadily. Zat"-r 7 77 4 2 1- 0) 8 oi\ior) 02,-A-303 L fa hit° OFF ODiklfrti, pi fang 11143TEVjE L glfR SELECT T[ n ENTER nir 1. 7 'y 7°7 4 '2 1-(7), o) • /IAA )45c it:, "0" -I -9800-52,55 19 If it is set to "0", home position starting will occur once for each...
... rea- NOTE: If home position starting will stop flashing and illuminate steadily. Zat"-r 7 77 4 2 1- 0) 8 oi\ior) 02,-A-303 L fa hit° OFF ODiklfrti, pi fang 11143TEVjE L glfR SELECT T[ n ENTER nir 1. 7 'y 7°7 4 '2 1-(7), o) • /IAA )45c it:, "0" -I -9800-52,55 19 If it is set to "0", home position starting will occur once for each...

Instruction Manual - English
Page 6
... of error codes 29 7. Installing the spool stand 6 3-6. Adjusting the trimming of the lower thread and gimp 53 9-17.Adjusting the gimp length after trimming (-02) ... 54 9-18.Lower thread presser (-02 55 9-19.Sub presser (-02 55 10.SUMMARY OF DIP SWITCHES ......... 56 10-1. Changing the mode 20 6-4.
... of error codes 29 7. Installing the spool stand 6 3-6. Adjusting the trimming of the lower thread and gimp 53 9-17.Adjusting the gimp length after trimming (-02) ... 54 9-18.Lower thread presser (-02 55 9-19.Sub presser (-02 55 10.SUMMARY OF DIP SWITCHES ......... 56 10-1. Changing the mode 20 6-4.

Instruction Manual - English
Page 8
...timing selection Starting method Feed method Needle Safety equipment Air pressure Air consumption Noise level Dimensions Work table legs Power supply Weight -00 -01 -02 Men's clothes and ladies' clothes Jeans and work clothes 10 - 50 mm 1,000 - 2,000 rpm (100 rpm steps) L1 14... 80 - Upper thread trimmer -00 -01 -02 Lower thread trimmer Long type Short type - - - - * * -02 is activated Main regulator: 0.5 MPa Knife pressure regulator: 0.3 MPa 43.2 l/min. (8 cycles/min.) 81 dB at max. Nm 120 (Schmetz) Built-in accordance with taper RH-9800 2 Please be sure to ISO 10821 1,200 ...
...timing selection Starting method Feed method Needle Safety equipment Air pressure Air consumption Noise level Dimensions Work table legs Power supply Weight -00 -01 -02 Men's clothes and ladies' clothes Jeans and work clothes 10 - 50 mm 1,000 - 2,000 rpm (100 rpm steps) L1 14... 80 - Upper thread trimmer -00 -01 -02 Lower thread trimmer Long type Short type - - - - * * -02 is activated Main regulator: 0.5 MPa Knife pressure regulator: 0.3 MPa 43.2 l/min. (8 cycles/min.) 81 dB at max. Nm 120 (Schmetz) Built-in accordance with taper RH-9800 2 Please be sure to ISO 10821 1,200 ...

Instruction Manual - English
Page 15
... on the right movable knife (2), left movable knife (3), thread handler (4), right cloth presser (5), left cloth presser (6) and movable knife driving cam (7). (If a connector with -02 specification. < -02 > 0828Q RH-9800 0829Q 9 of the sewing machine. < -00,-01 > 0826Q 0827Q Plug 4 Label No. L7. 3-10. L1 1 1 L2 2 2 L3 3 3 L4 4 4 L5 5 5 L6 6 6 L7 7 7 1113Q Insert the...
... on the right movable knife (2), left movable knife (3), thread handler (4), right cloth presser (5), left cloth presser (6) and movable knife driving cam (7). (If a connector with -02 specification. < -02 > 0828Q RH-9800 0829Q 9 of the sewing machine. < -00,-01 > 0826Q 0827Q Plug 4 Label No. L7. 3-10. L1 1 1 L2 2 2 L3 3 3 L4 4 4 L5 5 5 L6 6 6 L7 7 7 1113Q Insert the...

Instruction Manual - English
Page 23
For upper thread trimming specifications (-00) 0880Q 0879Q For upper and lower thread trimming specifications (-01, -02) 0881Q 0883Q 0882Q RH-9800 0881Q 17 CORRECT USE 5-6. 5. Threading the lower thread Remove the cloth presser plates (refer to page 13), and then thread the lower thread as shown in the illustration below.
For upper thread trimming specifications (-00) 0880Q 0879Q For upper and lower thread trimming specifications (-01, -02) 0881Q 0883Q 0882Q RH-9800 0881Q 17 CORRECT USE 5-6. 5. Threading the lower thread Remove the cloth presser plates (refer to page 13), and then thread the lower thread as shown in the illustration below.

Instruction Manual - English
Page 24
... sewing margin. Insert the material so that it touches the right and left and right and move the cloth guides (1) back and forth to "9-17. RH-9800 18 Adjusting the gimp length after trimming (-02)" (Page 54). 5-8. CORRECT USE 5-7.
... sewing margin. Insert the material so that it touches the right and left and right and move the cloth guides (1) back and forth to "9-17. RH-9800 18 Adjusting the gimp length after trimming (-02)" (Page 54). 5-8. CORRECT USE 5-7.

Instruction Manual - English
Page 28
... lengths for standard specifications. 2. Press the "Up" button (L) or the "Down" button (K) to set to accept the new buttonhole length setting. * The display will flash. 4. RH-9800 22
... lengths for standard specifications. 2. Press the "Up" button (L) or the "Down" button (K) to set to accept the new buttonhole length setting. * The display will flash. 4. RH-9800 22
Instruction Manual - English
Page 33
...power. * The two left-side columns of stitches for memory switch No. 00 01: 1 stitch 01 * Does not appear when memory switch No. 00 02: 2 stitches is set at the front panel. 6. No. Contents Setting range 00 Bar tacking at the sewing start to prevent fraying OFF: Disabled ON: Enabled... Number of the front panel display (J) are skipped. 3. Initial value OFF 01 OFF 01 OFF OFF 18 RH-9800 27 Press the "UP" button (L) or "DOWN" button (K) to select the desired memory switch number. * For memory switches which can be returned to ...
...power. * The two left-side columns of stitches for memory switch No. 00 01: 1 stitch 01 * Does not appear when memory switch No. 00 02: 2 stitches is set at the front panel. 6. No. Contents Setting range 00 Bar tacking at the sewing start to prevent fraying OFF: Disabled ON: Enabled... Number of the front panel display (J) are skipped. 3. Initial value OFF 01 OFF 01 OFF OFF 18 RH-9800 27 Press the "UP" button (L) or "DOWN" button (K) to select the desired memory switch number. * For memory switches which can be returned to ...

Instruction Manual - English
Page 34
... ON: Enabled 25 Spare - 99 Initial value OFF OFF 01 01 OFF 50 OFF OFF OFF OFF 45 OFF 05 OFF 20 OFF 05 OFF - RH-9800 28 of cutting block OFF:Disabled (Determined from number of slit signals) ON: Enabled (Determined by 1/2 pitch 08 Sewing end pitch for buttonhole taper to... OFF: No change for memory switch No. 08 * Does not appear when memory switch No. 08 is set to OFF. 01: 1 stitch, 02: 2 stitches, 03: 3 stitches, 04: 4 stitches, 05: 5 stitches, 06: 6 stitches, 07: 7 stitches, 08: 8 stitches, 09: 9 stitches 11 Test feeding speed OFF: Standard speed ON: Low ...
... ON: Enabled 25 Spare - 99 Initial value OFF OFF 01 01 OFF 50 OFF OFF OFF OFF 45 OFF 05 OFF 20 OFF 05 OFF - RH-9800 28 of cutting block OFF:Disabled (Determined from number of slit signals) ON: Enabled (Determined by 1/2 pitch 08 Sewing end pitch for buttonhole taper to... OFF: No change for memory switch No. 08 * Does not appear when memory switch No. 08 is set to OFF. 01: 1 stitch, 02: 2 stitches, 03: 3 stitches, 04: 4 stitches, 05: 5 stitches, 06: 6 stitches, 07: 7 stitches, 08: 8 stitches, 09: 9 stitches 11 Test feeding speed OFF: Standard speed ON: Low ...
Instruction Manual - English
Page 35
... trimming knife does not retract. Turn off the power. Upper thread operation is lowered. Machine operation direction is not at the home position. 6. Code E-00 E-02 E-03 E-04 E-05 E-09 E-10 E-12 E-15 E-16 E-30 E-32 E-35 E-40 E-42 E-45 E-46 E-50 E-51 E-52 E-59 E-60 E-62...Explanation Resetting method EMERGENCY STOP switch was pressed. Needle bar has not been raised. Needle bar does not stop at the home position. RH-9800 29 RESET button was pressed. Lower thread and trimming operations are displayed when the power is pressed. Turn off the power. Raise ...
... trimming knife does not retract. Turn off the power. Upper thread operation is lowered. Machine operation direction is not at the home position. 6. Code E-00 E-02 E-03 E-04 E-05 E-09 E-10 E-12 E-15 E-16 E-30 E-32 E-35 E-40 E-42 E-45 E-46 E-50 E-51 E-52 E-59 E-60 E-62...Explanation Resetting method EMERGENCY STOP switch was pressed. Needle bar has not been raised. Needle bar does not stop at the home position. RH-9800 29 RESET button was pressed. Lower thread and trimming operations are displayed when the power is pressed. Turn off the power. Raise ...
Instruction Manual - English
Page 59
... each other and spread by the loop spreader (1). 2. The mechanism is active. (Refer to the home position. The lower thread is completed. 1. STANDARD ADJUSTMENTS 9-15. RH-9800 53 Note: If both strands of the lower thread and gimp The lower thread and gimp should be trimmed at the correct time after the...
... each other and spread by the loop spreader (1). 2. The mechanism is active. (Refer to the home position. The lower thread is completed. 1. STANDARD ADJUSTMENTS 9-15. RH-9800 53 Note: If both strands of the lower thread and gimp The lower thread and gimp should be trimmed at the correct time after the...

Instruction Manual - English
Page 60
Adjusting the gimp length after the cloth pressers rise at the correct time after trimming (-02) Approx. 4 mm (1) Adjust so that the lower thread and gimp are spread by the thread handler (1). 2. Thread trimming operation can be trimmed at the feed ... thread and gimp should be checked in the direction of the gimp thread is active. (Refer to adjust the length. (2) (3) 0985Q Becomes shorter Becomes longer RH-9800 54 9.
Adjusting the gimp length after the cloth pressers rise at the correct time after trimming (-02) Approx. 4 mm (1) Adjust so that the lower thread and gimp are spread by the thread handler (1). 2. Thread trimming operation can be trimmed at the feed ... thread and gimp should be checked in the direction of the gimp thread is active. (Refer to adjust the length. (2) (3) 0985Q Becomes shorter Becomes longer RH-9800 54 9.
Instruction Manual - English
Page 61
STANDARD ADJUSTMENTS 9-18. Sub presser (-02) (1) Trimming of the lower thread is carried out when the cloth pressers rise. The end of the lower thread and gimp is securely held between the lower thread presser (1) and the throat plate (2). (2) (1) 0986Q 9-19. Lower thread presser (-02) The lower thread presser (1) operates at the same time as upper thread trimming is carried out. The sub presser (1) endures that the material does not move during thread trimming, in order to maintain a stable thread length after trimming. 0987Q RH-9800 55 9.
STANDARD ADJUSTMENTS 9-18. Sub presser (-02) (1) Trimming of the lower thread is carried out when the cloth pressers rise. The end of the lower thread and gimp is securely held between the lower thread presser (1) and the throat plate (2). (2) (1) 0986Q 9-19. Lower thread presser (-02) The lower thread presser (1) operates at the same time as upper thread trimming is carried out. The sub presser (1) endures that the material does not move during thread trimming, in order to maintain a stable thread length after trimming. 0987Q RH-9800 55 9.

Hand Book - English
Page 1
electric power consumption: 1kVA 175 kg 2002.10 RH-9800 1/17 RH−9800 Electronic Eyelet Button Holer Specifications Specifications Main use Sewing speed Buttonhole length Stitch length Stitch width Tacking length Cloth presser height Stitch shape changing Cut ... Starting method Feed method Needle Safety equipment Air pressure Air consumption Noise level Dimensions Work table legs Power supply Weight −00 −01 −02 Men's clothes and ladies' clothes Jeans and work clothes 1,000−2,000 rpm (100−rpm steps) L1: 14 − 18 mm L5: 28 −...
electric power consumption: 1kVA 175 kg 2002.10 RH-9800 1/17 RH−9800 Electronic Eyelet Button Holer Specifications Specifications Main use Sewing speed Buttonhole length Stitch length Stitch width Tacking length Cloth presser height Stitch shape changing Cut ... Starting method Feed method Needle Safety equipment Air pressure Air consumption Noise level Dimensions Work table legs Power supply Weight −00 −01 −02 Men's clothes and ladies' clothes Jeans and work clothes 1,000−2,000 rpm (100−rpm steps) L1: 14 − 18 mm L5: 28 −...

Hand Book - English
Page 2
There is set Long Short 00 { − − Option*2 − Option*2 Option Option 01 02 03 04 Standard bar tacking / eyelet buttonhole with taper bar { { { { 05 { { − Option*2 − {*1 Option − − { { − { − {*1 { − Option &#...L7. *2 The upper thread nipper cannot be used in conjunction with bar tack taper With round bar tack RH-9800 2/17 2002.10 Device for each sub-class RH−9800− Upper Lower thread Upper Fly indexer Upper Circular Round bar thread trimmer trimmer thread nipper*2 gimp guide stitching...
There is set Long Short 00 { − − Option*2 − Option*2 Option Option 01 02 03 04 Standard bar tacking / eyelet buttonhole with taper bar { { { { 05 { { − Option*2 − {*1 Option − − { { − { − {*1 { − Option &#...L7. *2 The upper thread nipper cannot be used in conjunction with bar tack taper With round bar tack RH-9800 2/17 2002.10 Device for each sub-class RH−9800− Upper Lower thread Upper Fly indexer Upper Circular Round bar thread trimmer trimmer thread nipper*2 gimp guide stitching...

Hand Book - English
Page 12
... L3: 32 - 36 mm S41468-001 Exchange parts set, L6 S38584-001 Exchange parts set, -2 L4: 36 - 40 mm S41469-001 Exchange parts set, L7 RH-9800 12/17 2002.10 No. 1 2 Movable knife cover, L1-2 Movable knife cover, L3-4 Part name For changing to...
... L3: 32 - 36 mm S41468-001 Exchange parts set, L6 S38584-001 Exchange parts set, -2 L4: 36 - 40 mm S41469-001 Exchange parts set, L7 RH-9800 12/17 2002.10 No. 1 2 Movable knife cover, L1-2 Movable knife cover, L3-4 Part name For changing to...
Hand Book - English
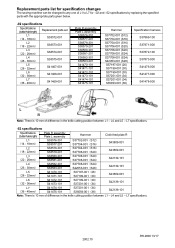
Page 13
L4 and L5 - L7 specifications. 2002.10 RH-9800 13/17 L7 specifications. -52 specifications Specifications (buttonhole length) Plate R assembly Plate L assembly Hammer Cloth feed plate R L1 (14 - 18mm) S38576-301 S38577-... list for specification changes The sewing machine can be changed to any one of L1 to L7 for -02 and -52 specifications by replacing the specified parts with the appropriate parts given below. -02 specifications Specifications (buttonhole length) Replacement parts set L1 (14 - 18mm) S38572-001 L2 (18 - 22mm...
L4 and L5 - L7 specifications. 2002.10 RH-9800 13/17 L7 specifications. -52 specifications Specifications (buttonhole length) Plate R assembly Plate L assembly Hammer Cloth feed plate R L1 (14 - 18mm) S38576-301 S38577-... list for specification changes The sewing machine can be changed to any one of L1 to L7 for -02 and -52 specifications by replacing the specified parts with the appropriate parts given below. -02 specifications Specifications (buttonhole length) Replacement parts set L1 (14 - 18mm) S38572-001 L2 (18 - 22mm...

Hand Book - English
Page 14
Gauge parts list (For -00, -01, -02) Work clamp L S35455−001 R S35454−001 S39929−001 S39930−001 S35197−001 S35198−001 S39931&#...8722;001 S37690−001 L2 S37691−001 S37692−001 L3 S37759−001 S37758−001 L4 S41848-001 −02 S41483-001 L5 S41486-101 S41485-101 L6 S41488-001 S41487-001 L7 S43408-001 S43409-001 L3W S43410-001 S43411-001 L4W ...L S41336−001 D11 < − 10 mm> S41337−001 D13 < − 12 mm> −00 & −01 <For waist belt presser> RH-9800 14/17 2002.10
Gauge parts list (For -00, -01, -02) Work clamp L S35455−001 R S35454−001 S39929−001 S39930−001 S35197−001 S35198−001 S39931&#...8722;001 S37690−001 L2 S37691−001 S37692−001 L3 S37759−001 S37758−001 L4 S41848-001 −02 S41483-001 L5 S41486-101 S41485-101 L6 S41488-001 S41487-001 L7 S43408-001 S43409-001 L3W S43410-001 S43411-001 L4W ...L S41336−001 D11 < − 10 mm> S41337−001 D13 < − 12 mm> −00 & −01 <For waist belt presser> RH-9800 14/17 2002.10

Hand Book - English
Page 15
...;101 (L2R) L2 S37647−101 (L3L) S37648−101 (L3R) L3 S37649−101 (L4L) S37650−101 (L4R) L4 S40823-001 (L5L) −02 S40822-001 (L5R) L5 S41480-001 (L6L) S41479-001 (L6R) L6 S41482-001 (L7L) S41481-001(L7R) L7 For circular stitching needle plate L S41339-001...
...;101 (L2R) L2 S37647−101 (L3L) S37648−101 (L3R) L3 S37649−101 (L4L) S37650−101 (L4R) L4 S40823-001 (L5L) −02 S40822-001 (L5R) L5 S41480-001 (L6L) S41479-001 (L6R) L6 S41482-001 (L7L) S41481-001(L7R) L7 For circular stitching needle plate L S41339-001...


