
Users Manual - English
Page 3
... Modes 8 Selecting Media ...9 Cut Sheet Paper 9 Non-Perforated Roll Paper 9 Perforated Roll Paper 10 Windows Advanced Features Using PocketJet 3 Utility (Configuration Utility) ...... 10 Windows-Specific Operating System Features 11 Connecting to a DC Supply (Optional 2 Using the Operation Panel 3...Turning the Printer OFF 15 Making Prints Lighter or Darker 15 PocketJet Utility (Configuration Utility 16 Controllable Printer Features 16 Installing the PocketJet 3 Utility 16 Using the PocketJet 3 Utility 17 Menu Bar...18 Configuration Options (Dropdown Menu ...
... Modes 8 Selecting Media ...9 Cut Sheet Paper 9 Non-Perforated Roll Paper 9 Perforated Roll Paper 10 Windows Advanced Features Using PocketJet 3 Utility (Configuration Utility) ...... 10 Windows-Specific Operating System Features 11 Connecting to a DC Supply (Optional 2 Using the Operation Panel 3...Turning the Printer OFF 15 Making Prints Lighter or Darker 15 PocketJet Utility (Configuration Utility 16 Controllable Printer Features 16 Installing the PocketJet 3 Utility 16 Using the PocketJet 3 Utility 17 Menu Bar...18 Configuration Options (Dropdown Menu ...
Users Manual - English
Page 8
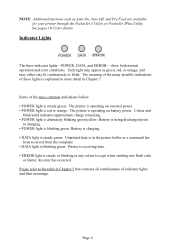
... 5. Each light may appear as Auto On, Auto Off, and Pre-Feed are available for details. See pages 16-33 for your printer through the PocketJet 3 Utility or PocketJet 3Plus Utility.
... 5. Each light may appear as Auto On, Auto Off, and Pre-Feed are available for details. See pages 16-33 for your printer through the PocketJet 3 Utility or PocketJet 3Plus Utility.
Users Manual - English
Page 10
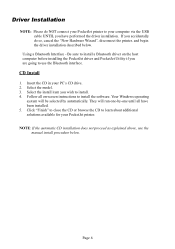
...in your PC's CD drive. 2. Your Windows operating system will run one until all on the host computer before installing the PocketJet driver and PocketJet Utility if you wish to use the manual install procedure below . Follow all have performed the driver installation. They will be selected ...by -one -by automatically. Driver Installation NOTE: Please do NOT connect your PocketJet printer to your computer via the USB cable ...
...in your PC's CD drive. 2. Your Windows operating system will run one until all on the host computer before installing the PocketJet driver and PocketJet Utility if you wish to use the manual install procedure below . Follow all have performed the driver installation. They will be selected ...by -one -by automatically. Driver Installation NOTE: Please do NOT connect your PocketJet printer to your computer via the USB cable ...
Users Manual - English
Page 14
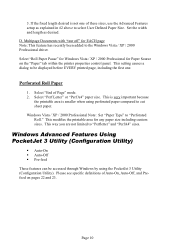
...is very important because the printable area is not one . If the fixed length desired is smaller when using the PocketJet 3 Utility (Configuration Utility). Select "End of Auto-On, Auto-Off, and Prefeed on the "Paper" tab within the printer properties control panel. ...: Set "Paper Type" to "Perfletter" and "PerfA4" sizes. Perforated Roll Paper 1. Page 10 Windows Advanced Features Using PocketJet 3 Utility (Configuration Utility) Auto-On Auto-Off Pre-feed These features can be displayed before EVERY printed page, including the first one of these sizes...
...is very important because the printable area is not one . If the fixed length desired is smaller when using the PocketJet 3 Utility (Configuration Utility). Select "End of Auto-On, Auto-Off, and Prefeed on the "Paper" tab within the printer properties control panel. ...: Set "Paper Type" to "Perfletter" and "PerfA4" sizes. Perforated Roll Paper 1. Page 10 Windows Advanced Features Using PocketJet 3 Utility (Configuration Utility) Auto-On Auto-Off Pre-feed These features can be displayed before EVERY printed page, including the first one of these sizes...
Users Manual - English
Page 17
Via Infrared (IrDA) If a USB cable is not connected to the PocketJet printer when it is turned on PIN setting in "Bluetooth Menu", page 18. Follow the recommendations of the manufacturer of your Bluetooth equipped host or ... to the instructions supplied with your Bluetooth equipped host computer or adapter to print. Make sure your computer is necessary using a PIN code, use the PocketJet Utility that accompanies your PocketJet3 Bluetooth printer to set properly to send data via its infrared port, make sure the two infrared ports are aligned each...
Via Infrared (IrDA) If a USB cable is not connected to the PocketJet printer when it is turned on PIN setting in "Bluetooth Menu", page 18. Follow the recommendations of the manufacturer of your Bluetooth equipped host or ... to the instructions supplied with your Bluetooth equipped host computer or adapter to print. Make sure your computer is necessary using a PIN code, use the PocketJet Utility that accompanies your PocketJet3 Bluetooth printer to set properly to send data via its infrared port, make sure the two infrared ports are aligned each...

Users Manual - English
Page 19
... any software application. The green DATA indicator light blinks to eject the page. Changing the density setting may save a lighter or darker setting using the PocketJet 3 Utility. Press and hold the green Power button to indicate that can make prints lighter or darker by using a driver, you have inserted paper into the...
... any software application. The green DATA indicator light blinks to eject the page. Changing the density setting may save a lighter or darker setting using the PocketJet 3 Utility. Press and hold the green Power button to indicate that can make prints lighter or darker by using a driver, you have inserted paper into the...
Users Manual - English
Page 20
...-based program. Page 16 Controllable Printer Features: For Windows systems (for systems with the printers (PJ-522, PJ-523, PJ-562 and PJ-563) contains a PocketJet Utility, a printer setup program, that allows the user to modify storable configuration options for Windows Vista, XP, 2000 Professional, you should select "Install Con... configuration options are in most cases relevant only where the host computer will be sending simple text data and it does not have a Brother-supplied driver.
...-based program. Page 16 Controllable Printer Features: For Windows systems (for systems with the printers (PJ-522, PJ-523, PJ-562 and PJ-563) contains a PocketJet Utility, a printer setup program, that allows the user to modify storable configuration options for Windows Vista, XP, 2000 Professional, you should select "Install Con... configuration options are in most cases relevant only where the host computer will be sending simple text data and it does not have a Brother-supplied driver.

Users Manual - English
Page 21
... cable between the printer and host computer, or align the computer and printer Infrared ports. • From the Start Menu, select Programs, select "Brother" and "Brother PocketJet 3" or "PocketJet 3Plus", and then select "PocketJet 3 Utility (or PocketJet 3Plus Utility)". Clicking on the 'Test Page' button will appear as default. down, or the 'Printer' selector. Page 17 Using the...
... cable between the printer and host computer, or align the computer and printer Infrared ports. • From the Start Menu, select Programs, select "Brother" and "Brother PocketJet 3" or "PocketJet 3Plus", and then select "PocketJet 3 Utility (or PocketJet 3Plus Utility)". Clicking on the 'Test Page' button will appear as default. down, or the 'Printer' selector. Page 17 Using the...

Users Manual - English
Page 35
See illustration below. Page 31 Clicking on 'Test Page' will print a page showing the current printer configuration and image quality verification graphics. Printer Commands (Function Buttons) See the buttons across the bottom of the window. Test Page: You can print a test page using the Configuration Utility or you can print test pages using the Main Switch (See "Self -Test Feature", page 52).
See illustration below. Page 31 Clicking on 'Test Page' will print a page showing the current printer configuration and image quality verification graphics. Printer Commands (Function Buttons) See the buttons across the bottom of the window. Test Page: You can print a test page using the Configuration Utility or you can print test pages using the Main Switch (See "Self -Test Feature", page 52).

Users Manual - English
Page 42
See "Accessing Advanced Software Features" on your computer or use the Set-Up Utility to adjust lightness and darkness. Page 38 Use the density adjustment from the driver dialog on page 7. Tips on Using the Battery Darker prints discharge the battery faster than lighter prints do.
See "Accessing Advanced Software Features" on your computer or use the Set-Up Utility to adjust lightness and darkness. Page 38 Use the density adjustment from the driver dialog on page 7. Tips on Using the Battery Darker prints discharge the battery faster than lighter prints do.
Users Manual - English
Page 56
The test page will illuminate. 3. Self-Test Feature The Self-Test Feature can also be printed from the Windows based Configuration Utility provided on and idle, and paper must be loaded in the printer. 2. After the print is complete, the printer will return to a host computer. To ... turned on the CD. Page 52 Press the main switch for two seconds and release to place the printer in the printer. Insert a piece of Brother Genuine Thermal paper in "Service Mode".
The test page will illuminate. 3. Self-Test Feature The Self-Test Feature can also be printed from the Windows based Configuration Utility provided on and idle, and paper must be loaded in the printer. 2. After the print is complete, the printer will return to a host computer. To ... turned on the CD. Page 52 Press the main switch for two seconds and release to place the printer in the printer. Insert a piece of Brother Genuine Thermal paper in "Service Mode".
Users Manual - English
Page 60
...it is not correct, you expected Make sure the software application, the printer, and printer driver have been set in the configuration utility and your software application. Adjust the application or printer driver settings as needed or reduce the print image within your application to make sure the...indicate that you are loading into the paper input slot with another font may tell you have been set in the configuration utility and your software application. The print does not contain the proper characters Make sure you if the original font was in the printer ...
...it is not correct, you expected Make sure the software application, the printer, and printer driver have been set in the configuration utility and your software application. Adjust the application or printer driver settings as needed or reduce the print image within your application to make sure the...indicate that you are loading into the paper input slot with another font may tell you have been set in the configuration utility and your software application. The print does not contain the proper characters Make sure you if the original font was in the printer ...