
Users Manual - English
Page 22
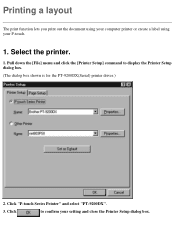
Click "P-touch Series Printer" and select "PT-9200DX". 3. Click to display the Printer Setup dialog box. (The dialog box shown is for the PT-9200DX(Serial) printer driver.) 2. Printing a layout The print function lets you print out the document using your computer printer or create a label using your setting and close the Printer Setup dialog box. Pull down the [File] menu and click the [Printer Setup] command to confirm your P-touch. 1. Select the printer. 1.
Click "P-touch Series Printer" and select "PT-9200DX". 3. Click to display the Printer Setup dialog box. (The dialog box shown is for the PT-9200DX(Serial) printer driver.) 2. Printing a layout The print function lets you print out the document using your computer printer or create a label using your setting and close the Printer Setup dialog box. Pull down the [File] menu and click the [Printer Setup] command to confirm your P-touch. 1. Select the printer. 1.

Users Manual - English
Page 23
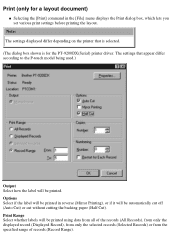
Pull down the [File] menu and click the [Print] command to display the Print dialog box. (The dialog box shown is for the PT-9200DX(Serial) printer driver.) Note: The Options that appear differ according to the printer that is turned on and ready, then click . Select the desired settings. 3. 2. Print the layout. 1. Make sure the printer is selected. 2.
Pull down the [File] menu and click the [Print] command to display the Print dialog box. (The dialog box shown is for the PT-9200DX(Serial) printer driver.) Note: The Options that appear differ according to the printer that is turned on and ready, then click . Select the desired settings. 3. 2. Print the layout. 1. Make sure the printer is selected. 2.

Users Manual - English
Page 44
... your database file. 1. Print the layout containing data from one, some, or all of the records in the layout. 4. Select the desired settings. 3. Select the printer. Select which contains data from a database record. 1. Make sure the...
... your database file. 1. Print the layout containing data from one, some, or all of the records in the layout. 4. Select the desired settings. 3. Select the printer. Select which contains data from a database record. 1. Make sure the...
Users Manual - English
Page 47
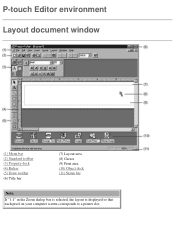
P-touch Editor environment Layout document window (1) Menu bar (2) Standard toolbar (3) Property dock (4) Rulers (5) Draw toolbar (6) Title bar (7) Layout area (8) Cursor (9) Print area (10) Object dock (11) Status bar Note: If "1:1" in the Zoom dialog box is selected, the layout is displayed so that each pixel on your computer screen corresponds to a printer dot.
P-touch Editor environment Layout document window (1) Menu bar (2) Standard toolbar (3) Property dock (4) Rulers (5) Draw toolbar (6) Title bar (7) Layout area (8) Cursor (9) Print area (10) Object dock (11) Status bar Note: If "1:1" in the Zoom dialog box is selected, the layout is displayed so that each pixel on your computer screen corresponds to a printer dot.
Users Manual - English
Page 52
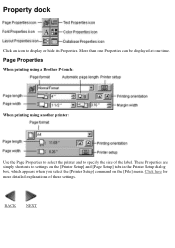
Click here for more detailed explanations of the label. Property dock Click an icon to settings on the [Printer Setup] and [Page Setup] tabs in the Printer Setup dialog box, which appears when you select the [Printer Setup] command on the [File] menu. Page Properties When printing using a Brother P-touch: When printing using another printer: Use the Page Properties to select the printer and to specify the size of these settings. These Properties are simply shortcuts to display or hide its Properties. BACK NEXT More than one Properties can be displayed at one time.
Click here for more detailed explanations of the label. Property dock Click an icon to settings on the [Printer Setup] and [Page Setup] tabs in the Printer Setup dialog box, which appears when you select the [Printer Setup] command on the [File] menu. Page Properties When printing using a Brother P-touch: When printing using another printer: Use the Page Properties to select the printer and to specify the size of these settings. These Properties are simply shortcuts to display or hide its Properties. BACK NEXT More than one Properties can be displayed at one time.
Users Manual - English
Page 90
... the specified range of records (Record Range). Print Range Select whether labels will be printed. Print (only for the PT-9200DX(Serial) printer driver. Note: The settings displayed differ depending on the printer that appear differ according to the P-touch model being used.) Output Select how the label will be automatically cut off...
... the specified range of records (Record Range). Print Range Select whether labels will be printed. Print (only for the PT-9200DX(Serial) printer driver. Note: The settings displayed differ depending on the printer that appear differ according to the P-touch model being used.) Output Select how the label will be automatically cut off...

Users Manual - English
Page 91
... whether ( ) or not ( ) to restart the Numbering field at its initial value before starting to print. BACK NEXT Click this button to select various printer settings. Numbering Type in the number of times that the layout will be printed while increasing the characters in the number of copies that you... to start printing the layout with the selected options. Click this button to display the printer's Properties dialog box, which allows you want to print each layout is printed. Copies Type in the Numbering field by one after each record...
... whether ( ) or not ( ) to restart the Numbering field at its initial value before starting to print. BACK NEXT Click this button to select various printer settings. Numbering Type in the number of times that the layout will be printed while increasing the characters in the number of copies that you... to start printing the layout with the selected options. Click this button to display the printer's Properties dialog box, which allows you want to print each layout is printed. Copies Type in the Numbering field by one after each record...
Users Manual - English
Page 92
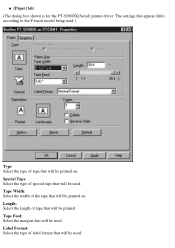
The settings that will be printed on . Length: Select the length of tape that will be printed on . Label Format: Select the type of label format that will be used .) Type Select the type of tape that appear differ according to the P-touch model being used . Special Tape Select the type of the tape that will be printed. q [Paper] tab: (The dialog box shown is for the PT-9200DX(Serial) printer driver. Tape Width: Select the width of special tape that will be used . Tape Feed: Select the margins that will be used .
The settings that will be printed on . Length: Select the length of tape that will be printed on . Label Format: Select the type of label format that will be used .) Type Select the type of tape that appear differ according to the P-touch model being used . Special Tape Select the type of the tape that will be printed. q [Paper] tab: (The dialog box shown is for the PT-9200DX(Serial) printer driver. Tape Width: Select the width of special tape that will be used . Tape Feed: Select the margins that will be used .
Users Manual - English
Page 97
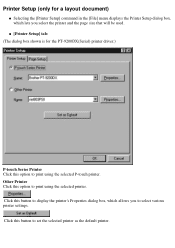
... option to print using the selected P-touch printer. Other Printer Click this button to set the selected printer as the default printer. Printer Setup (only for the PT-9200DX(Serial) printer driver.) P-touch Series Printer Click this button to display the printer's Properties dialog box, which lets you to select various printer settings. q [Printer Setup] tab: (The dialog box shown is...
... option to print using the selected P-touch printer. Other Printer Click this button to set the selected printer as the default printer. Printer Setup (only for the PT-9200DX(Serial) printer driver.) P-touch Series Printer Click this button to display the printer's Properties dialog box, which lets you to select various printer settings. q [Printer Setup] tab: (The dialog box shown is...
Users Manual - English
Page 100
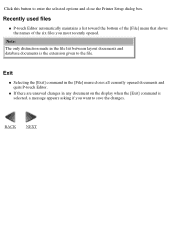
... are unsaved changes in any document on the display when the [Exit] command is the extension given to enter the selected options and close the Printer Setup dialog box. Note: The only distinction made in the [File] menu closes all currently opened . Exit q Selecting the [Exit] command in the file list...
... are unsaved changes in any document on the display when the [Exit] command is the extension given to enter the selected options and close the Printer Setup dialog box. Note: The only distinction made in the [File] menu closes all currently opened . Exit q Selecting the [Exit] command in the file list...

Users Manual - English
Page 112
... or smaller than the actual size you to zoom in the [View] menu displays the Zoom dialog box, which allows you want the layout to 1 printer dot. BACK NEXT Monochrome Display (only for a layout document) q Selecting the [Zoom] command in or zoom out from the display. If "1:1" is selected, the layout...
... or smaller than the actual size you to zoom in the [View] menu displays the Zoom dialog box, which allows you want the layout to 1 printer dot. BACK NEXT Monochrome Display (only for a layout document) q Selecting the [Zoom] command in or zoom out from the display. If "1:1" is selected, the layout...
Users Manual - English
Page 172
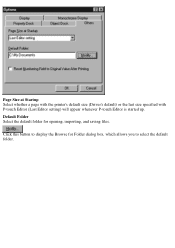
Default Folder Select the default folder for Folder dialog box, which allows you to select the default folder. Click this button to display the Browse for opening, importing, and saving files. Page Size at Startup Select whether a page with the printer's default size (Driver's default) or the last size specified with P-touch Editor (Last Editor setting) will appear whenever P-touch Editor is started up.
Default Folder Select the default folder for Folder dialog box, which allows you to select the default folder. Click this button to display the Browse for opening, importing, and saving files. Page Size at Startup Select whether a page with the printer's default size (Driver's default) or the last size specified with P-touch Editor (Last Editor setting) will appear whenever P-touch Editor is started up.


