Users Manual - English
Page 8
... LCD Display & Keyboard 13 LCD Display...13 Key Names and Functions 14 Power Supply ...16 Battery ...16 AC Adapter ...17 Inserting a Tape Cassette 18 Turning Power On/Off 19 Feeding Tape ...20 Feed & Cut...20 Feed Only ...20 LCD Display ...21 LCD Contrast ...21 Display Mode ...21 Back Light ...22 Setting Language...
... LCD Display & Keyboard 13 LCD Display...13 Key Names and Functions 14 Power Supply ...16 Battery ...16 AC Adapter ...17 Inserting a Tape Cassette 18 Turning Power On/Off 19 Feeding Tape ...20 Feed & Cut...20 Feed Only ...20 LCD Display ...21 LCD Contrast ...21 Display Mode ...21 Back Light ...22 Setting Language...
Users Manual - English
Page 9
... 52 LABEL PRINTING 53 Label Preview...53 Printing a Label ...53 Printing a Single Copy 54 Printing Multiple Copies 54 Auto-numbering Labels 55 Mirror Printing ...56 1 Tape Cutting Options 57 Adjusting the Label Length 58 2 Attaching Labels...59 Printing from the Label Collection 59 3 Printing a label from the Label Collection Stored in...
... 52 LABEL PRINTING 53 Label Preview...53 Printing a Label ...53 Printing a Single Copy 54 Printing Multiple Copies 54 Auto-numbering Labels 55 Mirror Printing ...56 1 Tape Cutting Options 57 Adjusting the Label Length 58 2 Attaching Labels...59 Printing from the Label Collection 59 3 Printing a label from the Label Collection Stored in...
Users Manual - English
Page 10
INTRODUCTION USING THE FILE MEMORY 68 Storing a Label into Memory 68 Opening a Stored Label File 68 Printing a Stored Label File 69 Deleting a Stored Label File 69 MAINTAINING YOUR P-TOUCH LABELER 70 Resetting the P-touch Labeler 70 Resetting data to factory settings (Downloaded data is not reset 70 Resetting data to factory settings (Downloaded data is reset 70 Maintenance...70 Cleaning the Unit 70 Cleaning the Print Head 70 Cleaning the Tape Cutter 71 TROUBLESHOOTING 72 What to do when...72 Error Messages...74 APPENDIX 78 Specifications ...78 INDEX...79 3
INTRODUCTION USING THE FILE MEMORY 68 Storing a Label into Memory 68 Opening a Stored Label File 68 Printing a Stored Label File 69 Deleting a Stored Label File 69 MAINTAINING YOUR P-TOUCH LABELER 70 Resetting the P-touch Labeler 70 Resetting data to factory settings (Downloaded data is not reset 70 Resetting data to factory settings (Downloaded data is reset 70 Maintenance...70 Cleaning the Unit 70 Cleaning the Print Head 70 Cleaning the Tape Cutter 71 TROUBLESHOOTING 72 What to do when...72 Error Messages...74 APPENDIX 78 Specifications ...78 INDEX...79 3
Users Manual - English
Page 11
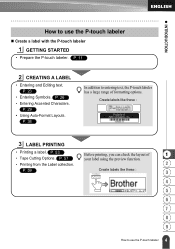
... formatting options. P. 23 • Entering Symbols. P. 26 • Entering Accented Characters. P. 38 In addition to entering text, the P-touch labeler has a large range of 1 • Tape Cutting Options. Create labels like these : 3 LABEL PRINTING • Printing a label. P. 11 2 CREATING A LABEL • Entering and Editing text. P. 57 your label using the preview...
... formatting options. P. 23 • Entering Symbols. P. 26 • Entering Accented Characters. P. 38 In addition to entering text, the P-touch labeler has a large range of 1 • Tape Cutting Options. Create labels like these : 3 LABEL PRINTING • Printing a label. P. 11 2 CREATING A LABEL • Entering and Editing text. P. 57 your label using the preview...
Users Manual - English
Page 14
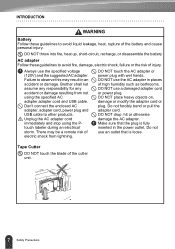
... or damage. DO NOT use a damaged adapter cord or power plug. Tape Cutter DO NOT touch the blade of electric shock from not using the Ptouch labeler during an electrical storm. Always use an outlet that the plug is loose. Brother shall not assume any responsibility for any accident or damage resulting...
... or damage. DO NOT use a damaged adapter cord or power plug. Tape Cutter DO NOT touch the blade of electric shock from not using the Ptouch labeler during an electrical storm. Always use an outlet that the plug is loose. Brother shall not assume any responsibility for any accident or damage resulting...
Users Manual - English
Page 15
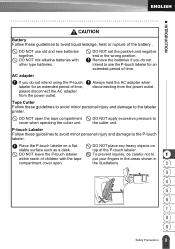
... AC adapter when disconnecting from the power outlet. Place the P-touch labeler on top of time, please disconnect the AC adapter from the power outlet. Tape Cutter Follow these guidelines to avoid minor personal injury and damage to the P-touch labeler. P-touch Labeler Follow these guidelines to avoid minor personal injury... and new batteries together. DO NOT use the P-touch labeler for an extended period of the P-touch labeler. DO NOT mix alkaline batteries with the tape compartment cover open the tape compartment cover when operating the cutter unit. DO NOT open .
... AC adapter when disconnecting from the power outlet. Place the P-touch labeler on top of time, please disconnect the AC adapter from the power outlet. Tape Cutter Follow these guidelines to avoid minor personal injury and damage to the P-touch labeler. P-touch Labeler Follow these guidelines to avoid minor personal injury... and new batteries together. DO NOT use the P-touch labeler for an extended period of the P-touch labeler. DO NOT mix alkaline batteries with the tape compartment cover open the tape compartment cover when operating the cutter unit. DO NOT open .
Users Manual - English
Page 16
...-based ink may be used, ensure it is recommended that you read . • Use only Brother TZ tapes with your P-touch labeler, and then keep it . • The software on the CD-ROM is intended for use tapes that you use a soft, dry cloth. • DO NOT place the P-touch labeler in ... printer for an extended period of the label may malfunction if left near any device that Brother Industries, Ltd does not assume responsibility for more than two minutes, all text and format settings will damage the tape. • It is of the printer or a soft wipe (e.g. Do not use with alcohol ...
...-based ink may be used, ensure it is recommended that you read . • Use only Brother TZ tapes with your P-touch labeler, and then keep it . • The software on the CD-ROM is intended for use tapes that you use a soft, dry cloth. • DO NOT place the P-touch labeler in ... printer for an extended period of the label may malfunction if left near any device that Brother Industries, Ltd does not assume responsibility for more than two minutes, all text and format settings will damage the tape. • It is of the printer or a soft wipe (e.g. Do not use with alcohol ...
Users Manual - English
Page 18
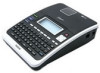
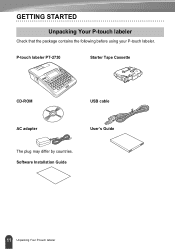
Software Installation Guide 11 Unpacking Your P-touch labeler P-touch labeler PT-2730 Starter Tape Cassette CD-ROM USB cable AC adapter User's Guide The plug may differ by countries. GETTING STARTED Unpacking Your P-touch labeler Check that the package contains the following before using your P-touch labeler.
Software Installation Guide 11 Unpacking Your P-touch labeler P-touch labeler PT-2730 Starter Tape Cassette CD-ROM USB cable AC adapter User's Guide The plug may differ by countries. GETTING STARTED Unpacking Your P-touch labeler Check that the package contains the following before using your P-touch labeler.

Users Manual - English
Page 19
Remove this sheet before using the P-touch. AC adaptor connector Battery compartment cover USB port Battery case 1 2 3 4 5 6 7 8 9 12 General Description z GETTING STARTED General Description Tape compartment cover Tape viewer LCD display Tape cassette compartment Tape exit slot Keyboard Print head Tape cutter Release lever When shipped from the factory, the LCD display is covered with a protective sheet to prevent damage.
Remove this sheet before using the P-touch. AC adaptor connector Battery compartment cover USB port Battery case 1 2 3 4 5 6 7 8 9 12 General Description z GETTING STARTED General Description Tape compartment cover Tape viewer LCD display Tape cassette compartment Tape exit slot Keyboard Print head Tape cutter Release lever When shipped from the factory, the LCD display is covered with a protective sheet to prevent damage.
Users Manual - English
Page 20
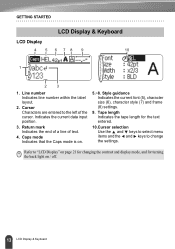
... the cursor. Refer to change the settings. GETTING STARTED LCD Display 45 LCD Display & Keyboard 6 78 9 10 1 2 3 1. Indicates the current data input position. 3. Tape length Indicates the tape length for the text entered. 10.Cursor selection Use the and keys to select menu items and the and keys to "LCD Display" on...
... the cursor. Refer to change the settings. GETTING STARTED LCD Display 45 LCD Display & Keyboard 6 78 9 10 1 2 3 1. Indicates the current data input position. 3. Tape length Indicates the tape length for the text entered. 10.Cursor selection Use the and keys to select menu items and the and keys to "LCD Display" on...

Users Manual - English
Page 21
... selected and printed. • Displays a preview of the label. 3 • Feeds 0.92" (23 mm) of blank tape and then automatically cuts the tape 4 when used labels in the file memory to change clock settings. Print Turns the P-touch labeler on and off. •... 8 saved, or deleted. 9 14 LCD Display & Keyboard File 7 Enables frequently used in combination with the Shift key. 5 8. Cursor ( ) the tape. • Moves the cursor in the direction of text entry screen and clock display. 9. Power 6. Preview 2 3. z GETTING STARTED Key Names and Functions...
... selected and printed. • Displays a preview of the label. 3 • Feeds 0.92" (23 mm) of blank tape and then automatically cuts the tape 4 when used labels in the file memory to change clock settings. Print Turns the P-touch labeler on and off. •... 8 saved, or deleted. 9 14 LCD Display & Keyboard File 7 Enables frequently used in combination with the Shift key. 5 8. Cursor ( ) the tape. • Moves the cursor in the direction of text entry screen and clock display. 9. Power 6. Preview 2 3. z GETTING STARTED Key Names and Functions...
Users Manual - English
Page 25
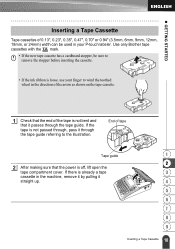
... that it passes through the tape guide referring to the illustration. If the tape is already a tape 3 cassette in the direction of the arrow as shown on the tape cassette. 1 Check that the power is off, lift open the tape compartment cover. Use only Brother tape cassettes with the mark. &#...8226; If the new tape cassette has a cardboard stopper...
... that it passes through the tape guide referring to the illustration. If the tape is already a tape 3 cassette in the direction of the arrow as shown on the tape cassette. 1 Check that the power is off, lift open the tape compartment cover. Use only Brother tape cassettes with the mark. &#...8226; If the new tape cassette has a cardboard stopper...

Users Manual - English
Page 26
...function that automatically turns itself off if no key is connected to an electrical outlet by holding down . • Be sure to feed tape to the Auto PowerOff Time table below for 1 hour after connection to turn the P-touch labeler on the print head. Refer to remove...the Power key again to USB. 19 Turning Power On/Off GETTING STARTED 3 Insert the tape cassette into the tape compartment, with the tape. • Store tape cassettes in the tape and ink ribbon after inserting the tape cassette, by the AC adapter, the previous session's information is displayed when the power ...
...function that automatically turns itself off if no key is connected to an electrical outlet by holding down . • Be sure to feed tape to the Auto PowerOff Time table below for 1 hour after connection to turn the P-touch labeler on the print head. Refer to remove...the Power key again to USB. 19 Turning Power On/Off GETTING STARTED 3 Insert the tape cassette into the tape compartment, with the tape. • Store tape cassettes in the tape and ink ribbon after inserting the tape cassette, by the AC adapter, the previous session's information is displayed when the power ...

Users Manual - English
Page 27
... either OK or Enter key. 3 The message "Feeding Tape... Please Wait" appears while the tape is cut using Fabric and Extra Strength Adhesive tapes, which should be discharged with the tape. • Do not block the tape exit slot during printing or when feeding tape. z GETTING STARTED Feeding Tape Feed & Cut The Feed & Cut function feeds 0.92...
... either OK or Enter key. 3 The message "Feeding Tape... Please Wait" appears while the tape is cut using Fabric and Extra Strength Adhesive tapes, which should be discharged with the tape. • Do not block the tape exit slot during printing or when feeding tape. z GETTING STARTED Feeding Tape Feed & Cut The Feed & Cut function feeds 0.92...

Users Manual - English
Page 31
...the new line. • There is a maximum number of lines of text that can be entered. 4 • To change the character attribute of each tape width. A maximum of 5 blocks can be entered in one space or line. • To move the cursor to the beginning or end of the ... text and then enter the 1 additional text. A maximum of 7 lines can be entered for 0.94" (24mm) tape,5 lines for 0.70" (18mm) tape, 3 lines for 0.47" (12mm) tape, 2 lines for 0.35" (9mm) and 0.23" (6 mm) tape, and 1 line for each line, refer to "Setting Character Attributes by Each Line" on page 35. 5 •...
...the new line. • There is a maximum number of lines of text that can be entered. 4 • To change the character attribute of each tape width. A maximum of 5 blocks can be entered in one space or line. • To move the cursor to the beginning or end of the ... text and then enter the 1 additional text. A maximum of 7 lines can be entered for 0.94" (24mm) tape,5 lines for 0.70" (18mm) tape, 3 lines for 0.47" (12mm) tape, 2 lines for 0.35" (9mm) and 0.23" (6 mm) tape, and 1 line for each line, refer to "Setting Character Attributes by Each Line" on page 35. 5 •...

Users Manual - English
Page 39
Attribute Size Width Value Auto 48pt 42pt 36pt 24pt 18pt 12pt 9pt 6pt x2 x3/2 x1 x2/3 x1/2 Result When Auto is selected, the text is automatically adjusted to print in the largest size available for each tape width. 1 2 3 4 5 6 7 8 9 32 Setting Character Attributes z EDITING A LABEL
Attribute Size Width Value Auto 48pt 42pt 36pt 24pt 18pt 12pt 9pt 6pt x2 x3/2 x1 x2/3 x1/2 Result When Auto is selected, the text is automatically adjusted to print in the largest size available for each tape width. 1 2 3 4 5 6 7 8 9 32 Setting Character Attributes z EDITING A LABEL
Users Manual - English
Page 42
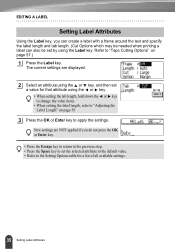
... the value faster. • When setting the label length, refer to "Adjusting the Label Length" on page 58 3 Press the OK or Enter key to "Tape Cutting Options" on page 57.) 1 Press the Label key. EDITING A LABEL Setting Label Attributes Using the Label key, you do not press the OK or...
... the value faster. • When setting the label length, refer to "Adjusting the Label Length" on page 58 3 Press the OK or Enter key to "Tape Cutting Options" on page 57.) 1 Press the Label key. EDITING A LABEL Setting Label Attributes Using the Label key, you do not press the OK or...

Users Manual - English
Page 46
... display the Print Options menu. • If the width of the current tape cassette does not match the set to clear the error message, and insert a tape cassette of the correct width. • If the number of the current Tape Cutting Option setting (refer to print the label. Press the Escape key or... any other key to Special Tape. 39 Using Auto-Format Layouts Repeat this for a list of available templates. • To print multiple copies, sequentially numbered copies, or a mirror image of the ...
... display the Print Options menu. • If the width of the current tape cassette does not match the set to clear the error message, and insert a tape cassette of the correct width. • If the number of the current Tape Cutting Option setting (refer to print the label. Press the Escape key or... any other key to Special Tape. 39 Using Auto-Format Layouts Repeat this for a list of available templates. • To print multiple copies, sequentially numbered copies, or a mirror image of the ...

Users Manual - English
Page 49
...block layout using the or key. 5 Press the OK or Enter key. Refer to display the Tape Width screen, and then select a tape width using the or key. 3 Press the OK or Enter key. When the tape width has changed , the last block layout selected is displayed. 6 Select an attribute using the or... details on predictive text. 3 8 Enter text and then press the OK or Enter key. 4 Repeat for each text field. When the tape width has not changed , the default layout for the new tape width is also 1 enabled when entering text with the Auto-Format function. The Style screen is displayed.
...block layout using the or key. 5 Press the OK or Enter key. Refer to display the Tape Width screen, and then select a tape width using the or key. 3 Press the OK or Enter key. When the tape width has changed , the last block layout selected is displayed. 6 Select an attribute using the or... details on predictive text. 3 8 Enter text and then press the OK or Enter key. 4 Repeat for each text field. When the tape width has not changed , the default layout for the new tape width is also 1 enabled when entering text with the Auto-Format function. The Style screen is displayed.

Users Manual - English
Page 50
... menu displayed hold down the Shift key and press the Print key to display the Print Options menu. • If the width of the current tape cassette does not match the set to print the label. is displayed when the OK or Enter key is pressed. EDITING A LABEL • Press the...; To print multiple copies, sequentially numbered copies, or a mirror image of the label, with a margin on the left and right ends regardless of the current Tape Cutting Option setting (refer to page 57). • Cutting is disabled when "Cut Option" is set width for the selected layout, an error message is...
... menu displayed hold down the Shift key and press the Print key to display the Print Options menu. • If the width of the current tape cassette does not match the set to print the label. is displayed when the OK or Enter key is pressed. EDITING A LABEL • Press the...; To print multiple copies, sequentially numbered copies, or a mirror image of the label, with a margin on the left and right ends regardless of the current Tape Cutting Option setting (refer to page 57). • Cutting is disabled when "Cut Option" is set width for the selected layout, an error message is...


