
Users Manual - English
Page 3
...& bottom view 1 Keyboard & LCD display 2 General Precautions 3 Batteries & Tape Cassettes 4 Installing batteries and a tape cassette 4 Cleaning 7 Cleaning the print head, rollers and tape cutter 7 Optional AC Adapter 8 Connecting the AC adapter 8 Turning the P-touch On/Off 8 2. Basic Functions 14 Performing Basic Operations 14 Choosing functions, parameters...Vertical Modes 9 Rotate Mode and Rotate & Repeat Mode 10 Flag Mode 11 Port & Panel Modes 12 3. CONTENTS Brother® 90 Days/One Year Limited Warranty and Replacement Service (For USA Only iii Important Information v 1.
...& bottom view 1 Keyboard & LCD display 2 General Precautions 3 Batteries & Tape Cassettes 4 Installing batteries and a tape cassette 4 Cleaning 7 Cleaning the print head, rollers and tape cutter 7 Optional AC Adapter 8 Connecting the AC adapter 8 Turning the P-touch On/Off 8 2. Basic Functions 14 Performing Basic Operations 14 Choosing functions, parameters...Vertical Modes 9 Rotate Mode and Rotate & Repeat Mode 10 Flag Mode 11 Port & Panel Modes 12 3. CONTENTS Brother® 90 Days/One Year Limited Warranty and Replacement Service (For USA Only iii Important Information v 1.

Users Manual - English
Page 4
Machine Adjustments 37 Selecting how tape is fed and cut 37 Adjusting the display contrast 37 Setting the Auto Reduction function 38 Calibrating the label length 38 Specifying if the PERSONAL ... character width 26 Specifying the character style 27 Using the pre-formatted Auto Format templates 29 Printing Labels 30 Previewing the label layout 30 Feeding tape 30 Printing a label 30 Using special printing functions 31 Storing and Recalling Files 35 Storing label text 35 Recalling text that has been stored 36...
Machine Adjustments 37 Selecting how tape is fed and cut 37 Adjusting the display contrast 37 Setting the Auto Reduction function 38 Calibrating the label length 38 Specifying if the PERSONAL ... character width 26 Specifying the character style 27 Using the pre-formatted Auto Format templates 29 Printing Labels 30 Previewing the label layout 30 Feeding tape 30 Printing a label 30 Using special printing functions 31 Storing and Recalling Files 35 Storing label text 35 Recalling text that has been stored 36...

Users Manual - English
Page 9
Getting Started 1 Getting Started General Description Top view & bottom view Top view Display Tape cutter button Keyboard Back cover AC adapter connector Battery compartment Tape cassette compartment Cassette release lever Print head Tape exit slot Bottom view 1
Getting Started 1 Getting Started General Description Top view & bottom view Top view Display Tape cutter button Keyboard Back cover AC adapter connector Battery compartment Tape cassette compartment Cassette release lever Print head Tape exit slot Bottom view 1

Users Manual - English
Page 11
... dusty places. Never leave it out of both direct sunlight and rain. ● Do not expose the machine to disassemble the P-touch. 3 Getting Started General Precautions ● Use only Brother TZ tapes with alcohol or other adapter will void the warranty. ● Do not try to disassemble the AC adapter. ● When the...
... dusty places. Never leave it out of both direct sunlight and rain. ● Do not expose the machine to disassemble the P-touch. 3 Getting Started General Precautions ● Use only Brother TZ tapes with alcohol or other adapter will void the warranty. ● Do not try to disassemble the AC adapter. ● When the...

Users Manual - English
Page 12
...of recharged and uncharged batteries 4 For more details on batteries ☞ This P-touch requires six AA-size batteries. Instead, recharge the batteries by leaving them in a wide variety of types, colors and sizes, enabling you to the instructions provided with the AC adapter connected. ...Ni-MH) batteries can be used instead of batteries used anywhere. Batteries & Tape Cassettes This machine has been designed to allow you to make distinctive color-coded and stylized labels. TZ tape cassettes are available for the type of six alkaline batteries. ☞ The rechargeable...
...of recharged and uncharged batteries 4 For more details on batteries ☞ This P-touch requires six AA-size batteries. Instead, recharge the batteries by leaving them in a wide variety of types, colors and sizes, enabling you to the instructions provided with the AC adapter connected. ...Ni-MH) batteries can be used instead of batteries used anywhere. Batteries & Tape Cassettes This machine has been designed to allow you to make distinctive color-coded and stylized labels. TZ tape cassettes are available for the type of six alkaline batteries. ☞ The rechargeable...
Users Manual - English
Page 13
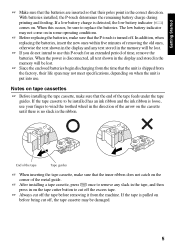
... is no slack in on . If the tape cassette to be damaged. 5 Getting Started ☞ Make sure that the batteries are inserted so that the end of the tape feeds under the tape guides. With batteries installed, the P-touch determines the remaining battery charge during printing and ...feeding. If a low battery charge is loose, use your finger to use . Notes on tape cassettes ☞ Before installing the tape cassette, make sure ...
... is no slack in on . If the tape cassette to be damaged. 5 Getting Started ☞ Make sure that the batteries are inserted so that the end of the tape feeds under the tape guides. With batteries installed, the P-touch determines the remaining battery charge during printing and ...feeding. If a low battery charge is loose, use your finger to use . Notes on tape cassettes ☞ Before installing the tape cassette, make sure ...

Users Manual - English
Page 14
... Overlap > 5 mm Overlap > 5 mm Flag > 5 mm 6 Flexible ID Tape ☞ For applications that this P-touch is equipped with Flexible ID Tape are not designed for use as electrical insulation. ☞ When wrapping labels around sharp bends and cylindrical objects, we recommend using Flexible ID Tape. ☞ Labels made with is affixed. Extra Strength Adhesive...
... Overlap > 5 mm Overlap > 5 mm Flag > 5 mm 6 Flexible ID Tape ☞ For applications that this P-touch is equipped with Flexible ID Tape are not designed for use as electrical insulation. ☞ When wrapping labels around sharp bends and cylindrical objects, we recommend using Flexible ID Tape. ☞ Labels made with is affixed. Extra Strength Adhesive...
Users Manual - English
Page 15
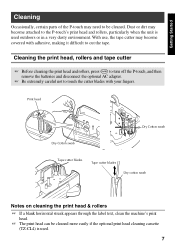
Getting Started Cleaning Occasionally, certain parts of the P-touch may need to cut the tape. With use, the tape cutter may become covered with your fingers. Print head Dry Cotton swab Dry Cotton swab Tape cutter blades Tape cutter blades Dry cotton swab Notes on cleaning the print head & rollers &#...print head. ☞ The print head can be cleaned. Cleaning the print head, rollers and tape cutter ☞ Before cleaning the print head and rollers, press o to turn off the P-touch, and then remove the batteries and disconnect the optional AC adapter. ☞ Be extremely careful ...
Getting Started Cleaning Occasionally, certain parts of the P-touch may need to cut the tape. With use, the tape cutter may become covered with your fingers. Print head Dry Cotton swab Dry Cotton swab Tape cutter blades Tape cutter blades Dry cotton swab Notes on cleaning the print head & rollers &#...print head. ☞ The print head can be cleaned. Cleaning the print head, rollers and tape cutter ☞ Before cleaning the print head and rollers, press o to turn off the P-touch, and then remove the batteries and disconnect the optional AC adapter. ☞ Be extremely careful ...
Users Manual - English
Page 16
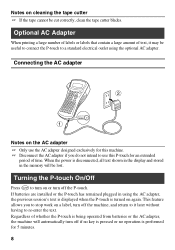
... When printing a large number of labels or labels that contain a large amount of whether the P-touch is being operated from batteries or the AC adapter, the machine will be cut correctly, clean the tape cutter blades. This feature allows you do not intend to stop work on again. Turning the... P-touch On/Off Press o to turn on the AC adapter ☞ Only use this machine. ☞ Disconnect...
... When printing a large number of labels or labels that contain a large amount of whether the P-touch is being operated from batteries or the AC adapter, the machine will be cut correctly, clean the tape cutter blades. This feature allows you do not intend to stop work on again. Turning the... P-touch On/Off Press o to turn on the AC adapter ☞ Only use this machine. ☞ Disconnect...

Users Manual - English
Page 18
... the length of each text block printed on a separate label as usual. Rotate Mode and Rotate & Repeat Mode Labels printed using Flexible ID Tape. When wrapping Flexible ID Tape around cables and wires to cables and wires, we recommend using these modes, the text is printed vertically along the label. With the...
... the length of each text block printed on a separate label as usual. Rotate Mode and Rotate & Repeat Mode Labels printed using Flexible ID Tape. When wrapping Flexible ID Tape around cables and wires to cables and wires, we recommend using these modes, the text is printed vertically along the label. With the...
Users Manual - English
Page 19
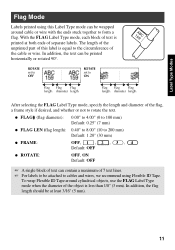
... wires, we recommend using this label is equal to the circumference of the object is printed at least 3/16" (5 mm). 11 To wrap Flexible ID Tape around cable or wire with the ends stuck together to form a flag. ROTATE set to OFF ROTATE set to ON Flag Flag Flag length diameter... of the unprinted part of this Label Type mode can contain a maximum of separate labels. Label Type Modes Flag Mode Labels printed using Flexible ID Tape.
... wires, we recommend using this label is equal to the circumference of the object is printed at least 3/16" (5 mm). 11 To wrap Flexible ID Tape around cable or wire with the ends stuck together to form a flag. ROTATE set to OFF ROTATE set to ON Flag Flag Flag length diameter... of the unprinted part of this Label Type mode can contain a maximum of separate labels. Label Type Modes Flag Mode Labels printed using Flexible ID Tape.

Users Manual - English
Page 21
... Type mode: OFF, 1 , 2 , 3 , 4 , 5 , 6 , 7 , 8 , 9 Default: OFF ● PRINT (print order): FRONT, REVERSE Default: FRONT ☞ For these types of labels, we recommend using Extra Strength Adhesive Tape. ☞ The PRINT parameter is only available with the PANEL Label Type mode. ☞ By using the Numbering function with the PANEL Label Type mode...
... Type mode: OFF, 1 , 2 , 3 , 4 , 5 , 6 , 7 , 8 , 9 Default: OFF ● PRINT (print order): FRONT, REVERSE Default: FRONT ☞ For these types of labels, we recommend using Extra Strength Adhesive Tape. ☞ The PRINT parameter is only available with the PANEL Label Type mode. ☞ By using the Numbering function with the PANEL Label Type mode...

Users Manual - English
Page 24
... only contain a maximum of fifty text blocks. ☞ The number of the block that the cursor is in is limited to exit Insert mode. 16 Tape Width 1/4" (6 mm) 3/8" (9 mm) 1/2" (12 mm) 3/4" (18 mm) 1" (24 mm) Maximum Number of Lines That Can Be Printed 2 2 3 5 7 ☞ The line number on the width of... can be printed as follows. For example, text entered as shown below, will be printed depends on the display indicates the line number of the tape.
... only contain a maximum of fifty text blocks. ☞ The number of the block that the cursor is in is limited to exit Insert mode. 16 Tape Width 1/4" (6 mm) 3/8" (9 mm) 1/2" (12 mm) 3/4" (18 mm) 1" (24 mm) Maximum Number of Lines That Can Be Printed 2 2 3 5 7 ☞ The line number on the width of... can be printed as follows. For example, text entered as shown below, will be printed depends on the display indicates the line number of the tape.

Users Manual - English
Page 26
For best results, print barcode labels in black on certain label tape colors. Setting bar code parameters 1 Press g, then c. 2 Press l or r until the parameter that you wish to change is displayed. 3 Press u or d until the desired setting is ...displayed. 4 Repeat steps 2 and 3 until all parameters are set as part of labels. ☞ Since this machine is only available with certain ink colors on white tape. Parameter PROTOCOL WIDTH (bar width) UNDER# (numbers printed below bar code) CHECK DIGIT Settings CODE 39, I-2/5, EAN13, EAN8, UPC-A, UPC-E, CODABAR, EAN128, CODE128 MEDIUM...
For best results, print barcode labels in black on certain label tape colors. Setting bar code parameters 1 Press g, then c. 2 Press l or r until the parameter that you wish to change is displayed. 3 Press u or d until the desired setting is ...displayed. 4 Repeat steps 2 and 3 until all parameters are set as part of labels. ☞ Since this machine is only available with certain ink colors on white tape. Parameter PROTOCOL WIDTH (bar width) UNDER# (numbers printed below bar code) CHECK DIGIT Settings CODE 39, I-2/5, EAN13, EAN8, UPC-A, UPC-E, CODABAR, EAN128, CODE128 MEDIUM...
Users Manual - English
Page 33
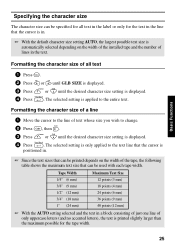
... sizes that the cursor is printed slightly larger than the maximum possible for the text in the line that can be used with each tape width. Formatting the character size of a line 1 Move the cursor to the text line that can be printed depends on the width... automatically selected depending on the width of lines in . ☞ With the default character size setting AUTO, the largest possible text size is displayed. 4 Press n. Tape Width Maximum Text Size 1/4" (6 mm) 3/8" (9 mm) 1/2" (12 mm) 12 points (3 mm) 18 points (4 mm) 24 points (6 mm) 3/4" (18 mm) 36 points (9 mm) 1" ...
... sizes that the cursor is printed slightly larger than the maximum possible for the text in the line that can be used with each tape width. Formatting the character size of a line 1 Move the cursor to the text line that can be printed depends on the width... automatically selected depending on the width of lines in . ☞ With the default character size setting AUTO, the largest possible text size is displayed. 4 Press n. Tape Width Maximum Text Size 1/4" (6 mm) 3/8" (9 mm) 1/2" (12 mm) 12 points (3 mm) 18 points (4 mm) 24 points (6 mm) 3/4" (18 mm) 36 points (9 mm) 1" ...

Users Manual - English
Page 37
... CHIP 3/8" × 1.00" (9 mm × 25 mm) 1 TEXT1? 2 TEXT2? 1 Press g, then the number key where the template that you to be printed. Key Template Name Tape Width Label Length 1 BIN BOX 3/4" × 2.75" (18 mm × 69 mm) Template Fields 1 SYMBOL? 2 TEXT1? 3 TEXT2? 4 BAR CODE? The first field for the selected...
... CHIP 3/8" × 1.00" (9 mm × 25 mm) 1 TEXT1? 2 TEXT2? 1 Press g, then the number key where the template that you to be printed. Key Template Name Tape Width Label Length 1 BIN BOX 3/4" × 2.75" (18 mm × 69 mm) Template Fields 1 SYMBOL? 2 TEXT1? 3 TEXT2? 4 BAR CODE? The first field for the selected...

Users Manual - English
Page 38
... The Preview function allows you to see a sample of the layout of the label being printed is indicated in the lower-left corner of tape, press f. Feeding tape ● To feed out 1" (23 mm) of the display. ☞ To scroll the print preview left or right, press l or r. ☞ To return ...to turn off the P-touch. 30 Press uor d until EXIT appears, and then press n . The length of the current label is displayed. ☞ To quit printing, ...
... The Preview function allows you to see a sample of the layout of the label being printed is indicated in the lower-left corner of tape, press f. Feeding tape ● To feed out 1" (23 mm) of the display. ☞ To scroll the print preview left or right, press l or r. ☞ To return ...to turn off the P-touch. 30 Press uor d until EXIT appears, and then press n . The length of the current label is displayed. ☞ To quit printing, ...

Users Manual - English
Page 39
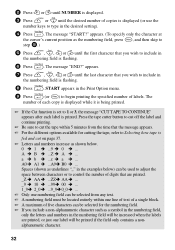
... the specified number of each copy is displayed while it is being printed. ☞ If the Cut function is set to 1 or 3, the message "CUT TAPE TO CONTINUE" appears after each label is printed. The number of copies. This type of copies is very useful when printing serial number labels, production... of labels, print several copies of the same text while incrementing the values of label text, or print label text as a mirror image. Press the tape cutter button to cut off the label and continue printing. ☞ Be sure to cut on page 37. ☞ To specify settings for cutting the...
... the specified number of each copy is displayed while it is being printed. ☞ If the Cut function is set to 1 or 3, the message "CUT TAPE TO CONTINUE" appears after each label is printed. The number of copies. This type of copies is very useful when printing serial number labels, production... of labels, print several copies of the same text while incrementing the values of label text, or print label text as a mirror image. Press the tape cutter button to cut off the label and continue printing. ☞ Be sure to cut on page 37. ☞ To specify settings for cutting the...
Users Manual - English
Page 40
... in the Print Option menu. 9 Press n (or p) to 1 or 3, the message "CUT TAPE TO CONTINUE" appears after each label is printed. Press the tape cutter button to cut off the label and continue printing. ☞ Be sure to cut the tape within 5 minutes from the time that the message appears. ☞ For the... different options available for cutting the tape, refer to Selecting how tape is fed and cut on page 37. ☞ Letters and numbers increase as shown below ) can be used to adjust the space between characters or ...
... in the Print Option menu. 9 Press n (or p) to 1 or 3, the message "CUT TAPE TO CONTINUE" appears after each label is printed. Press the tape cutter button to cut off the label and continue printing. ☞ Be sure to cut the tape within 5 minutes from the time that the message appears. ☞ For the... different options available for cutting the tape, refer to Selecting how tape is fed and cut on page 37. ☞ Letters and numbers increase as shown below ) can be used to adjust the space between characters or ...

Users Manual - English
Page 41
... label so that the second number in the desired setting). 4 Press r so that the text can be read correctly from the adhesive side of the tape. ☞ To specify settings for additional Print Option functions, instead of continuing with step 8.
... label so that the second number in the desired setting). 4 Press r so that the text can be read correctly from the adhesive side of the tape. ☞ To specify settings for additional Print Option functions, instead of continuing with step 8.


