
Users Manual - English
Page 47
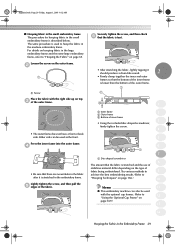
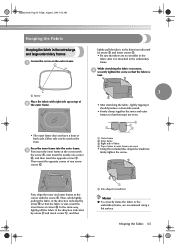
... frame into the outer frame. 4 • Be sure that there are no wrinkles in the fabric after it should produce a drum-like sound. 2 • Firmly clamp together the inner and outer frames so that the fabric is taut. • After stretching the fabric, lightly tapping it is described below. Securely tighten...
... frame into the outer frame. 4 • Be sure that there are no wrinkles in the fabric after it should produce a drum-like sound. 2 • Firmly clamp together the inner and outer frames so that the fabric is taut. • After stretching the fabric, lightly tapping it is described below. Securely tighten...

Users Manual - English
Page 80
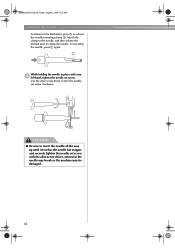
...in the illustration, press 1 to turn the needle set screw. Use the allen screw driver to extend the needle-mounting clamp 2. To unclamp the needle, press 1 again. CAUTION ● Be sure to clamp the needle. Sapphire.book Page 62 Friday, August 1, 2003 9:12 AM OTHER BASIC PROCEDURES As shown in place with... the allen screw driver, otherwise the needle may break or the machine may be damaged. 62 Attach the clamp to the needle, and then release the pressed area to insert the needle all the way up until it touches the needle bar stopper and...
...in the illustration, press 1 to turn the needle set screw. Use the allen screw driver to extend the needle-mounting clamp 2. To unclamp the needle, press 1 again. CAUTION ● Be sure to clamp the needle. Sapphire.book Page 62 Friday, August 1, 2003 9:12 AM OTHER BASIC PROCEDURES As shown in place with... the allen screw driver, otherwise the needle may break or the machine may be damaged. 62 Attach the clamp to the needle, and then release the pressed area to insert the needle all the way up until it touches the needle bar stopper and...

Users Manual - English
Page 82
.... Using a steam iron, affix the iron-on stabilizer 1 (backing) to the back of the fabric. 1 Note ● Use a piece of iron-on stabilizer (backing) is clamped on all edges in order to prevent wrinkles in the fabric. 2 1 Adhesive side of stabilizer (backing), refer to iron, hoop a layer of the iron-on...
.... Using a steam iron, affix the iron-on stabilizer 1 (backing) to the back of the fabric. 1 Note ● Use a piece of iron-on stabilizer (backing) is clamped on all edges in order to prevent wrinkles in the fabric. 2 1 Adhesive side of stabilizer (backing), refer to iron, hoop a layer of the iron-on...

Users Manual - English
Page 83
... 65 Then insert the opposite corner of non screw corner D. 3 • After stretching the fabric, lightly tapping it should produce a drum-like sound. • Firmly clamp together the inner and outer frames so that there are even • Using the included disc-shaped screwdriver, firmly tighten the screw. In the same...
... 65 Then insert the opposite corner of non screw corner D. 3 • After stretching the fabric, lightly tapping it should produce a drum-like sound. • Firmly clamp together the inner and outer frames so that there are even • Using the included disc-shaped screwdriver, firmly tighten the screw. In the same...

Users Manual - English
Page 85
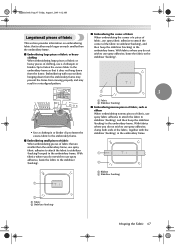
... fabric to stabilizer (backing), and then hoop the stabilizer (backing) in the embroidery frame. With fabrics where you do not wish to use spray adhesive, clamp both ends of the fabric, together with excess fabric hanging down from moving properly and may result in a misaligned pattern. ■ Embroidering the corner of...
... fabric to stabilizer (backing), and then hoop the stabilizer (backing) in the embroidery frame. With fabrics where you do not wish to use spray adhesive, clamp both ends of the fabric, together with excess fabric hanging down from moving properly and may result in a misaligned pattern. ■ Embroidering the corner of...
Users Manual - English
Page 88
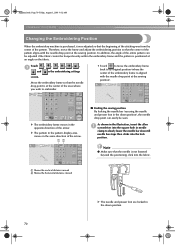
... frame and the pattern is positioned at the sewing position). As shown in the illustration, insert the allen 1 screwdriver into the square hole in needle clamp to its original position (where the center of the pattern. Sapphire.book Page 70 Friday, August 1, 2003 9:12 AM OTHER BASIC PROCEDURES Changing the Embroidering...
... frame and the pattern is positioned at the sewing position). As shown in the illustration, insert the allen 1 screwdriver into the square hole in needle clamp to its original position (where the center of the pattern. Sapphire.book Page 70 Friday, August 1, 2003 9:12 AM OTHER BASIC PROCEDURES Changing the Embroidering...

Users Manual - English
Page 190
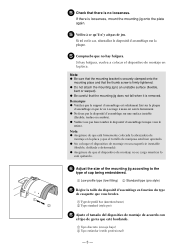
...the stopper is firmly secured. 3 1 Mounting bracket 2 Mounting plate 3 Tighten thumb screw Check that the stopper can be hooked onto the screw and clamped with it is looseness, mount the mounting jig onto the plate again X This completes the preparation of the arrow. Sapphire.book Page 172 Friday, ...flexible, bent or warped). ● Be careful that the thumb screw is removed. Note ● Be sure that the mounting bracket is securely clamped onto the mounting place and that the mounting jig does not fall when it is firmly tightened. ● Do not attach the mounting jig to...
...the stopper is firmly secured. 3 1 Mounting bracket 2 Mounting plate 3 Tighten thumb screw Check that the stopper can be hooked onto the screw and clamped with it is looseness, mount the mounting jig onto the plate again X This completes the preparation of the arrow. Sapphire.book Page 172 Friday, ...flexible, bent or warped). ● Be careful that the thumb screw is removed. Note ● Be sure that the mounting bracket is securely clamped onto the mounting place and that the mounting jig does not fall when it is firmly tightened. ● Do not attach the mounting jig to...

Users Manual - English
Page 191
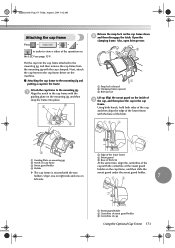
Open the clamping frame. Sapphire.book Page 173 Friday, August 1, 2003 9:12 AM Attaching the cap frame Press →...the operation on the cap frame down 2 and then disengage the latch. Also, open brim presser. 3 2 1 1 Snap lock released 2 Clamping frame opened 3 Brim presser Lift up (flip) the sweat guard on left side. 1 Edge of the lower frame 2 Sweat guard 3 ...Base of the brim At the same time, align the centerline of the cap with the cap clamped. Put the cap into place. 1 2 Release the snap lock on the LCD (see page 151). Next, attach the cap...
Open the clamping frame. Sapphire.book Page 173 Friday, August 1, 2003 9:12 AM Attaching the cap frame Press →...the operation on the cap frame down 2 and then disengage the latch. Also, open brim presser. 3 2 1 1 Snap lock released 2 Clamping frame opened 3 Brim presser Lift up (flip) the sweat guard on left side. 1 Edge of the lower frame 2 Sweat guard 3 ...Base of the brim At the same time, align the centerline of the cap with the cap clamped. Put the cap into place. 1 2 Release the snap lock on the LCD (see page 151). Next, attach the cap...

Users Manual - English
Page 192
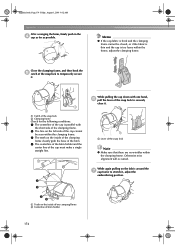
... brim. 4 The centerline of the brim holder and the center line of the cap must make a single straight line. 4 3 1 2 1 Teeth on the inside of the clamping frame 2 Centerline of brim holder 1 1 Lever of the snap lock to stretch it . While again pulling on the fabric around the 7 cap frame to securely... Sapphire.book Page 174 Friday, August 1, 2003 9:12 AM Appendix After arranging the brim, firmly push in the 4 cap as far as possible. Close the clamping frame, and then hook the 5 catch of the cap cannot be closed, or if the fabric is thin and the cap is parallel with one...
... brim. 4 The centerline of the brim holder and the center line of the cap must make a single straight line. 4 3 1 2 1 Teeth on the inside of the clamping frame 2 Centerline of brim holder 1 1 Lever of the snap lock to stretch it . While again pulling on the fabric around the 7 cap frame to securely... Sapphire.book Page 174 Friday, August 1, 2003 9:12 AM Appendix After arranging the brim, firmly push in the 4 cap as far as possible. Close the clamping frame, and then hook the 5 catch of the cap cannot be closed, or if the fabric is thin and the cap is parallel with one...
PR600 Cap Frame User Manual - Multi
Page 5
Si hay holgura, vuelva a colocar el dispositivo de montaje en la placa. Note G Be sure that the mounting bracket is securely clamped onto the mounting place and that the mounting jig does not fall when it is removed. G Veillez à ne pas faire tomber le dispositif d'assemblage ...
Si hay holgura, vuelva a colocar el dispositivo de montaje en la placa. Note G Be sure that the mounting bracket is securely clamped onto the mounting place and that the mounting jig does not fall when it is removed. G Veillez à ne pas faire tomber le dispositif d'assemblage ...

Cap Frame Users Manual - Multi
Page 5
... dispositif d'assemblage sur une surface instable (flexible, tordue ou courbée). If there is firmly tightened. Note G Be sure that the mounting bracket is securely clamped onto the mounting place and that the thumb screw is looseness, mount the mounting jig onto the plate again. 5 Veillez à ce qu'il n'y ait...
... dispositif d'assemblage sur une surface instable (flexible, tordue ou courbée). If there is firmly tightened. Note G Be sure that the mounting bracket is securely clamped onto the mounting place and that the thumb screw is looseness, mount the mounting jig onto the plate again. 5 Veillez à ce qu'il n'y ait...

Users Manual - English
Page 47
... frame into the outer frame. 4 • Be sure that there are no wrinkles in the fabric after it should produce a drum-like sound. 2 • Firmly clamp together the inner and outer frames so that the bottom of the inner frame is lower than the bottom of the outer frame. 1 2 3 1 1 Inner frame...
... frame into the outer frame. 4 • Be sure that there are no wrinkles in the fabric after it should produce a drum-like sound. 2 • Firmly clamp together the inner and outer frames so that the bottom of the inner frame is lower than the bottom of the outer frame. 1 2 3 1 1 Inner frame...
Users Manual - English
Page 80
... damaged. 62 CAUTION ● Be sure to turn the needle set screw. Attach the clamp to the needle, and then release the pressed area to extend the needle-mounting clamp 2. While holding the needle in the illustration, press 1 to clamp the needle. To unclamp the needle, press 1 again. Use the allen screw driver...
... damaged. 62 CAUTION ● Be sure to turn the needle set screw. Attach the clamp to the needle, and then release the pressed area to extend the needle-mounting clamp 2. While holding the needle in the illustration, press 1 to clamp the needle. To unclamp the needle, press 1 again. Use the allen screw driver...

Users Manual - English
Page 82
...-on stabilizer (backing) that is larger than the embroidery frame. When framing the fabric in the embroidery frame, be sure that the stabilizer (backing) is clamped on all edges in order to prevent wrinkles in the fabric. 2 1 Adhesive side of iron-on stabilizer (backing) 2 Fabric (wrong side) • When embroidering fabric...
...-on stabilizer (backing) that is larger than the embroidery frame. When framing the fabric in the embroidery frame, be sure that the stabilizer (backing) is clamped on all edges in order to prevent wrinkles in the fabric. 2 1 Adhesive side of iron-on stabilizer (backing) 2 Fabric (wrong side) • When embroidering fabric...
Users Manual - English
Page 83
... frame 3 Right side of fabric 4 Top of inner & outer frames are no wrinkles in the fabric after it should produce a drum-like sound. • Firmly clamp together the inner and outer frames so that the fabric is taut, insert the inner frame at corner B.
... frame 3 Right side of fabric 4 Top of inner & outer frames are no wrinkles in the fabric after it should produce a drum-like sound. • Firmly clamp together the inner and outer frames so that the fabric is taut, insert the inner frame at corner B.
Users Manual - English
Page 85
... fabric to stabilizer (backing), and then hoop the stabilizer (backing) in the embroidery frame. With fabrics where you do not wish to use spray adhesive, clamp both ends of the fabric, together with excess fabric hanging down from moving properly and may prevent the frame from the frame. With fabrics where...
... fabric to stabilizer (backing), and then hoop the stabilizer (backing) in the embroidery frame. With fabrics where you do not wish to use spray adhesive, clamp both ends of the fabric, together with excess fabric hanging down from moving properly and may prevent the frame from the frame. With fabrics where...

Users Manual - English
Page 88
... stops then clicks into the fabric. 1 Shows the vertical distance moved 2 Shows the horizontal distance moved X The needle and presser foot are locked in needle clamp to its original position (where the center of the pattern. Sapphire.book Page 70 Friday, August 1, 2003 9:12 AM OTHER BASIC PROCEDURES Changing the Embroidering...
... stops then clicks into the fabric. 1 Shows the vertical distance moved 2 Shows the horizontal distance moved X The needle and presser foot are locked in needle clamp to its original position (where the center of the pattern. Sapphire.book Page 70 Friday, August 1, 2003 9:12 AM OTHER BASIC PROCEDURES Changing the Embroidering...

Users Manual - English
Page 190
...Loosen the thumb screw for the mounting jig, 3 and then open the mounting bracket so that the stopper can be hooked onto the screw and clamped with a thickness from 9 mm (3/8 inch) to loosen the two 1 screws, and then lower the stopper in the direction of the mounting jig. Securely... clamp the mounting bracket onto the 4 mounting surface, and then tighten the thumb screw. 1 2 1 Loosen the screw so that it . 2 Loosen until the stopper moves. 3 ...
...Loosen the thumb screw for the mounting jig, 3 and then open the mounting bracket so that the stopper can be hooked onto the screw and clamped with a thickness from 9 mm (3/8 inch) to loosen the two 1 screws, and then lower the stopper in the direction of the mounting jig. Securely... clamp the mounting bracket onto the 4 mounting surface, and then tighten the thumb screw. 1 2 1 Loosen the screw so that it . 2 Loosen until the stopper moves. 3 ...
Users Manual - English
Page 191
...guard 3 Base of the brim At the same time, align the centerline of the cap with the cap clamped. Next, attach the cap frame to the cap frame driver on the machine. ■ Attaching the cap ...guiding plate on the LCD (see page 151). Also, open brim presser. 3 2 1 1 Snap lock released 2 Clamping frame opened 3 Brim presser Lift up (flip) the sweat guard on the inside of 3 the cap, and then ... cap frame attached to view a video of cap Using the Optional Cap Frame 173 Open the clamping frame. Sapphire.book Page 173 Friday, August 1, 2003 9:12 AM Attaching the cap frame Press →...
...guard 3 Base of the brim At the same time, align the centerline of the cap with the cap clamped. Next, attach the cap frame to the cap frame driver on the machine. ■ Attaching the cap ...guiding plate on the LCD (see page 151). Also, open brim presser. 3 2 1 1 Snap lock released 2 Clamping frame opened 3 Brim presser Lift up (flip) the sweat guard on the inside of 3 the cap, and then ... cap frame attached to view a video of cap Using the Optional Cap Frame 173 Open the clamping frame. Sapphire.book Page 173 Friday, August 1, 2003 9:12 AM Attaching the cap frame Press →...
Users Manual - English
Page 192
... secure it , adjust the embroidering position. 174 Memo ● If the cap fabric is thick and the clamping frame cannot be seen within the clamping frame. 3 The teeth on the inside of the clamping frame cleanly grab the base of the brim. 4 The centerline of the brim holder and the center line... of the snap lock Note ● Make sure that there are no wrinkles within the frame, adjust the clamping frame. Otherwise miss alignment will occurred. Sapphire.book Page 174 Friday, August 1, 2003 9:12 AM Appendix After arranging the brim, firmly push in the 4...
... secure it , adjust the embroidering position. 174 Memo ● If the cap fabric is thick and the clamping frame cannot be seen within the clamping frame. 3 The teeth on the inside of the clamping frame cleanly grab the base of the brim. 4 The centerline of the brim holder and the center line... of the snap lock Note ● Make sure that there are no wrinkles within the frame, adjust the clamping frame. Otherwise miss alignment will occurred. Sapphire.book Page 174 Friday, August 1, 2003 9:12 AM Appendix After arranging the brim, firmly push in the 4...


