Operation Manual
Page 11
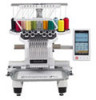
... single-needle machines ■ Can sew embroidery patterns using ten or less colors without the need to deal with the upper thread tail at the starting the machine, the presser foot is moved to the embroidering position at the same time. With this machine, it is not necessary to change the thread spool or rethread the machine with 10 needle embroidery machine, the embroidery frame is moved to determine the embroidering position, making it continues to operate automatically, from lowering the presser foot...
... single-needle machines ■ Can sew embroidery patterns using ten or less colors without the need to deal with the upper thread tail at the starting the machine, the presser foot is moved to the embroidering position at the same time. With this machine, it is not necessary to change the thread spool or rethread the machine with 10 needle embroidery machine, the embroidery frame is moved to determine the embroidering position, making it continues to operate automatically, from lowering the presser foot...
Operation Manual
Page 14
... you use the manual color sequence. (Refer to "Selecting/Managing Thread Colors for the optional round frame. The optional cap frame driver is an optional round frame holder C for Each Needle Bar (Manual Color Sequence)" on page 132.) ■ Availability of 200 mm (H) × 360 mm (W) (7-7/8 inches (H) × 14 inches (W)) can be embroidered. The machine can also be set to the 4 embroidery...
... you use the manual color sequence. (Refer to "Selecting/Managing Thread Colors for the optional round frame. The optional cap frame driver is an optional round frame holder C for Each Needle Bar (Manual Color Sequence)" on page 132.) ■ Availability of 200 mm (H) × 360 mm (W) (7-7/8 inches (H) × 14 inches (W)) can be embroidered. The machine can also be set to the 4 embroidery...
Operation Manual
Page 16
... machine...28 Remove the fixing plates ...29 Adjusting the operation panel position ...29 Preparing the thread guide assembly ...30 Preparing the spool stand ...31 Attaching the embroidery frame holder ...32 EMBROIDERING TUTORIAL 33 Operating Precautions...34 Power supply precautions ...34 Needle precautions ...35 Checking the needle ...35 Bobbin precautions ...35 Upper thread recommendations ...36 Fabric recommendations ...36 Display recommendations...36 Basic Procedures ...37 Installing the Bobbin ...38 Removing the bobbin case ...38 Installing the bobbin ...38 Installing the bobbin case...
... machine...28 Remove the fixing plates ...29 Adjusting the operation panel position ...29 Preparing the thread guide assembly ...30 Preparing the spool stand ...31 Attaching the embroidery frame holder ...32 EMBROIDERING TUTORIAL 33 Operating Precautions...34 Power supply precautions ...34 Needle precautions ...35 Checking the needle ...35 Bobbin precautions ...35 Upper thread recommendations ...36 Fabric recommendations ...36 Display recommendations...36 Basic Procedures ...37 Installing the Bobbin ...38 Removing the bobbin case ...38 Installing the bobbin ...38 Installing the bobbin case...
Operation Manual
Page 17
... 54 Upper threading ...56 Threading the needle ...60 Sewing the Embroidery 64 Starting embroidering ...64 Stopping embroidering ...66 Checking the Thread Tension 68 Removing the Embroidery Frame and Fabric 69 Removing the embroidery frame ...69 Removing the fabric...69 Turning OFF the Machine 70 Screen Quick Reference Guide 71 Key displays...71 Common screen controls ...71 Understanding the pattern type selection screen 72 Understanding the pattern list screen ...73 Understanding the pattern editing screen ...74 Understanding the embroidering settings...
... 54 Upper threading ...56 Threading the needle ...60 Sewing the Embroidery 64 Starting embroidering ...64 Stopping embroidering ...66 Checking the Thread Tension 68 Removing the Embroidery Frame and Fabric 69 Removing the embroidery frame ...69 Removing the fabric...69 Turning OFF the Machine 70 Screen Quick Reference Guide 71 Key displays...71 Common screen controls ...71 Understanding the pattern type selection screen 72 Understanding the pattern list screen ...73 Understanding the pattern editing screen ...74 Understanding the embroidering settings...
Operation Manual
Page 18
... bobbin thread breaks or runs out ...117 Embroidering From the Beginning or Middle of the Pattern 118 Resume Embroidering After Turning Off the Machine 120 Adjusting the Thread Tension 122 Adjusting the tension of the bobbin thread 122 Adjusting the tension of the upper thread 123 EMBROIDERING SETTINGS 125 Basting Embroidery ...126 Creating an Appliqué Piece 127 Creating an appliqué piece ...127 Using a frame pattern for the outline ...130 Selecting/Managing Thread Colors for Each Needle Bar (Manual...
... bobbin thread breaks or runs out ...117 Embroidering From the Beginning or Middle of the Pattern 118 Resume Embroidering After Turning Off the Machine 120 Adjusting the Thread Tension 122 Adjusting the tension of the bobbin thread 122 Adjusting the tension of the upper thread 123 EMBROIDERING SETTINGS 125 Basting Embroidery ...126 Creating an Appliqué Piece 127 Creating an appliqué piece ...127 Using a frame pattern for the outline ...130 Selecting/Managing Thread Colors for Each Needle Bar (Manual...
Operation Manual
Page 19
... create appliqués (1 237 Using a frame pattern to create appliqués (2 238 Sewing Large-size (Split) Embroidery Patterns 240 Helpful Tips for the Operation of the Machine 243 Checking the thread tension of built-in patterns 243 Sewing a pattern aligned with a mark on the fabric 244 Color thread table ...246 Colors of Tajima (.dst) embroidery data ...246 Creating Beautiful Embroidery 247 Threads...247 Stabilizers (backing) ...247 Hooping techniques ...249 Fabric/stabilizer compatibility chart ...250 Installing...
... create appliqués (1 237 Using a frame pattern to create appliqués (2 238 Sewing Large-size (Split) Embroidery Patterns 240 Helpful Tips for the Operation of the Machine 243 Checking the thread tension of built-in patterns 243 Sewing a pattern aligned with a mark on the fabric 244 Color thread table ...246 Colors of Tajima (.dst) embroidery data ...246 Creating Beautiful Embroidery 247 Threads...247 Stabilizers (backing) ...247 Hooping techniques ...249 Fabric/stabilizer compatibility chart ...250 Installing...
Operation Manual
Page 31
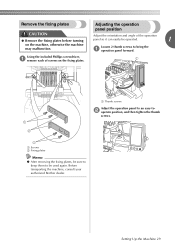
...-to2 operate position, and then tighten the thumb screws. 1 Screws 2 Fixing plates Memo ● After removing the fixing plates, be used again. Loosen 2 thumb screws to be sure to keep them to bring the 1 operation panel forward. Setting Up the Machine 29 Remove the fixing plates Adjusting the operation panel position CAUTION Adjust the orientation and angle of screws on the machine, otherwise the machine may malfunction. Before transporting the machine, consult your authorized Brother dealer...
...-to2 operate position, and then tighten the thumb screws. 1 Screws 2 Fixing plates Memo ● After removing the fixing plates, be used again. Loosen 2 thumb screws to be sure to keep them to bring the 1 operation panel forward. Setting Up the Machine 29 Remove the fixing plates Adjusting the operation panel position CAUTION Adjust the orientation and angle of screws on the machine, otherwise the machine may malfunction. Before transporting the machine, consult your authorized Brother dealer...
Operation Manual
Page 53
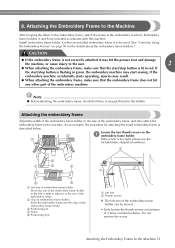
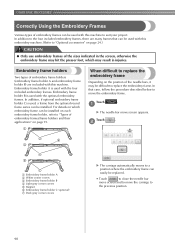
... Machine After hooping the fabric in green, the embroidery machine may hit the presser foot and damage the machine, or cause injury to the user. 2 ● When attaching the embroidery frame, make sure that the start sewing. Do not remove the screw. Attaching the Embroidery Frame to the size of the embroidery frame, and then attach the embroidery frame to the Machine 51 Loosen the two thumb screws on the embroidery frame holder. 3 Positioning pin 4 Holes 5 Positioning slots 1 Left arm 2 Thumb screws...
... Machine After hooping the fabric in green, the embroidery machine may hit the presser foot and damage the machine, or cause injury to the user. 2 ● When attaching the embroidery frame, make sure that the start sewing. Do not remove the screw. Attaching the Embroidery Frame to the size of the embroidery frame, and then attach the embroidery frame to the Machine 51 Loosen the two thumb screws on the embroidery frame holder. 3 Positioning pin 4 Holes 5 Positioning slots 1 Left arm 2 Thumb screws...
Operation Manual
Page 58
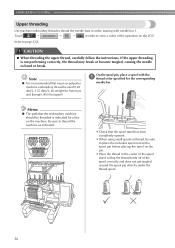
... thread feeds off of the operation on the machine. Touch → → → in order to view a video of the spool correctly and does not get tangled around the spool pin directly under the thread spool. 56 EMBROIDERING TUTORIAL Upper threading Use machine embroidery thread to thread the needle bars in order, starting with the 1 thread color specified for the corresponding needle bar. If the upper threading is recommended that the spool stand has been completely opened. • When using small spools...
... thread feeds off of the operation on the machine. Touch → → → in order to view a video of the spool correctly and does not get tangled around the spool pin directly under the thread spool. 56 EMBROIDERING TUTORIAL Upper threading Use machine embroidery thread to thread the needle bars in order, starting with the 1 thread color specified for the corresponding needle bar. If the upper threading is recommended that the spool stand has been completely opened. • When using small spools...
Operation Manual
Page 67
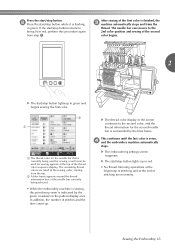
... embroidery machine is sewing, the point being used for sewing or will soon be used for the second needle bar is flashing in green. Press the start/stop button. 2 Press the start/stop button lights up in red. • No thread trimming operations at the beginning of stitching and at the top of the thread color sequence display. After sewing of the first color is sewn, 4 and the embroidery machine automatically...
... embroidery machine is sewing, the point being used for sewing or will soon be used for the second needle bar is flashing in green. Press the start/stop button. 2 Press the start/stop button lights up in red. • No thread trimming operations at the beginning of stitching and at the top of the thread color sequence display. After sewing of the first color is sewn, 4 and the embroidery machine automatically...
Operation Manual
Page 83
... last time the machine was switched off the power. When You Have a Question, This May Help You TECHNICAL TERMS: PATTERNS: ■ DST Following patterns can resume the embroidery when the machine turns on again. (Refer to "Resume Embroidering After Turning Off the Machine" on page 120.) 1 Needle 2 Needle hole in the needle plate. Embroidery patterns created by setting the custom thread color table on the "embroidering" screen. Optional embroidery cards - Use the "Temporary needle bar setting" function...
... last time the machine was switched off the power. When You Have a Question, This May Help You TECHNICAL TERMS: PATTERNS: ■ DST Following patterns can resume the embroidery when the machine turns on again. (Refer to "Resume Embroidering After Turning Off the Machine" on page 120.) 1 Needle 2 Needle hole in the needle plate. Embroidery patterns created by setting the custom thread color table on the "embroidering" screen. Optional embroidery cards - Use the "Temporary needle bar setting" function...
Operation Manual
Page 92
Embroidery frame holder A is used with the optional embroidery frames. Touch . 1 X The needle bar move the embroidery frame. Touch . 2 1 Embroidery frame holder A 2 White corner covers 3 Embroidery frame holder B 4 Light gray corner covers 5 Magnet 6 Embroidery frame holder C (optional) 7 Dark gray corner covers X The carriage automatically moves to a position where the embroidery frame can be installed on each embroidery frame holder, refer to move screen appears. For details on page 91. Embroidery frame holders Two types of embroidery frame holders (embroidery ...
Embroidery frame holder A is used with the optional embroidery frames. Touch . 1 X The needle bar move the embroidery frame. Touch . 2 1 Embroidery frame holder A 2 White corner covers 3 Embroidery frame holder B 4 Light gray corner covers 5 Magnet 6 Embroidery frame holder C (optional) 7 Dark gray corner covers X The carriage automatically moves to a position where the embroidery frame can be installed on each embroidery frame holder, refer to move screen appears. For details on page 91. Embroidery frame holders Two types of embroidery frame holders (embroidery ...
Operation Manual
Page 115
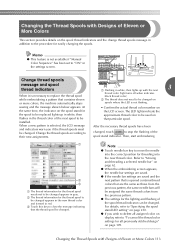
... stitched design" on the LCD screen. Change the thread spools according to move the needle into the correct position for the spool to be replaced lights up with Designs of the spool stand indicator. Note ● Touch needle bar key to their new assignments. For details, refer to "Specifying the spool stand LED setting" on page 230. ● If you if the thread spools must be changed. At the same time...
... stitched design" on the LCD screen. Change the thread spools according to move the needle into the correct position for the spool to be replaced lights up with Designs of the spool stand indicator. Note ● Touch needle bar key to their new assignments. For details, refer to "Specifying the spool stand LED setting" on page 230. ● If you if the thread spools must be changed. At the same time...
Operation Manual
Page 293
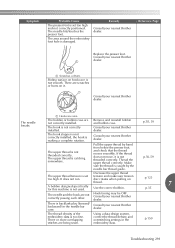
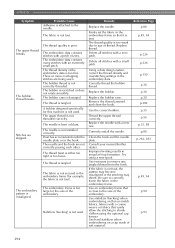
... thread density and overstitching settings in the needle bar case. Consult your nearest Brother dealer. Consult your nearest Brother dealer. Use the correct bobbin. 7 p.35 The needle and the hook are scratches or burrs on p.123 A bobbin designed specifically for this machine is not smooth. Hook timing may be OFF. Consult your nearest Brother dealer. The needle hits/touches the presser foot. The area around the embroidery foot hole is not correctly installed. Reference Page Replace...
... thread density and overstitching settings in the needle bar case. Consult your nearest Brother dealer. Consult your nearest Brother dealer. Use the correct bobbin. 7 p.35 The needle and the hook are scratches or burrs on p.123 A bobbin designed specifically for this machine is not smooth. Hook timing may be OFF. Consult your nearest Brother dealer. The needle hits/touches the presser foot. The area around the embroidery foot hole is not correctly installed. Reference Page Replace...
Operation Manual
Page 294
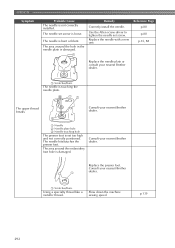
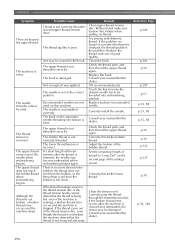
... Using a specialty thread like a metallic thread. Slow down the machine sewing speed. The area around the hole in the needle plate is touching the needle plate. Consult your nearest Brother dealer. Replace the presser foot. The needle set screw is damaged. The area around the embroidery foot hole is loose. Reference Page p.88 p.88 p.35, 88 Replace the needle plate or consult your nearest Brother dealer. 1 Needle 2 Needle plate hole 3 Needle touching hole The presser foot is set screw. Replace the needle with a new one. The upper thread breaks. The needle...
... Using a specialty thread like a metallic thread. Slow down the machine sewing speed. The area around the hole in the needle plate is touching the needle plate. Consult your nearest Brother dealer. Replace the presser foot. The needle set screw is damaged. The area around the embroidery foot hole is loose. Reference Page p.88 p.88 p.35, 88 Replace the needle plate or consult your nearest Brother dealer. 1 Needle 2 Needle plate hole 3 Needle touching hole The presser foot is set screw. Replace the needle with a new one. The upper thread breaks. The needle...
Operation Manual
Page 296
... or too loose. Delete all stitches with a new one. APPENDIX Symptom The upper thread breaks. The bobbin case is tangled. Clean the hook and the needle plate. The bobbin thread is not taut. The bobbin thread breaks. The fabric is not correctly threaded. The needle is misaligned. Firmly set the fabric in the embroidery frame (for this machine is too fine. Using a data design system, correct the thread density and overstitching settings in the embroidery frame. The embroidery pattern is bent...
... or too loose. Delete all stitches with a new one. APPENDIX Symptom The upper thread breaks. The bobbin case is tangled. Clean the hook and the needle plate. The bobbin thread is not taut. The bobbin thread breaks. The fabric is not correctly threaded. The needle is misaligned. Firmly set the fabric in the embroidery frame (for this machine is too fine. Using a data design system, correct the thread density and overstitching settings in the embroidery frame. The embroidery pattern is bent...
Operation Manual
Page 298
... automatic needle-threading mechanism is not threaded correctly. Replace the hook. Touch the key to move the desired needle bar to "Long Tail" on the second page of the thread tension disc, even though the thread is not broken, the machine detects that the thread is too short. Replace and use recommended needle. The upper thread comes out of the bobbin thread. The upper thread is not installed correctly. The bobbin thread is stopped. Remedy Clean upper thread tension disc. Replace...
... automatic needle-threading mechanism is not threaded correctly. Replace the hook. Touch the key to move the desired needle bar to "Long Tail" on the second page of the thread tension disc, even though the thread is not broken, the machine detects that the thread is too short. Replace and use recommended needle. The upper thread comes out of the bobbin thread. The upper thread is not installed correctly. The bobbin thread is stopped. Remedy Clean upper thread tension disc. Replace...
Operation Manual
Page 314
... 259 Lower thread guide 20 M Machine operations guide key 232 Main power switch 21, 40, 70 Maintenance 232, 282 Manual color sequence 132 Manual needle bar settings 145 Maximum sewing speed key 80 Monogram and frame designs 155 Mounting jig cap frame 264 Mouse pointer shape 231 Moving a pattern 183 Moving needle 63 Multi color key 75, 190 N Names of machine parts 20 Needle 35 changing 88 threading 60 Needle bar case 20 Needle bar key 55, 80 Needle plate 283...
... 259 Lower thread guide 20 M Machine operations guide key 232 Main power switch 21, 40, 70 Maintenance 232, 282 Manual color sequence 132 Manual needle bar settings 145 Maximum sewing speed key 80 Monogram and frame designs 155 Mounting jig cap frame 264 Mouse pointer shape 231 Moving a pattern 183 Moving needle 63 Multi color key 75, 190 N Names of machine parts 20 Needle 35 changing 88 threading 60 Needle bar case 20 Needle bar key 55, 80 Needle plate 283...
Operation Manual
Page 315
... 77 Sewing light 20, 229 Sewing order 79 Sewing speed 139 Thread guide assembly 30 Thread mark 195 Thread recommendations 36 Thread sensor 230 Thread spools 113 changing 113 easily changing 114 Thread tail length 227 Thread tension 122, 281 Thread tension disc 58 Thread tension knobs 20, 123 Thread trimming button 21, 67 Threading needle 60 upper thread 54, 56 Thumbnail size 224 Tips for machine operation 243 Touch panel 21 Trial sewing key 53, 77 Troubleshooting 232, 289 T-shirt 250 Sewing the embroidery 64 Sewing time...
... 77 Sewing light 20, 229 Sewing order 79 Sewing speed 139 Thread guide assembly 30 Thread mark 195 Thread recommendations 36 Thread sensor 230 Thread spools 113 changing 113 easily changing 114 Thread tail length 227 Thread tension 122, 281 Thread tension disc 58 Thread tension knobs 20, 123 Thread trimming button 21, 67 Threading needle 60 upper thread 54, 56 Thumbnail size 224 Tips for machine operation 243 Touch panel 21 Trial sewing key 53, 77 Troubleshooting 232, 289 T-shirt 250 Sewing the embroidery 64 Sewing time...

Installation Guide for KIT CW PRCW1
Page 5
... to find the Product Support in this guide has a Software License Agreement specific to the machine. Information found in this guide are not exhibited clearly within the text. CAUTION • The cutwork functions can be used with upgraded Brother multi-needle embroidery machines (except PR-600, PR-600II and PR-620). Note • This Installation Guide does not contain operating instructions for creating original cutwork patterns with cutwork may result...
... to find the Product Support in this guide has a Software License Agreement specific to the machine. Information found in this guide are not exhibited clearly within the text. CAUTION • The cutwork functions can be used with upgraded Brother multi-needle embroidery machines (except PR-600, PR-600II and PR-620). Note • This Installation Guide does not contain operating instructions for creating original cutwork patterns with cutwork may result...


