Operation Manual
Page 4
... using and storing this machine on the foot controller. • Never drop or insert foreign objects in injuries. 6 Special care is being sewn may fall, resulting in any assemblies, the presser feet, needle, or other hot objects. • Do not use a damaged or incorrect needle plate, as it could cause the needle to break. • Do not push or pull the fabric while sewing, and follow the troubleshooting table...
... using and storing this machine on the foot controller. • Never drop or insert foreign objects in injuries. 6 Special care is being sewn may fall, resulting in any assemblies, the presser feet, needle, or other hot objects. • Do not use a damaged or incorrect needle plate, as it could cause the needle to break. • Do not push or pull the fabric while sewing, and follow the troubleshooting table...

Operation Manual
Page 7
...SAFETY INSTRUCTIONS 1 Accessories 6 Machine Features 7 Before You Begin (1 8 Power Cord and Foot Controller 8 Main Power Switch 8 Thread Tension Dial 8 Handwheel 8 Stitch Length Regulator 8 Reverse Stitch Lever 8 Presser Foot Lever 9 Knee Lifter 9 Presser Foot Pressure Adjustment Dial 9 Fabric Extension Table 9 Before You Begin (2 10 Thread Cutter Button 10 Needle Stop Position Button 10 Feed Dog Adjustment Knob 10 Changing Needles 11 Changing the Needle 11 Changing the Feed Pin 11 Winding/Installing the Bobbin 12 Bobbin Winding 12 Bobbin Installation 14 Upper Threading...
...SAFETY INSTRUCTIONS 1 Accessories 6 Machine Features 7 Before You Begin (1 8 Power Cord and Foot Controller 8 Main Power Switch 8 Thread Tension Dial 8 Handwheel 8 Stitch Length Regulator 8 Reverse Stitch Lever 8 Presser Foot Lever 9 Knee Lifter 9 Presser Foot Pressure Adjustment Dial 9 Fabric Extension Table 9 Before You Begin (2 10 Thread Cutter Button 10 Needle Stop Position Button 10 Feed Dog Adjustment Knob 10 Changing Needles 11 Changing the Needle 11 Changing the Feed Pin 11 Winding/Installing the Bobbin 12 Bobbin Winding 12 Bobbin Installation 14 Upper Threading...

Operation Manual
Page 8
... Invisible Zipper Foot XC0093-001 17 1/4" Foot XA7258-001 18 Free Motion Quilting Foot XA7255-301 19 Seam Guide XA7256-001 20 Foot Controller XD0501-121 (EU area) XC8816-071 (Other areas) 21 Fabric Extension Table XC3117-052 22 Spool Net XA5523-050 23 Pin Feed Foot (on machine) 136021-001 24 Spool Cushion (on the machine rating plate. 6 No. The product code is mentioned on machine) XF2071-002 only) • Foot controller: Model T This foot controller can be used...
... Invisible Zipper Foot XC0093-001 17 1/4" Foot XA7258-001 18 Free Motion Quilting Foot XA7255-301 19 Seam Guide XA7256-001 20 Foot Controller XD0501-121 (EU area) XC8816-071 (Other areas) 21 Fabric Extension Table XC3117-052 22 Spool Net XA5523-050 23 Pin Feed Foot (on machine) 136021-001 24 Spool Cushion (on the machine rating plate. 6 No. The product code is mentioned on machine) XF2071-002 only) • Foot controller: Model T This foot controller can be used...

Operation Manual
Page 9
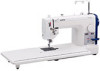
Machine Features Presser Foot Pressure Adjustment Dial (Page 9) Thread Guide (Right) (Page 15) Three Holed Thread Guide (Page 15) Thread Take-up Lever (Page 15) Thread guide (Left) (Page 15) Thread Trimmer Needle Threader (Page 17) Quick Bobbin Thread Device (Page 14) Thread Cutter Button (Page 10) Thread Tension Dial (Page 8 and 18) Feed Dog (Page 10 and 20) Thread Guide Bar (Page 12) Stitch Length Regulator (Page 8) Bobbin Winder (Page 12) Handwheel (Page 8) Indicator Lamp Needle Stop Position Button (Page 10) Main Power Switch (Page 8) Reverse Stitch Lever (Page 8) Power ...
Machine Features Presser Foot Pressure Adjustment Dial (Page 9) Thread Guide (Right) (Page 15) Three Holed Thread Guide (Page 15) Thread Take-up Lever (Page 15) Thread guide (Left) (Page 15) Thread Trimmer Needle Threader (Page 17) Quick Bobbin Thread Device (Page 14) Thread Cutter Button (Page 10) Thread Tension Dial (Page 8 and 18) Feed Dog (Page 10 and 20) Thread Guide Bar (Page 12) Stitch Length Regulator (Page 8) Bobbin Winder (Page 12) Handwheel (Page 8) Indicator Lamp Needle Stop Position Button (Page 10) Main Power Switch (Page 8) Reverse Stitch Lever (Page 8) Power ...

Operation Manual
Page 10
... side of fabric. 8 Upper Thread Tension Loosen Tighten Tension Block Handwheel ● Position needle using stitch regulator dial. Reverse Stitch Lever ● Sewing in reverse is possible when the reverse stitch lever is desired, turn machine on wrong side of the fabric. ● When looser thread tension is in the lowered position. ✽ Make sure to continuously press the lever to the right. Power Cord Foot Controller Slower Faster Power Switch I " position to turn tension dial to the left. Stitch Length Regulator ● Adjust desired stitch length using handwheel...
... side of fabric. 8 Upper Thread Tension Loosen Tighten Tension Block Handwheel ● Position needle using stitch regulator dial. Reverse Stitch Lever ● Sewing in reverse is possible when the reverse stitch lever is desired, turn machine on wrong side of the fabric. ● When looser thread tension is in the lowered position. ✽ Make sure to continuously press the lever to the right. Power Cord Foot Controller Slower Faster Power Switch I " position to turn tension dial to the left. Stitch Length Regulator ● Adjust desired stitch length using handwheel...

Operation Manual
Page 11
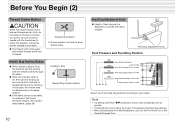
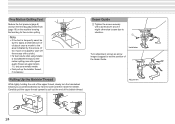
... Needle Fabric Extension Table ● Lower the adjustable table feet and slide the fabric extension table on the presser foot changes. Presser Foot Lever ● Lowering the presser foot lever lowers the sewing foot down onto the fabric and engages the thread tension function. ✽ When working with heavy fabrics or other fabrics that don't slide easily under the foot, raise the presser foot lever to lift and lower the presser foot easily, leaving both of pressure on to the machine. 2 Hole Guide pin 2 1 Table feet 3 3 Stopper Hook 9 See also: "Feed Dog Adjustment...
... Needle Fabric Extension Table ● Lower the adjustable table feet and slide the fabric extension table on the presser foot changes. Presser Foot Lever ● Lowering the presser foot lever lowers the sewing foot down onto the fabric and engages the thread tension function. ✽ When working with heavy fabrics or other fabrics that don't slide easily under the foot, raise the presser foot lever to lift and lower the presser foot easily, leaving both of pressure on to the machine. 2 Hole Guide pin 2 1 Table feet 3 3 Stopper Hook 9 See also: "Feed Dog Adjustment...
Operation Manual
Page 12
... needle with fabric weights. Feed Dog Adjustment Knob Foot Pressure and Feed Dog Position (Feed Dog Down) Velvet (Pin Feeding) Lightweight Fabrics Mediumweight Fabrics Heavyweight Fabrics Select one of stitching. In that case, the needle does not always stop as soon as the foot controller is down before using. Otherwise broken needles could result. ● The thread cutter trims upper and bobbin threads at the end of seams. Thread Cutter Button ✽ Ensure presser foot lever is released at the end of four feed dog positions according to jammed threads...
... needle with fabric weights. Feed Dog Adjustment Knob Foot Pressure and Feed Dog Position (Feed Dog Down) Velvet (Pin Feeding) Lightweight Fabrics Mediumweight Fabrics Heavyweight Fabrics Select one of stitching. In that case, the needle does not always stop as soon as the foot controller is down before using. Otherwise broken needles could result. ● The thread cutter trims upper and bobbin threads at the end of seams. Thread Cutter Button ✽ Ensure presser foot lever is released at the end of four feed dog positions according to jammed threads...

Operation Manual
Page 13
...) Changing the Needle 1 Turn the sewing machine off before carrying out the following operations. Use of injury if the machine accidentally starts running during this may break the needle, possibly resulting in tightly. The needle should lay parallel to highest position using handwheel, and lower the presser foot. 2 Loosen screw with screwdriver, and remove needle. 3 Hold the needle with fingertip. 7 Remove screwdriver. 8 Re-attach needle plate, needle and presser foot. 11 Make sure needle is loose, this operation. • Only use recommended sewing machine needles...
...) Changing the Needle 1 Turn the sewing machine off before carrying out the following operations. Use of injury if the machine accidentally starts running during this may break the needle, possibly resulting in tightly. The needle should lay parallel to highest position using handwheel, and lower the presser foot. 2 Loosen screw with screwdriver, and remove needle. 3 Hold the needle with fingertip. 7 Remove screwdriver. 8 Re-attach needle plate, needle and presser foot. 11 Make sure needle is loose, this operation. • Only use recommended sewing machine needles...

Operation Manual
Page 14
Winding/Installing the Bobbin Bobbin Winding 4 Note • Do not move bobbin winding clutch while machine is running. 3 3 2 81 Spool Cap 1 2 82 Spool Cushion 1 5679
Winding/Installing the Bobbin Bobbin Winding 4 Note • Do not move bobbin winding clutch while machine is running. 3 3 2 81 Spool Cap 1 2 82 Spool Cushion 1 5679
Operation Manual
Page 16
... extension table.) bobbin door, following the above in place without removing the fabric 5 Lower slide plate and close the bobbin 1 Open the bobbin thread setting cover beforehand, then following numbers 1 2 above case and continue the upper threading process. To reduce risk of injury, turn the power to the machine off during end to check that was ✽ If the latch lever on the hook, it at that a length of latch lever. Latch Spring 1 Needle Plate 1 2 Thread Notch 3 8 Bobbin...
... extension table.) bobbin door, following the above in place without removing the fabric 5 Lower slide plate and close the bobbin 1 Open the bobbin thread setting cover beforehand, then following numbers 1 2 above case and continue the upper threading process. To reduce risk of injury, turn the power to the machine off during end to check that was ✽ If the latch lever on the hook, it at that a length of latch lever. Latch Spring 1 Needle Plate 1 2 Thread Notch 3 8 Bobbin...

Operation Manual
Page 17
... the foot controller. Upper Threading 1 3 1 *1 *2 7 Long Groove 86 Scarf (depression on the right end, 1 Raise the presser foot lever. If the thread still tangles or breaks, use a different threading method (*2). ✽ Before threading the machine, prepare it as described below. 1 Starting with the hole on needle shaft) 9 Thread Needle Hole 2 3 4 5 0 A ✽ Thread tension may not be adjusted adequately if the thread does not pass correctly through the take-up spring (4). 4 1 2 When using the 15 needle threader, refer...
... the foot controller. Upper Threading 1 3 1 *1 *2 7 Long Groove 86 Scarf (depression on the right end, 1 Raise the presser foot lever. If the thread still tangles or breaks, use a different threading method (*2). ✽ Before threading the machine, prepare it as described below. 1 Starting with the hole on needle shaft) 9 Thread Needle Hole 2 3 4 5 0 A ✽ Thread tension may not be adjusted adequately if the thread does not pass correctly through the take-up spring (4). 4 1 2 When using the 15 needle threader, refer...

Operation Manual
Page 18
...-holed thread guide. 9 0 A 2 Pass the thread through the thread guide (right). 3 Pass the thread clockwise around the thread tension dial. 4 Pass the thread through the thread take-up spring. 5 Pass the thread through the thread guide (lower). 6 Pass the thread through the thread guide (right) again. 7 Pass the thread through the thread take-up lever from right to page 18. ✽ Use the appropriate needle for Thick Fabrics or When Using Heavier Threads For a tighter upper thread, such as when sewing...
...-holed thread guide. 9 0 A 2 Pass the thread through the thread guide (right). 3 Pass the thread clockwise around the thread tension dial. 4 Pass the thread through the thread take-up spring. 5 Pass the thread through the thread guide (lower). 6 Pass the thread through the thread guide (right) again. 7 Pass the thread through the thread take-up lever from right to page 18. ✽ Use the appropriate needle for Thick Fabrics or When Using Heavier Threads For a tighter upper thread, such as when sewing...
Operation Manual
Page 20
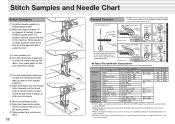
... needle thread tension to reduce bobbin tension Bobbin tension . . . Proper When it may also be used under normal sewing conditions. ✽ Adjust the pressure adjustment dial and the feed dog adjustment knob according to the chart on the sewing machine. ✽ When sewing on knit fabrics such as messy stitches, puckered seams Upper Thread and thread breakage. Stitch Samples and Needle Chart Stitch Samples 1 Set stitch length regulator to desired stitch length. 2 Make sure approximately 15 cm (approx. 6 inches) of upper thread is pulled under the presser foot...
... needle thread tension to reduce bobbin tension Bobbin tension . . . Proper When it may also be used under normal sewing conditions. ✽ Adjust the pressure adjustment dial and the feed dog adjustment knob according to the chart on the sewing machine. ✽ When sewing on knit fabrics such as messy stitches, puckered seams Upper Thread and thread breakage. Stitch Samples and Needle Chart Stitch Samples 1 Set stitch length regulator to desired stitch length. 2 Make sure approximately 15 cm (approx. 6 inches) of upper thread is pulled under the presser foot...

Operation Manual
Page 21
Changing Presser Feet (Zipper Foot) 1 Raise presser foot, and raise needle to highest position. 2 Loosen and remove screw using screwdriver. 3 Attach zipper foot and tighten screw. ✽ Use the same method to attach the other feet that come with your machine. ✽ Use the position knob on hems of dress shirts, to fold the edge of the fabric in while sewing. ● Free Motion Quilting Foot Spring action foot for darning, quilting or free motion embroidery. ● 1/4" Foot For quilt and patchwork piecing with 1/4" or 1/8" seam allowance. ✽ Use presser feet supplied with ...
Changing Presser Feet (Zipper Foot) 1 Raise presser foot, and raise needle to highest position. 2 Loosen and remove screw using screwdriver. 3 Attach zipper foot and tighten screw. ✽ Use the same method to attach the other feet that come with your machine. ✽ Use the position knob on hems of dress shirts, to fold the edge of the fabric in while sewing. ● Free Motion Quilting Foot Spring action foot for darning, quilting or free motion embroidery. ● 1/4" Foot For quilt and patchwork piecing with 1/4" or 1/8" seam allowance. ✽ Use presser feet supplied with ...
Operation Manual
Page 22
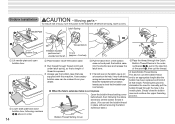
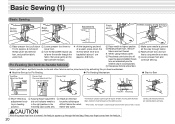
... sewing. 8 When changing sewing directions. 1 cm 1 Raise presser foot, pull about 2 Lower presser foot lever to ✽ At the beginning and end 15 cm (approx. 6 inches) of a seam, press down the thread under and behind 3 Turn the handwheel toward you reverse stitch lever and foot, and position fabric to Sew Feed Dog Adjustment Knob Presser Foot Pressure Adjustment Dial Indicator Needle Presser Foot Fabric Feed Pin Feed Pin Feed Dog 1 Move feed dog 2 Adjust pressure adjustment 3 Attach pin feed foot adjustment knob dial until feed pin catches fabric and sew. of lower foot...
... sewing. 8 When changing sewing directions. 1 cm 1 Raise presser foot, pull about 2 Lower presser foot lever to ✽ At the beginning and end 15 cm (approx. 6 inches) of a seam, press down the thread under and behind 3 Turn the handwheel toward you reverse stitch lever and foot, and position fabric to Sew Feed Dog Adjustment Knob Presser Foot Pressure Adjustment Dial Indicator Needle Presser Foot Fabric Feed Pin Feed Pin Feed Dog 1 Move feed dog 2 Adjust pressure adjustment 3 Attach pin feed foot adjustment knob dial until feed pin catches fabric and sew. of lower foot...
Operation Manual
Page 24
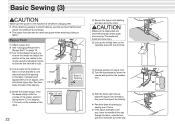
... the zipper when sewing. inch) below the base of zipper foot. Basic Sewing (3) CAUTION Make sure the power to the machine is off before changing feet. ✽ When attaching zippers to stretch fabrics, use the pin feed method and adjust foot pressure accordingly. ✽ The zipper foot can also be used as a guide when attaching piping to the section of 7 Change position of the opening by sewing over it twice. ✽ If the zipper slide gets in the way, lower the needle...
... the zipper when sewing. inch) below the base of zipper foot. Basic Sewing (3) CAUTION Make sure the power to the machine is off before changing feet. ✽ When attaching zippers to stretch fabrics, use the pin feed method and adjust foot pressure accordingly. ✽ The zipper foot can also be used as a guide when attaching piping to the section of 7 Change position of the opening by sewing over it twice. ✽ If the zipper slide gets in the way, lower the needle...
Operation Manual
Page 26
... up the bobbin thread, if necessary. Pulling Up the Bobbin Thread While lightly holding the end of the bobbin thread. Carefully pull the upper thread upward to pull out the end of the upper thread, slowly turn the feed dog adjustment knob (page 10) on the machine lowering the feed dog for free motion quilting, sew with a good quality thread, set the position of oil about once a month to lower and then raise the needle. Free Motion Quilting Foot Reduce the foot pressure (page...
... up the bobbin thread, if necessary. Pulling Up the Bobbin Thread While lightly holding the end of the bobbin thread. Carefully pull the upper thread upward to pull out the end of the upper thread, slowly turn the feed dog adjustment knob (page 10) on the machine lowering the feed dog for free motion quilting, sew with a good quality thread, set the position of oil about once a month to lower and then raise the needle. Free Motion Quilting Foot Reduce the foot pressure (page...

Operation Manual
Page 28
... you accidentally step on the foot controller. 1 Turn machine off. 2 Remove presser foot. 3 Remove needle plate. 4 Clean out dust and thread scraps. ✽ Thread scraps can be swept out through the bobbin door. 5 When the area under the needle plate is cleaned out, oil the hook of bobbin case with a soft, dry cloth. ■ Precautions Please keep machine out of direct sunlight. Item Dimensions of machine Weight of machine Sewing speed Specification 460 mm (W) × 195 mm...
... you accidentally step on the foot controller. 1 Turn machine off. 2 Remove presser foot. 3 Remove needle plate. 4 Clean out dust and thread scraps. ✽ Thread scraps can be swept out through the bobbin door. 5 When the area under the needle plate is cleaned out, oil the hook of bobbin case with a soft, dry cloth. ■ Precautions Please keep machine out of direct sunlight. Item Dimensions of machine Weight of machine Sewing speed Specification 460 mm (W) × 195 mm...
Operation Manual
Page 29
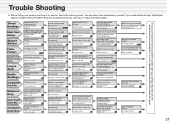
... the thread you need to be raised to the highest position. Re-thread machine properly. 15 Needle is dull. Turn handwheel to make sure the machine's plugged in . Remove needle plate and check bobbin case. Machine is not properly inserted. If you 're using . Visit us at " https://s.brother/cpiac/ ". Thread Breakage Bobbin Thread Breakage Skipped Stitches Fabric Puckers Fabric Won't Feed Properly or Irregular Stitches Loop in Seam Needle Breakage Sewing Machine Doesn't Run Machine is Noisy Needle Threader Doesn't Work Thread Cutter Doesn't Work Upper threading...
... the thread you need to be raised to the highest position. Re-thread machine properly. 15 Needle is dull. Turn handwheel to make sure the machine's plugged in . Remove needle plate and check bobbin case. Machine is not properly inserted. If you 're using . Visit us at " https://s.brother/cpiac/ ". Thread Breakage Bobbin Thread Breakage Skipped Stitches Fabric Puckers Fabric Won't Feed Properly or Irregular Stitches Loop in Seam Needle Breakage Sewing Machine Doesn't Run Machine is Noisy Needle Threader Doesn't Work Thread Cutter Doesn't Work Upper threading...
Operation Manual
Page 30
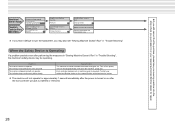
... Brother authorized service center. ✽ The machine will not operate. Clean bobbin case and under needle plate. Reattach. 11 Upper thread tension is dull. Increase tension. 18 Needle is bent, or tip is too low. The indicator lamp blinked for repair. Cause/solution The machine is locked because the thread is required. Change needle. 11 Bobbin case may be operating. Symptom The machine does not operate. Turn off the power, remove the tangled thread, and clean the machine. (page 26) Foot controller replacement...
... Brother authorized service center. ✽ The machine will not operate. Clean bobbin case and under needle plate. Reattach. 11 Upper thread tension is dull. Increase tension. 18 Needle is bent, or tip is too low. The indicator lamp blinked for repair. Cause/solution The machine is locked because the thread is required. Change needle. 11 Bobbin case may be operating. Symptom The machine does not operate. Turn off the power, remove the tangled thread, and clean the machine. (page 26) Foot controller replacement...


