

Users Manual - English
Page 2
... fingers away from all instructions before changing the light bulb. q Always use outdoors. The wrong plate can cause the needle to fit in a polarized outlet only one blade wider than the other user servicing adjustments mentioned in the outlet, reverse the plug. q Do not pull or push fabric while stitching. q Turn off , then remove plug from the accumulation of the sewing machine and foot control free from outlet. This...
... fingers away from all instructions before changing the light bulb. q Always use outdoors. The wrong plate can cause the needle to fit in a polarized outlet only one blade wider than the other user servicing adjustments mentioned in the outlet, reverse the plug. q Do not pull or push fabric while stitching. q Turn off , then remove plug from the accumulation of the sewing machine and foot control free from outlet. This...
Users Manual - English
Page 3
... not use extension cords. PLEASE READ BEFORE USING YOUR SEWING MACHINE For safe operation q Be sure to clean the case. Do not store the sewing machine beside a space heater, iron, or other hot objects. Benzene, thinner, and scouring powders can damage the case and machine, and should never be used. CONGRATULATIONS ON CHOOSING A BROTHER SEWING MACHINE Your machine is completed q Replacing or removing the needle or any accessories, the presser feet, needle, or other parts q A power failure...
... not use extension cords. PLEASE READ BEFORE USING YOUR SEWING MACHINE For safe operation q Be sure to clean the case. Do not store the sewing machine beside a space heater, iron, or other hot objects. Benzene, thinner, and scouring powders can damage the case and machine, and should never be used. CONGRATULATIONS ON CHOOSING A BROTHER SEWING MACHINE Your machine is completed q Replacing or removing the needle or any accessories, the presser feet, needle, or other parts q A power failure...

Users Manual - English
Page 4
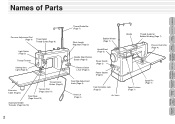
... 3 Tension Dial 3 Power Cord and Foot Controller 3 Power Switch 3 Hand Wheel 3 Stitch Length Regulator 3 Reverse stitch lever 3 Presser Foot Lift Lever 4 Knee Lift 4 Pressure Adjustment Dial 4 Flat Bed Extension Table 4 Thread Cutter Button 5 Needle Stop Position Button 5 Light Switch 5 Feed Dog Adjustment Knob 5 Changing Needles and Light Bulb 6 Changing Upper Needle 6 Changing Feed Pin 6 Changing Light Bulbs 6 Threading 7 Bobbin Winding 7 Bobbin Insertion 8 Upper Threading 9 Using the Automatic Needle Threader __________ 9 How to Pull Out the Bobbin Thread 10 Stitch...
... 3 Tension Dial 3 Power Cord and Foot Controller 3 Power Switch 3 Hand Wheel 3 Stitch Length Regulator 3 Reverse stitch lever 3 Presser Foot Lift Lever 4 Knee Lift 4 Pressure Adjustment Dial 4 Flat Bed Extension Table 4 Thread Cutter Button 5 Needle Stop Position Button 5 Light Switch 5 Feed Dog Adjustment Knob 5 Changing Needles and Light Bulb 6 Changing Upper Needle 6 Changing Feed Pin 6 Changing Light Bulbs 6 Threading 7 Bobbin Winding 7 Bobbin Insertion 8 Upper Threading 9 Using the Automatic Needle Threader __________ 9 How to Pull Out the Bobbin Thread 10 Stitch...
Users Manual - English
Page 5
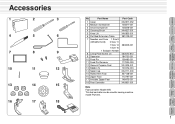
Part Name 1 Cover 2 Medium Screwdriver 3 Small Screwdriver 4 Cleaning Brush 5 Knee Lift 6 Flat Bed Extension Table 7 Needles and Case 1 Size 9 (ORGAN HLX5) 2 Size 11 1 Size 14 1 Size 16 1 Ballpoint Needle 8 Lining Plate Screw (2) 9 Separater 10 Feed Pin 11 Feed Pin Remover 12 General Purpose Foot 13 Bobbin (5) 14 Spool Cap 15 Rolled Hem Foot 16 Zipper Foot 17 Invisible Zipper Foot 18 Foot Controller Part Code XA0917-052 125877-001 125878-001 XA4527-001 XA0830-001 X81029-001 X80805-001 062670-812 184720-001...
Part Name 1 Cover 2 Medium Screwdriver 3 Small Screwdriver 4 Cleaning Brush 5 Knee Lift 6 Flat Bed Extension Table 7 Needles and Case 1 Size 9 (ORGAN HLX5) 2 Size 11 1 Size 14 1 Size 16 1 Ballpoint Needle 8 Lining Plate Screw (2) 9 Separater 10 Feed Pin 11 Feed Pin Remover 12 General Purpose Foot 13 Bobbin (5) 14 Spool Cap 15 Rolled Hem Foot 16 Zipper Foot 17 Invisible Zipper Foot 18 Foot Controller Part Code XA0917-052 125877-001 125878-001 XA4527-001 XA0830-001 X81029-001 X80805-001 062670-812 184720-001...
Users Manual - English
Page 6
... and Changing Needle Chart Presser Feet Pressure Adjustment Dial (Page 4) Three Holed Thread Guide (Page 9) Light Switch (Page 5) Thread Trimmer Sewing Area Light (Page 6) Thread Cutter Button (Page 5) Extension Table (Page 4) Tension Dial (Page 3 and 11) Feed Dogs (Page 5 and 13) Automatic Needle Threader (Page 9 to 10) Thread Guide Bar (Page 7) Stitch Length Regulator (Page 3) Bobbin Winder (Page 7) Hand Wheel (Page 3) Needle Stop Position Button (Page 5) Reverse Stitch Lever (Page 3) Power Switch (Page 3) Power Socket (Page 3) Feed Dog Adjustment Knob (Page 5) Foot Controller...
... and Changing Needle Chart Presser Feet Pressure Adjustment Dial (Page 4) Three Holed Thread Guide (Page 9) Light Switch (Page 5) Thread Trimmer Sewing Area Light (Page 6) Thread Cutter Button (Page 5) Extension Table (Page 4) Tension Dial (Page 3 and 11) Feed Dogs (Page 5 and 13) Automatic Needle Threader (Page 9 to 10) Thread Guide Bar (Page 7) Stitch Length Regulator (Page 3) Bobbin Winder (Page 7) Hand Wheel (Page 3) Needle Stop Position Button (Page 5) Reverse Stitch Lever (Page 3) Power Switch (Page 3) Power Socket (Page 3) Feed Dog Adjustment Knob (Page 5) Foot Controller...

Users Manual - English
Page 7
... foot controller can be used for Your Machine Basic Sewing Stitch Samples and Changing Needle Chart Presser Feet Threading Changing Needles and Light Bulb Before You Begin Names of Parts CONTENTS Accessories q Plug in reverse is possible when the reverse stitch lever is desired, turn tension dial to the right. q Plug foot controller into machine. Power Switch q Flip power switch to "I" position to "O" position. Stitch Length Regulator q Adjust desired stitch length using hand wheel. Upper Thread Tension Loosen Tighten Tension Block Power Cord and Foot Controller...
... foot controller can be used for Your Machine Basic Sewing Stitch Samples and Changing Needle Chart Presser Feet Threading Changing Needles and Light Bulb Before You Begin Names of Parts CONTENTS Accessories q Plug in reverse is possible when the reverse stitch lever is desired, turn tension dial to the right. q Plug foot controller into machine. Power Switch q Flip power switch to "I" position to "O" position. Stitch Length Regulator q Adjust desired stitch length using hand wheel. Upper Thread Tension Loosen Tighten Tension Block Power Cord and Foot Controller...
Users Manual - English
Page 8
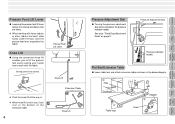
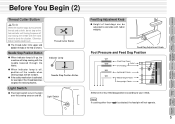
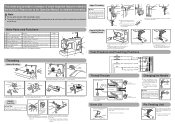
...Stitch Changing Knee Lift q Using the convenient knee lift enables you to lift the presser foot easily leaving your hands free to position the fabric. Pressure Adjustment Dial Pressure indicator needle N Flat Bed Extension Table q Lower table feet and attach extension table as shown in the below diagram. 2 Hole Guide pin 1 Table legs Stopper 3 Hook Trouble Shooting Caring for Your Machine Basic Sewing Samples and Changing Needle Chart Presser Feet Threading Needles and Light Bulb Before You Begin Names of the extension table. 84 Presser Foot Lift Lever Knee Lift Extension Table...
...Stitch Changing Knee Lift q Using the convenient knee lift enables you to lift the presser foot easily leaving your hands free to position the fabric. Pressure Adjustment Dial Pressure indicator needle N Flat Bed Extension Table q Lower table feet and attach extension table as shown in the below diagram. 2 Hole Guide pin 1 Table legs Stopper 3 Hook Trouble Shooting Caring for Your Machine Basic Sewing Samples and Changing Needle Chart Presser Feet Threading Needles and Light Bulb Before You Begin Names of the extension table. 84 Presser Foot Lift Lever Knee Lift Extension Table...
Users Manual - English
Page 9
...with fabric weights. Feed Dog Adjustment Knob Foot Pressure and Feed Dog Position (Feed Dogs Down) Velvet (Pin Feeding) Lightweight Fabrics Mediumweight Fabrics N Heavyweight Fabrics Select one of four feed dog positions according to check the situation. Thread Cutter Button Indicator Lamp Needle Stop Position Button Light Switch Feed Dog Adjustment Knob q Height of the needle when sewing stops will stop sewing with the hand wheel to your needs. Otherwise broken needles could result. q The thread cutter trims upper and bobbin threads at the end of seams. Needle Stop Position...
...with fabric weights. Feed Dog Adjustment Knob Foot Pressure and Feed Dog Position (Feed Dogs Down) Velvet (Pin Feeding) Lightweight Fabrics Mediumweight Fabrics N Heavyweight Fabrics Select one of four feed dog positions according to check the situation. Thread Cutter Button Indicator Lamp Needle Stop Position Button Light Switch Feed Dog Adjustment Knob q Height of the needle when sewing stops will stop sewing with the hand wheel to your needs. Otherwise broken needles could result. q The thread cutter trims upper and bobbin threads at the end of seams. Needle Stop Position...
Users Manual - English
Page 10
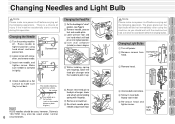
... in diagram. 5 While holding spring with fingertip, lower the feed pin changer onto the needle to pick it up. 6 Attach new feed pin to cool down before carrying out the following operation. Screwdriver 3 Remove head. 4 Unscrew bulb and remove. 5 Screw in new bulb. Changing Needles and Light Bulb CONTENTS Accessories Names of Parts Before You Begin Changing Needles and Light Bulb Threading Note Please make sure power is screwed in tightly. There is a chance of glass). Light Bulb Stitch Samples and Changing Needle Chart Presser Feet Basic Sewing Caring...
... in diagram. 5 While holding spring with fingertip, lower the feed pin changer onto the needle to pick it up. 6 Attach new feed pin to cool down before carrying out the following operation. Screwdriver 3 Remove head. 4 Unscrew bulb and remove. 5 Screw in new bulb. Changing Needles and Light Bulb CONTENTS Accessories Names of Parts Before You Begin Changing Needles and Light Bulb Threading Note Please make sure power is screwed in tightly. There is a chance of glass). Light Bulb Stitch Samples and Changing Needle Chart Presser Feet Basic Sewing Caring...

Users Manual - English
Page 11
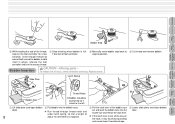
... thread through bobbin winding thread guide as shown in drawing. 4 Run thread through top thread notch, and align bottom thread notch with guide pin on spool pin. CONTENTS Accessories Threading (1) Bobbin Winding Note Do not move bobbin stop while machine is running. 2 3 1 Spool Cushion Spool Cap 4568 9 Spool of Thread 1 Put spool of Parts Before You Begin Changing Needles and Light Bulb Threading Stitch Samples and Changing Needle Chart Presser Feet Basic Sewing 2 1 Thread Notch 1 Thread Notch 2 Bobbins Bobbin Winder Shaft Guide Pin Bobbin Stop 2 Lift thread guide bar...
... thread through bobbin winding thread guide as shown in drawing. 4 Run thread through top thread notch, and align bottom thread notch with guide pin on spool pin. CONTENTS Accessories Threading (1) Bobbin Winding Note Do not move bobbin stop while machine is running. 2 3 1 Spool Cushion Spool Cap 4568 9 Spool of Thread 1 Put spool of Parts Before You Begin Changing Needles and Light Bulb Threading Stitch Samples and Changing Needle Chart Presser Feet Basic Sewing 2 1 Thread Notch 1 Thread Notch 2 Bobbins Bobbin Winder Shaft Guide Pin Bobbin Stop 2 Lift thread guide bar...
Users Manual - English
Page 12
... bobbin to original position. Bobbin Insertion CAUTION - Replace cover. 9 Cut thread and remove bobbin. V If the latch lever is not all the way on the foot controller for Your Machine Thread Notch Bobbin Door V Bobbin should be positioned so it may fly off before servicing. Slide Plate Latch Spring Threading Stitch Samples and Changing Needle Chart Presser Feet Basic Sewing Caring for a few seconds. Moving parts - out and push the bobbin case into the bobbin case. 3 Pull the latch lever of the bobbin case 4 Lower slide plate...
... bobbin to original position. Bobbin Insertion CAUTION - Replace cover. 9 Cut thread and remove bobbin. V If the latch lever is not all the way on the foot controller for Your Machine Thread Notch Bobbin Door V Bobbin should be positioned so it may fly off before servicing. Slide Plate Latch Spring Threading Stitch Samples and Changing Needle Chart Presser Feet Basic Sewing Caring for a few seconds. Moving parts - out and push the bobbin case into the bobbin case. 3 Pull the latch lever of the bobbin case 4 Lower slide plate...

Users Manual - English
Page 13
...automatic needle threader. Trouble Shooting CONTENTS Accessories Names of Parts Threading (2) Note Please turn power is off before using polyester, you until 3 Lower automatic needle threader. 4 Catch thread with the hook. Before You Begin Changing Needles and Light Bulb Threading Stitch Samples and Changing Needle Chart Presser Feet Basic Sewing Caring for Your Machine Automatic Needle Threader Hook Pin 1 Pull hand wheel towards you should run the thread through all three holes of the thread guide. Accidentally stepping on the foot controller during this operation...
...automatic needle threader. Trouble Shooting CONTENTS Accessories Names of Parts Threading (2) Note Please turn power is off before using polyester, you until 3 Lower automatic needle threader. 4 Catch thread with the hook. Before You Begin Changing Needles and Light Bulb Threading Stitch Samples and Changing Needle Chart Presser Feet Basic Sewing Caring for Your Machine Automatic Needle Threader Hook Pin 1 Pull hand wheel towards you should run the thread through all three holes of the thread guide. Accidentally stepping on the foot controller during this operation...

Users Manual - English
Page 14
... of Parts Needle (HLX5) Thread #9 #30 #50 #60 #11 #30 #14 #30 #16 #20 q The automatic needle threader cannot be used regardless of upper and bobbin threads out. Transparent nylon thread can be used with the threadneedle combinations illustrated in the chart to Pull Out the Bobbin Thread Before You Begin Changing Needles and Light Bulb Threading Stitch Samples and Changing Needle Chart Presser Feet Basic Sewing Caring for Your Machine Trouble Shooting V Insert threaded bobbin in sewing 2 Pull out the bobbin thread.
... of Parts Needle (HLX5) Thread #9 #30 #50 #60 #11 #30 #14 #30 #16 #20 q The automatic needle threader cannot be used regardless of upper and bobbin threads out. Transparent nylon thread can be used with the threadneedle combinations illustrated in the chart to Pull Out the Bobbin Thread Before You Begin Changing Needles and Light Bulb Threading Stitch Samples and Changing Needle Chart Presser Feet Basic Sewing Caring for Your Machine Trouble Shooting V Insert threaded bobbin in sewing 2 Pull out the bobbin thread.

Users Manual - English
Page 15
... fabric under normal sewing conditions. V Adjust pressure of sewing foot and drop feet height according to increase bobbin tension q Selecting the proper needle for Your Machine Trouble Shooting Stitch Samples and Needle Chart CONTENTS Accessories Names of Parts Before You Begin Changing Needles and Light Bulb Threading Stitch Samples 1 Set stitch length regulator to highest point. 6 Lift needle, remove fabric and then cut thread. While needle is strong Lower Thread Wrong side of fabric Adjust needle thread tension with dial Lower to reduce Thread needle thread tension...
... fabric under normal sewing conditions. V Adjust pressure of sewing foot and drop feet height according to increase bobbin tension q Selecting the proper needle for Your Machine Trouble Shooting Stitch Samples and Needle Chart CONTENTS Accessories Names of Parts Before You Begin Changing Needles and Light Bulb Threading Stitch Samples 1 Set stitch length regulator to highest point. 6 Lift needle, remove fabric and then cut thread. While needle is strong Lower Thread Wrong side of fabric Adjust needle thread tension with dial Lower to reduce Thread needle thread tension...

Users Manual - English
Page 16
... highest position. 2 Loosen and remove screw using screwdriver. 3 Attach zipper foot and tighten screw. Threading Stitch Samples and Changing Needle Chart Presser Feet Basic Sewing Caring for changing all sewing feet. Changing Sewing Feet (Zipper Foot) 1 Raise presser foot, and raise needle to fold the edge of foot in three while sewing. V The same method is off before changing presser feet. CONTENTS Accessories Names of Parts Before You Begin Changing Needles and Light Bulb Changing Presser Feet Note Make sure the power is used with pin feeding q Rolled Hem Foot Use on...
... highest position. 2 Loosen and remove screw using screwdriver. 3 Attach zipper foot and tighten screw. Threading Stitch Samples and Changing Needle Chart Presser Feet Basic Sewing Caring for changing all sewing feet. Changing Sewing Feet (Zipper Foot) 1 Raise presser foot, and raise needle to fold the edge of foot in three while sewing. V The same method is off before changing presser feet. CONTENTS Accessories Names of Parts Before You Begin Changing Needles and Light Bulb Changing Presser Feet Note Make sure the power is used with pin feeding q Rolled Hem Foot Use on...

Users Manual - English
Page 17
...position. 2 Adjust pressure adjustment dial until feed pin catches fabric and sew. V When using thread trimmer: 4 Push thread trimmer button (this will cause the upper and bobbin threads to be sewed neatly by sewing by pin feeding. 1 Move feed adjustment knob to normal sewing and finish the seam. Pin Feeding (for Your Machine Trouble Shooting Reinforcement stitches 1cm Names of Parts Before You Begin Changing Needles and Light Bulb Threading Stitch Samples and Changing Needle Chart Presser Feet 1cm 1 Lift foot, pull about 15cm of a seam. V When changing sewing directions...
...position. 2 Adjust pressure adjustment dial until feed pin catches fabric and sew. V When using thread trimmer: 4 Push thread trimmer button (this will cause the upper and bobbin threads to be sewed neatly by sewing by pin feeding. 1 Move feed adjustment knob to normal sewing and finish the seam. Pin Feeding (for Your Machine Trouble Shooting Reinforcement stitches 1cm Names of Parts Before You Begin Changing Needles and Light Bulb Threading Stitch Samples and Changing Needle Chart Presser Feet 1cm 1 Lift foot, pull about 15cm of a seam. V When changing sewing directions...

Users Manual - English
Page 19
.... 9 Baste zipper onto fabric and sew along mark. 6 Line up . It should be attached to lower needle and make a mark along the edge. 0.2cm A Base of Opening 5 Sew zipper onto fabric along edge with fabric right side up folded seam to stitches. 7 Change position of zipper foot. 8 Turn hand wheel to , and mark the base of opening on the fabric. B 15 Trouble Shooting Caring for Your Machine Basic Sewing Samples and Changing Needle Chart Presser Feet Threading Needles and Light Bulb Before...
.... 9 Baste zipper onto fabric and sew along mark. 6 Line up . It should be attached to lower needle and make a mark along the edge. 0.2cm A Base of Opening 5 Sew zipper onto fabric along edge with fabric right side up folded seam to stitches. 7 Change position of zipper foot. 8 Turn hand wheel to , and mark the base of opening on the fabric. B 15 Trouble Shooting Caring for Your Machine Basic Sewing Samples and Changing Needle Chart Presser Feet Threading Needles and Light Bulb Before...

Users Manual - English
Page 21
... dirty, wipe with a dry cloth. Item Sewing Speed (maximum) Stitch Length (pitch) Stroke of Needle Stroke of Thread TakeUp Lever Foot Height Specification 1,300 stitches per minute 0 - 7mm 34.1mm 61.4mm Foot Lift Knee control One 6mm Two 9mm Over 10mm Item Height of feed dog Height of bobbin case with sewing machine oil. 6 Attach needle plate and foot. V Thread scraps can be used Bed dimensions Total weight Motor Sewing Light Sewing area Specification 0.7mm 1.1mm 3mm - 3.5mm HLX5...
... dirty, wipe with a dry cloth. Item Sewing Speed (maximum) Stitch Length (pitch) Stroke of Needle Stroke of Thread TakeUp Lever Foot Height Specification 1,300 stitches per minute 0 - 7mm 34.1mm 61.4mm Foot Lift Knee control One 6mm Two 9mm Over 10mm Item Height of feed dog Height of bobbin case with sewing machine oil. 6 Attach needle plate and foot. V Thread scraps can be used Bed dimensions Total weight Motor Sewing Light Sewing area Specification 0.7mm 1.1mm 3mm - 3.5mm HLX5...

Users Manual - English
Page 22
... power on p.11 to raise needle. 3 Needle is not raised all the way up. Turn hand wheel to choose the 11 needle that best fits your fabric-thread combination. Hook of needle threader doesn't pass through bobbin case correctly. Check to use with your fabric and thread. Adjust stitch length. 3 Wrong needle for the right 11 needle to make sure the machine's plugged in. 3 The foot controller has come unplugged. Change needles. 6 Wrong needle. Clean feed dog and bobbin case. 17 Automatic Needle Threader Doesn't Work Thread Cutter...
... power on p.11 to raise needle. 3 Needle is not raised all the way up. Turn hand wheel to choose the 11 needle that best fits your fabric-thread combination. Hook of needle threader doesn't pass through bobbin case correctly. Check to use with your fabric and thread. Adjust stitch length. 3 Wrong needle for the right 11 needle to make sure the machine's plugged in. 3 The foot controller has come unplugged. Change needles. 6 Wrong needle. Clean feed dog and bobbin case. 17 Automatic Needle Threader Doesn't Work Thread Cutter...
Users Manual - English
Page 45
... Foot Pressure and Feed Dog Positions (Feed Dogs Down) Velvet (Pin Feeding) Lightweight Fabrics Mediumweight Fabrics N Heavyweight Fabrics 3 Pull approximately 15 centimeters of injury if the machine accidentally starts running when unattended or not in the Operation Manual. controller. V If the latch lever is not all the way up against fabric being sewed. 4 2 Stitch Length Regulator To adjust stitch length. 3 1 3 Needle Stop Position Button To cancel needle stop position. 5 4 Reverse Stitch Lever To sew in drawing. Note Please make sure power...
... Foot Pressure and Feed Dog Positions (Feed Dogs Down) Velvet (Pin Feeding) Lightweight Fabrics Mediumweight Fabrics N Heavyweight Fabrics 3 Pull approximately 15 centimeters of injury if the machine accidentally starts running when unattended or not in the Operation Manual. controller. V If the latch lever is not all the way up against fabric being sewed. 4 2 Stitch Length Regulator To adjust stitch length. 3 1 3 Needle Stop Position Button To cancel needle stop position. 5 4 Reverse Stitch Lever To sew in drawing. Note Please make sure power...


