Users Manual - English
Page 4
...sewing order/color .. 44 Displaying a preview of the embroidery .......... 46 Checking embroidery design information........ 48 Saving and Printing 49 Saving 49 Printing 52 Changing Software Settings 55 Changing the grid settings 55 Changing the measurement units 55 Tips and ... Image to an Embroidery Pattern (Auto Punch 23 Arranging Embroidery Designs 25 Opening/Importing Embroidery Designs ......... 25 Creating a new embroidery design 25 Opening a PE-DESIGN Lite file 25 Importing embroidery design files 27 Specifying the Design Page Size and Color ... 29 Saving the Image Data 30...
...sewing order/color .. 44 Displaying a preview of the embroidery .......... 46 Checking embroidery design information........ 48 Saving and Printing 49 Saving 49 Printing 52 Changing Software Settings 55 Changing the grid settings 55 Changing the measurement units 55 Tips and ... Image to an Embroidery Pattern (Auto Punch 23 Arranging Embroidery Designs 25 Opening/Importing Embroidery Designs ......... 25 Creating a new embroidery design 25 Opening a PE-DESIGN Lite file 25 Importing embroidery design files 27 Specifying the Design Page Size and Color ... 29 Saving the Image Data 30...
Users Manual - English
Page 11
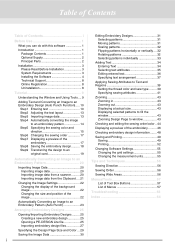
Click Next to install the application into the selected folder. → When the installation is necessary to restart the computer. 7 Make sure that PE-DESIGN Lite starts up correctly. Click Finish to your computer. a Note: This procedure also automatically installs the card writer driver. The card writer may now be connected to complete the installation of the software. b Memo: If the dialog box calling for restarting the computer appears, it is completed, the following dialog box appears. 7. Before Use 6.
Click Next to install the application into the selected folder. → When the installation is necessary to restart the computer. 7 Make sure that PE-DESIGN Lite starts up correctly. Click Finish to your computer. a Note: This procedure also automatically installs the card writer driver. The card writer may now be connected to complete the installation of the software. b Memo: If the dialog box calling for restarting the computer appears, it is completed, the following dialog box appears. 7. Before Use 6.
Users Manual - English
Page 12
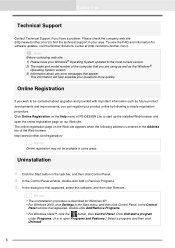
...Vista™, click the button, then Control Panel. b Memo: • The uninstallation procedure is described for software updates, visit the Brother Solutions Center at (http://solutions.brother.com/). Online Registration If you have your Windows® Operating System updated to the most current version. 2) The.... 2. In the Control Panel window, double-click Add or Remove Programs. 3. Click the Start button in the Address bar of PE-DESIGN Lite to start up the installed Web browser and open Programs and Features.) Select a program, and then click Uninstall. 8 This information ...
...Vista™, click the button, then Control Panel. b Memo: • The uninstallation procedure is described for software updates, visit the Brother Solutions Center at (http://solutions.brother.com/). Online Registration If you have your Windows® Operating System updated to the most current version. 2) The.... 2. In the Control Panel window, double-click Add or Remove Programs. 3. Click the Start button in the Address bar of PE-DESIGN Lite to start up the installed Web browser and open Programs and Features.) Select a program, and then click Uninstall. 8 This information ...
Users Manual - English
Page 24
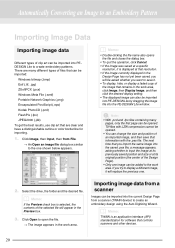
... display setting. • The displayed image can also be imported into PE-DESIGN Lite by dragging the image file into the PE-DESIGN Lite window. b Memo: • Double-clicking the file name also opens...file dialog box similar to create an embroidery design using the Auto Digitizing Wizard. There are clear and have a distinguishable outline or color borderline for software that are many pages, only the first... imported into PEDESIGN Lite to create embroidery patterns. a Note: • With .pcd and .fpx files containing many different types of the Design Page). • Only one ....
... display setting. • The displayed image can also be imported into PE-DESIGN Lite by dragging the image file into the PE-DESIGN Lite window. b Memo: • Double-clicking the file name also opens...file dialog box similar to create an embroidery design using the Auto Digitizing Wizard. There are clear and have a distinguishable outline or color borderline for software that are many pages, only the first... imported into PEDESIGN Lite to create embroidery patterns. a Note: • With .pcd and .fpx files containing many different types of the Design Page). • Only one ....
Users Manual - English
Page 29
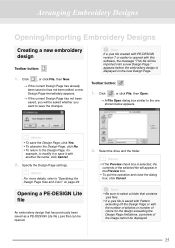
... settings. b Memo: • If the Preview check box is saved with Pattern extending off the Design Page or with this software, the message "This file will appear in the Preview box. • To quit the operation and close the dialog box, click Cancel. Select ... been saved or has not been edited, a new Design Page immediately appears. → If the current Design Page has not been saved, you want to the one shown below appears. Opening a PE-DESIGN Lite file An embroidery design that has previously been saved as a PE-DESIGN Lite file (.pes file) can be asked whether you will be opened...
... settings. b Memo: • If the Preview check box is saved with Pattern extending off the Design Page or with this software, the message "This file will appear in the Preview box. • To quit the operation and close the dialog box, click Cancel. Select ... been saved or has not been edited, a new Design Page immediately appears. → If the current Design Page has not been saved, you want to the one shown below appears. Opening a PE-DESIGN Lite file An embroidery design that has previously been saved as a PE-DESIGN Lite file (.pes file) can be asked whether you will be opened...
Users Manual - English
Page 53
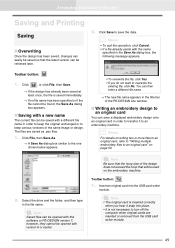
...: 1. You can then enter a different file name. → The new file name appears in the title bar of the PE-DESIGN Lite window. ■ Writing an embroidery design to an original card You can save the data. a Note: • The original card is inserted correctly when you do not... into the USB card writer module. Toolbar button: 1. a Note: Saved files can be opened with this software or PE-DESIGN version 7; a Note: Be sure that the hoop size of the same image or design. however, they cannot be retrieved later. 3. Insert an original card into place. • It is saved...
...: 1. You can then enter a different file name. → The new file name appears in the title bar of the PE-DESIGN Lite window. ■ Writing an embroidery design to an original card You can save the data. a Note: • The original card is inserted correctly when you do not... into the USB card writer module. Toolbar button: 1. a Note: Saved files can be opened with this software or PE-DESIGN version 7; a Note: Be sure that the hoop size of the same image or design. however, they cannot be retrieved later. 3. Insert an original card into place. • It is saved...

Users Manual - English
Page 56
...card (while the LED indicator is flashing). 9. To enter or change the print settings for the embroidery design files that you want to print a reduced image together with the software so that you can enter comments and information about the pattern to the one shown below appears. Under Print... in the card folder that comes with all stitches. 2. Click File, then Print Setup. → A Print Setup dialog box similar to a saved .pes file. 1. Print type Actual Size: Select this option to print. 1. Click in the upper-right corner of all of the abovementioned information on a single...
...card (while the LED indicator is flashing). 9. To enter or change the print settings for the embroidery design files that you want to print a reduced image together with the software so that you can enter comments and information about the pattern to the one shown below appears. Under Print... in the card folder that comes with all stitches. 2. Click File, then Print Setup. → A Print Setup dialog box similar to a saved .pes file. 1. Print type Actual Size: Select this option to print. 1. Click in the upper-right corner of all of the abovementioned information on a single...
Users Manual - English
Page 69
...Software 4 L LED 2 M measurement units 55 Memory 3 Monitor 3 moving embroidery patterns to center 32 images 14, 22 N NOT DEFINED 40 O opening .pes file 25 Clipboard images 21 embroidery patterns 27 images 20 new Design Page 25 PE-DESIGN Lite file 25 TWAIN images 21 Operating system 3 Option Design Page Property 29, 62 Design... 15 region sewing attributes 42 Registration 8 resizing images 14, 22 S satin stitch sewing attributes 42 Saving embroidery design 18 saving embroidery patterns 49 images 30 on card 19, 50 scaling images 22 selecting all embroidery patterns 31 ...
...Software 4 L LED 2 M measurement units 55 Memory 3 Monitor 3 moving embroidery patterns to center 32 images 14, 22 N NOT DEFINED 40 O opening .pes file 25 Clipboard images 21 embroidery patterns 27 images 20 new Design Page 25 PE-DESIGN Lite file 25 TWAIN images 21 Operating system 3 Option Design Page Property 29, 62 Design... 15 region sewing attributes 42 Registration 8 resizing images 14, 22 S satin stitch sewing attributes 42 Saving embroidery design 18 saving embroidery patterns 49 images 30 on card 19, 50 scaling images 22 selecting all embroidery patterns 31 ...

