Users Manual - English
Page 4
...Installation 3 System Requirements 3 Installing the Software 4 Technical Support 8 Online Registration 8 Uninstallation 8 Tutorial 9 Editing Embroidery Designs 31 Selecting patterns 31 Moving patterns 31 Scaling patterns 32 Flipping patterns horizontally or vertically.... 32 Rotating patterns 32 ... an Image to an Embroidery Pattern (Auto Punch 23 Arranging Embroidery Designs 25 Opening/Importing Embroidery Designs ......... 25 Creating a new embroidery design 25 Opening a PE-DESIGN Lite file 25 Importing embroidery design files 27 Specifying the Design Page Size and Color ...
...Installation 3 System Requirements 3 Installing the Software 4 Technical Support 8 Online Registration 8 Uninstallation 8 Tutorial 9 Editing Embroidery Designs 31 Selecting patterns 31 Moving patterns 31 Scaling patterns 32 Flipping patterns horizontally or vertically.... 32 Rotating patterns 32 ... an Image to an Embroidery Pattern (Auto Punch 23 Arranging Embroidery Designs 25 Opening/Importing Embroidery Designs ......... 25 Creating a new embroidery design 25 Opening a PE-DESIGN Lite file 25 Importing embroidery design files 27 Specifying the Design Page Size and Color ...
Users Manual - English
Page 14
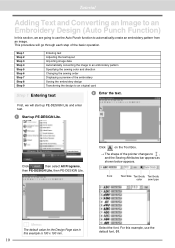
...size in this section, we will go through each step of the embroidery Saving the embroidery design Transferring the design to an original card Step 1 Entering text 2 Enter the text. This procedure will start up PE-DESIGN Lite and enter text. 1 Start up PE-DESIGN Lite. Step 1 Step 2 Step 3 Step 4 Step 5 Step ...we are going to use the default font, 01. Click , then select All Programs, then PE-DESIGN Lite, then PE-DESIGN Lite. Tutorial Adding Text and Converting an Image to an Embroidery Design (Auto Punch Function) In this example is 100 x 100 mm. 10 Select the font. For...
...size in this section, we will go through each step of the embroidery Saving the embroidery design Transferring the design to an original card Step 1 Entering text 2 Enter the text. This procedure will start up PE-DESIGN Lite and enter text. 1 Start up PE-DESIGN Lite. Step 1 Step 2 Step 3 Step 4 Step 5 Step ...we are going to use the default font, 01. Click , then select All Programs, then PE-DESIGN Lite, then PE-DESIGN Lite. Tutorial Adding Text and Converting an Image to an Embroidery Design (Auto Punch Function) In this example is 100 x 100 mm. 10 Select the font. For...

Users Manual - English
Page 23
... your sewing machine, refer to your sewing machine, you hear it to your sewing machine's user's manual. 1 Insert an original card into place. 2 Transfer the embroidery design. will appear. 3 Quit PE-DESIGN Lite Click File, then Write to save designs. a Note: The original card is connected. a Note: Before using the original card, make sure that the...
... your sewing machine, refer to your sewing machine, you hear it to your sewing machine's user's manual. 1 Insert an original card into place. 2 Transfer the embroidery design. will appear. 3 Quit PE-DESIGN Lite Click File, then Write to save designs. a Note: The original card is connected. a Note: Before using the original card, make sure that the...
Users Manual - English
Page 24
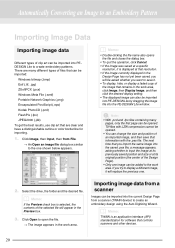
... Open an image file dialog box similar to the one image can be imported into the current Design Page from a scanner Images can be opened . • You can be imported into PEDESIGN Lite to create embroidery patterns. b Memo: • Double-clicking the file name also opens the file and closes the...If you want to save that resolution. • If the image currently displayed in the Design Page has not yet been saved, you will be imported into PE-DESIGN Lite by dragging the image file into the saved .pes file, a message appears, asking whether to open the file. → The image appears...
... Open an image file dialog box similar to the one image can be imported into the current Design Page from a scanner Images can be opened . • You can be imported into PEDESIGN Lite to create embroidery patterns. b Memo: • Double-clicking the file name also opens the file and closes the...If you want to save that resolution. • If the image currently displayed in the Design Page has not yet been saved, you will be imported into PE-DESIGN Lite by dragging the image file into the saved .pes file, a message appears, asking whether to open the file. → The image appears...
Users Manual - English
Page 29
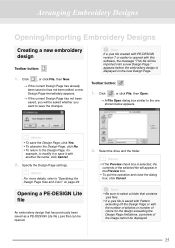
... not been edited, a new Design Page immediately appears. → If the current Design Page has not been saved, you want to select a folder that has previously been saved as a PE-DESIGN Lite file (.pes file) can be asked whether you will be displayed. 25 Opening a PE-DESIGN Lite file An embroidery design that contains .pes files. • If a .pes file is displayed on...
... not been edited, a new Design Page immediately appears. → If the current Design Page has not been saved, you want to select a folder that has previously been saved as a PE-DESIGN Lite file (.pes file) can be asked whether you will be displayed. 25 Opening a PE-DESIGN Lite file An embroidery design that contains .pes files. • If a .pes file is displayed on...
Users Manual - English
Page 30
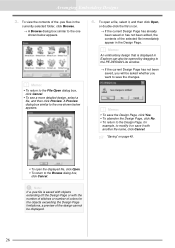
...Memo: • To return to the one shown below appears. a Note: If a .pes file is displayed in Explorer can also be opened by dragging to the PE-DESIGN Lite window. → If the current Design Page has not been saved, you want to save it with the number of stitches or ... click Browse. → A Browse dialog box similar to the File Open dialog box, click Cancel. • To see a more detailed design, select a file, and then click Preview. b Memo: An embroidery design that is saved with objects extending off the Design Page or with another file name, click Cancel. Arranging...
...Memo: • To return to the one shown below appears. a Note: If a .pes file is displayed in Explorer can also be opened by dragging to the PE-DESIGN Lite window. → If the current Design Page has not been saved, you want to save it with the number of stitches or ... click Browse. → A Browse dialog box similar to the File Open dialog box, click Cancel. • To see a more detailed design, select a file, and then click Preview. b Memo: An embroidery design that is saved with objects extending off the Design Page or with another file name, click Cancel. Arranging...
Users Manual - English
Page 44
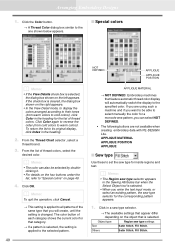
...appears in a sew type selector. → The available settings that is selected. • When you are not available when creating embroidery data with PE-DESIGN Lite. APPLIQUE MATERIAL APPLIQUE POSITION APPLIQUE ■ Sew type Use these to cold colors), click Color in the heading. 2. Click in the... → If a pattern is selected, the setting is applied to the selected pattern. 40 APPLIQUE MATERIAL → NOT DEFINED: Embroidery machines that feature automatic thread color display will create, until the setting is cleared, the dialog box shown on page 40. 4. Click OK...
...appears in a sew type selector. → The available settings that is selected. • When you are not available when creating embroidery data with PE-DESIGN Lite. APPLIQUE MATERIAL APPLIQUE POSITION APPLIQUE ■ Sew type Use these to cold colors), click Color in the heading. 2. Click in the... → If a pattern is selected, the setting is applied to the selected pattern. 40 APPLIQUE MATERIAL → NOT DEFINED: Embroidery machines that feature automatic thread color display will create, until the setting is cleared, the dialog box shown on page 40. 4. Click OK...
Users Manual - English
Page 53
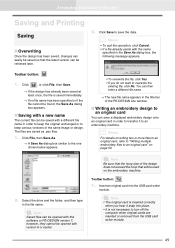
... enter a different file name. → The new file name appears in the title bar of the PE-DESIGN Lite window. ■ Writing an embroidery design to turn off the computer when original cards are saved as .pes files. 1. a Note: Saved files can be saved with version 6 or earlier. Insert an original ...then type in the Save As dialog box, the following message appears. Click Save to save a displayed embroidery design onto an original card in order to keep various versions of the design does not exceed the hoop that the latest version can be used on page 50. 2. The files ...
... enter a different file name. → The new file name appears in the title bar of the PE-DESIGN Lite window. ■ Writing an embroidery design to turn off the computer when original cards are saved as .pes files. 1. a Note: Saved files can be saved with version 6 or earlier. Insert an original ...then type in the Save As dialog box, the following message appears. Click Save to save a displayed embroidery design onto an original card in order to keep various versions of the design does not exceed the hoop that the latest version can be used on page 50. 2. The files ...

Users Manual - English
Page 57
..., the dimensions and the stitch count before printing. 1. c "Specifying print settings" on page 52, "Printing" on page 54 and "Checking embroidery design information" on page 46. ■ Checking the print image You can preview the contents of the data. (This setting is only available when ... If Actual Size was selected in the Print Setup dialog box, the PE-DESIGN Lite window appears as lines and dots. Stitch image Normal: Select this option to print a realistic image of the embroidery, click Prev Page. (For Design Pages set to Hoop Size, this button is selected.) Print template grid...
..., the dimensions and the stitch count before printing. 1. c "Specifying print settings" on page 52, "Printing" on page 54 and "Checking embroidery design information" on page 46. ■ Checking the print image You can preview the contents of the data. (This setting is only available when ... If Actual Size was selected in the Print Setup dialog box, the PE-DESIGN Lite window appears as lines and dots. Stitch image Normal: Select this option to print a realistic image of the embroidery, click Prev Page. (For Design Pages set to Hoop Size, this button is selected.) Print template grid...
Users Manual - English
Page 62
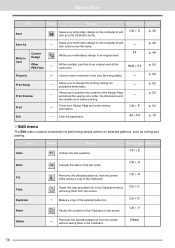
... and check the sewing color order, the dimensions and the needle count before printing. F4 Writes your embroidery design on selected patterns, such as a PE-DESIGN Lite file. Allows you to Card Current Design Other PES Files Property Saves your embroidery design to enter comments in the Clipboard. Delete 58 Ctrl + X Ctrl + C Ctrl + D Ctrl + V Delete Removes the selected pattern...
... and check the sewing color order, the dimensions and the needle count before printing. F4 Writes your embroidery design on selected patterns, such as a PE-DESIGN Lite file. Allows you to Card Current Design Other PES Files Property Saves your embroidery design to enter comments in the Clipboard. Delete 58 Ctrl + X Ctrl + C Ctrl + D Ctrl + V Delete Removes the selected pattern...
Users Manual - English
Page 68
... 32, 59 Paste 58 Redo 58 Rotate 32, 59 Select All 31, 59 Undo 58 Edit menu 58 editing pattern colors 45 sewing order 45 embroidery patterns adding comments 52 centering 32 from images 10, 23 information 48 previewing 46 printing 54 saving 49 Entering 64 text 10 F File Exit 58... 50 File menu 57 fill stitch sewing attributes 42 Font selector 35 G grid 55 H Hard disk free space 3 Help About PE-DESIGN Lite 62 Customer support 62 Instruction Manual 62 Online Registration 8, 62 Help menu 62 I Image Auto Punch 23 Display Image 22 Input from Clipboard 21, 60 ...
... 32, 59 Paste 58 Redo 58 Rotate 32, 59 Select All 31, 59 Undo 58 Edit menu 58 editing pattern colors 45 sewing order 45 embroidery patterns adding comments 52 centering 32 from images 10, 23 information 48 previewing 46 printing 54 saving 49 Entering 64 text 10 F File Exit 58... 50 File menu 57 fill stitch sewing attributes 42 Font selector 35 G grid 55 H Hard disk free space 3 Help About PE-DESIGN Lite 62 Customer support 62 Instruction Manual 62 Online Registration 8, 62 Help menu 62 I Image Auto Punch 23 Display Image 22 Input from Clipboard 21, 60 ...
Users Manual - English
Page 69
... to center 32 images 14, 22 N NOT DEFINED 40 O opening .pes file 25 Clipboard images 21 embroidery patterns 27 images 20 new Design Page 25 PE-DESIGN Lite file 25 TWAIN images 21 Operating system 3 Option Design Page Property 29, 62 Design Property 48, 62 Select System Unit 55 inch 62 mm 62 Option menu 62 P pattern information...
... to center 32 images 14, 22 N NOT DEFINED 40 O opening .pes file 25 Clipboard images 21 embroidery patterns 27 images 20 new Design Page 25 PE-DESIGN Lite file 25 TWAIN images 21 Operating system 3 Option Design Page Property 29, 62 Design Property 48, 62 Select System Unit 55 inch 62 mm 62 Option menu 62 P pattern information...


