

Users Manual - English
Page 5
... accessories ...7 Names of Machine Parts and Their Functions 8 Front view ...8 Needle and embroidery foot section ...9 Right-side/rear view ...9 Operation buttons ...10 Operation panel ...11 GETTING READY 13 Embroidery Step by Step 14 Attaching the Embroidery Unit 15 Embroidery unit precautions ...15 Attaching the embroidery unit ...15 Removing the embroidery unit ...16 Turning the Machine On/Off 18 Power...
... accessories ...7 Names of Machine Parts and Their Functions 8 Front view ...8 Needle and embroidery foot section ...9 Right-side/rear view ...9 Operation buttons ...10 Operation panel ...11 GETTING READY 13 Embroidery Step by Step 14 Attaching the Embroidery Unit 15 Embroidery unit precautions ...15 Attaching the embroidery unit ...15 Removing the embroidery unit ...16 Turning the Machine On/Off 18 Power...
Users Manual - English
Page 8
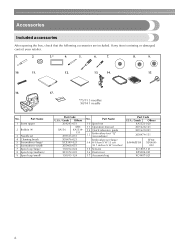
Part Name 10 Spool net 11 Operation manual 12 Quick reference guide 13 Embroidery foot "Q" (on machine) Embroidery set 4 Cleaning brush 5 Screwdriver (large) 6 Screwdriver (small) 7 Spool cap (large) 8 Spool cap (medium) 9 Spool cap (small) Part Code U.S.A. / Canada ...024 XE1372-001 130013-124 No. Accessories Included accessories After opening the box, check that the following accessories are included. Part Name 1 Seam ripper 2 Bobbin (4) 3 Needle set (large) 14 H 18cm X W 13 cm (H 7 inches X W 5 inches) 15 Scissors 16 Dust cover 17 Accessory bag Part Code U.S.A. / ...
Part Name 10 Spool net 11 Operation manual 12 Quick reference guide 13 Embroidery foot "Q" (on machine) Embroidery set 4 Cleaning brush 5 Screwdriver (large) 6 Screwdriver (small) 7 Spool cap (large) 8 Spool cap (medium) 9 Spool cap (small) Part Code U.S.A. / Canada ...024 XE1372-001 130013-124 No. Accessories Included accessories After opening the box, check that the following accessories are included. Part Name 1 Seam ripper 2 Bobbin (4) 3 Needle set (large) 14 H 18cm X W 13 cm (H 7 inches X W 5 inches) 15 Scissors 16 Dust cover 17 Accessory bag Part Code U.S.A. / ...

Users Manual - English
Page 10
... when threading the upper thread. m Needle threader lever Use the needle threader lever to operate the machine. f Bobbin winder Use the bobbin winder when winding the bobbin. Before using the machine can be selected and edited, and operations for the embroidery unit. e Top cover Open the ...g Operation panel From the operation panel, patterns can be displayed (page 11). 8 h Embroidery unit connector slot Plug in the connector for using the machine, carefully read these buttons to thread the needle. Names of Machine Parts and Their Functions The names of the various parts of the...
... when threading the upper thread. m Needle threader lever Use the needle threader lever to operate the machine. f Bobbin winder Use the bobbin winder when winding the bobbin. Before using the machine can be selected and edited, and operations for the embroidery unit. e Top cover Open the ...g Operation panel From the operation panel, patterns can be displayed (page 11). 8 h Embroidery unit connector slot Plug in the connector for using the machine, carefully read these buttons to thread the needle. Names of Machine Parts and Their Functions The names of the various parts of the...

Users Manual - English
Page 11
...) to clean the bobbin case and race. Needle and embroidery foot section Right-side/rear view a Thread guide disk Pass the thread through the thread guide disk when using the needle threader to use your machine. 9 d Needle plate cover Remove the needle plate cover to raise and lower the needle. b Handwheel Turn the handwheel toward you are...
...) to clean the bobbin case and race. Needle and embroidery foot section Right-side/rear view a Thread guide disk Pass the thread through the thread guide disk when using the needle threader to use your machine. 9 d Needle plate cover Remove the needle plate cover to raise and lower the needle. b Handwheel Turn the handwheel toward you are...
Users Manual - English
Page 13
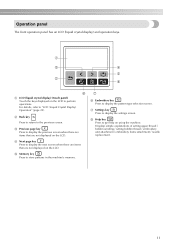
...screen. d Next page key Press to display the next screen when there are items that are not displayed on using the machine. g f Embroidery key Press to "LCD (Liquid Crystal Display) Operation" (page 20). c Previous page key Press to display the settings... screen. Displays simple explanations of setting upper thread / bobbin winding / setting bobbin thread / embroidery unit attachment / embroidery frame attachment / needle replacement. 11 a c d e b h f a LCD (liquid crystal display) (touch panel) Touch the keys displayed on the LCD....
...screen. d Next page key Press to display the next screen when there are items that are not displayed on using the machine. g f Embroidery key Press to "LCD (Liquid Crystal Display) Operation" (page 20). c Previous page key Press to display the settings... screen. Displays simple explanations of setting upper thread / bobbin winding / setting bobbin thread / embroidery unit attachment / embroidery frame attachment / needle replacement. 11 a c d e b h f a LCD (liquid crystal display) (touch panel) Touch the keys displayed on the LCD....

Users Manual - English
Page 15
...Embroidery Unit 15 Embroidery unit precautions 15 Attaching the embroidery unit 15 Removing the embroidery unit 16 Turning the Machine On/Off 18 Power supply precautions 18 Turning on the machine 19 Turning off the machine 19 LCD (Liquid Crystal Display) Operation 20 Viewing the LCD 20 Changing the machine settings 21 Checking machine... the upper thread 30 Threading the needle 32 Threading the needle manually (without using the needle threader 34 Replacing the Needle 35 Needle precautions 35 Checking the needle 35 Replacing the needle 36 1 GETTING READY The various preparations...
...Embroidery Unit 15 Embroidery unit precautions 15 Attaching the embroidery unit 15 Removing the embroidery unit 16 Turning the Machine On/Off 18 Power supply precautions 18 Turning on the machine 19 Turning off the machine 19 LCD (Liquid Crystal Display) Operation 20 Viewing the LCD 20 Changing the machine settings 21 Checking machine... the upper thread 30 Threading the needle 32 Threading the needle manually (without using the needle threader 34 Replacing the Needle 35 Needle precautions 35 Checking the needle 35 Replacing the needle 36 1 GETTING READY The various preparations...

Users Manual - English
Page 16
... a pattern Select an embroidery pattern. GETTING READY Embroidery Step by Step The basic steps for embroidery are as follows. 1 Attaching the embroidery unit Attach the embroidery unit. (If the embroidery unit is not attached, the machine does not operate.) For details, refer to "Attaching the embroidery unit" (page 15). ↓ 2 Checking the needle Use a needle matched to "Selecting Embroidery Patterns" (page...
... a pattern Select an embroidery pattern. GETTING READY Embroidery Step by Step The basic steps for embroidery are as follows. 1 Attaching the embroidery unit Attach the embroidery unit. (If the embroidery unit is not attached, the machine does not operate.) For details, refer to "Attaching the embroidery unit" (page 15). ↓ 2 Checking the needle Use a needle matched to "Selecting Embroidery Patterns" (page...
Users Manual - English
Page 23
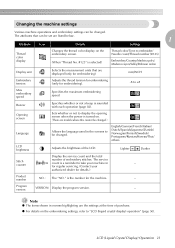
...page 82). is turned on. (There are displayed (only for the machine. - z For details on the embroidering settings, refer to +8 Max embroidery speed Specifies the maximum embroidering speed. Note z The items shown in ...embroidery stitches. Changing the machine settings Various machine operations and embroidery settings can be set are listed below. 1 Attribute Icon Details Settings Thread color display Changes the thread color display on the embroidery screen. (When "Thread No. #123" is selected) Thread color/Time to embroider/ Needle count/Thread number (#123) Embroidery...
...page 82). is turned on. (There are displayed (only for the machine. - z For details on the embroidering settings, refer to +8 Max embroidery speed Specifies the maximum embroidering speed. Note z The items shown in ...embroidery stitches. Changing the machine settings Various machine operations and embroidery settings can be set are listed below. 1 Attribute Icon Details Settings Thread color display Changes the thread color display on the embroidery screen. (When "Thread No. #123" is selected) Thread color/Time to embroider/ Needle count/Thread number (#123) Embroidery...
Users Manual - English
Page 25
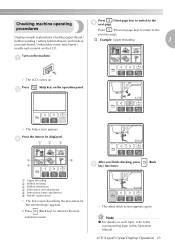
... finish checking, press (Back 5 e key) two times. a Upper threading b Bobbin winding c Bobbin installation d Embroidery unit attachment e Embroidery frame attachment f Needle replacement X The first screen describing the procedure for the selected topic appears. • Press (Back key) to return...simple explanations of setting upper thread / bobbin winding / setting bobbin thread / embroidery † Example: Upper threading 1 unit attachment / embroidery frame attachment / needle replacement on the machine. procedures Press (Previous page key) to return to be displayed. LCD (...
... finish checking, press (Back 5 e key) two times. a Upper threading b Bobbin winding c Bobbin installation d Embroidery unit attachment e Embroidery frame attachment f Needle replacement X The first screen describing the procedure for the selected topic appears. • Press (Back key) to return...simple explanations of setting upper thread / bobbin winding / setting bobbin thread / embroidery † Example: Upper threading 1 unit attachment / embroidery frame attachment / needle replacement on the machine. procedures Press (Previous page key) to return to be displayed. LCD (...
Users Manual - English
Page 34
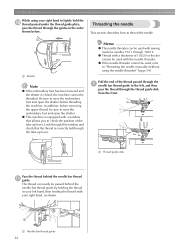
...or thicker cannot be sure to raise the embroidery foot and open the shutter before threading the machine. z Thread with a thickness of the take -up lever. In addition, before removing the upper thread, be used , refer to "Threading the needle manually (without using your right hand to...Thread guide disk Pass the thread behind the needle bar thread guide by holding the thread in the order shown below. 1 a Shutter Note z If the embroidery foot has been lowered and the shutter is closed, the machine cannot be used with sewing machine needles 75/11 through 100/16. GETTING READY ...
...or thicker cannot be sure to raise the embroidery foot and open the shutter before threading the machine. z Thread with a thickness of the take -up lever. In addition, before removing the upper thread, be used , refer to "Threading the needle manually (without using your right hand to...Thread guide disk Pass the thread behind the needle bar thread guide by holding the thread in the order shown below. 1 a Shutter Note z If the embroidery foot has been lowered and the shutter is closed, the machine cannot be used with sewing machine needles 75/11 through 100/16. GETTING READY ...
Users Manual - English
Page 35
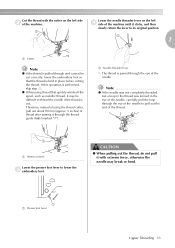
... thread after passing it through the thread guide disks (marked "7"). a Needle threader lever X The thread is performed, skip step c. Cut the thread with extreme force, otherwise the needle may be difficult to thread the needle if the thread is pulled through and cannot be cut . If this... Cutter Note z If the thread is cut correctly, lower the embroidery foot so that quickly winds off the spool, such as metallic thread, it clicks, and then slowly return the lever to lower the c embroidery foot. Therefore, instead of the machine until it may break or bend. 1 a Presser foot lever ...
... thread after passing it through the thread guide disks (marked "7"). a Needle threader lever X The thread is performed, skip step c. Cut the thread with extreme force, otherwise the needle may be difficult to thread the needle if the thread is pulled through and cannot be cut . If this... Cutter Note z If the thread is cut correctly, lower the embroidery foot so that quickly winds off the spool, such as metallic thread, it clicks, and then slowly return the lever to lower the c embroidery foot. Therefore, instead of the machine until it may break or bend. 1 a Presser foot lever ...
Users Manual - English
Page 36
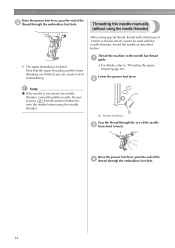
...thread through the embroidery foot hole. 34 Threading the needle manually (without using the needle threader) X The upper threading is not raised, the needle threader cannot thread the needle. Raise the ...needle threader, thread the needle as described below. b Note z If the needle is finished. Thread the machine to the needle bar thread a guide. • For details, refer to start embroidering. Lower the presser foot lever. Be sure to press (Needle position button) to back. When using the needle threader. 1 a Pressor foot lever Pass the thread through the embroidery...
...thread through the embroidery foot hole. 34 Threading the needle manually (without using the needle threader) X The upper threading is not raised, the needle threader cannot thread the needle. Raise the ...needle threader, thread the needle as described below. b Note z If the needle is finished. Thread the machine to the needle bar thread a guide. • For details, refer to start embroidering. Lower the presser foot lever. Be sure to press (Needle position button) to back. When using the needle threader. 1 a Pressor foot lever Pass the thread through the embroidery...
Users Manual - English
Page 38
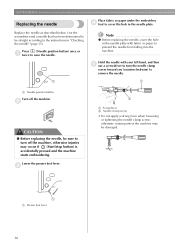
GETTING READY Replacing the needle Place fabric or paper under the embroidery d foot to cover the hole in "Checking the needle" (page 35). Use the screwdriver and a needle that has been determined to turn off the machine. c 2 a Screwdriver b Needle clamp screw • Do not apply a strong force when loosening or tightening the needle clamp screw, otherwise certain parts...
GETTING READY Replacing the needle Place fabric or paper under the embroidery d foot to cover the hole in "Checking the needle" (page 35). Use the screwdriver and a needle that has been determined to turn off the machine. c 2 a Screwdriver b Needle clamp screw • Do not apply a strong force when loosening or tightening the needle clamp screw, otherwise certain parts...

Users Manual - English
Page 42
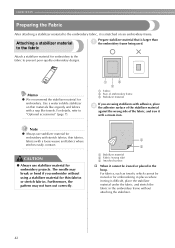
... fabric can be sure there is not space, do not embroider the fabric. The needle may break, resulting in poor quality embroidery designs. Note z For good quality embroidery designs be sure to prevent poor quality embroidery designs. ■ Fabric Prepare the fabric for embroidery machines. EMBROIDERY Embroidering Neatly This section describes the preparations and basic procedures for...
... fabric can be sure there is not space, do not embroider the fabric. The needle may break, resulting in poor quality embroidery designs. Note z For good quality embroidery designs be sure to prevent poor quality embroidery designs. ■ Fabric Prepare the fabric for embroidery machines. EMBROIDERY Embroidering Neatly This section describes the preparations and basic procedures for...
Users Manual - English
Page 43
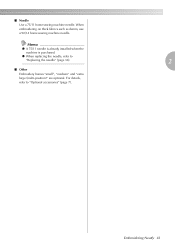
■ Needle Use a 75/11 home sewing machine needle. z When replacing the needle, refer to "Optional accessories" (page 7). For details, refer to "Replacing the needle" (page 36). 2 ■ Other Embroidery frames "small", "medium" and "extra large (multi-position)" are optional. Embroidering Neatly 41 When embroidering on thick fabrics such as denim, use a 90/14 home sewing machine needle. Memo z A 75/11 needle is already installed when the machine is purchased.
■ Needle Use a 75/11 home sewing machine needle. z When replacing the needle, refer to "Optional accessories" (page 7). For details, refer to "Replacing the needle" (page 36). 2 ■ Other Embroidery frames "small", "medium" and "extra large (multi-position)" are optional. Embroidering Neatly 41 When embroidering on thick fabrics such as denim, use a 90/14 home sewing machine needle. Memo z A 75/11 needle is already installed when the machine is purchased.
Users Manual - English
Page 44
... Fabric After attaching a stabilizer material to the fabric Prepare stabilizer material that is larger than a the embroidery frame being used. The needle may not turn out correctly. 1 2 3 a Stabilizer material b Fabric (wrong side) c Attached surface † When it cannot be ironed or for thin fabrics or stretch fabrics. ...
... Fabric After attaching a stabilizer material to the fabric Prepare stabilizer material that is larger than a the embroidery frame being used. The needle may not turn out correctly. 1 2 3 a Stabilizer material b Fabric (wrong side) c Attached surface † When it cannot be ironed or for thin fabrics or stretch fabrics. ...
Users Manual - English
Page 45
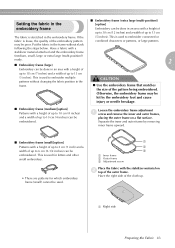
... patterns, or large patterns. Have the right side of the pattern being embroidered. Separate the inner and outer frame by the embroidery foot and cause injury or needle breakage. ■ Embroidery frame (medium)[option] Patterns with a height of up to 10 cm (4 inches) and a width of up to 10 ...cm (4 inches) can be embroidered. Otherwise, the embroidery frame may be poor. This is loose, the quality of the embroidery pattern may be ...
... patterns, or large patterns. Have the right side of the pattern being embroidered. Separate the inner and outer frame by the embroidery foot and cause injury or needle breakage. ■ Embroidery frame (medium)[option] Patterns with a height of up to 10 cm (4 inches) and a width of up to 10 ...cm (4 inches) can be embroidered. Otherwise, the embroidery frame may be poor. This is loose, the quality of the embroidery pattern may be ...
Users Manual - English
Page 49
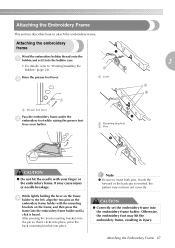
...; Do not hit the needle with the mounting brackets on the embroidery frame holder with your finger or the embroidery frame. Note z Be sure to attach the embroidery frame. Attaching the embroidery frame Wind the embroidery bobbin thread onto the a bobbin and set the embroidery frame into the bobbin case...inserted, the pattern may hit the embroidery frame, resulting in injury. After pressing the front mounting bracket onto the pin so that it into the embroidery frame holder. It may cause injury or needle breakage. Attaching the Embroidery Frame This section describes how to insert...
...; Do not hit the needle with the mounting brackets on the embroidery frame holder with your finger or the embroidery frame. Note z Be sure to attach the embroidery frame. Attaching the embroidery frame Wind the embroidery bobbin thread onto the a bobbin and set the embroidery frame into the bobbin case...inserted, the pattern may hit the embroidery frame, resulting in injury. After pressing the front mounting bracket onto the pin so that it into the embroidery frame holder. It may cause injury or needle breakage. Attaching the Embroidery Frame This section describes how to insert...
Users Manual - English
Page 50
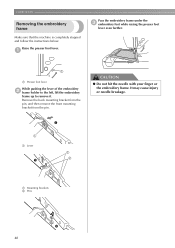
... or needle breakage. 1 a Lever 2 1 1 2 a Mounting brackets b Pins 3 48 EMBROIDERY Removing the embroidery frame Pass the embroidery frame under the c embroidery foot while raising the presser foot lever even further. a a a Presser foot lever While pushing the lever of the embroidery b frame holder to the left, lift the embroidery frame up to remove it. Make sure that the machine is...
... or needle breakage. 1 a Lever 2 1 1 2 a Mounting brackets b Pins 3 48 EMBROIDERY Removing the embroidery frame Pass the embroidery frame under the c embroidery foot while raising the presser foot lever even further. a a a Presser foot lever While pushing the lever of the embroidery b frame holder to the left, lift the embroidery frame up to remove it. Make sure that the machine is...
Users Manual - English
Page 52
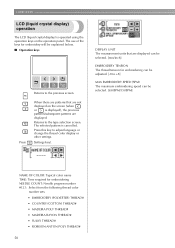
...NAME OF COLOR: Typical color name TIME: Time required for embroidery will be explained below. ■ Operation keys Press Returns to the previous screen. The use of the keys for embroidering NEEDLE COUNT: Needle progress number #123: Select from the following thread color ...number sets • EMBROIDERY (POLYESTER) THREAD# • COUNTRY (COTTON) THREAD# • MADEIRA POLY THREAD# • MADEIRA...
...NAME OF COLOR: Typical color name TIME: Time required for embroidery will be explained below. ■ Operation keys Press Returns to the previous screen. The use of the keys for embroidering NEEDLE COUNT: Needle progress number #123: Select from the following thread color ...number sets • EMBROIDERY (POLYESTER) THREAD# • COUNTRY (COTTON) THREAD# • MADEIRA POLY THREAD# • MADEIRA...


