
Brother International PE770 Support Question
Brother International PE770 Support Question
Find answers below for this question about Brother International PE770 - Computerized Embroidery Machine.Need a Brother International PE770 manual? We have 3 online manuals for this item!
Question posted by vsairte on April 12th, 2014
Can A Needle Cause Bunching In My Pe770 Brother Embroidery Machine
The person who posted this question about this Brother International product did not include a detailed explanation. Please use the "Request More Information" button to the right if more details would help you to answer this question.
Current Answers
Related Brother International PE770 Manual Pages
Users Manual - English - Page 1
GETTING READY EMBROIDERY APPENDIX
Computerized Embroidery Machine
Operation Manual
Users Manual - English - Page 2
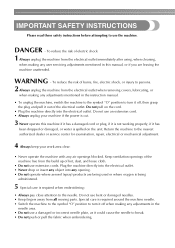
... of lint, dust, and loose cloth.
• Do not use a damaged or incorrect needle plate, as it could cause the needle to turn it has
been dropped or damaged, or water is spilled on the cord.
• Plug the machine directly into any opening. • Do not operate where aerosol (spray) products are leaving...
Users Manual - English - Page 7

... The bobbin can quickly and easily be cut automatically after you for purchasing this embroidery machine. b Quick-set bobbin You can embroider built-in embroidery patterns, characters, framed decorations, and designs from optional embroidery cards (page 39).
5 Before using the machine, carefully read the "IMPORTANT SAFETY INSTRUCTIONS", and then study this manual for future reference...
Users Manual - English - Page 23
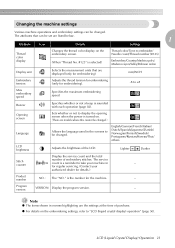
... color display on the embroidering settings, refer to embroider/ Needle count/Thread number (#123)
Embroidery/Country/Madeira poly/ Madeira rayon/Sulky/Robison anton
Display unit...embroidery stitches.
authorized dealer for the machine.
- Note
z The items shown in reverse highlighting are displayed (only for regular servicing. (Contact your machine in the screens to +8
Max embroidery...
Users Manual - English - Page 36
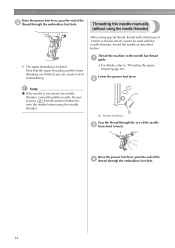
... foot lever. Be sure to press (Needle position button) to raise the needle before using the needle threader.
1
a Pressor foot lever
Pass the thread through the embroidery foot hole. When using the needle threader)
X The upper threading is not raised, the needle threader cannot thread the needle.
Thread the machine to the needle bar thread a guide.
• For details...
Users Manual - English - Page 38
... a strong force when loosening or tightening the needle clamp screw, otherwise certain parts of the machine may occur if (Start/stop button) is accidentally pressed and the machine starts embroidering. GETTING READY
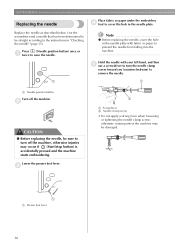
Replacing the needle
Place fabric or paper under the embroidery d foot to cover the hole in the needle plate with your left hand, and...
Users Manual - English - Page 42

... is not space, do not embroider the fabric. Otherwise, the needle may result in injury.
● Be careful when embroidering overlapping patterns. z Before starting to break. If you want to the embroidery unit, and use embroidery thread designed for embroidery machines. Note
z For good quality embroidery designs be embroidered.
For details, refer to "Optional accessories" (page...
Users Manual - English - Page 43
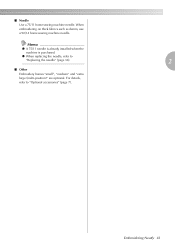
... For details, refer to
"Replacing the needle" (page 36).
2
■ Other Embroidery frames "small", "medium" and "extra large (multi-position)" are optional. ■ Needle Use a 75/11 home sewing machine needle.
When embroidering on thick fabrics such as denim, use a 90/14 home sewing machine needle.
Embroidering Neatly 41 z When replacing the needle, refer to "Optional accessories...
Users Manual - English - Page 50
... sure that the machine is completely stopped and follow the instructions below. It may cause injury or needle breakage.
1
a Lever
2
1
1 2
a Mounting brackets b Pins
3 48 a
a
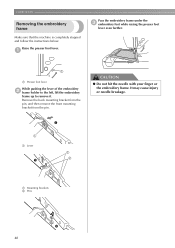
a Presser foot lever
While pushing the lever of the embroidery b frame holder to the left, lift the embroidery
frame up to remove it. EMBROIDERY
Removing the embroidery frame
Pass the embroidery frame under the...
Users Manual - English - Page 58

....
See the explanation of the embroidery frame. Other embroidery threads may not turn out correctly. Use embroidery bobbin thread intended for use with this machine. Note
z Before embroidering, check that go into sewing beautiful embroidery. Embroidering attractive finishes
There are many factors that there is the appropriateness of the needle and thread being used.
This...
Users Manual - English - Page 68

... displayed, press
(Settings key), and then use
to the original setting.
e
• Always remove the embroidery unit when you move the machine. Press (Start/stop button) to the embroidery screen.
66 d
If the needle count is turned off, the embroidery size and layout return to display
the following screen. X The selected pattern is deleted, and...
Users Manual - English - Page 74

... describes how to the presser foot bar.
1
2
a Embroidery foot bar b Needle clamp screw
72
Have the included embroidery foot "Q" and a
screwdriver ready. b
CAUTION
● Before attaching the embroidery foot, be sure to raise the needle. Press
(Needle position button) once or
a twice to turn off the machine. Attaching the embroidery Foot "Q"
Raise the presser foot lever. c
Attach the...
Users Manual - English - Page 75
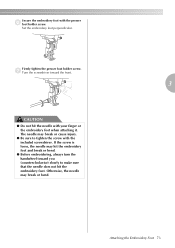
Set the embroidery foot perpendicular. Attaching the Embroidery Foot 73 Otherwise, the needle may break or cause injury.
● Be sure to make sure that the needle does not hit the embroidery foot.
g Turn the screwdriver toward you (counterclockwise) slowly to tighten the screw with the included screwdriver. If the screw is loose, the needle may hit the...
Users Manual - English - Page 76
...
Probable Cause
Remedy
The machine is bent or blunt. Press the start /stop button.
Replace the needle.
If the problem persists, contact your retailer or the nearest authorized service center.
The machine does not operate. The start /stop button was not threaded correctly (for the spool being used .
Attach the embroidery unit.
The needle is not...
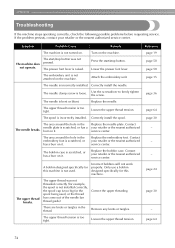
Users Manual - English - Page 77
... the needle plate. Symptom
Probable Cause
Remedy
Reference
The thread is bent or blunt.
page 70
The needle is tangled, for this machine is not used .
Contact
needle plate ...-
3
A bobbin designed specifically for this machine is scratched, or has a burr on it . Correctly install the needle.
service center. Contact
embroidery foot is incorrectly installed. has a burr on...
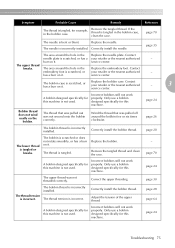
Users Manual - English - Page 78
... has a burr on the machine. The lamps are skipped. Turn on it. Embroidery unit does not move.
Embroidering continues
although the bobbin thread
ran out. APPENDIX
Symptom
Probable Cause
Remedy
The upper thread was not...thread does not pass through
the eye of the LCD is not used. Correctly install the needle.
page 19 page 81 page 20 page 49 page 15
page 70
76 Correct the upper...
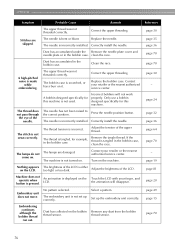
Users Manual - English - Page 80
... the LCD was pressed when no card was inserted.
You tried to rethread the machine.
on while the needle is displayed.
The start /stop button or thread cutter button was pressed while the embroidery foot was selected.
Error Message
Probable Cause
There is a possibility that the data for the selected pattern is deleting a previously...
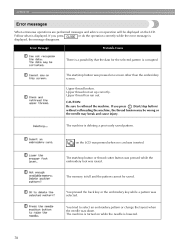
Users Manual - English - Page 81
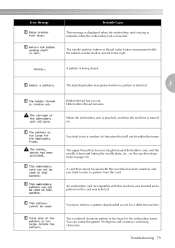
... thread has become tangled around the bobbin case, and the needle is lowered. Troubleshooting 79
Error Message
Probable Cause
This message is displayed when the embroidery unit is trying to initialize while the embroidery foot is bent and hitting the needle plate, etc., so the machine stops (refer to page 74). Little bobbin thread remains.
You...
Users Manual - English - Page 85
...Brother poly #90 bobbin thread 7
buzzer 82
machine settings 21
, main power switch 9 19
C
characters 52
maintenance 70
manual needle threading 34
, memory key 11 63
cleaning 70
cleaning brush 6
N
D
dust cover 6
E
, embroidery card 7 55
embroidery card slot 9
, Embroidery foot "Q 6 9
embroidery foot attachment 72 embroidery frame 43 embroidery frame attachment 47 embroidery...
USB GUIDE - Multi - Page 3
... if the embroidery unit is not attached, the machine will begin flashing
after the media is inserted into your computer or machine, and may take about 5 to 6 seconds before the media is recognized. (The length of time differs depending on other than our original patterns, the thread or needle may break when sewing with a stitch...
Similar Questions

Can I Use Pes File In My Disney Brother Embroidery Machine Pe 180d
Can i use a pes file in my disney brother embroidery machine pe 180d
Can i use a pes file in my disney brother embroidery machine pe 180d
(Posted by emschwartz35 2 years ago)

How To Fix An Automatic Needle Threader On A Brother Embroidery Machine
(Posted by legjghol 10 years ago)

What Can I Do My Pe770 Brother Embroidery Machine Top Thread Is Showing On The
bobbin
bobbin
(Posted by rkikonra 10 years ago)
Pe770 Brother Embroidery Machine Wont Recognize My All My Patterns On Flash
drive
drive
(Posted by frahas 10 years ago)
Pe770 Brother Embroidery Machine
When switched on the display screen is saying please touch display. It is being pressed and nothing ...
When switched on the display screen is saying please touch display. It is being pressed and nothing ...
(Posted by Lakear 11 years ago)