

Users Manual - English
Page 6
... out partway through a design...65 Stopping while embroidering ...66 Bobbin Case Adjustment 68 Correct tension...68 Bobbin thread is loose...68 Bobbin thread is tight ...68 APPENDIX 69 Care and Maintenance ...70 Cleaning the machine surface ...70 Cleaning the race ...70 Attaching the Embroidery Foot 72 Attaching the embroidery Foot "Q" ...72 Troubleshooting ...74 Error messages ...78 Adjusting the...
... out partway through a design...65 Stopping while embroidering ...66 Bobbin Case Adjustment 68 Correct tension...68 Bobbin thread is loose...68 Bobbin thread is tight ...68 APPENDIX 69 Care and Maintenance ...70 Cleaning the machine surface ...70 Cleaning the race ...70 Attaching the Embroidery Foot 72 Attaching the embroidery Foot "Q" ...72 Troubleshooting ...74 Error messages ...78 Adjusting the...

Users Manual - English
Page 7
... quickly and easily be wound with thread (page 24). In addition, after embroidering (page 51). c Automatic thread cutting The thread can quickly be cut automatically after you for the correct operation of the various functions. b Quick-set bobbin You can start embroiderying without pulling up the bobbin thread (page 28). Introduction Thank you have finished reading this embroidery machine.
... quickly and easily be wound with thread (page 24). In addition, after embroidering (page 51). c Automatic thread cutting The thread can quickly be cut automatically after you for the correct operation of the various functions. b Quick-set bobbin You can start embroiderying without pulling up the bobbin thread (page 28). Introduction Thank you have finished reading this embroidery machine.
Users Manual - English
Page 9
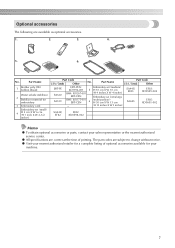
... Name Part Code U.S.A. / Canada Other EBT-PE SA520 SA519 EBT-PEN: Embroidery set (medium) XC5996-001 5 H 10 cm X W 10 cm BM4: X81267-001 (H 4 inches X W 4 inches) EBT-CEN Embroidery set (small) 4 H 2 cm X W 6 cm (H 1 inch...embroidery 3 Embroidery card Embroidery set (extra large BM3: X81175-001 EBT-CEN 6 (multi-position)) H 30 cm X W 13 cm - (H 12 inches X W 5 inches) SA443/ EF83 SA445 EF83: XD0599-002 EF85: XD0601-002 SA442/ EF82 EF82: XD0598-002 Memo z To obtain optional accessories or parts, contact your machine. 7 Part Name 1 Brother poly #90 bobbin thread...
... Name Part Code U.S.A. / Canada Other EBT-PE SA520 SA519 EBT-PEN: Embroidery set (medium) XC5996-001 5 H 10 cm X W 10 cm BM4: X81267-001 (H 4 inches X W 4 inches) EBT-CEN Embroidery set (small) 4 H 2 cm X W 6 cm (H 1 inch...embroidery 3 Embroidery card Embroidery set (extra large BM3: X81175-001 EBT-CEN 6 (multi-position)) H 30 cm X W 13 cm - (H 12 inches X W 5 inches) SA443/ EF83 SA445 EF83: XD0599-002 EF85: XD0601-002 SA442/ EF82 EF82: XD0598-002 Memo z To obtain optional accessories or parts, contact your machine. 7 Part Name 1 Brother poly #90 bobbin thread...

Users Manual - English
Page 10
... to place the spool of the machine and their functions are described below. d Bobbin winding thread guide Pass the thread around this thread guide when winding the bobbin thread. m Needle threader lever Use the needle threader lever to the machine, and then attach the embroidery frame. Before using the machine can be displayed (page 11). 8 h Embroidery unit connector slot Plug in...
... to place the spool of the machine and their functions are described below. d Bobbin winding thread guide Pass the thread around this thread guide when winding the bobbin thread. m Needle threader lever Use the needle threader lever to the machine, and then attach the embroidery frame. Before using the machine can be displayed (page 11). 8 h Embroidery unit connector slot Plug in...
Users Manual - English
Page 12
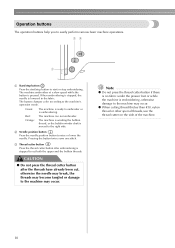
... needle is embroidering, otherwise damage to the right side. Green: The machine is ready to embroider or is moved to the machine may occur. Orange: The machine is winding the bobbin thread, or the bobbin winder shaft is embroidering. CAUTION ● Do not press the thread cutter button after embroidering is pressed. a Start/stop button Press the...
... needle is embroidering, otherwise damage to the right side. Green: The machine is ready to embroider or is moved to the machine may occur. Orange: The machine is winding the bobbin thread, or the bobbin winder shaft is embroidering. CAUTION ● Do not press the thread cutter button after embroidering is pressed. a Start/stop button Press the...
Users Manual - English
Page 13
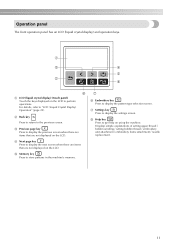
... panel The front operation panel has an LCD (liquid crystal display) and operation keys. g f Embroidery key Press to "LCD (Liquid Crystal Display) Operation" (page 20). For details, refer to display...machine's memory. e Memory key Press to display the previous screen when there are items that are not displayed on the LCD. a c d e b h f a LCD (liquid crystal display) (touch panel) Touch the keys displayed on using the machine. Displays simple explanations of setting upper thread / bobbin winding / setting bobbin thread / embroidery unit attachment / embroidery...
... panel The front operation panel has an LCD (liquid crystal display) and operation keys. g f Embroidery key Press to "LCD (Liquid Crystal Display) Operation" (page 20). For details, refer to display...machine's memory. e Memory key Press to display the previous screen when there are items that are not displayed on the LCD. a c d e b h f a LCD (liquid crystal display) (touch panel) Touch the keys displayed on using the machine. Displays simple explanations of setting upper thread / bobbin winding / setting bobbin thread / embroidery unit attachment / embroidery...

Users Manual - English
Page 16
...embroidery pattern. For details, refer to "Upper Threading" (page 30). 14 GETTING READY Embroidery Step by Step The basic steps for embroidery are as follows. 1 Attaching the embroidery unit Attach the embroidery unit. (If the embroidery unit is not attached, the machine ...page 36). ↓ 3 Setting up the embroidery thread according to the embroidery unit. For details on adjusting the layout, refer to "Adjusting the layout" (page 61). ↓ 8 Setting up the embroidery Set up the bobbin thread For the bobbin thread, wind embroidery bobbin thread and set it in place.
...embroidery pattern. For details, refer to "Upper Threading" (page 30). 14 GETTING READY Embroidery Step by Step The basic steps for embroidery are as follows. 1 Attaching the embroidery unit Attach the embroidery unit. (If the embroidery unit is not attached, the machine ...page 36). ↓ 3 Setting up the embroidery thread according to the embroidery unit. For details on adjusting the layout, refer to "Adjusting the layout" (page 61). ↓ 8 Setting up the embroidery Set up the bobbin thread For the bobbin thread, wind embroidery bobbin thread and set it in place.
Users Manual - English
Page 25
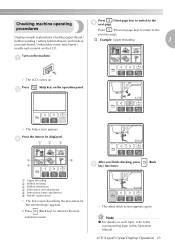
.... X The initial stitch screen appears again. a X The LCD comes on the machine. a Upper threading b Bobbin winding c Bobbin installation d Embroidery unit attachment e Embroidery frame attachment f Needle replacement X The first screen describing the procedure for the selected ...Display) Operation 23 Checking machine operating Press (Next page key) to switch to the previous page. Displays simple explanations of setting upper thread / bobbin winding / setting bobbin thread / embroidery † Example: Upper threading 1 unit attachment / embroidery frame attachment / needle...
.... X The initial stitch screen appears again. a X The LCD comes on the machine. a Upper threading b Bobbin winding c Bobbin installation d Embroidery unit attachment e Embroidery frame attachment f Needle replacement X The first screen describing the procedure for the selected ...Display) Operation 23 Checking machine operating Press (Next page key) to switch to the previous page. Displays simple explanations of setting upper thread / bobbin winding / setting bobbin thread / embroidery † Example: Upper threading 1 unit attachment / embroidery frame attachment / needle...
Users Manual - English
Page 26
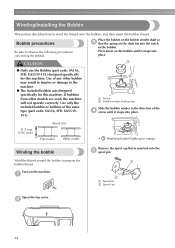
... Other model • (Start/stop button) lights up in the direction of any other models are used, the machine will not operate correctly. Bobbin precautions Be sure to prepare the bobbin thread. CAUTION Place the bobbin on the bobbin winder shaft so c that is inserted onto the e spool pin. 1 2 a Spool pin b Spool cap Open the top...
... Other model • (Start/stop button) lights up in the direction of any other models are used, the machine will not operate correctly. Bobbin precautions Be sure to prepare the bobbin thread. CAUTION Place the bobbin on the bobbin winder shaft so c that is inserted onto the e spool pin. 1 2 a Spool pin b Spool cap Open the top...
Users Manual - English
Page 29
... then close the top cover. CAUTION ● When the bobbin winding becomes slow, stop the machine, otherwise the machine may bend or break when the bobbin thread starts to run out. Press (Start/stop the machine. If the bobbin is not a malfunction. 1 a Start/stop button • When the bobbin winding becomes slow, press (Start/stop button) once to...
... then close the top cover. CAUTION ● When the bobbin winding becomes slow, stop the machine, otherwise the machine may bend or break when the bobbin thread starts to run out. Press (Start/stop the machine. If the bobbin is not a malfunction. 1 a Start/stop button • When the bobbin winding becomes slow, press (Start/stop button) once to...
Users Manual - English
Page 30
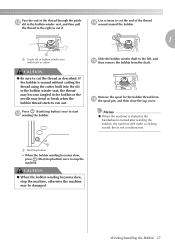
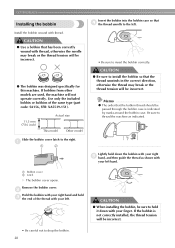
... with your left hand. a Bobbin cover b Latch X The bobbin cover opens. CAUTION ● Use a bobbin that the bobbin thread should be passed through the bobbin case is not correctly installed, the thread tension will be incorrect. If the bobbin is indicated by marks around the bobbin case. If bobbins from other models are used, the machine will be incorrect. ● The...
... with your left hand. a Bobbin cover b Latch X The bobbin cover opens. CAUTION ● Use a bobbin that the bobbin thread should be passed through the bobbin case is not correctly installed, the thread tension will be incorrect. If the bobbin is indicated by marks around the bobbin case. If bobbins from other models are used, the machine will be incorrect. ● The...
Users Manual - English
Page 31
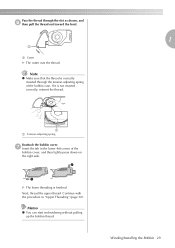
... embroidering without pulling up the bobbin thread. Note z Make sure that the thread is not inserted correctly, reinsert the thread. 1 a Tension-adjusting spring Reattach the bobbin cover. If it is correctly inserted through the slot as shown, and f then pull the thread out toward the front. 1 1 a Cutter X The cutter cuts the thread. g Insert the tab in "Upper...
... embroidering without pulling up the bobbin thread. Note z Make sure that the thread is not inserted correctly, reinsert the thread. 1 a Tension-adjusting spring Reattach the bobbin cover. If it is correctly inserted through the slot as shown, and f then pull the thread out toward the front. 1 1 a Cutter X The cutter cuts the thread. g Insert the tab in "Upper...
Users Manual - English
Page 41
... 54 Using an embroidery card (sold separately 55 Embroidering 56 Embroidering attractive finishes .....56 Embroidering a pattern 57 Appliquéing 59 Editing and Saving Patterns 61 Adjusting the layout 61 Storing patterns 63 Adjusting the thread tension...........64 Resewing 65 Thread runs out partway through a design 65 Stopping while embroidering .........66 Bobbin Case Adjustment...
... 54 Using an embroidery card (sold separately 55 Embroidering 56 Embroidering attractive finishes .....56 Embroidering a pattern 57 Appliquéing 59 Editing and Saving Patterns 61 Adjusting the layout 61 Storing patterns 63 Adjusting the thread tension...........64 Resewing 65 Thread runs out partway through a design 65 Stopping while embroidering .........66 Bobbin Case Adjustment...

Users Manual - English
Page 42
... are too thick. If there is enough bobbin thread. EMBROIDERY Embroidering Neatly This section describes the preparations and basic procedures for embroidery machines. To check the fabric thickness, attach the embroidery frame to the embroidery unit, and use (Needle position button) to "Optional accessories" (page 7). ■ Embroidery thread For the upper thread, use embroidery thread designed for embroidering. For details, refer to...
... are too thick. If there is enough bobbin thread. EMBROIDERY Embroidering Neatly This section describes the preparations and basic procedures for embroidery machines. To check the fabric thickness, attach the embroidery frame to the embroidery unit, and use (Needle position button) to "Optional accessories" (page 7). ■ Embroidery thread For the upper thread, use embroidery thread designed for embroidering. For details, refer to...
Users Manual - English
Page 49
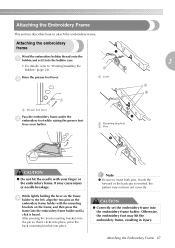
...embroidery frame Wind the embroidery bobbin thread onto the a bobbin and set the embroidery frame into the embroidery frame holder until a click is inserted, the pattern may not turn out correctly. While lightly holding the lever on the frame d holder to "Winding/Installing the Bobbin" (page 24). Otherwise, the embroidery foot may cause injury or needle breakage. Attaching the Embroidery... Frame 47 Attaching the Embroidery Frame This section ...
...embroidery frame Wind the embroidery bobbin thread onto the a bobbin and set the embroidery frame into the embroidery frame holder until a click is inserted, the pattern may not turn out correctly. While lightly holding the lever on the frame d holder to "Winding/Installing the Bobbin" (page 24). Otherwise, the embroidery foot may cause injury or needle breakage. Attaching the Embroidery... Frame 47 Attaching the Embroidery Frame This section ...

Users Manual - English
Page 58
... not turn out correctly. EMBROIDERY Embroidering After the preparations are two important factors mentioned earlier. Embroidering attractive finishes There are many factors that there is the appropriateness of threads below. Thread Upper thread Bobbin thread Use embroidery thread, or country embroidery thread intended for embroidering and appliquéing. If you can try embroidering. Use embroidery bobbin thread intended for use with this machine.
... not turn out correctly. EMBROIDERY Embroidering After the preparations are two important factors mentioned earlier. Embroidering attractive finishes There are many factors that there is the appropriateness of threads below. Thread Upper thread Bobbin thread Use embroidery thread, or country embroidery thread intended for embroidering and appliquéing. If you can try embroidering. Use embroidery bobbin thread intended for use with this machine.
Users Manual - English
Page 67
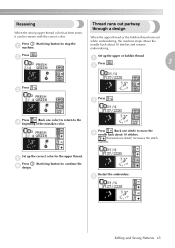
... or bobbin thread. Restart the embroidery. b Set up the correct color for the upper thread. Resewing When the wrong upper thread color has been sewn, it can be resewn with the correct color. c Press . e Editing and Saving Patterns 65 Thread runs out partway through a design When the upper thread or the bobbin thread runs out while embroidering, the machine stops...
... or bobbin thread. Restart the embroidery. b Set up the correct color for the upper thread. Resewing When the wrong upper thread color has been sewn, it can be resewn with the correct color. c Press . e Editing and Saving Patterns 65 Thread runs out partway through a design When the upper thread or the bobbin thread runs out while embroidering, the machine stops...
Users Manual - English
Page 70
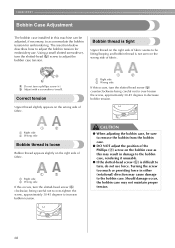
...; If the slotted-head screw (b) is tight Upper thread on the bobbin case as this machine can be adjusted, if necessary, to remove the bobbin from the bobbin case. ● DO NOT adjust the position of fabric. Bobbin thread is difficult to turn, do not use . EMBROIDERY Bobbin Case Adjustment The bobbin case installed in either (rotational) direction may cause...
...; If the slotted-head screw (b) is tight Upper thread on the bobbin case as this machine can be adjusted, if necessary, to remove the bobbin from the bobbin case. ● DO NOT adjust the position of fabric. Bobbin thread is difficult to turn, do not use . EMBROIDERY Bobbin Case Adjustment The bobbin case installed in either (rotational) direction may cause...
Users Manual - English
Page 73
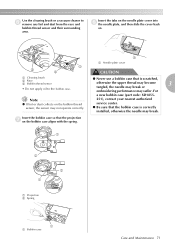
... • Do not apply oil to f remove any lint and dust from the race and bobbin thread sensor and their surrounding area. a b 2 1 a Projection b Spring 1 a Bobbin case Care and Maintenance 71 Note ! Insert the bobbin case so that the projection g on . Insert the tabs on the needle plate cover into h the needle plate, and then...
... • Do not apply oil to f remove any lint and dust from the race and bobbin thread sensor and their surrounding area. a b 2 1 a Projection b Spring 1 a Bobbin case Care and Maintenance 71 Note ! Insert the bobbin case so that the projection g on . Insert the tabs on the needle plate cover into h the needle plate, and then...
Users Manual - English
Page 77
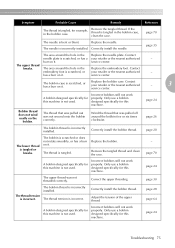
... nearest authorized - Correct the upper threading. The upper thread breaks. Contact embroidery foot is incorrect. Only use a bobbin designed specifically for this machine. service center. The thread that was not threaded correctly. page 26 The bobbin thread is not used . page 28 page 64 A bobbin designed specifically for this machine. Incorrect bobbins will not work properly. Only use a bobbin designed specifically for this...
... nearest authorized - Correct the upper threading. The upper thread breaks. Contact embroidery foot is incorrect. Only use a bobbin designed specifically for this machine. service center. The thread that was not threaded correctly. page 26 The bobbin thread is not used . page 28 page 64 A bobbin designed specifically for this machine. Incorrect bobbins will not work properly. Only use a bobbin designed specifically for this...


