
Accessory Catalog
Page 4
... opening on the edge of zipper/piping, avoiding the non-flat parts of zipper/piping, and presses the fabric with a screwdriver. 5. Requires Low Shank Adapter for ULT series, PC-6500, PC-8200 and PC-8500 sewing machines. Adjustable Zipper & Piping Foot Brother General Sewing Accessories 06 Adjustable Zipper & Piping Foot Attaches zippers...
... opening on the edge of zipper/piping, avoiding the non-flat parts of zipper/piping, and presses the fabric with a screwdriver. 5. Requires Low Shank Adapter for ULT series, PC-6500, PC-8200 and PC-8500 sewing machines. Adjustable Zipper & Piping Foot Brother General Sewing Accessories 06 Adjustable Zipper & Piping Foot Attaches zippers...

Accessory Catalog
Page 6
...stitches, making sure the fabric is Project Book (See page 50 for details.) www.brother.com Attach the presser foot. 3. Hold the fabric from the back and front and roll it into the curled part of the foot. 5. Continue to sew to the end of the fabric. Position ... edge and sew 2-3 stitches. 3. Sew along the guide. Brother General Sewing Accessories 09 Narrow Hemmer Foot Non Stick Foot Overlock Foot Picot Foot Brother General Sewing Accessories 10 SA126 ABCDEFJKMN SA127 GHILOP Skirt Innov-is rolling around the curled part of the foot. 7. Slowly sew 2-3 stitches, making sure ...
...stitches, making sure the fabric is Project Book (See page 50 for details.) www.brother.com Attach the presser foot. 3. Hold the fabric from the back and front and roll it into the curled part of the foot. 5. Continue to sew to the end of the fabric. Position ... edge and sew 2-3 stitches. 3. Sew along the guide. Brother General Sewing Accessories 09 Narrow Hemmer Foot Non Stick Foot Overlock Foot Picot Foot Brother General Sewing Accessories 10 SA126 ABCDEFJKMN SA127 GHILOP Skirt Innov-is rolling around the curled part of the foot. 7. Slowly sew 2-3 stitches, making sure ...
Users Manual - English
Page 2
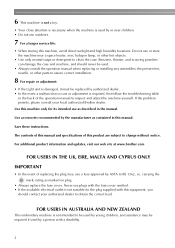
... any opening. • Do not operate where aerosol (spray) products are leaving the machine unattended. Keep ventilation openings of the machine free from all moving parts. Do not pull on the unit. Do not use bent or damaged needles. • Keep fingers away from the build up of lint, dust, and...
... any opening. • Do not operate where aerosol (spray) products are leaving the machine unattended. Keep ventilation openings of the machine free from all moving parts. Do not pull on the unit. Do not use bent or damaged needles. • Keep fingers away from the build up of lint, dust, and...
Users Manual - English
Page 3
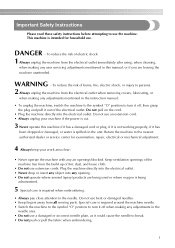
...troubleshooting table in the manual. Use this manual. Benzene, thinner, and scouring powders can damage the case and machine, and should contact your local authorized Brother dealer. Save these instructions. 6 This machine is not a toy: • Your close attention is necessary when the machine is used by or ...near a space heater, iron, halogen lamp, or other parts to assure correct installation. 8 For repair or adjustment: • If the Light unit is damaged, it must be required if used by a person...
...troubleshooting table in the manual. Use this manual. Benzene, thinner, and scouring powders can damage the case and machine, and should contact your local authorized Brother dealer. Save these instructions. 6 This machine is not a toy: • Your close attention is necessary when the machine is used by or ...near a space heater, iron, halogen lamp, or other parts to assure correct installation. 8 For repair or adjustment: • If the Light unit is damaged, it must be required if used by a person...
Users Manual - English
Page 4
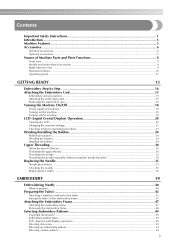
Contents Important Safety Instructions 1 Introduction ...5 Machine Features ...5 Accessories...6 Included accessories ...6 Optional accessories ...7 Names of Machine Parts and Their Functions 8 Front view ...8 Needle and embroidery foot section ...9 Right-side/rear view ...9 Operation buttons ...10 Operation panel ...11 GETTING READY 13 Embroidery Step ...
Contents Important Safety Instructions 1 Introduction ...5 Machine Features ...5 Accessories...6 Included accessories ...6 Optional accessories ...7 Names of Machine Parts and Their Functions 8 Front view ...8 Needle and embroidery foot section ...9 Right-side/rear view ...9 Operation buttons ...10 Operation panel ...11 GETTING READY 13 Embroidery Step ...
Users Manual - English
Page 7
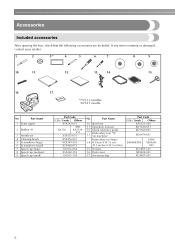
...(on machine) Embroidery set 4 Cleaning brush 5 Screwdriver (large) 6 Screwdriver (small) 7 Spool cap (large) 8 Spool cap (medium) 9 Spool cap (small) Part Code U.S.A. / Canada Others X54243-051 SA156 SFB: XA5539- 151 X59535-051 X59476-051 XC8349-051 X55468-051 130012-054 X55260-153 130013-154 No... 3 Needle set (large) 14 H 18cm X W 13 cm (H 7 inches X W 5 inches) 15 Scissors 16 Dust cover 17 Accessory bag Part Code U.S.A. / Canada Others XA5523-050 XD1628-051 XD1629-051 XD0474-051 SA444/EF84 EF84: XD0600- 002 XC1807-121 XZ5004-021 XC4487-051 6 Accessories Included...
...(on machine) Embroidery set 4 Cleaning brush 5 Screwdriver (large) 6 Screwdriver (small) 7 Spool cap (large) 8 Spool cap (medium) 9 Spool cap (small) Part Code U.S.A. / Canada Others X54243-051 SA156 SFB: XA5539- 151 X59535-051 X59476-051 XC8349-051 X55468-051 130012-054 X55260-153 130013-154 No... 3 Needle set (large) 14 H 18cm X W 13 cm (H 7 inches X W 5 inches) 15 Scissors 16 Dust cover 17 Accessory bag Part Code U.S.A. / Canada Others XA5523-050 XD1628-051 XD1629-051 XD0474-051 SA444/EF84 EF84: XD0600- 002 XC1807-121 XZ5004-021 XC4487-051 6 Accessories Included...
Users Manual - English
Page 8
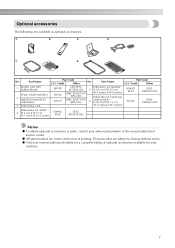
z All specifications are available as optional accessories. 1. 2. 3. 4. 5. 6. Part Name Part Code U.S.A. / Canada Other EBT-PE SA520 SA519 EBT-PEN: Embroidery set (medium) XC5996-001 5 H 10 cm X W 10 cm BM4: X81267-001 (H 4 inches X W 4... printing. Optional accessories The following are correct at the time of optional accessories available for embroidery 3 Embroidery card Part Code U.S.A. / Canada Other No. Part Name 1 Brother poly #90 bobbin thread Water solude stabilizer 2 Stabilizer material for your sales representative or the nearest authorized service ...
z All specifications are available as optional accessories. 1. 2. 3. 4. 5. 6. Part Name Part Code U.S.A. / Canada Other EBT-PE SA520 SA519 EBT-PEN: Embroidery set (medium) XC5996-001 5 H 10 cm X W 10 cm BM4: X81267-001 (H 4 inches X W 4... printing. Optional accessories The following are correct at the time of optional accessories available for embroidery 3 Embroidery card Part Code U.S.A. / Canada Other No. Part Name 1 Brother poly #90 bobbin thread Water solude stabilizer 2 Stabilizer material for your sales representative or the nearest authorized service ...

Users Manual - English
Page 9
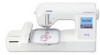
...and lower the presser foot lever to raise and lower the presser foot j Operation buttons Use these descriptions to learn the names of the machine parts. k Embroidery unit Attach the embroidery unit to operate the machine. b Thread guide cover Like with the thread guide plate, pass the thread ...using the machine, carefully read these buttons to the machine, and then attach the embroidery frame. Names of Machine Parts and Their Functions The names of the various parts of thread on the spool pin. Before using the machine can be selected and edited, and operations for the embroidery...
...and lower the presser foot lever to raise and lower the presser foot j Operation buttons Use these descriptions to learn the names of the machine parts. k Embroidery unit Attach the embroidery unit to operate the machine. b Thread guide cover Like with the thread guide plate, pass the thread ...using the machine, carefully read these buttons to the machine, and then attach the embroidery frame. Names of Machine Parts and Their Functions The names of the various parts of thread on the spool pin. Before using the machine can be selected and edited, and operations for the embroidery...

Users Manual - English
Page 25
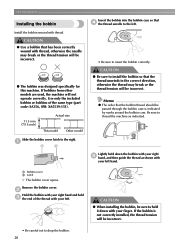
CAUTION 1 ● Only use the Bobbin (part code: SA156, SFB: XA5539-151) designed specifically for this machine. Winding the bobbin Wind the thread around the bobbin to wind the thread onto the ... Open the top cover. If bobbins from other bobbin may result in the bobbin. Use only the included bobbin or bobbins of the same type (part code: SA156, SFB: XA5539151). 2 a Notch b Bobbin winder shaft spring Slide the bobbin winder in the direction of any other models are used, the machine will...
CAUTION 1 ● Only use the Bobbin (part code: SA156, SFB: XA5539-151) designed specifically for this machine. Winding the bobbin Wind the thread around the bobbin to wind the thread onto the ... Open the top cover. If bobbins from other bobbin may result in the bobbin. Use only the included bobbin or bobbins of the same type (part code: SA156, SFB: XA5539151). 2 a Notch b Bobbin winder shaft spring Slide the bobbin winder in the direction of any other models are used, the machine will...
Users Manual - English
Page 29
... the bobbin case. Be sure to drop the bobbin. 28 a 1 2 Lightly hold down with your right hand and hold c the end of the same type (part code: SA156, SFB: XA5539-151). 11.5 mm (7/16 inch) Actual size This model Other model • Be sure to hold it down the bobbin with...
... the bobbin case. Be sure to drop the bobbin. 28 a 1 2 Lightly hold down with your right hand and hold c the end of the same type (part code: SA156, SFB: XA5539-151). 11.5 mm (7/16 inch) Actual size This model Other model • Be sure to hold it down the bobbin with...

Users Manual - English
Page 37
... the needle as described below. c 2 a Screwdriver b Needle clamp screw • Do not apply a strong force when loosening or tightening the needle clamp screw, otherwise certain parts of the machine may occur if (Start/stop button) is accidentally pressed and the machine starts embroidering. Use the screwdriver and a needle that has been...
... the needle as described below. c 2 a Screwdriver b Needle clamp screw • Do not apply a strong force when loosening or tightening the needle clamp screw, otherwise certain parts of the machine may occur if (Start/stop button) is accidentally pressed and the machine starts embroidering. Use the screwdriver and a needle that has been...

Users Manual - English
Page 58
.... Embroidering a pattern † Example: Embroidery thread number selected Embroidery patterns are embroidered with a change the setting in design c Current name of color d Current color part e Next color part • The thread color number set displayed for the thread colors can be used for embroidering b Current color step/Number of colors in the...
.... Embroidering a pattern † Example: Embroidery thread number selected Embroidery patterns are embroidered with a change the setting in design c Current name of color d Current color part e Next color part • The thread color number set displayed for the thread colors can be used for embroidering b Current color step/Number of colors in the...

Users Manual - English
Page 63
... available embroidery frames and use , the presser foot may break or bend. ● When you have to turn the power back on in the lower part of screen when you change the size and position, you can embroider with the pattern position. • Press (Back key) to return to the position...
... available embroidery frames and use , the presser foot may break or bend. ● When you have to turn the power back on in the lower part of screen when you change the size and position, you can embroider with the pattern position. • Press (Back key) to return to the position...

Users Manual - English
Page 72
... the bobbin case is scratched, otherwise the upper thread may become 3 tangled, the needle may break or embroidering performance may break. For a new bobbin case (part code: XC8167- a c b a Needle plate cover a CAUTION a Cleaning brush b Race c Bobbin thread sensor • Do not apply oil to f remove any lint and dust from the...
... the bobbin case is scratched, otherwise the upper thread may become 3 tangled, the needle may break or embroidering performance may break. For a new bobbin case (part code: XC8167- a c b a Needle plate cover a CAUTION a Cleaning brush b Race c Bobbin thread sensor • Do not apply oil to f remove any lint and dust from the...


