Users Manual - English
Page 9
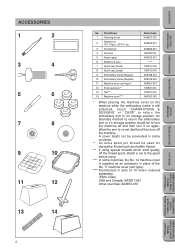
.../11 3pcs., 90/14 1 pc. 3 Screwdriver 4 Scissors 5 Seam ripper 6 Bobbins (4 pcs) 7 Spool cap (Small) 8 Spool cap (Large) 9 Embroidery sheet (Regular) 10 Embroidery frame (Regular) 11 Machine cover (soft type)* 12 Extra spool pin** 13 Net*** 14 Machine cover**** Parts Code XA4527-001 X59535-001 X53666-001...before using. **** In some countries, the No. 14 machine cover is still attached, touch "CHARACTERS & DESIGNS" or "CARD" to return the embroidery arm to it's storage position. A cover might not be provieded in sets of the No. 11 machine cover (soft type). ***** Distributed in ...
.../11 3pcs., 90/14 1 pc. 3 Screwdriver 4 Scissors 5 Seam ripper 6 Bobbins (4 pcs) 7 Spool cap (Small) 8 Spool cap (Large) 9 Embroidery sheet (Regular) 10 Embroidery frame (Regular) 11 Machine cover (soft type)* 12 Extra spool pin** 13 Net*** 14 Machine cover**** Parts Code XA4527-001 X59535-001 X53666-001...before using. **** In some countries, the No. 14 machine cover is still attached, touch "CHARACTERS & DESIGNS" or "CARD" to return the embroidery arm to it's storage position. A cover might not be provieded in sets of the No. 11 machine cover (soft type). ***** Distributed in ...
Users Manual - English
Page 23
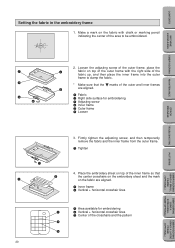
... the inner frame from the outer frame. 1 Tighten 4. CONTENTS MACHINE KNOWLEDGE EMBROIDERING MAINTENANCE ERROR MESSAGE TROUBLESHOOTING Setting the fabric in the embroidery frame 1. Place the embroidery sheet on top of the inner frame so that the ᮢ marks of the outer and inner frames are aligned. 1 Inner frame... Vertical + horizontal crosshair lines 3 Center of the area to clamp the fabric. * Make sure that the center crosshairs on the embroidery sheet and the mark on top of the outer frame with chalk or marking pencil indicating the center of the crosshairs and the pattern 20 ...
... the inner frame from the outer frame. 1 Tighten 4. CONTENTS MACHINE KNOWLEDGE EMBROIDERING MAINTENANCE ERROR MESSAGE TROUBLESHOOTING Setting the fabric in the embroidery frame 1. Place the embroidery sheet on top of the inner frame so that the ᮢ marks of the outer and inner frames are aligned. 1 Inner frame... Vertical + horizontal crosshair lines 3 Center of the area to clamp the fabric. * Make sure that the center crosshairs on the embroidery sheet and the mark on top of the outer frame with chalk or marking pencil indicating the center of the crosshairs and the pattern 20 ...
Users Manual - English
Page 24
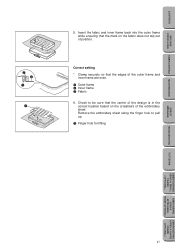
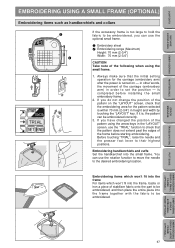
... USING A SMALL FRAME (OPTIONAL) EMBROIDERING USING A EXTRA-SMALL FRAME (OPTIONAL) EMBROIDERING USING A LARGE FRAME (OPTIONAL) CONTENTS MACHINE KNOWLEDGE EMBROIDERING MAINTENANCE ERROR MESSAGE TROUBLESHOOTING 5. Remove the embroidery sheet using the finger hole to be sure that the mark on the crosshairs of the outer frame and inner frame are even. 1 Outer frame 2 Inner...
... USING A SMALL FRAME (OPTIONAL) EMBROIDERING USING A EXTRA-SMALL FRAME (OPTIONAL) EMBROIDERING USING A LARGE FRAME (OPTIONAL) CONTENTS MACHINE KNOWLEDGE EMBROIDERING MAINTENANCE ERROR MESSAGE TROUBLESHOOTING 5. Remove the embroidery sheet using the finger hole to be sure that the mark on the crosshairs of the outer frame and inner frame are even. 1 Outer frame 2 Inner...

Users Manual - English
Page 42
... OPERATION" key 1 If you touch "THREAD COLOR", the color names (reference) of the different threads to be used with some of each color embroidery. The color names will then be displayed. * If you touch "THREAD COLOR" once more, the display will then be calculated and displayed. The... then be displayed in such cases the time displayed may be somewhat different from the time given on the pattern sheet for that memory card. 1. CONTENTS MACHINE KNOWLEDGE EMBROIDERING MAINTENANCE Displaying the embroidery time for one -point patterns 1 1 "BASIC OPERATION" key 1 2 3 4 If you would like to...
... OPERATION" key 1 If you touch "THREAD COLOR", the color names (reference) of the different threads to be used with some of each color embroidery. The color names will then be displayed. * If you touch "THREAD COLOR" once more, the display will then be calculated and displayed. The... then be displayed in such cases the time displayed may be somewhat different from the time given on the pattern sheet for that memory card. 1. CONTENTS MACHINE KNOWLEDGE EMBROIDERING MAINTENANCE Displaying the embroidery time for one -point patterns 1 1 "BASIC OPERATION" key 1 2 3 4 If you would like to...
Users Manual - English
Page 70
... before starting embroidering. If you do not change the position of the pattern on - If you have changed the position of the carriage (embroidery arm) in height and width by touching the "LAYOUT" key. Before touching "TRIAL", raise the needle and the presser foot lever to ... is within 70 mm (2-3/4") in order to set the position - in other words, the movement of the pattern using the small frame. 1. ABC 1 Embroidery sheet 2 Embroidering range (Maximum) Height: 70 mm (2-3/4") Width: 70 mm (2-3/4") CAUTION Take note of the following when using the arrow keys in the "LAYOUT...
... before starting embroidering. If you do not change the position of the pattern on - If you have changed the position of the carriage (embroidery arm) in height and width by touching the "LAYOUT" key. Before touching "TRIAL", raise the needle and the presser foot lever to ... is within 70 mm (2-3/4") in order to set the position - in other words, the movement of the pattern using the small frame. 1. ABC 1 Embroidery sheet 2 Embroidering range (Maximum) Height: 70 mm (2-3/4") Width: 70 mm (2-3/4") CAUTION Take note of the following when using the arrow keys in the "LAYOUT...

Users Manual - English
Page 71
...operation for monogramming initials on - It is used mostly for the carriage (embroidery arm) after the power is attached horizontally. 1 Frame fixing plate 2 Screws (x 2) 3 Washers (x 2) 4 Nuts (x 2) 5 Embroidery sheet (horizontal type) 6 Embroidery range 7 Maximum embroidering area - Width : 30 mm (1-3/16") 5... Center of pattern CAUTION Take note of the carriage (embroidery arm) in order to embroider even smaller articles. 1 Embroidery sheet (vertical type) 2 Embroidery range 3 Maximum embroidering area - is also available as an option. Always make sure ...
...operation for monogramming initials on - It is used mostly for the carriage (embroidery arm) after the power is attached horizontally. 1 Frame fixing plate 2 Screws (x 2) 3 Washers (x 2) 4 Nuts (x 2) 5 Embroidery sheet (horizontal type) 6 Embroidery range 7 Maximum embroidering area - Width : 30 mm (1-3/16") 5... Center of pattern CAUTION Take note of the carriage (embroidery arm) in order to embroider even smaller articles. 1 Embroidery sheet (vertical type) 2 Embroidery range 3 Maximum embroidering area - is also available as an option. Always make sure ...

Users Manual - English
Page 73
...re-set the current needle position as the embroidery start position 3. Mark the embroidery start position with a line on the fabric with a cross by touching "LAYOUT". Align the line on the ABC embroidery sheet, and fit the fabric and embroidery sheet into two even lengths. Then touch "...START/CENTER" to embroider continuously by drawing another line across this line. 1 Embroidery start position. 70 Check the lengths of the pattern,...
...re-set the current needle position as the embroidery start position 3. Mark the embroidery start position with a line on the fabric with a cross by touching "LAYOUT". Align the line on the ABC embroidery sheet, and fit the fabric and embroidery sheet into two even lengths. Then touch "...START/CENTER" to embroider continuously by drawing another line across this line. 1 Embroidery start position. 70 Check the lengths of the pattern,...

Owner's Manual (Español) - Spanish
Page 9
...14 1 pc. 3 Screwdriver 4 Scissors 5 Seam ripper 6 Bobbins (4 pcs) 7 Spool cap (Small) 8 Spool cap (Large) 9 Embroidery sheet (Regular) 10 Embroidery frame (Regular) 11 Machine cover (soft type)* 12 Extra spool pin** 13 Net*** 14 Machine cover**** Parts Code XA4527-001 X59535-001 ... EMBROIDERING USING A SMALL FRAME (OPTIONAL) PATTERNS TROUBLESHOOTING ERROR MESSAGE EMBROIDERING MAINTENANCE MACHINE KNOWLEDGE CONTENTS An alternate method to return the embroidery arm to it's storage position would be used for decorative thread such as metallic thread. *** If using . **** In...
...14 1 pc. 3 Screwdriver 4 Scissors 5 Seam ripper 6 Bobbins (4 pcs) 7 Spool cap (Small) 8 Spool cap (Large) 9 Embroidery sheet (Regular) 10 Embroidery frame (Regular) 11 Machine cover (soft type)* 12 Extra spool pin** 13 Net*** 14 Machine cover**** Parts Code XA4527-001 X59535-001 ... EMBROIDERING USING A SMALL FRAME (OPTIONAL) PATTERNS TROUBLESHOOTING ERROR MESSAGE EMBROIDERING MAINTENANCE MACHINE KNOWLEDGE CONTENTS An alternate method to return the embroidery arm to it's storage position would be used for decorative thread such as metallic thread. *** If using . **** In...

Owner's Manual (Español) - Spanish
Page 23
...1 Area available for embroidering 2 Vertical + horizontal crosshair lines 3 Center of the inner frame so that the center crosshairs on the embroidery sheet and the mark on the fabric are aligned. 1 Fabric 2 Right side surface for embroidering 3 Adjusting screw 4 Inner frame 5 Outer frame 6 Loosen... 3. Place the embroidery sheet on top of the crosshairs and the pattern 20 PATTERNS EMBROIDERING USING A SMALL FRAME (OPTIONAL) EMBROIDERING USING A EXTRA-SMALL FRAME (OPTIONAL)...
...1 Area available for embroidering 2 Vertical + horizontal crosshair lines 3 Center of the inner frame so that the center crosshairs on the embroidery sheet and the mark on the fabric are aligned. 1 Fabric 2 Right side surface for embroidering 3 Adjusting screw 4 Inner frame 5 Outer frame 6 Loosen... 3. Place the embroidery sheet on top of the crosshairs and the pattern 20 PATTERNS EMBROIDERING USING A SMALL FRAME (OPTIONAL) EMBROIDERING USING A EXTRA-SMALL FRAME (OPTIONAL)...

Owner's Manual (Español) - Spanish
Page 24
... into the outer frame while ensuring that the edges of the outer frame and inner frame are even. 1 Outer frame 2 Inner frame 3 Fabric 6. Remove the embroidery sheet using the finger hole to be sure that the center of the design is in the correct location based on the fabric does not slip...
... into the outer frame while ensuring that the edges of the outer frame and inner frame are even. 1 Outer frame 2 Inner frame 3 Fabric 6. Remove the embroidery sheet using the finger hole to be sure that the center of the design is in the correct location based on the fabric does not slip...

Owner's Manual (Español) - Spanish
Page 42
...COLOR" key 2. The color names will then be calculated and displayed. The time taken to change at the end of the patterns on the pattern sheet for one -point patterns 1 1 "BASIC OPERATION" key 1 2 3 4 If you touch "THREAD COLOR", the color names (reference) of ... required will change the threads is not displayed on the display. 3 Remaining time 4 Total required time 4. CONTENTS MACHINE KNOWLEDGE EMBROIDERING MAINTENANCE Displaying the embroidery time for one -point patterns 1 1 "BASIC OPERATION" key 1 If you would like to know the time it takes to embroider a pattern,...
...COLOR" key 2. The color names will then be calculated and displayed. The time taken to change at the end of the patterns on the pattern sheet for one -point patterns 1 1 "BASIC OPERATION" key 1 2 3 4 If you touch "THREAD COLOR", the color names (reference) of ... required will change the threads is not displayed on the display. 3 Remaining time 4 Total required time 4. CONTENTS MACHINE KNOWLEDGE EMBROIDERING MAINTENANCE Displaying the embroidery time for one -point patterns 1 1 "BASIC OPERATION" key 1 If you would like to know the time it takes to embroider a pattern,...

Owner's Manual (Español) - Spanish
Page 70
...won't fit into the frame For items which won't fit into the frame, baste or iron a piece of the frame before installing the small embroidery frame. 2. ABC 1 Embroidery sheet 2 Embroidering range (Maximum) Height: 70 mm (2-3/4") Width: 70 mm (2-3/4") CAUTION Take note of the following when using the arrow keys in ...be embroidered, you do not change the position of the pattern on the "LAYOUT" screen, check that the embroidering area for the carriage (embroidery arm) after the power is turned on - Always make sure that the pattern does not extend past the edges of stabilizer fabric onto ...
...won't fit into the frame For items which won't fit into the frame, baste or iron a piece of the frame before installing the small embroidery frame. 2. ABC 1 Embroidery sheet 2 Embroidering range (Maximum) Height: 70 mm (2-3/4") Width: 70 mm (2-3/4") CAUTION Take note of the following when using the arrow keys in ...be embroidered, you do not change the position of the pattern on the "LAYOUT" screen, check that the embroidering area for the carriage (embroidery arm) after the power is turned on - Always make sure that the pattern does not extend past the edges of stabilizer fabric onto ...

Owner's Manual (Español) - Spanish
Page 71
... to change the attachment position. * Use the horizontal attachment sheet when the frame is attached horizontally. 1 Frame fixing plate 2 Screws (x 2) 3 Washers (x 2) 4 Nuts (x 2) 5 Embroidery sheet (horizontal type) 6 Embroidery range 7 Maximum embroidering area - in other words, the movement of the carriage (embroidery arm) in order to check that the initial setting operation ...on - Always make sure that the pattern does not extend past the edges of attachment to embroider even smaller articles. 1 Embroidery sheet (vertical type) 2 Embroidery range 3 Maximum embroidering area -
... to change the attachment position. * Use the horizontal attachment sheet when the frame is attached horizontally. 1 Frame fixing plate 2 Screws (x 2) 3 Washers (x 2) 4 Nuts (x 2) 5 Embroidery sheet (horizontal type) 6 Embroidery range 7 Maximum embroidering area - in other words, the movement of the carriage (embroidery arm) in order to check that the initial setting operation ...on - Always make sure that the pattern does not extend past the edges of attachment to embroider even smaller articles. 1 Embroidery sheet (vertical type) 2 Embroidery range 3 Maximum embroidering area -

Owner's Manual (Español) - Spanish
Page 73
...re-set the current needle position as the embroidery start position with the carriage at the place indicated by touching "LAYOUT". If the length is displayed on the left side on the ABC embroidery sheet, and fit the fabric and embroidery sheet into two even lengths. Draw a line... on the fabric with embroidering just by drawing another line across this line. 1 Embroidery start position 3. After touching "LAYOUT", touch "90˚ ...
...re-set the current needle position as the embroidery start position with the carriage at the place indicated by touching "LAYOUT". If the length is displayed on the left side on the ABC embroidery sheet, and fit the fabric and embroidery sheet into two even lengths. Draw a line... on the fabric with embroidering just by drawing another line across this line. 1 Embroidery start position 3. After touching "LAYOUT", touch "90˚ ...


