
Users Manual - English
Page 4
... the case. Always be used. 3. PLEASE READ BEFORE USING YOUR EMBROIDERY MACHINE For safe operation 1. Do not touch the embroidery card inserted in the back of its features, we suggest that specifications and external appearance are subject to turn off the power switch and unplug ...the cord when: ● Operation is an advanced computerized home embroidery machine. For a longer service life 1. Use only neutral soaps ...
... the case. Always be used. 3. PLEASE READ BEFORE USING YOUR EMBROIDERY MACHINE For safe operation 1. Do not touch the embroidery card inserted in the back of its features, we suggest that specifications and external appearance are subject to turn off the power switch and unplug ...the cord when: ● Operation is an advanced computerized home embroidery machine. For a longer service life 1. Use only neutral soaps ...

Users Manual - English
Page 5
... 18 Embroidering different types of fabric 18 Setting the fabric in the embroidery frame 20 Fitting the embroidery frame to the machine 22 Removing the embroidery frame ...... 22 THREAD TENSION ADJUSTMENT....... 23 ADJUSTING THE LCD SCREEN CONTRAST 24 If the LCD is...PATTERN 43 Moving the position (LAYOUT) ......... 43 Changing the embroidery position .... 44 Checking the embroidery area.......... 44 Embroidering from a specific starting point 45 Changing the pattern direction.......... 45 Mirror imazing patterns 46 Changing the size of characters and frame patterns 47 Changing thread...
... 18 Embroidering different types of fabric 18 Setting the fabric in the embroidery frame 20 Fitting the embroidery frame to the machine 22 Removing the embroidery frame ...... 22 THREAD TENSION ADJUSTMENT....... 23 ADJUSTING THE LCD SCREEN CONTRAST 24 If the LCD is...PATTERN 43 Moving the position (LAYOUT) ......... 43 Changing the embroidery position .... 44 Checking the embroidery area.......... 44 Embroidering from a specific starting point 45 Changing the pattern direction.......... 45 Mirror imazing patterns 46 Changing the size of characters and frame patterns 47 Changing thread...
Users Manual - English
Page 48
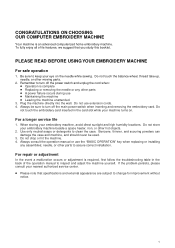
.../CENTER" to select "START" and then touch the arrow key to align the hole of the frame as the presser foot prevents the needle from a specific starting position on the fabric in the frame as shown in the illustration. Make a mark at left each time "90˚ clockwise" is touched. 45...
.../CENTER" to select "START" and then touch the arrow key to align the hole of the frame as the presser foot prevents the needle from a specific starting position on the fabric in the frame as shown in the illustration. Make a mark at left each time "90˚ clockwise" is touched. 45...
