

Owner's Manual - English
Page 2
... 42 How to Respond to a Dialog Box 43 Printing a Document 46 Printing with Standard Settings 47 Changing Items in Print Dialog Box 47 Changing Other Printer Options 48 Using Online Help 50 Beyond the Basics 51 Using Templates for Easy Publishing 51 Safeguarding a Document 55 Working with Dual Documents 55 Renaming...
... 42 How to Respond to a Dialog Box 43 Printing a Document 46 Printing with Standard Settings 47 Changing Items in Print Dialog Box 47 Changing Other Printer Options 48 Using Online Help 50 Beyond the Basics 51 Using Templates for Easy Publishing 51 Safeguarding a Document 55 Working with Dual Documents 55 Renaming...
Owner's Manual - English
Page 13
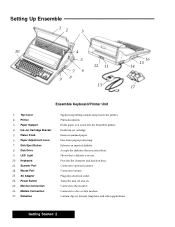
...Releases an inserted diskette. Setting Up Ensemble 12 3 10 4 5 76 98 12 11 13 16 15 14 17 Ensemble Keyboard/Printer Unit 1. Monitor Connection 16. Holds ink-jet cartridge. Shows that you insert here. Connects to the monitor. Plugs into the Ensemble...Provides the character and function keys. Paper Support 4. Ink-Jet Cartridge Bracket 5. Keyboard 11. Holds paper as it is in use. Top Cover 2. Printer 3. Platen Knob 6. Mouse Port 13. Removes jammed paper. Disk Drive 9. Prints documents. Turns the unit off and on. Fine tunes paper positioning....
...Releases an inserted diskette. Setting Up Ensemble 12 3 10 4 5 76 98 12 11 13 16 15 14 17 Ensemble Keyboard/Printer Unit 1. Monitor Connection 16. Holds ink-jet cartridge. Shows that you insert here. Connects to the monitor. Plugs into the Ensemble...Provides the character and function keys. Paper Support 4. Ink-Jet Cartridge Bracket 5. Keyboard 11. Holds paper as it is in use. Top Cover 2. Printer 3. Platen Knob 6. Mouse Port 13. Removes jammed paper. Disk Drive 9. Prints documents. Turns the unit off and on. Fine tunes paper positioning....
Owner's Manual - English
Page 14
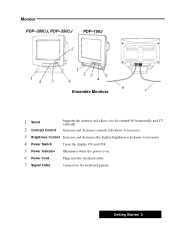
Getting Started 3 Increases and decreases contrast (clockwise to increase). 3 Brightness Control Increases and decreases the display brightness (clockwise to increase). 4 Power Switch Turns the display ON and OFF. 5 Power Indicator Illuminates when the power is on. 6 Power Cord Plugs into the electrical outlet. 7 Signal Cable Connects to be rotated 90° horizontally and 17° vertically. Monitor PDP-300CJ, PDP-350CJ PDP-100J 5 1 2 3 1 23 5 4 4 6 Ensemble Monitors 7 1 Stand 2 Contrast Control Supports the monitor and allows it to the keyboard/printer.
Getting Started 3 Increases and decreases contrast (clockwise to increase). 3 Brightness Control Increases and decreases the display brightness (clockwise to increase). 4 Power Switch Turns the display ON and OFF. 5 Power Indicator Illuminates when the power is on. 6 Power Cord Plugs into the electrical outlet. 7 Signal Cable Connects to be rotated 90° horizontally and 17° vertically. Monitor PDP-300CJ, PDP-350CJ PDP-100J 5 1 2 3 1 23 5 4 4 6 Ensemble Monitors 7 1 Stand 2 Contrast Control Supports the monitor and allows it to the keyboard/printer.

Owner's Manual - English
Page 15
... or PDP-350CJ monitor, push down very firmly on its side as shown below . 2. "To put the system together: Before plugging the monitor or keyboard/printer into the locked position. Putting Ensemble Together "To attach the monitor stand: 1. Carefully set the monitor on the swivel base while sliding forward until the...
... or PDP-350CJ monitor, push down very firmly on its side as shown below . 2. "To put the system together: Before plugging the monitor or keyboard/printer into the locked position. Putting Ensemble Together "To attach the monitor stand: 1. Carefully set the monitor on the swivel base while sliding forward until the...
Owner's Manual - English
Page 16
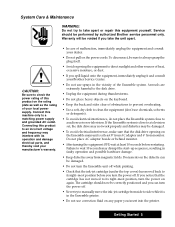
... WARNING: Do not try to manually move the ink-jet cartridge from side to side while it and consult your Brother Service Center. Warranty will be performed by authorized Brother service personnel only. To disconnect, be damaged. S If you spill liquid onto the equipment, immediately unplug it is...S Use a soft, dry cloth to the disk drive. Getting Started 5 S Do not pull on the Ensemble main unit is in the Ensemble printer. S Check that the disk drive opening on the power cords. S Never try to prevent overheating. Service should now be correctly positioned and you turn...
... WARNING: Do not try to manually move the ink-jet cartridge from side to side while it and consult your Brother Service Center. Warranty will be performed by authorized Brother service personnel only. To disconnect, be damaged. S If you spill liquid onto the equipment, immediately unplug it is...S Use a soft, dry cloth to the disk drive. Getting Started 5 S Do not pull on the Ensemble main unit is in the Ensemble printer. S Check that the disk drive opening on the power cords. S Never try to prevent overheating. Service should now be correctly positioned and you turn...
Owner's Manual - English
Page 17
... hold it is over the button that says URW Roman. Click once on creating and formatting a document, see page 28. Click once on the keyboard/printer and the monitor. 2. Your text size increasesfrom 12 pts. All your address and press ENTER. 5. A list of the button that now reads URW Sans). 6. Move...
... hold it is over the button that says URW Roman. Click once on creating and formatting a document, see page 28. Click once on the keyboard/printer and the monitor. 2. Your text size increasesfrom 12 pts. All your address and press ENTER. 5. A list of the button that now reads URW Sans). 6. Move...

Owner's Manual - English
Page 19
... of 8.5" x 11" paper against the long, narrow guide mark. (This mark lines up with the 0" mark on the ruler on the back of the keyboard/printer, and place a sheet of the keyboard. 2. Press the PAPER INSERT key on inserting paper, see page 16. A dialog box will move to the Main Menu...
... of 8.5" x 11" paper against the long, narrow guide mark. (This mark lines up with the 0" mark on the ruler on the back of the keyboard/printer, and place a sheet of the keyboard. 2. Press the PAPER INSERT key on inserting paper, see page 16. A dialog box will move to the Main Menu...

Owner's Manual - English
Page 21
bond paper for your Ensemble Desktop Publishing System. "To install the cut sheet feeder allows you . 2. Getting Started 10 Turn the keyboard/printer unit around so that the back of it in the center. 3. Carefully free the tab on one end of the paper support and then the ...-710 cut sheet feeder is facing you to load up to 30 sheets of 16-24 lb. Lift the paper support off the Ensemble keyboard/printer and monitor. The cut sheet feeder: 1. Flip open the paper support and slightly bend it is available for automatic feeding.
bond paper for your Ensemble Desktop Publishing System. "To install the cut sheet feeder allows you . 2. Getting Started 10 Turn the keyboard/printer unit around so that the back of it in the center. 3. Carefully free the tab on one end of the paper support and then the ...-710 cut sheet feeder is facing you to load up to 30 sheets of 16-24 lb. Lift the paper support off the Ensemble keyboard/printer and monitor. The cut sheet feeder: 1. Flip open the paper support and slightly bend it is available for automatic feeding.

Owner's Manual - English
Page 29
... INK CHG to move slightly to the left side of the ink-jet cartridge bracket. 5. If print quality still does not improve, your local authorized Brother Service Center. The print head will move the ink-jet cartridge bracket to the left and then back to the right. Gently blot and wipe... contacts on . 7. If print quality does not improve after cleaning the print head, remove the ink-jet cartridge (see instructions on the page. Contact your printer may need to clean the print head. To dissolve any dried ink, hold the damp cloth against the nozzles for cleaning because it can leave...
... INK CHG to move slightly to the left side of the ink-jet cartridge bracket. 5. If print quality still does not improve, your local authorized Brother Service Center. The print head will move the ink-jet cartridge bracket to the left and then back to the right. Gently blot and wipe... contacts on . 7. If print quality does not improve after cleaning the print head, remove the ink-jet cartridge (see instructions on the page. Contact your printer may need to clean the print head. To dissolve any dried ink, hold the damp cloth against the nozzles for cleaning because it can leave...

Owner's Manual - English
Page 31
... tutorial) into the disk drive. 2. S To go to the next screen, press ENTER. The demo will be especially helpful. Follow the directions on the keyboard/printer and monitor. 2. Starting the Tutorial and the Demonstration You can save your machine. 3. It consists of your place and stop, press MENU + S. S To continue to...
... tutorial) into the disk drive. 2. S To go to the next screen, press ENTER. The demo will be especially helpful. Follow the directions on the keyboard/printer and monitor. 2. Starting the Tutorial and the Demonstration You can save your machine. 3. It consists of your place and stop, press MENU + S. S To continue to...
Owner's Manual - English
Page 39
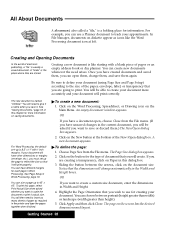
... when asked if you have unsaved changes in Word Processing. You can size a page up the page to 45" x 45". Click on Paper in the printer and tape the pages together when finished. Click Apply and then click Close. Getting Started 28 The new document is like the Word Processing document...
... when asked if you have unsaved changes in Word Processing. You can size a page up the page to 45" x 45". Click on Paper in the printer and tape the pages together when finished. Click Apply and then click Close. Getting Started 28 The new document is like the Word Processing document...

Owner's Manual - English
Page 57
...with documents. (See Merging a Document" in the Word Processing chapter.) Getting Started 46 S Printer Options. S Document Options. Includes medium (type of the paper is divided into two sections: Printer Options and Options that will vary with application. For a list of recommended paper, label, and ...dialog box appears which extend to the edge of surface to be used to merge names and addresses with some common options: Printer Options Other Options The minimum margins for printing labels which allows you to a large degree, the other applications. Truncating will depend...
...with documents. (See Merging a Document" in the Word Processing chapter.) Getting Started 46 S Printer Options. S Document Options. Includes medium (type of the paper is divided into two sections: Printer Options and Options that will vary with application. For a list of recommended paper, label, and ...dialog box appears which extend to the edge of surface to be used to merge names and addresses with some common options: Printer Options Other Options The minimum margins for printing labels which allows you to a large degree, the other applications. Truncating will depend...
Owner's Manual - English
Page 58
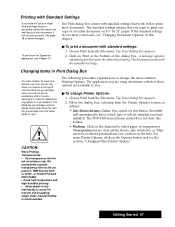
...common Printing Options. "To change the most documents. The Print dialog box comes with standard settings that work well to change Printer Options: 1. Transparencies are available to check for overhead presentations (see Chapter 10. S Avoid high temperature and high humidity printing . To... print from the Printer Options section as film," used for placement of a color document to you. A message appears informingyou that you want to print a...
...common Printing Options. "To change the most documents. The Print dialog box comes with standard settings that work well to change Printer Options: 1. Transparencies are available to check for overhead presentations (see Chapter 10. S Avoid high temperature and high humidity printing . To... print from the Printer Options section as film," used for placement of a color document to you. A message appears informingyou that you want to print a...

Owner's Manual - English
Page 59
... envelopes, a message may not be 8.5" by 11". If the application has Merge Options, see instructions for : S Print Quality. A black dot appears in the printer. Use Page Size from the File menu. When printing labels, make sure that is 12" by 20" with the new settings. Paper types Paper size... explain how to reflect the range of your document has been set up to change Options. Click the arrow buttons or type numbers in your printer options. Make sure the settings in the Options dialog box match the actual size and orientation of pages, click From. S Number of the...
... envelopes, a message may not be 8.5" by 11". If the application has Merge Options, see instructions for : S Print Quality. A black dot appears in the printer. Use Page Size from the File menu. When printing labels, make sure that is 12" by 20" with the new settings. Paper types Paper size... explain how to reflect the range of your document has been set up to change Options. Click the arrow buttons or type numbers in your printer options. Make sure the settings in the Options dialog box match the actual size and orientation of pages, click From. S Number of the...

Owner's Manual - English
Page 60
...new settings. Change the paper type if it , the width of these options again. 5. S Size of paper insertion: manual or automatic. Turn this printer from the sides of the paper you want , as you find the one that portrait orientation be inserted in the paper tray. Experiment with heavily...types of the individual labels. Ensemble will give you higher quality printed images, especially with settings until you read it is not included in your printer, select the correct size from the paper size list. S Ink Saver. If you want to remain in the dialog box, changing the options...
...new settings. Change the paper type if it , the width of these options again. 5. S Size of paper insertion: manual or automatic. Turn this printer from the sides of the paper you want , as you find the one that portrait orientation be inserted in the paper tray. Experiment with heavily...types of the individual labels. Ensemble will give you higher quality printed images, especially with settings until you read it is not included in your printer, select the correct size from the paper size list. S Ink Saver. If you want to remain in the dialog box, changing the options...

Owner's Manual - English
Page 71
... you create. The SC-700 Image Scanner allows you to pick up to 30 sheets of bond paper and insert them into your ink-jet printer. Optional Accessories Fax Modem Data Modem Scanner Cut Sheet Feeder The FX-700 Fax Modem allows you to send and receive data informaĆ tion...
... you create. The SC-700 Image Scanner allows you to pick up to 30 sheets of bond paper and insert them into your ink-jet printer. Optional Accessories Fax Modem Data Modem Scanner Cut Sheet Feeder The FX-700 Fax Modem allows you to send and receive data informaĆ tion...
Owner's Manual - English
Page 205
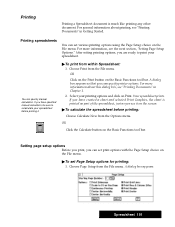
... box, see Printing Documents" in Chapter 1. 2. Printing spreadsheets You can set print options with the Page Setup choice on the File menu. You can specify printer options. If you have created a chart and selected Print Graphics, the chart is much like printing any other document. A dialog box appears so that you...
... box, see Printing Documents" in Chapter 1. 2. Printing spreadsheets You can set print options with the Page Setup choice on the File menu. You can specify printer options. If you have created a chart and selected Print Graphics, the chart is much like printing any other document. A dialog box appears so that you...
Owner's Manual - English
Page 235
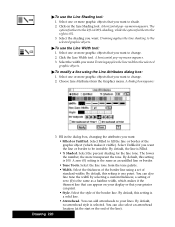
... Width tool. Select the width you want . Choose Line Attributes from the tone palette. Select Unfilled if you want the line or border to your printer can print. Select the thickness of the border line using the Line Attributes dialog box: 1. a setting of zero (0) is Filled. Drawing 220
... Width tool. Select the width you want . Choose Line Attributes from the tone palette. Select Unfilled if you want the line or border to your printer can print. Select the thickness of the border line using the Line Attributes dialog box: 1. a setting of zero (0) is Filled. Drawing 220

Owner's Manual - English
Page 278
Addresses only" in the dialog box. 4. Fill the Printer Options and Document Options sections in order to print. 2. This option prints the address that is currently displayed on screen as a card, a list of the ...
Addresses only" in the dialog box. 4. Fill the Printer Options and Document Options sections in order to print. 2. This option prints the address that is currently displayed on screen as a card, a list of the ...

Owner's Manual - English
Page 297
...A drop-down list, select Events Window. Click Print when you are finished. This does not have to correspond to the actual paper in your printer may want to size. In the Print dialog box, you choose a page size which you want to the words Content." Click the up or... select the year for printing. 6. For example, you may also edit the number in your printer, Planner prints pages at 8.5" by 11". "To print the Events Window: 1. If you want to print your printer. OR If you want to print. 2. You can tape together. Planner calculates the number of...
...A drop-down list, select Events Window. Click Print when you are finished. This does not have to correspond to the actual paper in your printer may want to size. In the Print dialog box, you choose a page size which you want to the words Content." Click the up or... select the year for printing. 6. For example, you may also edit the number in your printer, Planner prints pages at 8.5" by 11". "To print the Events Window: 1. If you want to print your printer. OR If you want to print. 2. You can tape together. Planner calculates the number of...


