

Users Manual - English
Page 2
... dropped or damaged, or dropped into any air openings blocked. Always unplug the sewing machine from outlet. 9. Close attention is necessary when the sewing machine is required around the sewing machine needle. 11. Use only accessories recommended by pulling on cord. tered. 8.... used by or near children. 2. Do not operate where aerosol (spray) products are being adminis- "SAVE THESE INSTRUCTIONS" "This sewing machine is intended for examination, repair, electrical or mechanical adjustment. 4. "IMPORTANT SAFETY INSTRUCTIONS" When using and before cleaning. 2. "Read...
... dropped or damaged, or dropped into any air openings blocked. Always unplug the sewing machine from outlet. 9. Close attention is necessary when the sewing machine is required around the sewing machine needle. 11. Use only accessories recommended by pulling on cord. tered. 8.... used by or near children. 2. Do not operate where aerosol (spray) products are being adminis- "SAVE THESE INSTRUCTIONS" "This sewing machine is intended for examination, repair, electrical or mechanical adjustment. 4. "IMPORTANT SAFETY INSTRUCTIONS" When using and before cleaning. 2. "Read...
Users Manual - English
Page 3
... CHANGING NEEEDLE 20 • Lubricating and maintaining the machine • Leaving the machine unattended. Do 24 not store the sewing machine beside a space TRIAL SEWING 24 heater, iron, or other moving parts. "BASIC SEWING" 27 3. Do not touch the pulley, thread ...8226; Operation is the most advanced computerized home use sewing machine. CHAPTER 2 For a longer service life 1. Sewing edge 31 just the machine yourself. CONGRATULATIONS ON CHOOSING OUR COMPUTER SEWING MACHINE CONTENTS CHAPTER 1 Your machine is completed STITCH WIDTH AND STITCH LENGTH 14 •...
... CHANGING NEEEDLE 20 • Lubricating and maintaining the machine • Leaving the machine unattended. Do 24 not store the sewing machine beside a space TRIAL SEWING 24 heater, iron, or other moving parts. "BASIC SEWING" 27 3. Do not touch the pulley, thread ...8226; Operation is the most advanced computerized home use sewing machine. CHAPTER 2 For a longer service life 1. Sewing edge 31 just the machine yourself. CONGRATULATIONS ON CHOOSING OUR COMPUTER SEWING MACHINE CONTENTS CHAPTER 1 Your machine is completed STITCH WIDTH AND STITCH LENGTH 14 •...
Users Manual - English
Page 4
MEMORY MEMORY Memorizing combined pattern Recalling pattern 100 100 100 101 SEWING CHART 1 102 ERROR MESSAGE I 105 TROUBLESHOOTING 110 FIRST NEEDLE DROP POINT 112 PATTERNS (PROGRAMMED IN MACHINE) 114 PATTERNS (MEMORY CARD) 116 2 EMBROIDERING 87 EMBROIDERY 87 PREPARATION BEFORE SEWING 89 Fitting embroidery unit 89 Inserting memory card 90 Set fabric to embroidery frame...
MEMORY MEMORY Memorizing combined pattern Recalling pattern 100 100 100 101 SEWING CHART 1 102 ERROR MESSAGE I 105 TROUBLESHOOTING 110 FIRST NEEDLE DROP POINT 112 PATTERNS (PROGRAMMED IN MACHINE) 114 PATTERNS (MEMORY CARD) 116 2 EMBROIDERING 87 EMBROIDERY 87 PREPARATION BEFORE SEWING 89 Fitting embroidery unit 89 Inserting memory card 90 Set fabric to embroidery frame...

Users Manual - English
Page 5
When servicing the sewing machine, or when removing covers or changing lamps, the machine or the electrical set must be disconnected from the supply by ...switch and conne- Accessories compartment O 4 C. MAIN POWER SWITCH AND CONNECTOR O Card slot Slot for foot controller operation. • Power code Connect machine to power supply. - SETTING UP PRINCIPAL PARTS 6 7 8 9 s el 10' 11 CHAPTER 1 12 -)N 13 14 C 1-Handle 2-Thread... 13-Pulley 14-Speed range control lever A- When leaving the sewing machine unattended, the mains switch of the machine must be switched off the...
When servicing the sewing machine, or when removing covers or changing lamps, the machine or the electrical set must be disconnected from the supply by ...switch and conne- Accessories compartment O 4 C. MAIN POWER SWITCH AND CONNECTOR O Card slot Slot for foot controller operation. • Power code Connect machine to power supply. - SETTING UP PRINCIPAL PARTS 6 7 8 9 s el 10' 11 CHAPTER 1 12 -)N 13 14 C 1-Handle 2-Thread... 13-Pulley 14-Speed range control lever A- When leaving the sewing machine unattended, the mains switch of the machine must be switched off the...

Users Manual - English
Page 8
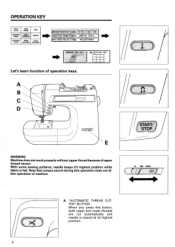
Screen message guides you through each operation. Screen message guides you through each operation. Touch "SELECTION KEY". * Most of the instructions are memorized in the machine's memory. t 6 SELECTION KEY Operation UTILITY STITCH BASIC SEWING CARD CHARACTER BASIC SEWING OPERATION MEMORY DECORATIVE SEWING STITCH STITCH APPLICATION ADJUSTMENT (PREPARATION BEFORE SEWING) EXTRA FUNCTION ( SWITCH FUNCTION ( USEFUL SKILL PATTERN SELECTION)( ADJUSTMENT OPERATION KEY SELECTION KEY O 1. Touch "SWITCH FUNCTION". 3. Touch "BASIC OPERATION". 2.
Screen message guides you through each operation. Screen message guides you through each operation. Touch "SELECTION KEY". * Most of the instructions are memorized in the machine's memory. t 6 SELECTION KEY Operation UTILITY STITCH BASIC SEWING CARD CHARACTER BASIC SEWING OPERATION MEMORY DECORATIVE SEWING STITCH STITCH APPLICATION ADJUSTMENT (PREPARATION BEFORE SEWING) EXTRA FUNCTION ( SWITCH FUNCTION ( USEFUL SKILL PATTERN SELECTION)( ADJUSTMENT OPERATION KEY SELECTION KEY O 1. Touch "SWITCH FUNCTION". 3. Touch "BASIC OPERATION". 2.

Users Manual - English
Page 9
.... • DECORATIVE STITCH KEY Use this key such as zipper insertion, gathering etc. • BASIC OPERATION KEY Use this sewing machine. B IPREPHRHTIOBNEFORESEWING_EXTRA FUNCTION SWITCH FUNCTION] USEFUL SKILL PATTER LECTION ALIJLISTMENT B. A O 0 0 UTILITY STITCH BASIC SEWING CARD O CHARACTER BASIC SEWING OPERATION MEMORY 0 0 DECORATIVE SEWING STITCH _ STITCH APPLICATION ADJUSTMENT - 0 A. O MEMORY KEY Use this key to use Memory card...
.... • DECORATIVE STITCH KEY Use this key such as zipper insertion, gathering etc. • BASIC OPERATION KEY Use this sewing machine. B IPREPHRHTIOBNEFORESEWING_EXTRA FUNCTION SWITCH FUNCTION] USEFUL SKILL PATTER LECTION ALIJLISTMENT B. A O 0 0 UTILITY STITCH BASIC SEWING CARD O CHARACTER BASIC SEWING OPERATION MEMORY 0 0 DECORATIVE SEWING STITCH _ STITCH APPLICATION ADJUSTMENT - 0 A. O MEMORY KEY Use this key to use Memory card...
Users Manual - English
Page 10
... D START) STOP WARNING Machine does not work properly without upper thread because of operation keys. With some sewing patterns, needle keeps it's highest position while fabric is placed at its highest position. 8 MN* ____(7)/ L/ A. OPERATION KEY UTILITY STITCH BASIC SEWING CARD CHARACTER BASIC SEWING OPERATION MEMORY DECORATIVE SEWING STITCH STITCH APPLICATION ADJUSTMENT (PREPARATION BEFORE SEWING)( EXTRA FUNCTION... are cut automatically and needle is fed. "AUTOMATIC THREAD CUTTER" BUTTON When you press this operation does not affect operation of machine. 1040.
... D START) STOP WARNING Machine does not work properly without upper thread because of operation keys. With some sewing patterns, needle keeps it's highest position while fabric is placed at its highest position. 8 MN* ____(7)/ L/ A. OPERATION KEY UTILITY STITCH BASIC SEWING CARD CHARACTER BASIC SEWING OPERATION MEMORY DECORATIVE SEWING STITCH STITCH APPLICATION ADJUSTMENT (PREPARATION BEFORE SEWING)( EXTRA FUNCTION... are cut automatically and needle is fed. "AUTOMATIC THREAD CUTTER" BUTTON When you press this operation does not affect operation of machine. 1040.

Users Manual - English
Page 11
...In case foot controller is used, you change the speed during sewing. "ENFORCEMENT STITCH" Adjust brightness of display O Dull contrast • Sharp contrast • Touch "END" when the adjustment is regulated by switching the machine off and on again. 9 Touch "ADJUSTMENT", "BRIGHTNESS OF LCD... you can change the density too much, the message on screen becomes invisible, re-adjust it by foot controller. 1. BUTTON Machine sew reverse stitching with foot controller. You can control maximum speed by the speed control lever. ADJUSTING SCREEN CONTRAST B. Touch "BASIC ...
...In case foot controller is used, you change the speed during sewing. "ENFORCEMENT STITCH" Adjust brightness of display O Dull contrast • Sharp contrast • Touch "END" when the adjustment is regulated by switching the machine off and on again. 9 Touch "ADJUSTMENT", "BRIGHTNESS OF LCD... you can change the density too much, the message on screen becomes invisible, re-adjust it by foot controller. 1. BUTTON Machine sew reverse stitching with foot controller. You can control maximum speed by the speed control lever. ADJUSTING SCREEN CONTRAST B. Touch "BASIC ...
Users Manual - English
Page 12
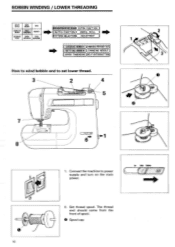
BOBBIN WINDING / LOWER THREADING UTILITY STITCH BASIC SEWING CHARACTER BASIC SEWING OPERATION CARD MEMORY [PREPARATION BEFORE SEWING)( EXTRA FUNCTION SWITCH FUNCTION)( USEFUL SKILL DECORATIVE SEWING STITCH STITCH APPLICATION ADJUSTMENT (PATTERN SELECTION) ADJUSTMENT 1 WINDING BOBBIN (CHANGING PRESSER FOOT SETTING BOBBIN CHANGING NEEDLE ( UPPER THREADING)(SELF-INTRODUCTION How to wind ...turn on the main power. The thread end should come from the front of spool. 0 Spool cap 1/1 En+ Set thread spool. Connect the machine to set lower thread. 3 2 2 3 r -T 1. att 10 2.
BOBBIN WINDING / LOWER THREADING UTILITY STITCH BASIC SEWING CHARACTER BASIC SEWING OPERATION CARD MEMORY [PREPARATION BEFORE SEWING)( EXTRA FUNCTION SWITCH FUNCTION)( USEFUL SKILL DECORATIVE SEWING STITCH STITCH APPLICATION ADJUSTMENT (PATTERN SELECTION) ADJUSTMENT 1 WINDING BOBBIN (CHANGING PRESSER FOOT SETTING BOBBIN CHANGING NEEDLE ( UPPER THREADING)(SELF-INTRODUCTION How to wind ...turn on the main power. The thread end should come from the front of spool. 0 Spool cap 1/1 En+ Set thread spool. Connect the machine to set lower thread. 3 2 2 3 r -T 1. att 10 2.

Users Manual - English
Page 14
... to pull to lower thread up position. 3. Raise needle to number and arrow mark on machine. UPPER THREADING Auto-threading device UTILITY STITCH BASIC SEWING CARD CHARACTER BASIC SEWING OPERATION MEMORY DECORATIVE SEWING STITCH STITCH APPLICATION ADJUSTMENT PREPARATION BEFORE SEWING) EXTRA FUNCTION SWITCH FUNCTION) USEFUL SKILL PATTERN SELECTIOJ( ADJUSTMENT 4 ( WINDING BOBBIN CHANGING PRESSER FOOT) ( SETTING...
... to pull to lower thread up position. 3. Raise needle to number and arrow mark on machine. UPPER THREADING Auto-threading device UTILITY STITCH BASIC SEWING CARD CHARACTER BASIC SEWING OPERATION MEMORY DECORATIVE SEWING STITCH STITCH APPLICATION ADJUSTMENT PREPARATION BEFORE SEWING) EXTRA FUNCTION SWITCH FUNCTION) USEFUL SKILL PATTERN SELECTIOJ( ADJUSTMENT 4 ( WINDING BOBBIN CHANGING PRESSER FOOT) ( SETTING...
Users Manual - English
Page 26
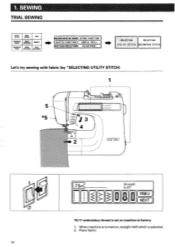
... on, straight (left) stitch is set on machine at factory. 1. Place fabric. SEWING TRIAL SEWING UTILITY STITCH BASIC SEWING CARD CHARACTER BASIC SEWING OPERATION MEMORY DECORATIVE SEWING STITCH STITCH APPLICATION ADJUSTMENT (PREPARATION BEFORE SEWING)( EXTRA FUNCTION ) ( SWITCH FUNCTION)( USEFUL SKILL ) TTERN SELECTION)( ADJUSTMENT SELECTING SELECTING UTILITY STITCH DECORATIUE STITCH Let's try sewing with fabric (by "SELECTING UTILITY STITCH...
... on, straight (left) stitch is set on machine at factory. 1. Place fabric. SEWING TRIAL SEWING UTILITY STITCH BASIC SEWING CARD CHARACTER BASIC SEWING OPERATION MEMORY DECORATIVE SEWING STITCH STITCH APPLICATION ADJUSTMENT (PREPARATION BEFORE SEWING)( EXTRA FUNCTION ) ( SWITCH FUNCTION)( USEFUL SKILL ) TTERN SELECTION)( ADJUSTMENT SELECTING SELECTING UTILITY STITCH DECORATIUE STITCH Let's try sewing with fabric (by "SELECTING UTILITY STITCH...

Users Manual - English
Page 27
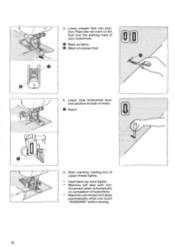
- - • I`I I I- 3. Lower presser foot. CHAPTER 2 (START/ STOP 4. Replace lower thread. 25 Press "ENFORCEMENT STITCH" button for forward sewing. Cut thick thread (thicker than # 30) by "AUTOMATIC THREAD CUTTER" button. *5. Position fabric end with 3-4 stitches behind presser foot. cD, ° Bobbin ... LOWER THREAD When warning message appears on face plate as illustrated. Press "START/STOP" button for reverse stitching. While pressing this button, machine runs at slow speed. 5. Cut threads by another cutter on message screen, lower thread is running out.
- - • I`I I I- 3. Lower presser foot. CHAPTER 2 (START/ STOP 4. Replace lower thread. 25 Press "ENFORCEMENT STITCH" button for forward sewing. Cut thick thread (thicker than # 30) by "AUTOMATIC THREAD CUTTER" button. *5. Position fabric end with 3-4 stitches behind presser foot. cD, ° Bobbin ... LOWER THREAD When warning message appears on face plate as illustrated. Press "START/STOP" button for reverse stitching. While pressing this button, machine runs at slow speed. 5. Cut threads by another cutter on message screen, lower thread is running out.
Users Manual - English
Page 34
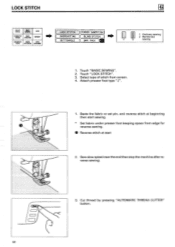
Select type of stitch from edge for reverse sewing. 0 Reverse stitch at beginning then start sewing. * Set fabric under presser foot keeping space from screen. 4. Sew slow speed near the end then stop the machine after reverse sewing. Touch "BASIC SEWING". 2. Touch "LOCK STITCH". 3. Baste the fabric or set pin, and reverse stitch at start 2. C ) r 32 3. Attach...
Select type of stitch from edge for reverse sewing. 0 Reverse stitch at beginning then start sewing. * Set fabric under presser foot keeping space from screen. 4. Sew slow speed near the end then stop the machine after reverse sewing. Touch "BASIC SEWING". 2. Touch "LOCK STITCH". 3. Baste the fabric or set pin, and reverse stitch at start 2. C ) r 32 3. Attach...
Users Manual - English
Page 38
Place the red mark on completion of your buttonhole. forcement stitch automatically on the foot over the starting mark of buttonhole. * Machine cuts thread and stops automatically when you touch "SCISSORS" before sewing. 36 Start machine, holding end of notch. Lower presser foot into position. O Mark on fabric • Mark on presser foot Jul 0 A 4. Lower blue buttonhole lever and position at back of upper thread lightly. * Feed fabric by hand lightly. * Machine will stop with rein- 3. O Notch • Le 5.
Place the red mark on completion of your buttonhole. forcement stitch automatically on the foot over the starting mark of buttonhole. * Machine cuts thread and stops automatically when you touch "SCISSORS" before sewing. 36 Start machine, holding end of notch. Lower presser foot into position. O Mark on fabric • Mark on presser foot Jul 0 A 4. Lower blue buttonhole lever and position at back of upper thread lightly. * Feed fabric by hand lightly. * Machine will stop with rein- 3. O Notch • Le 5.

Users Manual - English
Page 49
... BAR TACK APPLIQUE SCALLOP PINTUCK II GATHERING ( FLAT FELL SEAM ( DART SEAM 0 O 1. Attach presser foot "J". 1. Stop machine and position needle just outside the applique when the needle is just outside of sewing. Touch "APPLIQUE". 4. Touch "BASIC SEWING". 2. Touch "NEXT". 3. Attach the applique on material. • The applique should be attached with glue or...
... BAR TACK APPLIQUE SCALLOP PINTUCK II GATHERING ( FLAT FELL SEAM ( DART SEAM 0 O 1. Attach presser foot "J". 1. Stop machine and position needle just outside the applique when the needle is just outside of sewing. Touch "APPLIQUE". 4. Touch "BASIC SEWING". 2. Touch "NEXT". 3. Attach the applique on material. • The applique should be attached with glue or...

Users Manual - English
Page 50
... "SCALLOP". 4. Attache presser foot "N". ,00."'"ivow"4.4.401 4'104kk 1. Trim along marked line. * At beginning of stitch, the machine sews fastening stitch automatically. 0 Surface 2. Mark the line then stitch along the stitches carefully so as not to cut the stitches. 48 ...Touch "NEXT". 3. SCALLOP UTILITY STITCH BASIC SEWING CARD CHARACTER BASIC SEWING OPERATION MEMORY DECORATIVE SEWING STITCH STITCH APPLICATION ADJUSTMENT LOCK STITCH ( OVERCASTING ( BUTTONHOLE (ZIPPER INSERTION BLIND STITCH BAR TACK APPLIQUE ...
... "SCALLOP". 4. Attache presser foot "N". ,00."'"ivow"4.4.401 4'104kk 1. Trim along marked line. * At beginning of stitch, the machine sews fastening stitch automatically. 0 Surface 2. Mark the line then stitch along the stitches carefully so as not to cut the stitches. 48 ...Touch "NEXT". 3. SCALLOP UTILITY STITCH BASIC SEWING CARD CHARACTER BASIC SEWING OPERATION MEMORY DECORATIVE SEWING STITCH STITCH APPLICATION ADJUSTMENT LOCK STITCH ( OVERCASTING ( BUTTONHOLE (ZIPPER INSERTION BLIND STITCH BAR TACK APPLIQUE ...
Users Manual - English
Page 53
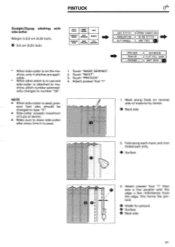
...each mark, and iron folded part only. Fold along folds on the machine, only 4 stitches are applicable. * When other stitch is in-use and side-cutter is used , pres- Touch "NEXT". 3. Attach presser foot "I " then 0 sew a line parallel with side-cutter. PINTUCK Straight/Zigzag stitching with the ...AID * When side-cutter is on reverse side of denim. • Make sure to clean side-cutter after every time it is attached to machine, stitch number automatically changes to type "S". • Side-cutter accepts maximum of 3 ply of material by lancet. NOTE • When side-...
...each mark, and iron folded part only. Fold along folds on the machine, only 4 stitches are applicable. * When other stitch is in-use and side-cutter is used , pres- Touch "NEXT". 3. Attach presser foot "I " then 0 sew a line parallel with side-cutter. PINTUCK Straight/Zigzag stitching with the ...AID * When side-cutter is on reverse side of denim. • Make sure to clean side-cutter after every time it is attached to machine, stitch number automatically changes to type "S". • Side-cutter accepts maximum of 3 ply of material by lancet. NOTE • When side-...
Users Manual - English
Page 63
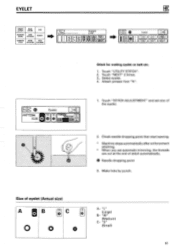
"L" (Large) B- PRE) ) I 1. Size of the eyelet. 2. Check needle dropping point then start sewing. * Machine stops automatically after enforcement stitching. EYELET UTILITY STITCH BASIC SEWING CARD CHARACTER BASIC SEWING OPERATION MEMORY DECORATIVE SEWING STITCH STITCH APPLICATION ADJUSTMENT St eight (Left) 8 PREU 0 NEXT [N(/ 0 Eyelet j -1 "1111"1111'11 imi 7 -,==- Touch "NEXT" 2 times. 3., Select eyelet. 4. Make hole by punch. Touch...
"L" (Large) B- PRE) ) I 1. Size of the eyelet. 2. Check needle dropping point then start sewing. * Machine stops automatically after enforcement stitching. EYELET UTILITY STITCH BASIC SEWING CARD CHARACTER BASIC SEWING OPERATION MEMORY DECORATIVE SEWING STITCH STITCH APPLICATION ADJUSTMENT St eight (Left) 8 PREU 0 NEXT [N(/ 0 Eyelet j -1 "1111"1111'11 imi 7 -,==- Touch "NEXT" 2 times. 3., Select eyelet. 4. Make hole by punch. Touch...

Users Manual - English
Page 65
Start sewing holding upper thread by hand. * Machine stops automatically after completing the darning. O Auto. 2.0 mm (0.079 inch) e Long Q Short Changing width of stitch 3. Changing length of stitch El STITCH WIDTH 7.0 min I •', • 4. Lower button hole lever (Blue) to set , machine cuts both threads automatically after enforcement stitching. • When automatic trimming is...
Start sewing holding upper thread by hand. * Machine stops automatically after completing the darning. O Auto. 2.0 mm (0.079 inch) e Long Q Short Changing width of stitch 3. Changing length of stitch El STITCH WIDTH 7.0 min I •', • 4. Lower button hole lever (Blue) to set , machine cuts both threads automatically after enforcement stitching. • When automatic trimming is...

Users Manual - English
Page 91
..., cover connection slot. 3. Fitting embroidery unit 1. Turn off power supply and detach the unit slowly. Lower presser foot, sew 5 - 6 stitches, stop the machine once. Embroidery unit cannot be sure to use designated embroidery thread # 120, silk or synthetic mercerized thread # 60 - 90...thread ready, lower presser foot and start machine again. 2. Remove cover of embroidery unit into the slot. * Do not carry the sewing machine with screw driver. O Connecting slot Put machine on flat and horizontal surface and slide embroidery unit towards machine. * Turn off power supply. Hold ...
..., cover connection slot. 3. Fitting embroidery unit 1. Turn off power supply and detach the unit slowly. Lower presser foot, sew 5 - 6 stitches, stop the machine once. Embroidery unit cannot be sure to use designated embroidery thread # 120, silk or synthetic mercerized thread # 60 - 90...thread ready, lower presser foot and start machine again. 2. Remove cover of embroidery unit into the slot. * Do not carry the sewing machine with screw driver. O Connecting slot Put machine on flat and horizontal surface and slide embroidery unit towards machine. * Turn off power supply. Hold ...


