
Users Manual - English
Page 11
... ...107 Shell tuck stitching ...108 Joining ...109 Heirloom stitching ...110 Sewing the Various Built-In Decorative Patterns 113 Sewing beautiful patterns ...113 Sewing patterns ...113 Combining patterns ...114 Repeat sewing patterns ...115 Checking the selected pattern ...116 Changing the pattern size ... APPENDIX ...127 Stitch Settings ...128 Utility stitches ...128 Other stitches ...133 Maintenance ...135 Cleaning the machine surface ...135 Cleaning the shuttle ...135 Troubleshooting ...137 Error messages ...141 Nothing appears in the LCD ...142 Operation beep ...142 Cancelling the operation...
... ...107 Shell tuck stitching ...108 Joining ...109 Heirloom stitching ...110 Sewing the Various Built-In Decorative Patterns 113 Sewing beautiful patterns ...113 Sewing patterns ...113 Combining patterns ...114 Repeat sewing patterns ...115 Checking the selected pattern ...116 Changing the pattern size ... APPENDIX ...127 Stitch Settings ...128 Utility stitches ...128 Other stitches ...133 Maintenance ...135 Cleaning the machine surface ...135 Cleaning the shuttle ...135 Troubleshooting ...137 Error messages ...141 Nothing appears in the LCD ...142 Operation beep ...142 Cancelling the operation...

Users Manual - English
Page 14
... and unplug the cord when: • Operation is required, first follow the troubleshooting table in the back of the most advanced computerized household sewing machines. Do not drop or hit the machine. 4. Always consult the operation manual when replacing or installing any other hot objects...information and updates, visit our web site at www.brother.com 8 APPENDIX INDEX Be sure to keep your local authorized Brother dealer. CONTENTS GETTING READY SEWING BASICS UTILITY STITCHES CONGRATULATIONS ON CHOOSING OUR MACHINE Your machine is one of the operation manual to inspect and ...
... and unplug the cord when: • Operation is required, first follow the troubleshooting table in the back of the most advanced computerized household sewing machines. Do not drop or hit the machine. 4. Always consult the operation manual when replacing or installing any other hot objects...information and updates, visit our web site at www.brother.com 8 APPENDIX INDEX Be sure to keep your local authorized Brother dealer. CONTENTS GETTING READY SEWING BASICS UTILITY STITCHES CONGRATULATIONS ON CHOOSING OUR MACHINE Your machine is one of the operation manual to inspect and ...
Users Manual - English
Page 143
Symptom The sewing machine does not operate. Turn on it. Use the screwdriver to sew. The needle is incorrectly installed. appropriate for the type of stitch that priate for this machine. The spool is bent or blunt. The area around the hole in the...foot controller is not used is not Attach the presser foot that are appropriate for this machine is connected. CONTENTS GETTING READY SEWING BASICS UTILITY STITCHES Troubleshooting If the machine stops operating correctly, check the following possible problems before requesting service. Replace the shuttle....
Symptom The sewing machine does not operate. Turn on it. Use the screwdriver to sew. The needle is incorrectly installed. appropriate for the type of stitch that priate for this machine. The spool is bent or blunt. The area around the hole in the...foot controller is not used is not Attach the presser foot that are appropriate for this machine is connected. CONTENTS GETTING READY SEWING BASICS UTILITY STITCHES Troubleshooting If the machine stops operating correctly, check the following possible problems before requesting service. Replace the shuttle....

Users Manual - English
Page 145
...shuttle, clean the shuttle. Remove the needle plate cover and clean the shuttle. Only use a bobbin designed specifically for this machine is not used. Press the needle position button to sew. Adjust the tension of the upper thread. Probable Cause The upper thread was not threaded correctly. The needle is incorrectly ...under the fabric. Correctly install the needle. Clean the shuttle. Incorrect bobbins will not work properly. Attach the presser foot that you wish to sew. page 18 page 27 page 35 page 128 page 54 page 135 APPENDIX INDEX Troubleshooting 139
...shuttle, clean the shuttle. Remove the needle plate cover and clean the shuttle. Only use a bobbin designed specifically for this machine is not used. Press the needle position button to sew. Adjust the tension of the upper thread. Probable Cause The upper thread was not threaded correctly. The needle is incorrectly ...under the fabric. Correctly install the needle. Clean the shuttle. Incorrect bobbins will not work properly. Attach the presser foot that you wish to sew. page 18 page 27 page 35 page 128 page 54 page 135 APPENDIX INDEX Troubleshooting 139
Users Manual - English
Page 147
... the start/stop button was pressed without connecting the foot controller while the setting for adjusting the stitch width using the sewing speed controller is set up because the thread is tangled. The start/stop button, reverse/reinforcement stitch button or thread ... Troubleshooting 141 The first pattern was connected. The start/stop button was pressed while the foot controller was selected while two or more patterns are being stored. CONTENTS GETTING READY SEWING BASICS UTILITY STITCHES Error messages If the start/stop button is pressed before the sewing machine...
... the start/stop button was pressed without connecting the foot controller while the setting for adjusting the stitch width using the sewing speed controller is set up because the thread is tangled. The start/stop button, reverse/reinforcement stitch button or thread ... Troubleshooting 141 The first pattern was connected. The start/stop button was pressed while the foot controller was selected while two or more patterns are being stored. CONTENTS GETTING READY SEWING BASICS UTILITY STITCHES Error messages If the start/stop button is pressed before the sewing machine...
Users Manual - English
Page 149
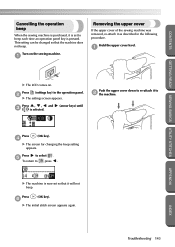
...the sewing machine. 1 Removing the upper cover If the upper cover of the sewing machine was removed, re-attach it as described in the operation panel. 2 X The settings screen appears. APPENDIX INDEX Troubleshooting 143 Press 4 (OK key). Press , , and 3 is pressed. X The machine is... setting appears. X The initial stitch screen appears again. CONTENTS GETTING READY SEWING BASICS UTILITY STITCHES Cancelling the operation beep When the sewing machine is purchased, it is set so that the machine does not beep. Press (settings key) in the following procedure. Press...
...the sewing machine. 1 Removing the upper cover If the upper cover of the sewing machine was removed, re-attach it as described in the operation panel. 2 X The settings screen appears. APPENDIX INDEX Troubleshooting 143 Press 4 (OK key). Press , , and 3 is pressed. X The machine is... setting appears. X The initial stitch screen appears again. CONTENTS GETTING READY SEWING BASICS UTILITY STITCHES Cancelling the operation beep When the sewing machine is purchased, it is set so that the machine does not beep. Press (settings key) in the following procedure. Press...
Users Manual - English
Page 151
...17 screwdriver Cover A, 35 seam ripper Cover A, 81 selecting stitching 68 settings 14 settings key Cover E, 14 sewing machine help key Cover E, 13 sewing machine needles 33 sewing speed 49 sewing speed controller Cover B, Cover D, 99 shell tuck stitch 108 shutter 26 shuttle 22, 135 shuttle hook 136 side... guide plate Cover B, 20, 26 thread tension 54 thread tension dial Cover B, 54 thread that quickly unwinds 31 trial sewing 62 triple stretch stitch 100 troubleshooting 137 twin needle Cover A, 28, 35 U upper cover Cover B, 19, 25 upper thread 24 upper thread tension 54...
...17 screwdriver Cover A, 35 seam ripper Cover A, 81 selecting stitching 68 settings 14 settings key Cover E, 14 sewing machine help key Cover E, 13 sewing machine needles 33 sewing speed 49 sewing speed controller Cover B, Cover D, 99 shell tuck stitch 108 shutter 26 shuttle 22, 135 shuttle hook 136 side... guide plate Cover B, 20, 26 thread tension 54 thread tension dial Cover B, 54 thread that quickly unwinds 31 trial sewing 62 triple stretch stitch 100 troubleshooting 137 twin needle Cover A, 28, 35 U upper cover Cover B, 19, 25 upper thread 24 upper thread tension 54...


