
Brother International PC 420 Support Question
Brother International PC 420 Support Question
Find answers below for this question about Brother International PC 420 - PRW Limited Edition Project Runway Sewing Machine.Need a Brother International PC 420 manual? We have 1 online manual for this item!
Question posted by ssotemw on February 20th, 2014
How To Install The Bobbin On A Brother Sewing Machine
The person who posted this question about this Brother International product did not include a detailed explanation. Please use the "Request More Information" button to the right if more details would help you to answer this question.
Current Answers
Related Brother International PC 420 Manual Pages
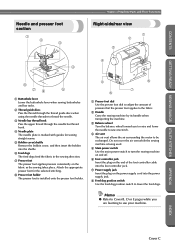
Users Manual - English - Page 3

... to place the spool of thread on the spool pin.
4 Thread guide for bobbin winding Pass the thread around this thread guide when winding the bobbin thread.
5 Upper cover Open the upper cover to learn the names of the sewing machine and their functions are described below. Front view
1 D
C B
2 3 4 5 6
7 8
A
0 9
1 Thread guide plate / 2 Thread guide...
Users Manual - English - Page 4
... the air surrounding the motor to lower the feed dogs. Do not cover the air vent while the sewing machine is marked with guides for the selected stitching.
8 Presser foot holder The presser foot is installed onto the presser foot holder.
5 6
8 7
1 Presser foot dial Use the presser foot dial to adjust the amount...
Users Manual - English - Page 5
... threads have already been cut both the upper and the bobbin threads. The
machine sews at a slow speed at the beginning of each other special threads, use the thread cutter on how the sewing machine is sewing, otherwise damage to the machine may occur. CONTENTS
GETTING READY SEWING BASICS UTILITY STITCHES
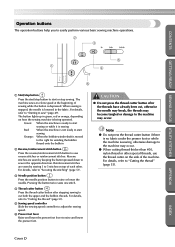
Operation buttons
The operation buttons help you...
Users Manual - English - Page 6
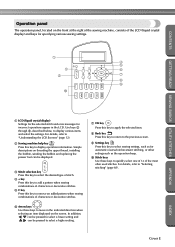
...sewing settings, such as for incorrect operations appear in the indicated direction when selecting an item displayed on threading the upper thread, installing the bobbin, winding the bobbin...the right of the sewing machine, consists of the LCD (liquid crystal display) and keys for specifying various sewing settings.
1
4
5
2
6
3
7
8 9
0
GETTING READY SEWING BASICS UTILITY STITCHES
...
Users Manual - English - Page 8
...installed at the end of the sewing machine, the upper thread can select from the built-in stitches You can easily be threaded. CONTENTS
GETTING READY SEWING BASICS UTILITY STITCHES
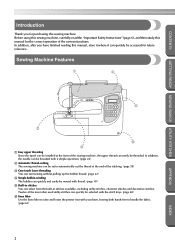
Introduction
Thank you have finished reading this sewing machine... lower threading You can start sewing without pulling up the bobbin thread. (page 22) 4 Simple bobbin-winding The bobbin can quickly and easily be...
Users Manual - English - Page 9
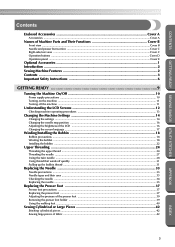
...Understanding the LCD Screens 12
Checking machine operating procedures ...13
Changing the Machine Settings 14
Changing the settings ...14 Changing the needle stop position ...16 Adjusting the brightness of the LCD ...16 Changing the screen language ...17
Winding/Installing the Bobbin 18
Bobbin precautions ...18 Winding the bobbin ...18 Installing the bobbin ...22
Upper Threading ...24
Threading...
Users Manual - English - Page 12

... manufacturer as a toy. Do not pull or push fabric while stitching. This sewing machine is damaged, it has been dropped or damaged, or dropped into any adjustments in the needle
area.... 10. Do not use as threading needle, changing needle, threading bobbin, or changing presser foot, and the like. 15. Switch the machine to ensure that they do not play with any other user servicing...
Users Manual - English - Page 14

....brother.com
8
APPENDIX
INDEX
Always consult the operation manual when replacing or installing any other parts to inspect and adjust the machine yourself. CONTENTS
GETTING READY SEWING BASICS UTILITY STITCHES
CONGRATULATIONS ON CHOOSING OUR MACHINE
Your machine is required, first follow the troubleshooting table in the back of the most advanced computerized household sewing machines...
Users Manual - English - Page 17
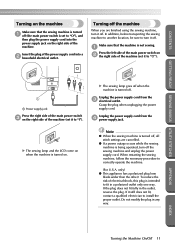
... another location, be sure to turn off . When restarting the sewing machine, follow the necessary procedure to install the proper outlet. Turning off the machine
When you are cancelled.
● If a power outage occurs while the sewing machine is being operated, turn it off the sewing machine and unplug the power supply cord.
Unplug the power supply cord...
Users Manual - English - Page 19
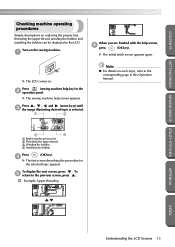
... this Operation Manual.
3
4
1 Replacing the presser foot 2 Threading the upper thread 3 Winding the bobbin 4 Installing the bobbin
Press
(OK key).
4
X The first screen describing the procedure for
the selected topic appears.
X The sewing machine help key) in the LCD. Press
(sewing machine help screen appears. Press , , and (arrow keys) until 3 the image illustrating desired topic is...
Users Manual - English - Page 24

... machine will not operate correctly. GETTING READY SEWING BASICS UTILITY STITCHES
GETTING READY
CONTENTS
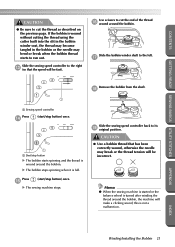
Winding/Installing the Bobbin
This section describes how to observe the following precautions concerning the bobbin.
CAUTION
● Only use the bobbin (part code: SA156, XA5539-151) designed specifically for winding the bobbin is indicated by a broken line on the sewing machine...
Users Manual - English - Page 25
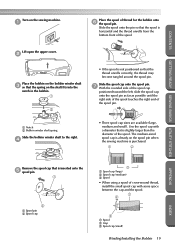
... (small)
Winding/Installing the Bobbin 19
INDEX
Lift open the upper cover.
2
Place the bobbin on the bobbin winder shaft 3 so that the spring on the shaft fits into the
notch in the bobbin.
1
2
.... CONTENTS
GETTING READY SEWING BASICS UTILITY STITCHES
Turn on the sewing machine.
1
Place the spool of the spool pin.
1 Notch 2 Bobbin winder shaft spring
Slide the bobbin winder shaft to the...
Users Manual - English - Page 27
... button) once.
1
1 Start/stop button) once. APPENDIX
INDEX
Winding/Installing the Bobbin 21
If the bobbin is not a malfunction.
Memo
● When the sewing machine is started or the balance wheel is turned after winding the thread around the bobbin, the machine will be incorrect. Slide the sewing speed controller to the right c (so that has been correctly...
Users Manual - English - Page 28
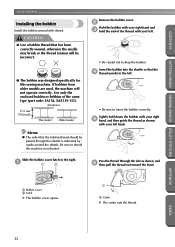
... code: SA156, XA5539-151). Slide the bobbin cover latch to drop the bobbin.
GETTING READY SEWING BASICS UTILITY STITCHES
GETTING READY
CONTENTS
Installing the bobbin
Install the bobbin wound with your left hand. Use only the enclosed bobbin or bobbins of the thread with thread.
If bobbins from older models are used, the machine will be passed through the slot as...
Users Manual - English - Page 31

...(large, medium and small). The medium-sized spool cap is already on the spool pin when the sewing machine is purchased.
1
2
Remove the spool cap that the thread unrolls correctly, the thread may become ...possible until the right side of the spool touches the right end of cross-wound thread,
install the small spool cap with a diameter that the spool is slightly larger than the diameter ...
Users Manual - English - Page 35
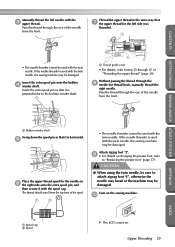
The thread should unroll from the front.
Insert the extra spool pin onto the bobbin 4 winder shaft. GETTING READY SEWING BASICS UTILITY STITCHES
APPENDIX
1 Bobbin winder shaft Swing down the spool pin so that it is used with the twin needle, the sewing machine may be damaged.
Pass the thread through the 8 needle bar thread hook...
Users Manual - English - Page 40
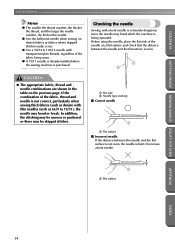
... even, the needle is purchased. In addition, the stitching may be uneven or puckered or there may break while the machine is being sewn.
● A 75/11 needle is already installed when the sewing machine is bent.
Before using the needle, place the flat side of the fabric being operated. Do not use a bent...
Users Manual - English - Page 41
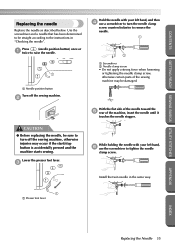
...screw counterclockwise to turn off the sewing machine. 2
CAUTION
● Before ...Install the twin needle in "Checking the needle".
While holding the needle with your left hand, and then 4 use the screwdriver to the instructions in the same way.
1
1 Presser foot lever
APPENDIX
INDEX
Replacing the Needle 35
With the flat side of the needle toward the 5 rear of the sewing machine...
Users Manual - English - Page 44

... R) is positioned to be read.
1
Note
● When a stitch is attached before starting to sew. Buttonhole foot "A"
Overcasting foot "G"
Zigzag foot "J"
Button fitting foot "M"
Monogramming foot "N"
Blind stitch...attached. APPENDIX
INDEX
1
1 Presser foot lever X The presser foot is installed, turn off the sewing machine, attach the correct presser foot, and then select the desired stitch again....
Users Manual - English - Page 143
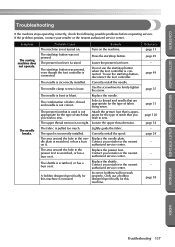
Symptom The sewing machine does not operate.
To use the start/stop button was pressed, even though the foot controller is incorrectly installed. Correctly install the needle.
The spool is raised. Correctly install the spool. Replace the needle plate.
The shuttle is not used is not Attach the presser foot that is bent or blunt.
A bobbin designed...
Similar Questions


Whats The Resale Value Of The Brother 2300 Prw Limited Edition Project Runway?
(Posted by Anonymous-139615 9 years ago)

Brother Pc-420 Prw Limited Edition Project Runway Sewing Machine Will Not
thread needle
thread needle
(Posted by graphevaru 10 years ago)

How To Thread A Bobbin Brother Sewing Machine Ls2125i
(Posted by Anal14 10 years ago)
