
Users Manual - English
Page 2
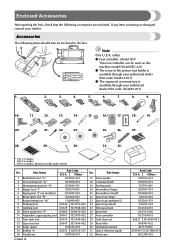
... ripper 15 Bobbin (4) 16 Needle set 29 Knee lifter 30 Operation manual 31 Quick reference guide 32 Hard case Part Code U.S.A. Part Name 1 Buttonhole foot "A" 2 Overcasting foot "G" 3 Monogramming foot "N" 4 Zipper foot "I" 5 Zigzag foot "J" (on this machine model NX-400/PC-420. ● The screw of the presser foot holder is available through your authorized dealer...
... ripper 15 Bobbin (4) 16 Needle set 29 Knee lifter 30 Operation manual 31 Quick reference guide 32 Hard case Part Code U.S.A. Part Name 1 Buttonhole foot "A" 2 Overcasting foot "G" 3 Monogramming foot "N" 4 Zipper foot "I" 5 Zigzag foot "J" (on this machine model NX-400/PC-420. ● The screw of the presser foot holder is available through your authorized dealer...

Users Manual - English
Page 3
... the sewing machine and automatically cut them. APPENDIX INDEX Cover B When sewing cylindrical pieces, remove the flat bed attachment. C Needle threader lever Use the needle threader to place the spool of the upper thread. CONTENTS GETTING READY SEWING BASICS UTILITY STITCHES Names of Machine Parts and Their Functions The names of the various parts of the machine parts. D Thread...
... the sewing machine and automatically cut them. APPENDIX INDEX Cover B When sewing cylindrical pieces, remove the flat bed attachment. C Needle threader lever Use the needle threader to place the spool of the upper thread. CONTENTS GETTING READY SEWING BASICS UTILITY STITCHES Names of Machine Parts and Their Functions The names of the various parts of the machine parts. D Thread...
Users Manual - English
Page 4
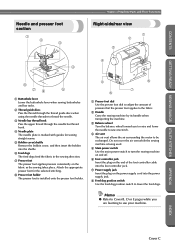
... vent while the sewing machine is marked with guides for the selected stitching. 8 Presser foot holder The presser foot is installed onto the presser foot holder. 5 6 8 7 1 Presser foot dial Use the presser foot dial to adjust the amount of Machine Parts and Their Functions... Needle and presser foot section 1 2 3 Right-side/rear view 1 2 3 4 4 8 76 5 1 Buttonhole lever Lower the buttonhole lever when sewing buttonholes and bar tacks. 2 Thread guide discs Pass the thread through the...
... vent while the sewing machine is marked with guides for the selected stitching. 8 Presser foot holder The presser foot is installed onto the presser foot holder. 5 6 8 7 1 Presser foot dial Use the presser foot dial to adjust the amount of Machine Parts and Their Functions... Needle and presser foot section 1 2 3 Right-side/rear view 1 2 3 4 4 8 76 5 1 Buttonhole lever Lower the buttonhole lever when sewing buttonholes and bar tacks. 2 Thread guide discs Pass the thread through the...
Users Manual - English
Page 7
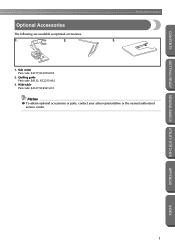
Side cutter Part code: SA177,XC3879-002 2. Quilting guide Part code: SA132, XC2215-002 3. CONTENTS Enclosed Accessories Optional Accessories The following are available as optional accessories. 1. 2. 3. 1. Wide table Part code: SA537,XC4541-051 Memo ● To obtain optional accessories or parts, contact your sales representative or the nearest authorized service center. GETTING READY SEWING BASICS UTILITY STITCHES APPENDIX INDEX 1
Side cutter Part code: SA177,XC3879-002 2. Quilting guide Part code: SA132, XC2215-002 3. CONTENTS Enclosed Accessories Optional Accessories The following are available as optional accessories. 1. 2. 3. 1. Wide table Part code: SA537,XC4541-051 Memo ● To obtain optional accessories or parts, contact your sales representative or the nearest authorized service center. GETTING READY SEWING BASICS UTILITY STITCHES APPENDIX INDEX 1
Users Manual - English
Page 9
... Enclosed Accessories Cover A Accessories ...Cover A Names of Machine Parts and Their Functions Cover B Front view ...Cover B Needle and presser foot section ...Cover C Right-side/rear view ...Cover C Operation buttons ...Cover D Operation panel ...Cover E Optional Accessories ...1 Introduction ...2 Sewing Machine Features ...2 Contents ...3 Important Safety Instructions 6 GETTING READY 9 Turning the Machine On/Off 10 Power supply precautions ...10...
... Enclosed Accessories Cover A Accessories ...Cover A Names of Machine Parts and Their Functions Cover B Front view ...Cover B Needle and presser foot section ...Cover C Right-side/rear view ...Cover C Operation buttons ...Cover D Operation panel ...Cover E Optional Accessories ...1 Introduction ...2 Sewing Machine Features ...2 Contents ...3 Important Safety Instructions 6 GETTING READY 9 Turning the Machine On/Off 10 Power supply precautions ...10...

Users Manual - English
Page 12
... GETTING READY SEWING BASICS UTILITY STITCHES Important Safety Instructions When using this machine, basic safety precautions should always be taken, including the following: Read all moving parts. Close attention is necessary when the machine is used or... where oxygen is intended for use bent needles. 13. Do not pull or push fabric while stitching. DANGER - Do not use by pulling on cord. Always unplug the machine from outlet. 9. To disconnect, turn the main switch to persons: 1. This sewing machine...
... GETTING READY SEWING BASICS UTILITY STITCHES Important Safety Instructions When using this machine, basic safety precautions should always be taken, including the following: Read all moving parts. Close attention is necessary when the machine is used or... where oxygen is intended for use bent needles. 13. Do not pull or push fabric while stitching. DANGER - Do not use by pulling on cord. Always unplug the machine from outlet. 9. To disconnect, turn the main switch to persons: 1. This sewing machine...

Users Manual - English
Page 14
... sewing machines. For additional product information and updates, visit our web site at www.brother.com 8 APPENDIX INDEX PLEASE READ BEFORE USING THIS MACHINE For safe operation 1. Plug the machine directly into the wall. When storing this machine, avoid direct sunlight and high humidity locations. Always consult the operation manual when replacing or installing any other parts...
... sewing machines. For additional product information and updates, visit our web site at www.brother.com 8 APPENDIX INDEX PLEASE READ BEFORE USING THIS MACHINE For safe operation 1. Plug the machine directly into the wall. When storing this machine, avoid direct sunlight and high humidity locations. Always consult the operation manual when replacing or installing any other parts...

Users Manual - English
Page 24
CAUTION ● Only use the bobbin (part code: SA156, XA5539-151) designed specifically for this sewing machine. If bobbins from older models are used, the machine will not operate correctly. INDEX 18 Use of the same type (part code: SA156, XA5539-151). Be sure to wind the thread onto the bobbin,... or bobbins of any other bobbin may result in injuries or damage to the machine. ● The enclosed bobbin was designed specifically for winding the bobbin is indicated by a broken line on the sewing machine. Actual size 11.5 mm (7/16 inch) This model Older model Winding the ...
CAUTION ● Only use the bobbin (part code: SA156, XA5539-151) designed specifically for this sewing machine. If bobbins from older models are used, the machine will not operate correctly. INDEX 18 Use of the same type (part code: SA156, XA5539-151). Be sure to wind the thread onto the bobbin,... or bobbins of any other bobbin may result in injuries or damage to the machine. ● The enclosed bobbin was designed specifically for winding the bobbin is indicated by a broken line on the sewing machine. Actual size 11.5 mm (7/16 inch) This model Older model Winding the ...
Users Manual - English
Page 28
If bobbins from older models are used, the machine will be passed through the slot as indicated. Lightly hold the end of the same type (part code: SA156, XA5539-151). Be sure to the right. 1 1 2 Pass the thread through the shuttle is ...5 hand, and then guide the thread as shown with your left hand. Slide the bobbin cover latch to thread the machine as shown, and 6 then pull the thread out toward the front. Use only the enclosed bobbin or bobbins of the... the bobbin thread should be incorrect. ● The bobbin was designed specifically for this sewing machine.
If bobbins from older models are used, the machine will be passed through the slot as indicated. Lightly hold the end of the same type (part code: SA156, XA5539-151). Be sure to the right. 1 1 2 Pass the thread through the shuttle is ...5 hand, and then guide the thread as shown with your left hand. Slide the bobbin cover latch to thread the machine as shown, and 6 then pull the thread out toward the front. Use only the enclosed bobbin or bobbins of the... the bobbin thread should be incorrect. ● The bobbin was designed specifically for this sewing machine.
Users Manual - English
Page 34
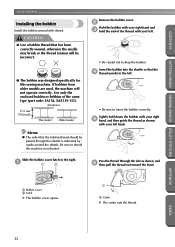
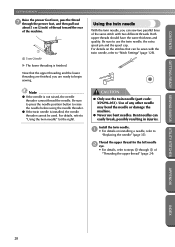
..." (page 35). Now that can be used. Using the twin needle With the twin needle, you are ready to use the twin needle (part code: X59296-051). Install the twin needle. 1 • For details on the stitches that the upper threading and the lower threading are finished..., and then pull out about 5 cm (2 inch) of thread toward the rear of the machine. 1 1 5 cm (2 inch) X The lower threading is not raised, the needle threader cannot thread the needle. GETTING READY SEWING BASICS UTILITY STITCHES GETTING READY CONTENTS Raise the presser foot lever, pass the thread 7 through a...
..." (page 35). Now that can be used. Using the twin needle With the twin needle, you are ready to use the twin needle (part code: X59296-051). Install the twin needle. 1 • For details on the stitches that the upper threading and the lower threading are finished..., and then pull out about 5 cm (2 inch) of thread toward the rear of the machine. 1 1 5 cm (2 inch) X The lower threading is not raised, the needle threader cannot thread the needle. GETTING READY SEWING BASICS UTILITY STITCHES GETTING READY CONTENTS Raise the presser foot lever, pass the thread 7 through a...
Users Manual - English
Page 41
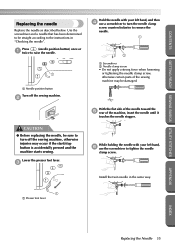
...the needle toward the 5 rear of the sewing machine may be sure to remove the needle. 1 2 1 Screwdriver 2 Needle clamp screw • Do not apply a strong force when loosening or tightening the needle clamp screw, otherwise certain parts of the machine, insert the needle until it touches the ...needle stopper. While holding the needle with your left hand, and then 4 use the screwdriver to raise the needle. 1 1 Needle position button Turn off the sewing machine, otherwise injuries may occur ...
...the needle toward the 5 rear of the sewing machine may be sure to remove the needle. 1 2 1 Screwdriver 2 Needle clamp screw • Do not apply a strong force when loosening or tightening the needle clamp screw, otherwise certain parts of the machine, insert the needle until it touches the ...needle stopper. While holding the needle with your left hand, and then 4 use the screwdriver to raise the needle. 1 1 Needle position button Turn off the sewing machine, otherwise injuries may occur ...

Users Manual - English
Page 48
...APPENDIX INDEX Note ● The optional wide table is possible. X With the flat bed attachment removed, freearm sewing is available through your brother retailer. 42 Open up the legs at the bottom of fabric, remove the flat bed attachment. Stitching cylindrical ... flat bed attachment removed, freearm sewing is possible. GETTING READY SEWING BASICS UTILITY STITCHES GETTING READY CONTENTS Sewing Cylindrical or Large Pieces When sewing cylindrical or large pieces of the wide 1 table. Slide the part that you are finished with free-arm sewing, 3 install the flat bed ...
...APPENDIX INDEX Note ● The optional wide table is possible. X With the flat bed attachment removed, freearm sewing is available through your brother retailer. 42 Open up the legs at the bottom of fabric, remove the flat bed attachment. Stitching cylindrical ... flat bed attachment removed, freearm sewing is possible. GETTING READY SEWING BASICS UTILITY STITCHES GETTING READY CONTENTS Sewing Cylindrical or Large Pieces When sewing cylindrical or large pieces of the wide 1 table. Slide the part that you are finished with free-arm sewing, 3 install the flat bed ...
Users Manual - English
Page 52
...In addition, keep your hands away from all moving parts such as the needle and balance wheel, otherwise injuries may occur. ● Do not pull or push the fabric too hard while sewing, otherwise injuries may occur or the needle may break... or bend. 46 APPENDIX INDEX Bent needles can easily break, possibly resulting in operation, pay special attention to the needle location. CONTENTS GETTING READY SEWING BASICS UTILITY STITCHES SEWING BASICS Sewing Basic sewing operations are described below. Before operating the sewing machine...
...In addition, keep your hands away from all moving parts such as the needle and balance wheel, otherwise injuries may occur. ● Do not pull or push the fabric too hard while sewing, otherwise injuries may occur or the needle may break... or bend. 46 APPENDIX INDEX Bent needles can easily break, possibly resulting in operation, pay special attention to the needle location. CONTENTS GETTING READY SEWING BASICS UTILITY STITCHES SEWING BASICS Sewing Basic sewing operations are described below. Before operating the sewing machine...
Users Manual - English
Page 85
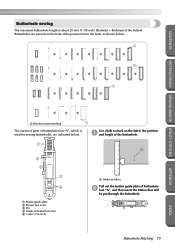
Buttonhole Stitching 79 INDEX Use chalk to the back, as shown below. 1 1 1 GETTING READY SEWING BASICS UTILITY STITCHES APPENDIX 1 Reinforcement stitching 1 The names of parts of buttonhole foot "A", which is about 28 mm (1-1/8 inch) (diameter + thickness of buttonhole 2 foot "A", and then insert the button that will be put through the ...
Buttonhole Stitching 79 INDEX Use chalk to the back, as shown below. 1 1 1 GETTING READY SEWING BASICS UTILITY STITCHES APPENDIX 1 Reinforcement stitching 1 The names of parts of buttonhole foot "A", which is about 28 mm (1-1/8 inch) (diameter + thickness of buttonhole 2 foot "A", and then insert the button that will be put through the ...
Users Manual - English
Page 87
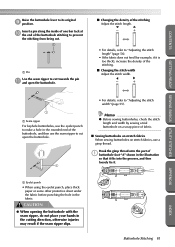
...for example, if it is too thick), increase the density of the stitching. ■ Changing the stitch width Adjust the stitch width. - + GETTING READY SEWING BASICS UTILITY STITCHES 1 1 Seam ripper For keyhole buttonholes, use the eyelet punch to make a hole in the rounded end of 1 buttonhole foot "A" shown..., and then loosely tie it. CONTENTS Raise the buttonhole lever to "Adjusting the stitch width" (page 55). Hook the gimp thread onto the part of the buttonhole, and then use a gimp thread. CAUTION ● When opening the buttonhole with the seam ripper, do not place your hands...
...for example, if it is too thick), increase the density of the stitching. ■ Changing the stitch width Adjust the stitch width. - + GETTING READY SEWING BASICS UTILITY STITCHES 1 1 Seam ripper For keyhole buttonholes, use the eyelet punch to make a hole in the rounded end of 1 buttonhole foot "A" shown..., and then loosely tie it. CONTENTS Raise the buttonhole lever to "Adjusting the stitch width" (page 55). Hook the gimp thread onto the part of the buttonhole, and then use a gimp thread. CAUTION ● When opening the buttonhole with the seam ripper, do not place your hands...
Users Manual - English
Page 88
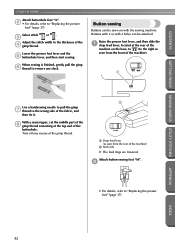
... 6 thread to "Replacing the presser foot" (page 37). Button sewing Buttons can be sewn on the base, to (to "Replacing the presser foot" (page 37). With a seam ripper, cut the middle part of the 8 gimp thread remaining at the rear of the machine on with 4 holes can be attached. UTILITY STITCHES CONTENTS Attach... excess of the gimp thread. 2 1 Drop feed lever (as seen from the rear of the fabric, and then tie it. Buttons with 2 or with the sewing machine. APPENDIX INDEX 82 Select stitch 46 or 47 . 3 Adjust the stitch width to the wrong side of the...
... 6 thread to "Replacing the presser foot" (page 37). Button sewing Buttons can be sewn on the base, to (to "Replacing the presser foot" (page 37). With a seam ripper, cut the middle part of the 8 gimp thread remaining at the rear of the machine on with 4 holes can be attached. UTILITY STITCHES CONTENTS Attach... excess of the gimp thread. 2 1 Drop feed lever (as seen from the rear of the fabric, and then tie it. Buttons with 2 or with the sewing machine. APPENDIX INDEX 82 Select stitch 46 or 47 . 3 Adjust the stitch width to the wrong side of the...

Users Manual - English
Page 124
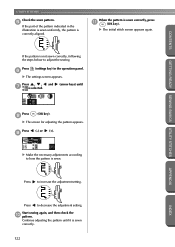
...key) in the operation panel. 2 X The settings screen appears. CAUTION ● If the stitching density is selected. (arrow keys) until GETTING READY SEWING BASICS UTILITY STITCHES Press 4 (OK key). X The screen for finer stitching. Press 4 (OK key). APPENDIX INDEX 118 until the desired ratio is selected.... (arrow keys) until Changing the pattern length The length of one part of a satin stitch can be bunched together, causing the needle to one of five sizes. Press 6 (OK key). UTILITY STITCHES ...
...key) in the operation panel. 2 X The settings screen appears. CAUTION ● If the stitching density is selected. (arrow keys) until GETTING READY SEWING BASICS UTILITY STITCHES Press 4 (OK key). X The screen for finer stitching. Press 4 (OK key). APPENDIX INDEX 118 until the desired ratio is selected.... (arrow keys) until Changing the pattern length The length of one part of a satin stitch can be bunched together, causing the needle to one of five sizes. Press 6 (OK key). UTILITY STITCHES ...
Users Manual - English
Page 128
UTILITY STITCHES Check the sewn pattern. 5 If the part of the pattern indicated in the operation panel. 6 X The settings screen appears. Press (settings key) in the illustration is sewn uniformly, the pattern is correctly ... the adjustment setting. When the pattern is sewn correctly. 122 INDEX X The screen for adjusting the pattern appears. Continue adjusting the pattern until GETTING READY SEWING BASICS UTILITY STITCHES APPENDIX Press 8 (OK key). CONTENTS If the pattern is sewn. Press , , and 7 is selected. (arrow keys) until it is sewn correctly, press...
UTILITY STITCHES Check the sewn pattern. 5 If the part of the pattern indicated in the operation panel. 6 X The settings screen appears. Press (settings key) in the illustration is sewn uniformly, the pattern is correctly ... the adjustment setting. When the pattern is sewn correctly. 122 INDEX X The screen for adjusting the pattern appears. Continue adjusting the pattern until GETTING READY SEWING BASICS UTILITY STITCHES APPENDIX Press 8 (OK key). CONTENTS If the pattern is sewn. Press , , and 7 is selected. (arrow keys) until it is sewn correctly, press...

Users Manual - English
Page 142
For a new shuttle (part code: XC3153-051), contact your nearest authorized service center. ● Be sure that the shuttle is scratched, otherwise the upper thread may become tangled, the needle may break or sewing performance may break. Check that the edge of the race shelf is 6 ... you. CAUTION ● Never use a shuttle that the projection on . 1 1 Shuttle Use the cleaning brush or a vacuum cleaner to 5 remove any lint and dust from you may damage the machine. INDEX 136 GETTING READY SEWING BASICS UTILITY STITCHES APPENDIX CONTENTS Turn the balance wheel toward you...
For a new shuttle (part code: XC3153-051), contact your nearest authorized service center. ● Be sure that the shuttle is scratched, otherwise the upper thread may become tangled, the needle may break or sewing performance may break. Check that the edge of the race shelf is 6 ... you. CAUTION ● Never use a shuttle that the projection on . 1 1 Shuttle Use the cleaning brush or a vacuum cleaner to 5 remove any lint and dust from you may damage the machine. INDEX 136 GETTING READY SEWING BASICS UTILITY STITCHES APPENDIX CONTENTS Turn the balance wheel toward you...


