
Users Manual - English
Page 2
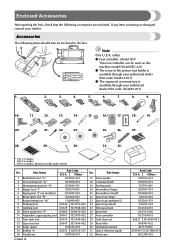
...Part Name 1 Buttonhole foot "A" 2 Overcasting foot "G" 3 Monogramming foot "N" 4 Zipper foot "I" 5 Zigzag foot "J" (on this machine model NX-400/PC-420. ● The screw of the presser foot holder is available through your retailer. Others X59296-051 X59476-051 135793-001 X55467-051 ...foot 9 Quilting foot 10 Stitch guide foot "P" 11 Adjustable zipper/piping foot 12 Non stick foot 13 Open toe foot 14 Seam ripper 15 Bobbin (4) 16 Needle set 29 Knee lifter 30 Operation manual 31 Quick reference guide 32 Hard case Part Code U.S.A. Accessories The following accessories are enclosed....
...Part Name 1 Buttonhole foot "A" 2 Overcasting foot "G" 3 Monogramming foot "N" 4 Zipper foot "I" 5 Zigzag foot "J" (on this machine model NX-400/PC-420. ● The screw of the presser foot holder is available through your retailer. Others X59296-051 X59476-051 135793-001 X55467-051 ...foot 9 Quilting foot 10 Stitch guide foot "P" 11 Adjustable zipper/piping foot 12 Non stick foot 13 Open toe foot 14 Seam ripper 15 Bobbin (4) 16 Needle set 29 Knee lifter 30 Operation manual 31 Quick reference guide 32 Hard case Part Code U.S.A. Accessories The following accessories are enclosed....

Users Manual - English
Page 3
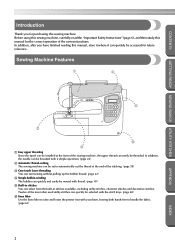
.... 5 Upper cover Open the upper cover to place the spool of the machine parts. B Thread cutter Pass the threads through the thread cutter to cut the thread. (page Cover D) A Flat bed attachment with accessory compartment Store presser feet and bobbins in the accessory compartment of the sewing machine and their functions are described below.
.... 5 Upper cover Open the upper cover to place the spool of the machine parts. B Thread cutter Pass the threads through the thread cutter to cut the thread. (page Cover D) A Flat bed attachment with accessory compartment Store presser feet and bobbins in the accessory compartment of the sewing machine and their functions are described below.
Users Manual - English
Page 4
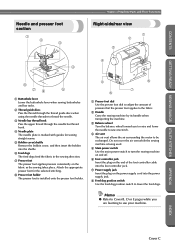
... applies to the fabric. 2 Handle Carry the sewing machine by its handle when transporting the machine. 3 Balance wheel Turn the balance wheel toward you are learning to be exchanged. Attach the appropriate presser foot for sewing straight seams. 5 Bobbin cover/shuttle Remove the bobbin cover, and then insert the bobbin into the shuttle. 6 Feed dogs The feed...
... applies to the fabric. 2 Handle Carry the sewing machine by its handle when transporting the machine. 3 Balance wheel Turn the balance wheel toward you are learning to be exchanged. Attach the appropriate presser foot for sewing straight seams. 5 Bobbin cover/shuttle Remove the bobbin cover, and then insert the bobbin into the shuttle. 6 Feed dogs The feed...
Users Manual - English
Page 5
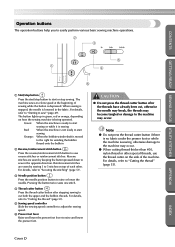
... READY SEWING BASICS UTILITY STITCHES Operation buttons The operation buttons help you to easily perform various basic sewing machine operations. 2 3 5 1 4 6 1 Start/stop button Press the start/stop sewing. Pressing the button twice sews one stitch. 4 Thread cutter button Press the thread cutter button after the threads have already been cut both the upper and the bobbin...
... READY SEWING BASICS UTILITY STITCHES Operation buttons The operation buttons help you to easily perform various basic sewing machine operations. 2 3 5 1 4 6 1 Start/stop button Press the start/stop sewing. Pressing the button twice sews one stitch. 4 Thread cutter button Press the thread cutter button after the threads have already been cut both the upper and the bobbin...
Users Manual - English
Page 6
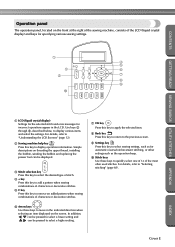
...SEWING BASICS UTILITY STITCHES APPENDIX 1 LCD (liquid crystal display) Settings for the selected stitch and error messages for automatic reverse/reinforcement stitching, or other settings such as for incorrect operations appear in the indicated direction when selecting an item displayed on threading the upper thread, installing the bobbin, winding the bobbin...at the right of the sewing machine, consists of the most often used stitches. For details, refer to "Understanding the LCD Screens" (page 12). 2 Sewing machine help key Press this key to select sewing settings, such as the ...
...SEWING BASICS UTILITY STITCHES APPENDIX 1 LCD (liquid crystal display) Settings for the selected stitch and error messages for automatic reverse/reinforcement stitching, or other settings such as for incorrect operations appear in the indicated direction when selecting an item displayed on threading the upper thread, installing the bobbin, winding the bobbin...at the right of the sewing machine, consists of the most often used stitches. For details, refer to "Understanding the LCD Screens" (page 12). 2 Sewing machine help key Press this key to select sewing settings, such as the ...
Users Manual - English
Page 8
... it can quickly be accessed for the correct operation of the sewing machine, the upper thread can be threaded. Twelve of the stitching. (page 58) 3 One-touch lower threading You can start sewing without pulling up the bobbin thread. (page 22) 4 Simple bobbin-winding The bobbin can quickly and easily be selected with the stitch keys...
... it can quickly be accessed for the correct operation of the sewing machine, the upper thread can be threaded. Twelve of the stitching. (page 58) 3 One-touch lower threading You can start sewing without pulling up the bobbin thread. (page 22) 4 Simple bobbin-winding The bobbin can quickly and easily be selected with the stitch keys...
Users Manual - English
Page 9
... ...1 Introduction ...2 Sewing Machine Features ...2 Contents ...3 Important Safety Instructions 6 GETTING READY 9 Turning the Machine On/Off 10 Power supply precautions ...10 Turning on the machine ...11 Turning off the machine ...11 Understanding the LCD Screens 12 Checking machine operating procedures ...13 Changing the Machine Settings 14 Changing ...Threading the needle ...27 Using the twin needle ...28 Using thread that winds off quickly ...31 Pulling up the bobbin thread ...31 Replacing the Needle ...33 Needle precautions ...33 Needle types and their uses ...33 Checking the needle ......
... ...1 Introduction ...2 Sewing Machine Features ...2 Contents ...3 Important Safety Instructions 6 GETTING READY 9 Turning the Machine On/Off 10 Power supply precautions ...10 Turning on the machine ...11 Turning off the machine ...11 Understanding the LCD Screens 12 Checking machine operating procedures ...13 Changing the Machine Settings 14 Changing ...Threading the needle ...27 Using the twin needle ...28 Using thread that winds off quickly ...31 Pulling up the bobbin thread ...31 Replacing the Needle ...33 Needle precautions ...33 Needle types and their uses ...33 Checking the needle ......

Users Manual - English
Page 12
... for household use the proper needle plate. This sewing machine is intended for examination, repair, electrical or mechanical adjustment. 4. Switch the machine to the symbol "{" position which represents off, ...SEWING BASICS UTILITY STITCHES Important Safety Instructions When using this machine, basic safety precautions should always be taken, including the following: Read all moving parts. To reduce the risk of burns, fire, electric shock, or injury to break. 12. Use only accessories recommended by the manufacturer as threading needle, changing needle, threading bobbin...
... for household use the proper needle plate. This sewing machine is intended for examination, repair, electrical or mechanical adjustment. 4. Switch the machine to the symbol "{" position which represents off, ...SEWING BASICS UTILITY STITCHES Important Safety Instructions When using this machine, basic safety precautions should always be taken, including the following: Read all moving parts. To reduce the risk of burns, fire, electric shock, or injury to break. 12. Use only accessories recommended by the manufacturer as threading needle, changing needle, threading bobbin...
Users Manual - English
Page 15
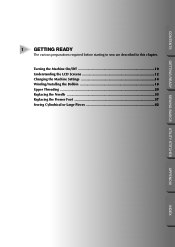
Turning the Machine On/Off 10 Understanding the LCD Screens 12 Changing the Machine Settings 14 Winding/Installing the Bobbin 18 Upper Threading ...24 Replacing the Needle 33 Replacing the Presser Foot 37 Sewing Cylindrical or Large Pieces 42 APPENDIX INDEX CONTENTS GETTING READY SEWING BASICS UTILITY STITCHES 1 GETTING READY The various preparations required before starting to sew are described in this chapter.
Turning the Machine On/Off 10 Understanding the LCD Screens 12 Changing the Machine Settings 14 Winding/Installing the Bobbin 18 Upper Threading ...24 Replacing the Needle 33 Replacing the Presser Foot 37 Sewing Cylindrical or Large Pieces 42 APPENDIX INDEX CONTENTS GETTING READY SEWING BASICS UTILITY STITCHES 1 GETTING READY The various preparations required before starting to sew are described in this chapter.
Users Manual - English
Page 19
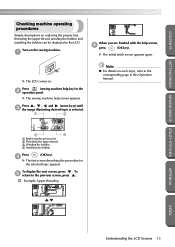
... be displayed in this Operation Manual. 3 4 1 Replacing the presser foot 2 Threading the upper thread 3 Winding the bobbin 4 Installing the bobbin Press (OK key). 4 X The first screen describing the procedure for the selected topic appears. Press (sewing machine help screen appears. To display the next screen, press . To 5 return to the corresponding page in the...
... be displayed in this Operation Manual. 3 4 1 Replacing the presser foot 2 Threading the upper thread 3 Winding the bobbin 4 Installing the bobbin Press (OK key). 4 X The first screen describing the procedure for the selected topic appears. Press (sewing machine help screen appears. To display the next screen, press . To 5 return to the corresponding page in the...

Users Manual - English
Page 24
...: SA156, XA5539-151) designed specifically for this sewing machine. Bobbin precautions Be sure to prepare the bobbin thread. 1 APPENDIX 1 Bobbin winder Memo ● The order that the machine should be threaded for winding the bobbin is indicated by a broken line on the sewing machine. Use only the enclosed bobbin or bobbins of any other bobbin may result in injuries or damage to...
...: SA156, XA5539-151) designed specifically for this sewing machine. Bobbin precautions Be sure to prepare the bobbin thread. 1 APPENDIX 1 Bobbin winder Memo ● The order that the machine should be threaded for winding the bobbin is indicated by a broken line on the sewing machine. Use only the enclosed bobbin or bobbins of any other bobbin may result in injuries or damage to...
Users Manual - English
Page 25
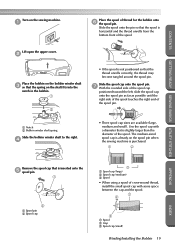
...some space between the cap and the spool. 1 2 3 1 Spool 2 Gap 3 Spool cap (small) Winding/Installing the Bobbin 19 INDEX The medium-sized spool cap is already on the spool pin when the sewing machine is purchased. 1 2 APPENDIX Remove the spool cap that is inserted onto the 5 spool pin. 1 2 1 Spool pin ... with a diameter that is slightly larger than the diameter of thread for the bobbin onto 6 the spool pin. Lift open the upper cover. 2 Place the bobbin on the bobbin winder shaft 3 so that the spring on the sewing machine. 1 Place the spool of the spool. Slide the spool onto the pin ...
...some space between the cap and the spool. 1 2 3 1 Spool 2 Gap 3 Spool cap (small) Winding/Installing the Bobbin 19 INDEX The medium-sized spool cap is already on the spool pin when the sewing machine is purchased. 1 2 APPENDIX Remove the spool cap that is inserted onto the 5 spool pin. 1 2 1 Spool pin ... with a diameter that is slightly larger than the diameter of thread for the bobbin onto 6 the spool pin. Lift open the upper cover. 2 Place the bobbin on the bobbin winder shaft 3 so that the spring on the sewing machine. 1 Place the spool of the spool. Slide the spool onto the pin ...
Users Manual - English
Page 26
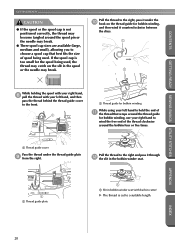
...right. If the spool cap is too small for bobbin winding, use your right hand, 8 pull the thread with built-in the bobbin winder seat. Pull the thread to the right and pass it counterclockwise between the discs. 1 1 GETTING READY SEWING BASICS UTILITY STITCHES While holding the spool with your... right hand to wind the free end of the thread clockwise around the bobbin four or five times. 1 Thread guide cover Pass the thread under the 0 ...
...right. If the spool cap is too small for bobbin winding, use your right hand, 8 pull the thread with built-in the bobbin winder seat. Pull the thread to the right and pass it counterclockwise between the discs. 1 1 GETTING READY SEWING BASICS UTILITY STITCHES While holding the spool with your... right hand to wind the free end of the thread clockwise around the bobbin four or five times. 1 Thread guide cover Pass the thread under the 0 ...
Users Manual - English
Page 27
... it is not a malfunction. APPENDIX INDEX Winding/Installing the Bobbin 21 X The sewing machine stops. Slide the sewing speed controller to the left. Press e (start /stop button) once. 1 1 Start/stop button) once. Memo ● When the sewing machine is started or the balance wheel is wound around the bobbin, the machine will make a clicking sound; CAUTION ● Use...
... it is not a malfunction. APPENDIX INDEX Winding/Installing the Bobbin 21 X The sewing machine stops. Slide the sewing speed controller to the left. Press e (start /stop button) once. 1 1 Start/stop button) once. Memo ● When the sewing machine is started or the balance wheel is wound around the bobbin, the machine will make a clicking sound; CAUTION ● Use...
Users Manual - English
Page 28
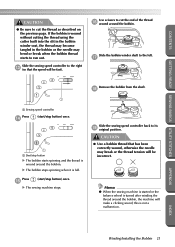
... your right 5 hand, and then guide the thread as shown with thread. Memo ● The order that the bobbin thread should be incorrect. ● The bobbin was designed specifically for this sewing machine. Slide the bobbin cover latch to the right. 1 1 2 Pass the thread through the shuttle is indicated by marks around the shuttle. Use...
... your right 5 hand, and then guide the thread as shown with thread. Memo ● The order that the bobbin thread should be incorrect. ● The bobbin was designed specifically for this sewing machine. Slide the bobbin cover latch to the right. 1 1 2 Pass the thread through the shuttle is indicated by marks around the shuttle. Use...
Users Manual - English
Page 29
...31). Memo ● You can begin sewing without pulling up the thread according to hold down on the next page). Winding/Installing the Bobbin 23 APPENDIX INDEX If you wish to pull up the bobbin thread before starting to sew, pull up the bobbin thread. Next, thread the upper thread.... Continue with your finger and unroll the bobbin thread correctly, otherwise the thread may ...
...31). Memo ● You can begin sewing without pulling up the thread according to hold down on the next page). Winding/Installing the Bobbin 23 APPENDIX INDEX If you wish to pull up the bobbin thread before starting to sew, pull up the bobbin thread. Next, thread the upper thread.... Continue with your finger and unroll the bobbin thread correctly, otherwise the thread may ...
Users Manual - English
Page 35
If the needle threader is horizontal. 5 Place the upper thread spool for the left needle with the twin needle, the sewing machine may be damaged. GETTING READY SEWING BASICS UTILITY STITCHES APPENDIX 1 Bobbin winder shaft Swing down the spool pin so that 7 the upper thread for the needle on 6 the right side onto ...top front of the needle from the front. Thread the upper thread in the same way that it is used with the twin needle, the sewing machine may be damaged. Insert the extra spool pin so that it is used with the spool cap. Pass the thread through 0 of the needle...
If the needle threader is horizontal. 5 Place the upper thread spool for the left needle with the twin needle, the sewing machine may be damaged. GETTING READY SEWING BASICS UTILITY STITCHES APPENDIX 1 Bobbin winder shaft Swing down the spool pin so that 7 the upper thread for the needle on 6 the right side onto ...top front of the needle from the front. Thread the upper thread in the same way that it is used with the twin needle, the sewing machine may be damaged. Insert the extra spool pin so that it is used with the spool cap. Pass the thread through 0 of the needle...
Users Manual - English
Page 37
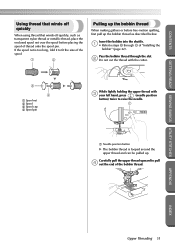
...of thread onto the spool pin. Pass the bobbin thread through 5 of the spool. 1 2 Pulling up the bobbin thread When making gathers or before placing the spool of the bobbin thread. APPENDIX INDEX Upper Threading 31 CONTENTS GETTING READY SEWING BASICS UTILITY STITCHES Using thread that winds off ...quickly When using thread that winds off quickly, such as described below. If the spool net is looped around the upper thread and can be pulled up the bobbin thread as transparent ...
...of thread onto the spool pin. Pass the bobbin thread through 5 of the spool. 1 2 Pulling up the bobbin thread When making gathers or before placing the spool of the bobbin thread. APPENDIX INDEX Upper Threading 31 CONTENTS GETTING READY SEWING BASICS UTILITY STITCHES Using thread that winds off ...quickly When using thread that winds off quickly, such as described below. If the spool net is looped around the upper thread and can be pulled up the bobbin thread as transparent ...
Users Manual - English
Page 38
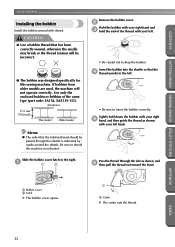
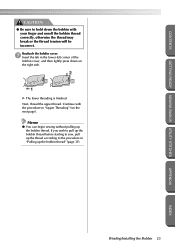
CONTENTS GETTING READY SEWING BASICS UTILITY STITCHES GETTING READY Pull out about 5 cm (2 inch) of the bobbin 5 thread under the presser foot toward the rear of the bobbin cover, and then lightly press down on the right side. 2 1 32 APPENDIX INDEX Reattach the bobbin cover. 6 Insert the tab in the lower-left corner of the machine.
CONTENTS GETTING READY SEWING BASICS UTILITY STITCHES GETTING READY Pull out about 5 cm (2 inch) of the bobbin 5 thread under the presser foot toward the rear of the bobbin cover, and then lightly press down on the right side. 2 1 32 APPENDIX INDEX Reattach the bobbin cover. 6 Insert the tab in the lower-left corner of the machine.
Users Manual - English
Page 60
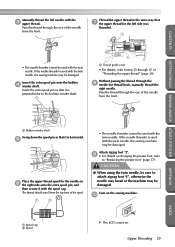
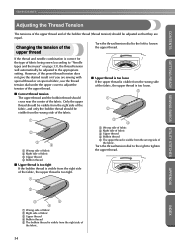
..., use the thread tension dial under the upper cover to the appropriate setting. SEWING BASICS CONTENTS GETTING READY SEWING BASICS UTILITY STITCHES Adjusting the Thread Tension The tensions of the upper thread and of the bobbin thread (thread tension) should cross near the center of the fabric. Turn the...are equal. Only the upper thread should be visible from the right side of the fabric, and only the bobbin thread should be adjusted so that they are sewing with special thread or on page 33), the thread tension will automatically be adjusted to adjust the tension of the...
..., use the thread tension dial under the upper cover to the appropriate setting. SEWING BASICS CONTENTS GETTING READY SEWING BASICS UTILITY STITCHES Adjusting the Thread Tension The tensions of the upper thread and of the bobbin thread (thread tension) should cross near the center of the fabric. Turn the...are equal. Only the upper thread should be visible from the right side of the fabric, and only the bobbin thread should be adjusted so that they are sewing with special thread or on page 33), the thread tension will automatically be adjusted to adjust the tension of the...


